User's Guide
Page 2
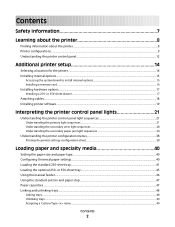
... Understanding the primary light sequences...21 Understanding the secondary error light sequences...28 Understanding the secondary paper jam light sequences 34 Understanding the printer configuration menus...38 Printing the printer settings configuration sheet ...38 Loading paper and specialty media 40 Setting the paper size and paper type...40 Configuring Universal paper settings...40...
... Understanding the primary light sequences...21 Understanding the secondary error light sequences...28 Understanding the secondary paper jam light sequences 34 Understanding the printer configuration menus...38 Printing the printer settings configuration sheet ...38 Loading paper and specialty media 40 Setting the paper size and paper type...40 Configuring Universal paper settings...40...
User's Guide
Page 3
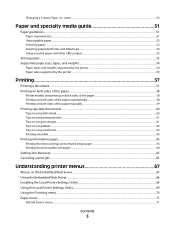
......61 Tips on using labels...62 Tips on using card stock...63 Printing a booklet ...63 Printing information pages...63 Printing the menu settings and network setup pages ...63 Printing the print quality test pages ...64 Setting Jam Recovery...65 Canceling a print job...65 Understanding printer menus 67 Menus on the Embedded Web Server...67 Using the Embedded...
......61 Tips on using labels...62 Tips on using card stock...63 Printing a booklet ...63 Printing information pages...63 Printing the menu settings and network setup pages ...63 Printing the print quality test pages ...64 Setting Jam Recovery...65 Canceling a print job...65 Understanding printer menus 67 Menus on the Embedded Web Server...67 Using the Embedded...
User's Guide
Page 5
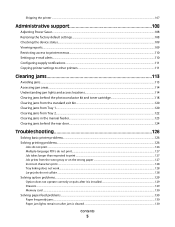
... settings...108 Checking the device status...109 Viewing reports...109 Restricting access to printer menus...110 Setting up e-mail alerts...110 Configuring supply notifications...111 Copying printer settings to other printers...111 Clearing jams 113 Avoiding jams...113 Accessing jam areas...114 Understanding jam ... behind the rear door...124 Troubleshooting 126 Solving basic printer problems...126 Solving printing problems...126 Jobs do not print...126 Multiple-language PDFs do not print...127 Job takes longer than expected to print ...127 Job prints from the wrong tray or on the wrong paper ...
... settings...108 Checking the device status...109 Viewing reports...109 Restricting access to printer menus...110 Setting up e-mail alerts...110 Configuring supply notifications...111 Copying printer settings to other printers...111 Clearing jams 113 Avoiding jams...113 Accessing jam areas...114 Understanding jam ... behind the rear door...124 Troubleshooting 126 Solving basic printer problems...126 Solving printing problems...126 Jobs do not print...126 Multiple-language PDFs do not print...127 Job takes longer than expected to print ...127 Job prints from the wrong tray or on the wrong paper ...

User's Guide
Page 6
... have jagged or uneven edges ...132 Clipped images...132 Gray background ...133 Ghost images...133 Incorrect margins...134 Paper curl...134 Print is too dark...134 Print is too light ...135 Skewed print...136 Toner fog or background shading appears on the page 136 Toner rubs off...136 Toner specks...137 Transparency... print quality is poor...137 Streaked horizontal lines...137 Streaked vertical lines ...138 Solid black or white streaks appear on transparencies or paper 139 Contacting ...
... have jagged or uneven edges ...132 Clipped images...132 Gray background ...133 Ghost images...133 Incorrect margins...134 Paper curl...134 Print is too dark...134 Print is too light ...135 Skewed print...136 Toner fog or background shading appears on the page 136 Toner rubs off...136 Toner specks...137 Transparency... print quality is poor...137 Streaked horizontal lines...137 Streaked vertical lines ...138 Solid black or white streaks appear on transparencies or paper 139 Contacting ...
User's Guide
Page 7
... CAUTION-HOT SURFACE: The fuser and the inside of the printer near the product and easily accessible. CAUTION-POTENTIAL INJURY: This product uses a laser. CAUTION-POTENTIAL INJURY: Do not twist, bind, crush,... CAUTION-SHOCK HAZARD: Make sure that heats the print media, and the heat may not always be hot. This product uses a printing process that all cables from the wall outlet before ...: If you are not under the printer when you are properly installed in their marked plug-in the user documentation, to a professional service person. Lexmark is near the fuser may result in...
... CAUTION-HOT SURFACE: The fuser and the inside of the printer near the product and easily accessible. CAUTION-POTENTIAL INJURY: This product uses a laser. CAUTION-POTENTIAL INJURY: Do not twist, bind, crush,... CAUTION-SHOCK HAZARD: Make sure that heats the print media, and the heat may not always be hot. This product uses a printing process that all cables from the wall outlet before ...: If you are not under the printer when you are properly installed in their marked plug-in the user documentation, to a professional service person. Lexmark is near the fuser may result in...
User's Guide
Page 8
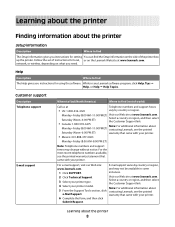
...instances. 2 Click Technical Support. Note: For additional information about 5 From the Support Tools section, click contacting Lexmark, see the printed warranty statement that came with your printer. • Mexico: 001-888-377-0063 Monday-Friday (8:00 AM-8:00 PM ET) Note: Telephone numbers...AM-11:00 PM ET) contacting Lexmark, see the printed Saturday (Noon-6:00 PM ET) warranty that came with your printer. 6 Complete the form, and then click Submit Request. Learning about the printer Finding information about the printer Setup information Description Where to find The...
...instances. 2 Click Technical Support. Note: For additional information about 5 From the Support Tools section, click contacting Lexmark, see the printed warranty statement that came with your printer. • Mexico: 001-888-377-0063 Monday-Friday (8:00 AM-8:00 PM ET) Note: Telephone numbers...AM-11:00 PM ET) contacting Lexmark, see the printed Saturday (Noon-6:00 PM ET) warranty that came with your printer. 6 Complete the form, and then click Submit Request. Learning about the printer Finding information about the printer Setup information Description Where to find The...

User's Guide
Page 22
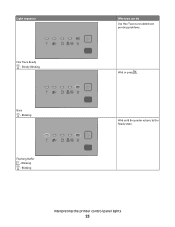
On Send a job to print. Blinking - On (green) Send a job to print. On (yellow) Interpreting the printer control panel lights 22 Blinking - Power Saver - Light sequence What you can do Replace the photoconductor kit. Replace PC Kit - Ready -
On Send a job to print. Blinking - On (green) Send a job to print. On (yellow) Interpreting the printer control panel lights 22 Blinking - Power Saver - Light sequence What you can do Replace the photoconductor kit. Replace PC Kit - Ready -
User's Guide
Page 23
Slowly Blinking Busy - Blinking Flushing Buffer - Interpreting the printer control panel lights 23 Light sequence Hex Trace Ready - Wait until the printer returns to troubleshoot printing problems. Wait or press . Blinking - Blinking What you can do Use Hex Trace to the Ready state.
Slowly Blinking Busy - Blinking Flushing Buffer - Interpreting the printer control panel lights 23 Light sequence Hex Trace Ready - Wait until the printer returns to troubleshoot printing problems. Wait or press . Blinking - Blinking What you can do Use Hex Trace to the Ready state.
User's Guide
Page 26
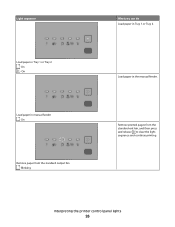
Light sequence Load paper in the manual feeder. Remove printed pages from the standard output bin - Load paper in Tray 1 or Tray 2 - Blinking What you can do Load paper in manual feeder - On Load paper in Tray 1 or Tray 2. Interpreting the printer control panel lights 26 On Remove paper from the standard exit bin, and then press and release to clear the light sequence and continue printing. On -
Light sequence Load paper in the manual feeder. Remove printed pages from the standard output bin - Load paper in Tray 1 or Tray 2 - Blinking What you can do Load paper in manual feeder - On Load paper in Tray 1 or Tray 2. Interpreting the printer control panel lights 26 On Remove paper from the standard exit bin, and then press and release to clear the light sequence and continue printing. On -
User's Guide
Page 27
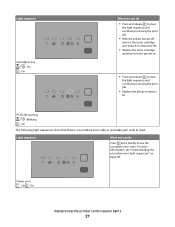
... secondary jam code to read: Light sequence What you can do • Press and release to clear the light sequence and continue processing the print job. • With the printer turned off, remove the toner cartridge and shake it to extend its life. • Replace the toner cartridge, and then turn the... printer on. • Press and release to see "Understanding the secondary error light sequences" on page 28. On What you can do Press twice quickly to ...
... secondary jam code to read: Light sequence What you can do • Press and release to clear the light sequence and continue processing the print job. • With the printer turned off, remove the toner cartridge and shake it to extend its life. • Replace the toner cartridge, and then turn the... printer on. • Press and release to see "Understanding the secondary error light sequences" on page 28. On What you can do Press twice quickly to ...

User's Guide
Page 29
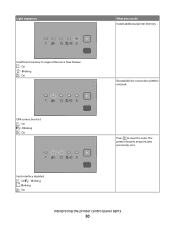
... panel lights 29 On Insufficient memory to On. • Install additional printer memory. For more information, see "Installing a memory card" on page 16. On - On - On What you can do • Simplify the page by reducing the ... "Installing a memory card" on page 16. • Press to collate the remaining pages of the job. • Press to cancel the print job. • Simplify the page by reducing the amount of text, graphics, fonts, or macros. • Install additional printer memory. On - Light sequences Complex page, some data may not have...
... panel lights 29 On Insufficient memory to On. • Install additional printer memory. For more information, see "Installing a memory card" on page 16. On - On - On What you can do • Simplify the page by reducing the ... "Installing a memory card" on page 16. • Press to collate the remaining pages of the job. • Press to cancel the print job. • Simplify the page by reducing the amount of text, graphics, fonts, or macros. • Install additional printer memory. On - Light sequences Complex page, some data may not have...
User's Guide
Page 30
Host interface disabled - On Interpreting the printer control panel lights 30 Light sequences What you can do Install additional printer memory. The printer discards any print jobs previously sent. Blinking - On - On - Blinking - ENA connection lost - Blinking - Blinking - On Reestablish the connection with the network. On - On Press to support Resource Save feature - Insufficient memory to clear the code.
Host interface disabled - On Interpreting the printer control panel lights 30 Light sequences What you can do Install additional printer memory. The printer discards any print jobs previously sent. Blinking - On - On - Blinking - ENA connection lost - Blinking - Blinking - On Reestablish the connection with the network. On - On Press to support Resource Save feature - Insufficient memory to clear the code.
User's Guide
Page 31
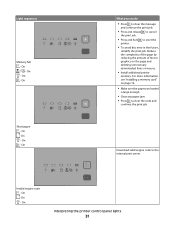
... a memory card" on the page and deleting unnecessary downloaded fonts or macros. • Install additional printer memory. On - On - Download valid engine code to reset the printer. • To avoid this error in the future, simplify the print job. On - On Interpreting the printer control panel lights 31 On - On - Light sequences Memory full -
... a memory card" on the page and deleting unnecessary downloaded fonts or macros. • Install additional printer memory. On - On - Download valid engine code to reset the printer. • To avoid this error in the future, simplify the print job. On - On Interpreting the printer control panel lights 31 On - On - Light sequences Memory full -
User's Guide
Page 32
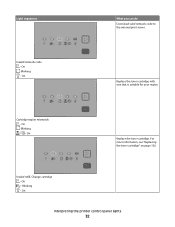
Cartridge region mismatch - For more information, see "Replacing the toner cartridge" on page 102. On - On - On Replace the toner cartridge with one that is suitable for your region. On Interpreting the printer control panel lights 32 Blinking - Invalid refill, Change cartridge - Light sequences What you can do Download valid network code to the internal print server. Blinking - On - Invalid network code - On Replace the toner cartridge. Blinking -
Cartridge region mismatch - For more information, see "Replacing the toner cartridge" on page 102. On - On - On Replace the toner cartridge with one that is suitable for your region. On Interpreting the printer control panel lights 32 Blinking - Invalid refill, Change cartridge - Light sequences What you can do Download valid network code to the internal print server. Blinking - On - Invalid network code - On Replace the toner cartridge. Blinking -

User's Guide
Page 34
...occurred. Understanding the secondary paper jam light sequences When the and lights are on the printer control panel Light sequence What you can help pinpoint the site of the jam. On - On Interpreting the printer control panel lights 34 On - Press and release twice quickly to display the secondary ...jam light sequence which can do to access the jam Try one or more of the printer to continue printing. Be sure to check all the paper is cleared, press to ensure all areas of the following: • Remove Tray 1. • ...
...occurred. Understanding the secondary paper jam light sequences When the and lights are on the printer control panel Light sequence What you can help pinpoint the site of the jam. On - On Interpreting the printer control panel lights 34 On - Press and release twice quickly to display the secondary ...jam light sequence which can do to access the jam Try one or more of the printer to continue printing. Be sure to check all the paper is cleared, press to ensure all areas of the following: • Remove Tray 1. • ...
User's Guide
Page 38
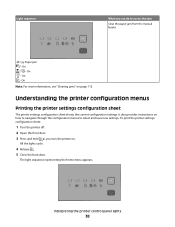
...light sequence representing the home menu appears. Light sequence What you turn the printer on. It also provides instructions on page 113. To print the printer settings configuration sheet: 1 Turn the printer off. 2 Open the front door. 3 Press and hold as you... select and save new settings. Interpreting the printer control panel lights 38 On - All the lights cycle. 4 Release . 5 Close the front door. On - Understanding the printer configuration menus Printing the printer settings configuration sheet The printer settings configuration sheet shows the current configuration settings...
...light sequence representing the home menu appears. Light sequence What you turn the printer on. It also provides instructions on page 113. To print the printer settings configuration sheet: 1 Turn the printer off. 2 Open the front door. 3 Press and hold as you... select and save new settings. Interpreting the printer control panel lights 38 On - All the lights cycle. 4 Release . 5 Close the front door. On - Understanding the printer configuration menus Printing the printer settings configuration sheet The printer settings configuration sheet shows the current configuration settings...

User's Guide
Page 39
On - On 6 Press until all the lights cycle. Note: The sheet prints only when the home menu light sequence is on. On - On - The printer settings configuration sheet prints. Interpreting the printer control panel lights 39 Home Menu -
On - On 6 Press until all the lights cycle. Note: The sheet prints only when the home menu light sequence is on. On - On - The printer settings configuration sheet prints. Interpreting the printer control panel lights 39 Home Menu -
User's Guide
Page 40
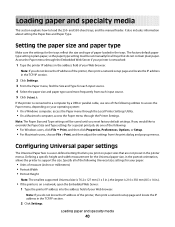
...contain plain paper. Loading paper and specialty media This section explains how to a computer by a USB or parallel cable, use one of the printer, then print a network setup page and locate the IP address in the TCP/IP section. 2 Click Settings. 3 From the Paper menu, find the... millimeters) • Portrait Width • Portrait Height Note: The smallest supported Universal size is networked: 1 Type the printer IP address in the address field of the printer, then print a network setup page and locate the IP address in the TCP/IP section. 2 Click Settings. Loading paper and specialty...
...contain plain paper. Loading paper and specialty media This section explains how to a computer by a USB or parallel cable, use one of the printer, then print a network setup page and locate the IP address in the TCP/IP section. 2 Click Settings. 3 From the Paper menu, find the... millimeters) • Portrait Width • Portrait Height Note: The smallest supported Universal size is networked: 1 Type the printer IP address in the address field of the printer, then print a network setup page and locate the IP address in the TCP/IP section. 2 Click Settings. Loading paper and specialty...

User's Guide
Page 41
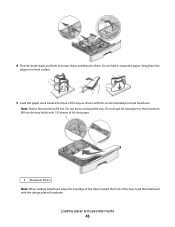
...which you will contain the Universal paper. 3 From the Paper Menu, click Universal Setup. 4 Select the unit of these utilities installs with your printer software. One of measure in inches or millimeters. 5 Enter the paper width under Portrait Width. 6 Enter the paper height under Portrait Height. ... paper loading prevents jams and facilitates trouble-free printing. 1 Pull the tray completely out. Busy Loading paper and specialty media 41 Do not remove trays while a job prints or when the Busy light sequence appears on the printer control panel. Under the Paper menu, select Universal...
...which you will contain the Universal paper. 3 From the Paper Menu, click Universal Setup. 4 Select the unit of these utilities installs with your printer software. One of measure in inches or millimeters. 5 Enter the paper width under Portrait Width. 6 Enter the paper height under Portrait Height. ... paper loading prevents jams and facilitates trouble-free printing. 1 Pull the tray completely out. Busy Loading paper and specialty media 41 Do not remove trays while a job prints or when the Busy light sequence appears on the printer control panel. Under the Paper menu, select Universal...
User's Guide
Page 43
... facedown. Do not fold or crease the paper. Do not load A6-size paper to the maximum fill line; Load the letterhead with the recommended print side facedown. the tray holds only 150 sheets of A6-size paper. 1 Maximum fill line Note: When loading letterhead, place the top edge of the...
... facedown. Do not fold or crease the paper. Do not load A6-size paper to the maximum fill line; Load the letterhead with the recommended print side facedown. the tray holds only 150 sheets of A6-size paper. 1 Maximum fill line Note: When loading letterhead, place the top edge of the...


