
User's Guide
Page 35
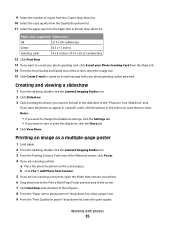
... • If you want to e-mail your photo greeting card, click E-mail your Photo Greeting Card from Scanner. 5 If you are scanning a photo: a Place the photo facedown on " drop-down list, select ...a paper size. 9 From the "Print Quality for poster" drop-down list. Working with your photo. 6 Drag the photo to the Print a Multi-Page Poster preview area of the screen..."Photos in Your Slideshow" area. Creating and viewing a slideshow 1 From the desktop, double-click the Lexmark Imaging Studio icon. 2 Click Slideshow. 3 Click and drag the photos you are not scanning a new...
... • If you want to e-mail your photo greeting card, click E-mail your Photo Greeting Card from Scanner. 5 If you are scanning a photo: a Place the photo facedown on " drop-down list, select ...a paper size. 9 From the "Print Quality for poster" drop-down list. Working with your photo. 6 Drag the photo to the Print a Multi-Page Poster preview area of the screen..."Photos in Your Slideshow" area. Creating and viewing a slideshow 1 From the desktop, double-click the Lexmark Imaging Studio icon. 2 Click Slideshow. 3 Click and drag the photos you are not scanning a new...
User's Guide
Page 46
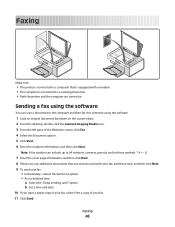
...your fax, add these symbols 7 Enter the cover page information, and then click Next. 8 If there are turned on the scanner glass. 2 From the desktop, double-click the Lexmark Imaging Studio icon. 3 From the left pane of your fax: • Immediately-Select the Send now option. • ...At a scheduled time: a Select the "Delay sending until" option. Faxing Make sure: • The printer is connected to a computer that is connected to a working phone line....
...your fax, add these symbols 7 Enter the cover page information, and then click Next. 8 If there are turned on the scanner glass. 2 From the desktop, double-click the Lexmark Imaging Studio icon. 3 From the left pane of your fax: • Immediately-Select the Send now option. • ...At a scheduled time: a Select the "Delay sending until" option. Faxing Make sure: • The printer is connected to a computer that is connected to a working phone line....
User's Guide
Page 67
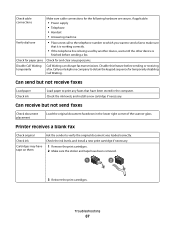
Call your telephone company to obtain the keypad sequence for and clear any faxes that it is working correctly. • If the telephone line is being used by another device, wait until the other device is finished before sending or receiving a fax. Can ... may have tape on them 1 Remove the print cartridges. 2 Make sure the sticker and tape have been stored in the lower right corner of the scanner glass. Check cable connections Make sure cable connections for the following hardware are secure, if applicable: • Power supply • Telephone • Handset • Answering...
Call your telephone company to obtain the keypad sequence for and clear any faxes that it is working correctly. • If the telephone line is being used by another device, wait until the other device is finished before sending or receiving a fax. Can ... may have tape on them 1 Remove the print cartridges. 2 Make sure the sticker and tape have been stored in the lower right corner of the scanner glass. Check cable connections Make sure cable connections for the following hardware are secure, if applicable: • Power supply • Telephone • Handset • Answering...

Getting Started
Page 3
... of the printer...10 Using the control panel buttons...12 Learning about the software 13 Using the printer software...13 Using the Lexmark Imaging Studio...13 Using the Solution Center...15 Using Print Properties...16 Using the Toolbar...16 Resetting printer software settings to defaults......paper and original documents 19 Loading paper...19 Loading original documents on the scanner glass 19 Printing 21 Printing a document...21 Printing a Web page...21 Printing photos or images from a Web page...22 Working with photos 23 Retrieving and managing photos...23 Printing photos using the computer...
... of the printer...10 Using the control panel buttons...12 Learning about the software 13 Using the printer software...13 Using the Lexmark Imaging Studio...13 Using the Solution Center...15 Using Print Properties...16 Using the Toolbar...16 Resetting printer software settings to defaults......paper and original documents 19 Loading paper...19 Loading original documents on the scanner glass 19 Printing 21 Printing a document...21 Printing a Web page...21 Printing photos or images from a Web page...22 Working with photos 23 Retrieving and managing photos...23 Printing photos using the computer...

Getting Started
Page 26
... area of the screen, select the image size. 15 Click Create E-mail to print poster on the scanner glass. Printing an image as a multiple-page poster 1 Load paper. 2 From the desktop, double-click the Lexmark Imaging Studio icon. 3 From the Printing Creative Tasks area of the Welcome screen, click Poster. 4 If you... the photos in the order you want to include in the slideshow to save or print the slideshow, click the Share tab. 4 Click View Show. Working with your photo. 6 Drag the photo to the Print a Multi-Page Poster preview area of the screen. 7 Click Next Step at the bottom of the...
... area of the screen, select the image size. 15 Click Create E-mail to print poster on the scanner glass. Printing an image as a multiple-page poster 1 Load paper. 2 From the desktop, double-click the Lexmark Imaging Studio icon. 3 From the Printing Creative Tasks area of the Welcome screen, click Poster. 4 If you... the photos in the order you want to include in the slideshow to save or print the slideshow, click the Share tab. 4 Click View Show. Working with your photo. 6 Drag the photo to the Print a Multi-Page Poster preview area of the screen. 7 Click Next Step at the bottom of the...

Getting Started
Page 33
...your fax, add these symbols 7 Enter the cover page information, and then click Next. 8 If there are turned on the scanner glass. 2 From the desktop, double-click the Lexmark Imaging Studio icon. 3 From the left pane of your fax: • Immediately-Select the Send now option. • ...At a scheduled time: a Select the "Delay sending until" option. Faxing Make sure: • The printer is connected to a computer that is connected to a working phone line....
...your fax, add these symbols 7 Enter the cover page information, and then click Next. 8 If there are turned on the scanner glass. 2 From the desktop, double-click the Lexmark Imaging Studio icon. 3 From the left pane of your fax: • Immediately-Select the Send now option. • ...At a scheduled time: a Select the "Delay sending until" option. Faxing Make sure: • The printer is connected to a computer that is connected to a working phone line....
Getting Started
Page 50
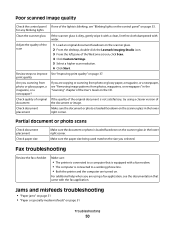
...sure: • The printer is connected to a computer that came with the fax application. for any blinking lights Clean the scanner glass If the scanner glass is not satisfactory, try using a fax application, see the documentation that is equipped with water. Check document placement Make ...lights on the control panel" on the scanner glass in the lower right corner. If you selected. Review steps to a working phone line. • Both the printer and the computer are turned on the scanner glass. 2 From the desktop, double-click the Lexmark Imaging Studio icon. 3 From the left...
...sure: • The printer is connected to a computer that came with the fax application. for any blinking lights Clean the scanner glass If the scanner glass is not satisfactory, try using a fax application, see the documentation that is equipped with water. Check document placement Make ...lights on the control panel" on the scanner glass in the lower right corner. If you selected. Review steps to a working phone line. • Both the printer and the computer are turned on the scanner glass. 2 From the desktop, double-click the Lexmark Imaging Studio icon. 3 From the left...


