User's Guide
Page 2
...with other products, programs, or services, except those described in its printer products. This printer is intended to be incorporated in the Technical Reference. The safety features of harmful emissions. 2 Lexmark is near the product and easily accessible. You must understand the section...do not allow disclaimer of express or implied warranties in your operating instructions that the printer emulates the functions corresponding to meet strict global safety standards with local law: LEXMARK INTERNATIONAL, INC., PROVIDES THIS PUBLICATION "AS IS" WITHOUT WARRANTY OF ANY KIND, EITHER...
...with other products, programs, or services, except those described in its printer products. This printer is intended to be incorporated in the Technical Reference. The safety features of harmful emissions. 2 Lexmark is near the product and easily accessible. You must understand the section...do not allow disclaimer of express or implied warranties in your operating instructions that the printer emulates the functions corresponding to meet strict global safety standards with local law: LEXMARK INTERNATIONAL, INC., PROVIDES THIS PUBLICATION "AS IS" WITHOUT WARRANTY OF ANY KIND, EITHER...
User's Guide
Page 3
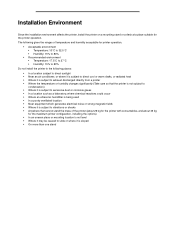
...: 15% to 80% • Recommended environment • Temperature: 17.5°C to 27°C • Humidity: 15% to 80% Do not install the printer in the following places: • In a location subject to direct sunlight • Near an air conditioner, or where it is subject to direct cool or... warm drafts, or radiated heat • Where it is subject to exhaust discharged directly from a printer • Where the temperature or humidity changes significantly (Take care so that the printer is not subject to condensation) • Where it is subject to excessive dust or corrosive gases •...
...: 15% to 80% • Recommended environment • Temperature: 17.5°C to 27°C • Humidity: 15% to 80% Do not install the printer in the following places: • In a location subject to direct sunlight • Near an air conditioner, or where it is subject to direct cool or... warm drafts, or radiated heat • Where it is subject to exhaust discharged directly from a printer • Where the temperature or humidity changes significantly (Take care so that the printer is not subject to condensation) • Where it is subject to excessive dust or corrosive gases •...
User's Guide
Page 4
... panel ...5 Chapter 2: Installing and removing options 7 Installing a 530-sheet drawer ...8 Securing the drawer to the printer ...9 Removing options ...11 Removing the printer from the optional 530-sheet drawer 11 Chapter 3: Printing ...15 Tips for successful printing ...15 Tips on storing media ......15 Avoiding jams ...15 Sending a job to print ...15 Canceling a print job ...15 Canceling a job from the printer operator panel 16 Canceling a job from a computer running Windows 16 Canceling a job from a Macintosh computer 16 Printing the status page ...17 Chapter ...
... panel ...5 Chapter 2: Installing and removing options 7 Installing a 530-sheet drawer ...8 Securing the drawer to the printer ...9 Removing options ...11 Removing the printer from the optional 530-sheet drawer 11 Chapter 3: Printing ...15 Tips for successful printing ...15 Tips on storing media ......15 Avoiding jams ...15 Sending a job to print ...15 Canceling a print job ...15 Canceling a job from the printer operator panel 16 Canceling a job from a computer running Windows 16 Canceling a job from a Macintosh computer 16 Printing the status page ...17 Chapter ...
User's Guide
Page 5
... printer for long term storage 40 Storing supplies ...40 Storing media ...40 Storing the toner cartridges ...40 Replacing the toner cartridges ...41 Replacing the fuser ...44 Replacing the waste toner bottle ...47 Replacing the photodeveloper cartridge ...49 Recycling Lexmark ...8: Troubleshooting 65 Solving basic printer problems ...65 Checking an unresponsive printer ...65 Solving display problems ...66 Solving printing problems ...66 Solving print quality problems ...67 Solving color quality problems ...70 Frequently asked questions (FAQ) about color printing 70 Solving option problems ...
... printer for long term storage 40 Storing supplies ...40 Storing media ...40 Storing the toner cartridges ...40 Replacing the toner cartridges ...41 Replacing the fuser ...44 Replacing the waste toner bottle ...47 Replacing the photodeveloper cartridge ...49 Recycling Lexmark ...8: Troubleshooting 65 Solving basic printer problems ...65 Checking an unresponsive printer ...65 Solving display problems ...66 Solving printing problems ...66 Solving print quality problems ...67 Solving color quality problems ...70 Frequently asked questions (FAQ) about color printing 70 Solving option problems ...
User's Guide
Page 6
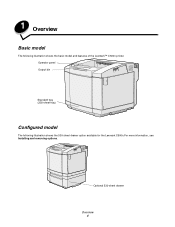
Optional 530-sheet drawer Overview 4 Operator panel Output bin Standard tray (250-sheet tray) Configured model The following illustration shows the basic model and features of the Lexmark™ C500n printer. 1 Overview Basic model The following illustration shows the 530-sheet drawer option available for the Lexmark C500n.For more information, see Installing and removing options.
Optional 530-sheet drawer Overview 4 Operator panel Output bin Standard tray (250-sheet tray) Configured model The following illustration shows the basic model and features of the Lexmark™ C500n printer. 1 Overview Basic model The following illustration shows the 530-sheet drawer option available for the Lexmark C500n.For more information, see Installing and removing options.
User's Guide
Page 7
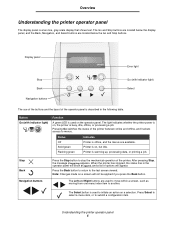
...such as moving from one menu index item to initiate an action on a selection. The Select button is on , but idle. Printer is on , the printer is offline, and the menus are located below the Go and Stop buttons. After pressing Stop, the message Stopping appears. The Left... or processing a job. The Go and Stop buttons are located below the display panel, and the Back, Navigation, and Select buttons are available. Printer is a two line, gray scale display that shows text. Display panel ERROR Error light Stop Back Navigation buttons Go (with indicator light) Function A...
...such as moving from one menu index item to initiate an action on a selection. The Select button is on , but idle. Printer is on , the printer is offline, and the menus are located below the Go and Stop buttons. After pressing Stop, the message Stopping appears. The Left... or processing a job. The Go and Stop buttons are located below the display panel, and the Back, Navigation, and Select buttons are available. Printer is a two line, gray scale display that shows text. Display panel ERROR Error light Stop Back Navigation buttons Go (with indicator light) Function A...
User's Guide
Page 8
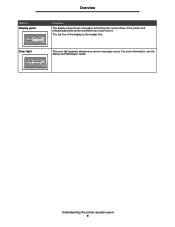
Understanding the printer operator panel 6 For more information, see the Menus and Messages Guide. Error light Tray1:Letter Set K Toner CG ERROR The error light appears whenever a service message occurs. The top line of the printer and indicating possible printer problems you must resolve. Overview Button Display panel Tray1:Letter Ready ERROR Function The display panel shows messages describing the current state of the display is the header line.
Understanding the printer operator panel 6 For more information, see the Menus and Messages Guide. Error light Tray1:Letter Set K Toner CG ERROR The error light appears whenever a service message occurs. The top line of the printer and indicating possible printer problems you must resolve. Overview Button Display panel Tray1:Letter Ready ERROR Function The display panel shows messages describing the current state of the display is the header line.
User's Guide
Page 9
2 Installing and removing options You can also use these instructions to help you are installing options after setting up the printer, turn the printer off and unplug the power cord before continuing. • Optional 530-sheet drawer • Printer Installing and removing options 7 Install the printer and any options you have purchased in the following order: CAUTION: If you locate an option for removal. You can customize your printer by adding optional input devices.
2 Installing and removing options You can also use these instructions to help you are installing options after setting up the printer, turn the printer off and unplug the power cord before continuing. • Optional 530-sheet drawer • Printer Installing and removing options 7 Install the printer and any options you have purchased in the following order: CAUTION: If you locate an option for removal. You can customize your printer by adding optional input devices.
User's Guide
Page 10
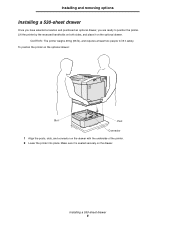
...the posts, slots, and connector on the drawer. Lift the printer by the recessed handholds on both sides, and place it is seated securely on the drawer with the underside of the printer. 2 Lower the printer into place. CAUTION: The printer weighs 29 kg (66 lb), and requires at least two... people to position the printer. Installing and removing options Installing a 530-sheet drawer Once you have selected a...
...the posts, slots, and connector on the drawer. Lift the printer by the recessed handholds on both sides, and place it is seated securely on the drawer with the underside of the printer. 2 Lower the printer into place. CAUTION: The printer weighs 29 kg (66 lb), and requires at least two... people to position the printer. Installing and removing options Installing a 530-sheet drawer Once you have selected a...
User's Guide
Page 11
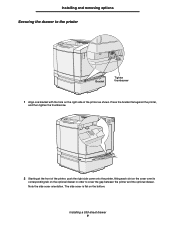
The side cover is flat on the optional drawer in order to the printer Bracket Tighten thumbscrew 1 Align one bracket with the hole on the right side of the printer, push the right side cover onto the printer, fitting each slot on the cover over its corresponding tab on the bottom. Note ...the side cover orientation. Installing a 530-sheet drawer 9 Installing and removing options Securing the drawer to cover the gap between the printer and the optional drawer. Press the bracket flat against the printer, and then tighten the thumbscrew. 2 Starting at the front of the...
The side cover is flat on the optional drawer in order to the printer Bracket Tighten thumbscrew 1 Align one bracket with the hole on the right side of the printer, push the right side cover onto the printer, fitting each slot on the cover over its corresponding tab on the bottom. Note ...the side cover orientation. Installing a 530-sheet drawer 9 Installing and removing options Securing the drawer to cover the gap between the printer and the optional drawer. Press the bracket flat against the printer, and then tighten the thumbscrew. 2 Starting at the front of the...
User's Guide
Page 12
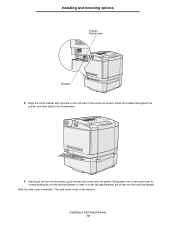
Installing and removing options Tighten thumbscrew Bracket 3 Align the other bracket with the hole on the left side of the printer, push the left side cover onto the printer, fitting each slot on the cover over its corresponding tab on the bottom. The side cover is flat on the optional drawer in order to cover the gap between the printer and the optional drawer. Note the side cover orientation. Installing a 530-sheet drawer 10 Press the bracket flat against the printer, and then tighten the thumbscrew. 4 Starting at the front of the printer as shown.
Installing and removing options Tighten thumbscrew Bracket 3 Align the other bracket with the hole on the left side of the printer, push the left side cover onto the printer, fitting each slot on the cover over its corresponding tab on the bottom. The side cover is flat on the optional drawer in order to cover the gap between the printer and the optional drawer. Note the side cover orientation. Installing a 530-sheet drawer 10 Press the bracket flat against the printer, and then tighten the thumbscrew. 4 Starting at the front of the printer as shown.
User's Guide
Page 13
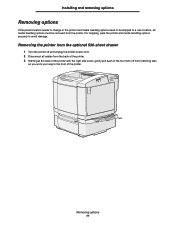
...drawer 1 Turn the printer off and unplug the printer power cord. 2 Disconnect all media handling options must be shipped to a new location, all cables from the printer. Removing options 11 Installing and removing options Removing options If the printer location needs to change or the printer and media handling ...options need to be removed from the back of the printer. 3 Starting at the back of the printer with the right side cover, gently pull each of the...
...drawer 1 Turn the printer off and unplug the printer power cord. 2 Disconnect all media handling options must be shipped to a new location, all cables from the printer. Removing options 11 Installing and removing options Removing options If the printer location needs to change or the printer and media handling ...options need to be removed from the back of the printer. 3 Starting at the back of the printer with the right side cover, gently pull each of the...
User's Guide
Page 14
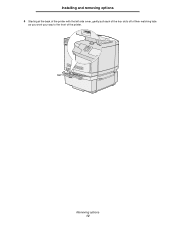
Installing and removing options 4 Starting at the back of the printer with the left side cover, gently pull each of the four slots off of their matching tabs as you work your way to the front of the printer. Removing options 12
Installing and removing options 4 Starting at the back of the printer with the left side cover, gently pull each of the four slots off of their matching tabs as you work your way to the front of the printer. Removing options 12
User's Guide
Page 16
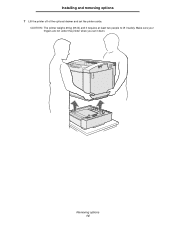
CAUTION: The printer weighs 29 kg (66 lb) and it requires at least two people to lift it down. Make sure your fingers are not under the printer when you set the printer aside. Removing options 14 Installing and removing options 7 Lift the printer off of the optional drawer and set it safely.
CAUTION: The printer weighs 29 kg (66 lb) and it requires at least two people to lift it down. Make sure your fingers are not under the printer when you set the printer aside. Removing options 14 Installing and removing options 7 Lift the printer off of the optional drawer and set it safely.
User's Guide
Page 17
...see Storing media. Avoiding jams If you select appropriate paper or specialty media (transparencies, labels, and card stock), you are considering using with the printer before purchasing large quantities. For more information, see Hints for avoiding jams. Sending a job to print To print a job from a typical Windows...and click OK. 5 Click OK or Print to send the job to cancel a job. Note: Click Properties or Setup to adjust printer settings not available from your media properly. By selecting appropriate paper or specialty media and loading it properly, you are several methods for ...
...see Storing media. Avoiding jams If you select appropriate paper or specialty media (transparencies, labels, and card stock), you are considering using with the printer before purchasing large quantities. For more information, see Hints for avoiding jams. Sending a job to print To print a job from a typical Windows...and click OK. 5 Click OK or Print to send the job to cancel a job. Note: Click Properties or Setup to adjust printer settings not available from your media properly. By selecting appropriate paper or specialty media and loading it properly, you are several methods for ...

User's Guide
Page 18
...of print jobs appears in the printer window. 2 Choose the print job you send a job to print, the printer icon for your selected printer appears on the desktop. 1 Double-click the printer icon on your desktop. A list of available printers appears. 4 Double-click the printer you selected when you want ...want to cancel. 3 Click the trash can also be done by clicking the printer setup utility in the printer window. 5 Select the job you want to cancel is printing: 1 Press 2 Press to take the printer offline. Canceling a job from a Macintosh computer running Windows Canceling a job ...
...of print jobs appears in the printer window. 2 Choose the print job you send a job to print, the printer icon for your selected printer appears on the desktop. 1 Double-click the printer icon on your desktop. A list of available printers appears. 4 Double-click the printer you selected when you want ...want to cancel. 3 Click the trash can also be done by clicking the printer setup utility in the printer window. 5 Select the job you want to cancel is printing: 1 Press 2 Press to take the printer offline. Canceling a job from a Macintosh computer running Windows Canceling a job ...
User's Guide
Page 19
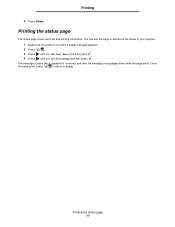
Printing the status page The status page shows parts life and printing information. The message Please Wait appears for a second, and then the message StatusPage blinks while the page prints. Once the page prints, press to return to determine the status of your supplies. 1 Make sure the printer is on and the Ready message appears. 2 Press . 3 Press until you see Test Menu, and then press . 4 Press until you see StatusPage and then press . Printing the status page 17 You can use this page to Ready. Printing 4 Press Delete.
Printing the status page The status page shows parts life and printing information. The message Please Wait appears for a second, and then the message StatusPage blinks while the page prints. Once the page prints, press to return to determine the status of your supplies. 1 Make sure the printer is on and the Ready message appears. 2 Press . 3 Press until you see Test Menu, and then press . 4 Press until you see StatusPage and then press . Printing the status page 17 You can use this page to Ready. Printing 4 Press Delete.

User's Guide
Page 20
...the weight, fiber content, and color. For more information, see the Card Stock & Label Guide available on the Lexmark Web site at www.lexmark.com/ publications. Business papers designed ...laser printing process heats paper to determine whether the paper you have chosen is paper, card stock, transparencies, labels, and envelopes. A number of 170°C (338°F) for the printer... Always print several samples before printing. Lexmark recommends Lexmark part number 12A5950 for letter-size glossy paper and Lexmark part number 12A5951 for the printer. When choosing any type of media...
...the weight, fiber content, and color. For more information, see the Card Stock & Label Guide available on the Lexmark Web site at www.lexmark.com/ publications. Business papers designed ...laser printing process heats paper to determine whether the paper you have chosen is paper, card stock, transparencies, labels, and envelopes. A number of 170°C (338°F) for the printer... Always print several samples before printing. Lexmark recommends Lexmark part number 12A5950 for letter-size glossy paper and Lexmark part number 12A5951 for the printer. When choosing any type of media...
User's Guide
Page 21
...of stability resulting in the original wrapper. This content provides the paper with a high degree of material. Paper containing fibers such as the printer for 24 to 48 hours before printing to 24 lb bond) paper, grain long fibers are recommended. Excessive curl can cause paper feeding ...the storage or transportation environment is either grain long, running the length of the paper, or grain short, running the width of the printer to 47 lb bond) grain long. Moisture content The amount of moisture in the same environment as cotton possesses characteristics that the weight ...
...of stability resulting in the original wrapper. This content provides the paper with a high degree of material. Paper containing fibers such as the printer for 24 to 48 hours before printing to 24 lb bond) paper, grain long fibers are recommended. Excessive curl can cause paper feeding ...the storage or transportation environment is either grain long, running the length of the paper, or grain short, running the width of the printer to 47 lb bond) grain long. Moisture content The amount of moisture in the same environment as cotton possesses characteristics that the weight ...
User's Guide
Page 22
... new, undamaged paper. • Before loading paper, know the recommended print side of the paper you can be affected by the temperature in the printer fuser • Preprinted papers that require a registration (the precise print location on the page) greater than 60 g/m2 (16 lb) • ...optical character recognition (OCR) forms In some cases, you are using. Storing paper Use the following papers are not recommended for use with the printer: • Chemically treated papers used to make copies without carbon paper, also known as carbonless papers, carbonless copy paper (CCP), or no ...
... new, undamaged paper. • Before loading paper, know the recommended print side of the paper you can be affected by the temperature in the printer fuser • Preprinted papers that require a registration (the precise print location on the page) greater than 60 g/m2 (16 lb) • ...optical character recognition (OCR) forms In some cases, you are using. Storing paper Use the following papers are not recommended for use with the printer: • Chemically treated papers used to make copies without carbon paper, also known as carbonless papers, carbonless copy paper (CCP), or no ...

