User's Guide
Page 2
... electrical outlet that is not responsible for selecting print media to avoid the possibility of specific Lexmark components. Lexmark is near the product and easily accessible. This printer is a trademark of express or implied warranties in conjunction with the PCL language. Comments about... product, program, or service that discusses the guidelines for the use or distribute any time. Lexmark may use of printer commands (language) and functions included in its printer products. You must understand the section in any way it operates. Changes are the user's ...
... electrical outlet that is not responsible for selecting print media to avoid the possibility of specific Lexmark components. Lexmark is near the product and easily accessible. This printer is a trademark of express or implied warranties in conjunction with the PCL language. Comments about... product, program, or service that discusses the guidelines for the use or distribute any time. Lexmark may use of printer commands (language) and functions included in its printer products. You must understand the section in any way it operates. Changes are the user's ...
User's Guide
Page 3
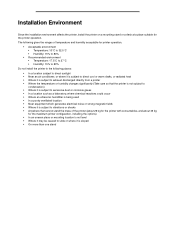
...: 15% to 80% • Recommended environment • Temperature: 17.5°C to 27°C • Humidity: 15% to 80% Do not install the printer in the following places: • In a location subject to direct sunlight • Near an air conditioner, or where it is subject to direct cool or... warm drafts, or radiated heat • Where it is subject to exhaust discharged directly from a printer • Where the temperature or humidity changes significantly (Take care so that the printer is not subject to condensation) • Where it is subject to vibrations or shocks • Anywhere ...
...: 15% to 80% • Recommended environment • Temperature: 17.5°C to 27°C • Humidity: 15% to 80% Do not install the printer in the following places: • In a location subject to direct sunlight • Near an air conditioner, or where it is subject to direct cool or... warm drafts, or radiated heat • Where it is subject to exhaust discharged directly from a printer • Where the temperature or humidity changes significantly (Take care so that the printer is not subject to condensation) • Where it is subject to vibrations or shocks • Anywhere ...
User's Guide
Page 4
... panel ...5 Chapter 2: Installing and removing options 7 Installing a 530-sheet drawer ...8 Securing the drawer to the printer ...9 Removing options ...11 Removing the printer from the optional 530-sheet drawer 11 Chapter 3: Printing ...15 Tips for successful printing ...15 Tips on storing media ......15 Avoiding jams ...15 Sending a job to print ...15 Canceling a print job ...15 Canceling a job from the printer operator panel 16 Canceling a job from a computer running Windows 16 Canceling a job from a Macintosh computer 16 Printing the status page ...17 Chapter ...
... panel ...5 Chapter 2: Installing and removing options 7 Installing a 530-sheet drawer ...8 Securing the drawer to the printer ...9 Removing options ...11 Removing the printer from the optional 530-sheet drawer 11 Chapter 3: Printing ...15 Tips for successful printing ...15 Tips on storing media ......15 Avoiding jams ...15 Sending a job to print ...15 Canceling a print job ...15 Canceling a job from the printer operator panel 16 Canceling a job from a computer running Windows 16 Canceling a job from a Macintosh computer 16 Printing the status page ...17 Chapter ...
User's Guide
Page 5
... printer for long term storage 40 Storing supplies ...40 Storing media ...40 Storing the toner cartridges ...40 Replacing the toner cartridges ...41 Replacing the fuser ...44 Replacing the waste toner bottle ...47 Replacing the photodeveloper cartridge ...49 Recycling Lexmark ...8: Troubleshooting 65 Solving basic printer problems ...65 Checking an unresponsive printer ...65 Solving display problems ...66 Solving printing problems ...66 Solving print quality problems ...67 Solving color quality problems ...70 Frequently asked questions (FAQ) about color printing 70 Solving option problems ...
... printer for long term storage 40 Storing supplies ...40 Storing media ...40 Storing the toner cartridges ...40 Replacing the toner cartridges ...41 Replacing the fuser ...44 Replacing the waste toner bottle ...47 Replacing the photodeveloper cartridge ...49 Recycling Lexmark ...8: Troubleshooting 65 Solving basic printer problems ...65 Checking an unresponsive printer ...65 Solving display problems ...66 Solving printing problems ...66 Solving print quality problems ...67 Solving color quality problems ...70 Frequently asked questions (FAQ) about color printing 70 Solving option problems ...
User's Guide
Page 6
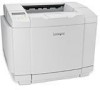
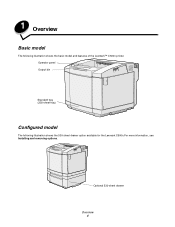
1 Overview Basic model The following illustration shows the 530-sheet drawer option available for the Lexmark C500n.For more information, see Installing and removing options. Operator panel Output bin Standard tray (250-sheet tray) Configured model The following illustration shows the basic model and features of the Lexmark™ C500n printer. Optional 530-sheet drawer Overview 4
1 Overview Basic model The following illustration shows the 530-sheet drawer option available for the Lexmark C500n.For more information, see Installing and removing options. Operator panel Output bin Standard tray (250-sheet tray) Configured model The following illustration shows the basic model and features of the Lexmark™ C500n printer. Optional 530-sheet drawer Overview 4
User's Guide
Page 7
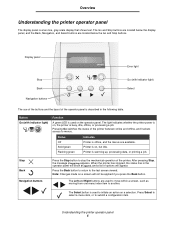
... on , but idle. The Left and Right buttons are used to initiate an action on a selection. Pressing Go switches the status of the printer. Printer is offline, and the menus are located below the display panel, and the Back, Navigation, and Select buttons are available. Button Go (with ..., or to the last screen viewed. The Go and Stop buttons are located below the Go and Stop buttons. Understanding the printer operator panel 5 Overview Understanding the printer operator panel The display panel is used to move within a screen, such as moving from one menu index item to another....
... on , but idle. The Left and Right buttons are used to initiate an action on a selection. Pressing Go switches the status of the printer. Printer is offline, and the menus are located below the display panel, and the Back, Navigation, and Select buttons are available. Button Go (with ..., or to the last screen viewed. The Go and Stop buttons are located below the Go and Stop buttons. Understanding the printer operator panel 5 Overview Understanding the printer operator panel The display panel is used to move within a screen, such as moving from one menu index item to another....
User's Guide
Page 8
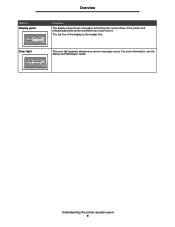
For more information, see the Menus and Messages Guide. Overview Button Display panel Tray1:Letter Ready ERROR Function The display panel shows messages describing the current state of the display is the header line. The top line of the printer and indicating possible printer problems you must resolve. Understanding the printer operator panel 6 Error light Tray1:Letter Set K Toner CG ERROR The error light appears whenever a service message occurs.
For more information, see the Menus and Messages Guide. Overview Button Display panel Tray1:Letter Ready ERROR Function The display panel shows messages describing the current state of the display is the header line. The top line of the printer and indicating possible printer problems you must resolve. Understanding the printer operator panel 6 Error light Tray1:Letter Set K Toner CG ERROR The error light appears whenever a service message occurs.
User's Guide
Page 9
You can customize your printer by adding optional input devices. Install the printer and any options you have purchased in the following order: CAUTION: If you locate an option for removal. 2 Installing and removing options You can also use these instructions to help you are installing options after setting up the printer, turn the printer off and unplug the power cord before continuing. • Optional 530-sheet drawer • Printer Installing and removing options 7
You can customize your printer by adding optional input devices. Install the printer and any options you have purchased in the following order: CAUTION: If you locate an option for removal. 2 Installing and removing options You can also use these instructions to help you are installing options after setting up the printer, turn the printer off and unplug the power cord before continuing. • Optional 530-sheet drawer • Printer Installing and removing options 7
User's Guide
Page 10
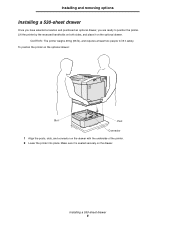
...optional drawer. Installing a 530-sheet drawer 8 Lift the printer by the recessed handholds on both sides, and place it on the drawer with the underside of the printer. 2 Lower the printer into place. Make sure it safely. CAUTION: The printer weighs 29 kg (66 lb), and requires at least ...two people to position the printer. Installing and removing options Installing a 530-sheet drawer Once you have...
...optional drawer. Installing a 530-sheet drawer 8 Lift the printer by the recessed handholds on both sides, and place it on the drawer with the underside of the printer. 2 Lower the printer into place. Make sure it safely. CAUTION: The printer weighs 29 kg (66 lb), and requires at least ...two people to position the printer. Installing and removing options Installing a 530-sheet drawer Once you have...
User's Guide
Page 11
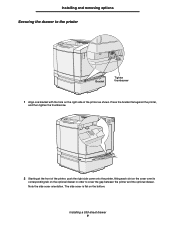
... then tighten the thumbscrew. 2 Starting at the front of the printer, push the right side cover onto the printer, fitting each slot on the cover over its corresponding tab on the optional drawer in order to the printer Bracket Tighten thumbscrew 1 Align one bracket with the hole on the bottom.... Installing a 530-sheet drawer 9 Note the side cover orientation. The side cover is flat on the right side of the printer as shown. Installing and removing options ...
... then tighten the thumbscrew. 2 Starting at the front of the printer, push the right side cover onto the printer, fitting each slot on the cover over its corresponding tab on the optional drawer in order to the printer Bracket Tighten thumbscrew 1 Align one bracket with the hole on the bottom.... Installing a 530-sheet drawer 9 Note the side cover orientation. The side cover is flat on the right side of the printer as shown. Installing and removing options ...
User's Guide
Page 12
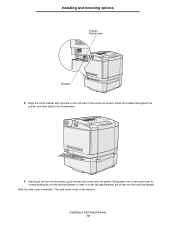
Installing and removing options Tighten thumbscrew Bracket 3 Align the other bracket with the hole on the left side of the printer, push the left side cover onto the printer, fitting each slot on the cover over its corresponding tab on the bottom. Note the side cover orientation. Press the bracket flat against the printer, and then tighten the thumbscrew. 4 Starting at the front of the printer as shown. Installing a 530-sheet drawer 10 The side cover is flat on the optional drawer in order to cover the gap between the printer and the optional drawer.
Installing and removing options Tighten thumbscrew Bracket 3 Align the other bracket with the hole on the left side of the printer, push the left side cover onto the printer, fitting each slot on the cover over its corresponding tab on the bottom. Note the side cover orientation. Press the bracket flat against the printer, and then tighten the thumbscrew. 4 Starting at the front of the printer as shown. Installing a 530-sheet drawer 10 The side cover is flat on the optional drawer in order to cover the gap between the printer and the optional drawer.
User's Guide
Page 13
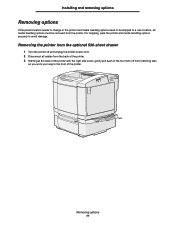
...must be removed from the back of the printer. 3 Starting at the back of the printer with the right side cover, gently pull each of the printer. Installing and removing options Removing options If the printer location needs to change or the printer and media handling options need to be ...shipped to a new location, all cables from the printer. Removing options 11 For shipping, pack the printer and media handling options ...
...must be removed from the back of the printer. 3 Starting at the back of the printer with the right side cover, gently pull each of the printer. Installing and removing options Removing options If the printer location needs to change or the printer and media handling options need to be ...shipped to a new location, all cables from the printer. Removing options 11 For shipping, pack the printer and media handling options ...
User's Guide
Page 14
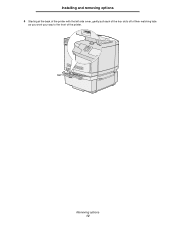
Removing options 12 Installing and removing options 4 Starting at the back of the printer with the left side cover, gently pull each of the four slots off of their matching tabs as you work your way to the front of the printer.
Removing options 12 Installing and removing options 4 Starting at the back of the printer with the left side cover, gently pull each of the four slots off of their matching tabs as you work your way to the front of the printer.
User's Guide
Page 16
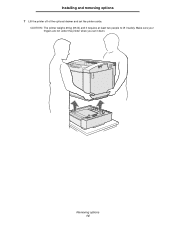
Removing options 14 Installing and removing options 7 Lift the printer off of the optional drawer and set it safely. Make sure your fingers are not under the printer when you set the printer aside. CAUTION: The printer weighs 29 kg (66 lb) and it requires at least two people to lift it down.
Removing options 14 Installing and removing options 7 Lift the printer off of the optional drawer and set it safely. Make sure your fingers are not under the printer when you set the printer aside. CAUTION: The printer weighs 29 kg (66 lb) and it requires at least two people to lift it down.
User's Guide
Page 17
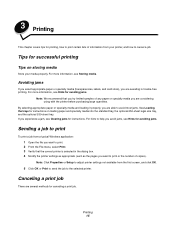
... select Print. 3 Verify that you try limited samples of any paper or specialty media you want to the selected printer. Tips for successful printing Tips on storing media Store your printer, and how to avoid most jams. See Loading the trays for instructions on loading paper and specialty media into the..., the optional 250-sheet legal size tray, and the optional 530-sheet tray. For hints to help you are considering using with the printer before purchasing large quantities. For more information, see Clearing jams for instructions. Note: Click Properties or Setup to adjust...
... select Print. 3 Verify that you try limited samples of any paper or specialty media you want to the selected printer. Tips for successful printing Tips on storing media Store your printer, and how to avoid most jams. See Loading the trays for instructions on loading paper and specialty media into the..., the optional 250-sheet legal size tray, and the optional 530-sheet tray. For hints to help you are considering using with the printer before purchasing large quantities. For more information, see Clearing jams for instructions. Note: Click Properties or Setup to adjust...

User's Guide
Page 18
... Delete key on the keyboard. A list of print jobs appears in the printer window. 2 Choose the print job you want to take the printer offline. Canceling a print job 16 A list of available printers appears. 4 Double-click the printer you selected when you want to cancel is printing: 1 Press 2 Press... to cancel. 3 Click the trash can also be done by clicking the printer setup utility in the right corner of the taskbar. 1 Double-click the printer icon. Canceling a job from a computer running Mac OS X 1 Open Applications Æ Utilities, and then...
... Delete key on the keyboard. A list of print jobs appears in the printer window. 2 Choose the print job you want to take the printer offline. Canceling a print job 16 A list of available printers appears. 4 Double-click the printer you selected when you want to cancel is printing: 1 Press 2 Press... to cancel. 3 Click the trash can also be done by clicking the printer setup utility in the right corner of the taskbar. 1 Double-click the printer icon. Canceling a job from a computer running Mac OS X 1 Open Applications Æ Utilities, and then...
User's Guide
Page 19
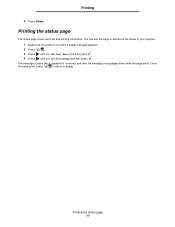
Printing the status page The status page shows parts life and printing information. The message Please Wait appears for a second, and then the message StatusPage blinks while the page prints. You can use this page to Ready. Printing the status page 17 Printing 4 Press Delete. Once the page prints, press to return to determine the status of your supplies. 1 Make sure the printer is on and the Ready message appears. 2 Press . 3 Press until you see Test Menu, and then press . 4 Press until you see StatusPage and then press .
Printing the status page The status page shows parts life and printing information. The message Please Wait appears for a second, and then the message StatusPage blinks while the page prints. You can use this page to Ready. Printing the status page 17 Printing 4 Press Delete. Once the page prints, press to return to determine the status of your supplies. 1 Make sure the printer is on and the Ready message appears. 2 Press . 3 Press until you see Test Menu, and then press . 4 Press until you see StatusPage and then press .

User's Guide
Page 20
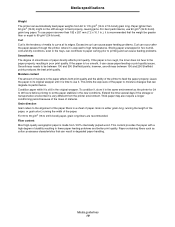
... laser printers. The last four are followed when evaluating new paper stock. Paper To ensure the best print quality and feed reliability, use may also provide acceptable print quality. When choosing any type of any media, consider the weight, fiber content, and color. When loading paper, note the recommended print side on the Lexmark...
... laser printers. The last four are followed when evaluating new paper stock. Paper To ensure the best print quality and feed reliability, use may also provide acceptable print quality. When choosing any type of any media, consider the weight, fiber content, and color. When loading paper, note the recommended print side on the Lexmark...
User's Guide
Page 21
... points produces the best print quality. Fiber content Most high-quality xerographic paper is too smooth, it can occur after the paper passes through the printer, where it in a sheet of the paper to printing and can degrade its performance. Paper lighter than or equal to 90 g/m2 (24... before printing to feed the paper properly. Curl Curl is still in fewer paper feeding problems and better print quality. Media specifications Weight The printer can result in degraded paper handling. If the paper is too rough, the toner does not fuse to curve at its original wrapper until ...
... points produces the best print quality. Fiber content Most high-quality xerographic paper is too smooth, it can occur after the paper passes through the printer, where it in a sheet of the paper to printing and can degrade its performance. Paper lighter than or equal to 90 g/m2 (24... before printing to feed the paper properly. Curl Curl is still in fewer paper feeding problems and better print quality. Media specifications Weight The printer can result in degraded paper handling. If the paper is too rough, the toner does not fuse to curve at its original wrapper until ...
User's Guide
Page 22
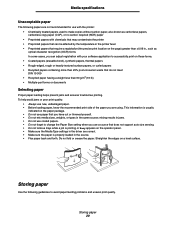
Do not fold or crease the paper. mixing results in the driver are not recommended for use with the printer: • Chemically treated papers used to make copies without carbon paper, also known as carbonless papers, carbonless copy paper (CCP), or no carbon required (NCR... print side of the paper you use paper that you can adjust registration with chemicals that may contaminate the printer • Preprinted papers that can be affected by the temperature in the printer fuser • Preprinted papers that do not meet DIN 19 309 • Recycled paper having a weight less than ...
Do not fold or crease the paper. mixing results in the driver are not recommended for use with the printer: • Chemically treated papers used to make copies without carbon paper, also known as carbonless papers, carbonless copy paper (CCP), or no carbon required (NCR... print side of the paper you use paper that you can adjust registration with chemicals that may contaminate the printer • Preprinted papers that can be affected by the temperature in the printer fuser • Preprinted papers that do not meet DIN 19 309 • Recycled paper having a weight less than ...

