User's Guide
Page 9
... 146 Jams and misfeeds troubleshooting...147 How to clear and avoid paper jams...147 Paper jam in the printer...147 Paper jam in the paper support...148 Paper or specialty media misfeeds...148 Printer does not feed paper, envelopes, or specialty media 149 Banner paper jams ...149 Paper continues to jam...
... 146 Jams and misfeeds troubleshooting...147 How to clear and avoid paper jams...147 Paper jam in the printer...147 Paper jam in the paper support...148 Paper or specialty media misfeeds...148 Printer does not feed paper, envelopes, or specialty media 149 Banner paper jams ...149 Paper continues to jam...
User's Guide
Page 13
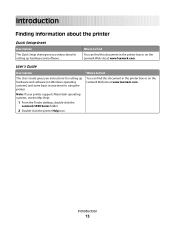
...instructions for using the printer. Introduction 13 Where to find You can find this document in the printer box or on the Lexmark Web site at www.lexmark.com. Where to find You can find this document in the printer box or on Windows operating systems) and some basic ...instructions for setting up hardware and software (on the Lexmark Web site at www.lexmark.com. Note: If your printer supports Macintosh operating systems, see the Mac Help: 1 From the Finder desktop, double-click the...
...instructions for using the printer. Introduction 13 Where to find You can find this document in the printer box or on the Lexmark Web site at www.lexmark.com. Where to find You can find this document in the printer box or on Windows operating systems) and some basic ...instructions for setting up hardware and software (on the Lexmark Web site at www.lexmark.com. Note: If your printer supports Macintosh operating systems, see the Mac Help: 1 From the Finder desktop, double-click the...
User's Guide
Page 14
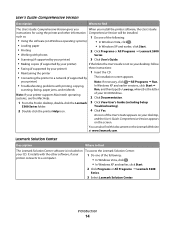
...instructions: • Maintaining the printer 1 Insert the CD. • Connecting the printer to find The Lexmark Solution Center software is the letter Note: If your printer supports Macintosh operating systems, see the Mac Help: of the following : • Using the software (on Windows...• In Windows XP and earlier, click Start. 2 Click Programs or All Programs Œ Lexmark 5300 Series. 3 Select Lexmark Solution Center. Lexmark Solution Center Description Where to a network (if supported by your printer) If the link to the User's Guide is not on your printer connects to...
...instructions: • Maintaining the printer 1 Insert the CD. • Connecting the printer to find The Lexmark Solution Center software is the letter Note: If your printer supports Macintosh operating systems, see the Mac Help: of the following : • Using the software (on Windows...• In Windows XP and earlier, click Start. 2 Click Programs or All Programs Œ Lexmark 5300 Series. 3 Select Lexmark Solution Center. Lexmark Solution Center Description Where to a network (if supported by your printer) If the link to the User's Guide is not on your printer connects to...
User's Guide
Page 15
... Saturday (Noon-6:00 PM ET) Telephone numbers and support hours vary by country or region, and may change without notice. Introduction 15 E-mail support For e-mail support, visit our Web site: www.lexmark.com. 1 Click CUSTOMER SUPPORT. 2 Click Technical Support. 3 Select your printer family. 4 Select your printer...: 01-800-253-9627 Monday-Friday (8:00 AM-8:00 PM ET) Note: Support numbers and times may not be available in some instances. Note: For additional information about contacting Lexmark, see the printed warranty that shipped with your printer. Select a country or ...
... Saturday (Noon-6:00 PM ET) Telephone numbers and support hours vary by country or region, and may change without notice. Introduction 15 E-mail support For e-mail support, visit our Web site: www.lexmark.com. 1 Click CUSTOMER SUPPORT. 2 Click Technical Support. 3 Select your printer family. 4 Select your printer...: 01-800-253-9627 Monday-Friday (8:00 AM-8:00 PM ET) Note: Support numbers and times may not be available in some instances. Note: For additional information about contacting Lexmark, see the printed warranty that shipped with your printer. Select a country or ...
User's Guide
Page 16
... the printer), and have it ready when you contact us so that shipped with your product supports Macintosh, see the Statement of Warranty information varies by Lexmark International, Inc. Limited Warranty Description Where to find (US) Where to view the warranty. original... date of purchase. 2 Click Warranty Information. 3 From the Statement of Limited Warranty section, click Inkjet & All-In-One Printers. 4...
... the printer), and have it ready when you contact us so that shipped with your product supports Macintosh, see the Statement of Warranty information varies by Lexmark International, Inc. Limited Warranty Description Where to find (US) Where to view the warranty. original... date of purchase. 2 Click Warranty Information. 3 From the Statement of Limited Warranty section, click Inkjet & All-In-One Printers. 4...

User's Guide
Page 17
Note: You may not support: • Memory Cards • PictBridge-enabled digital camera • Photo Card mode Checking the box contents 12 3 4 1 2 3 7 5 6 Name Description 1 Black print cartridge Cartridges to be ... in electronic format 7 User's Guide Printed booklet that serves as a guide Note: Complete user information (User's Guide: Comprehensive Version) can be installed into the printer 2 Color print cartridge Note: Cartridge combinations vary depending on the installation software CD. Setting up the printer 17 For more information about connecting this cord, see...
Note: You may not support: • Memory Cards • PictBridge-enabled digital camera • Photo Card mode Checking the box contents 12 3 4 1 2 3 7 5 6 Name Description 1 Black print cartridge Cartridges to be ... in electronic format 7 User's Guide Printed booklet that serves as a guide Note: Complete user information (User's Guide: Comprehensive Version) can be installed into the printer 2 Color print cartridge Note: Cartridge combinations vary depending on the installation software CD. Setting up the printer 17 For more information about connecting this cord, see...
User's Guide
Page 19
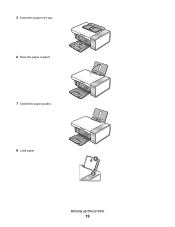
5 Extend the paper exit tray. 6 Raise the paper support. 7 Extend the paper guides. 8 Load paper. 1 2 Setting up the printer 19
5 Extend the paper exit tray. 6 Raise the paper support. 7 Extend the paper guides. 8 Load paper. 1 2 Setting up the printer 19

User's Guide
Page 23
... the control panel" on the alignment page are normal, and do not indicate a problem. Understanding the parts of the printer 1 6 7 8 5 43 2 Use the To 1 Paper support Load paper. 2 PictBridge port Connect a PictBridge-enabled digital camera or a flash drive to the printer. 3 Memory card slots Insert a memory card. 4 Control panel Operate the...
... the control panel" on the alignment page are normal, and do not indicate a problem. Understanding the parts of the printer 1 6 7 8 5 43 2 Use the To 1 Paper support Load paper. 2 PictBridge port Connect a PictBridge-enabled digital camera or a flash drive to the printer. 3 Memory card slots Insert a memory card. 4 Control panel Operate the...
User's Guide
Page 35
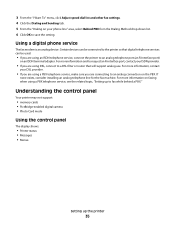
..." area, select Behind PBX from the Dialing Method drop-down list. 6 Click OK to save the setting. Understanding the control panel Your printer may not support: • memory cards • PictBridge-enabled digital camera • Photo Card mode Using the control panel The display shows: • Printer status • Messages •... on the PBX. Using a digital phone service The fax modem is an analog device. Certain devices can be connected to the printer so that will support analog use.
..." area, select Behind PBX from the Dialing Method drop-down list. 6 Click OK to save the setting. Understanding the control panel Your printer may not support: • memory cards • PictBridge-enabled digital camera • Photo Card mode Using the control panel The display shows: • Printer status • Messages •... on the PBX. Using a digital phone service The fax modem is an analog device. Certain devices can be connected to the printer so that will support analog use.

User's Guide
Page 45
... installation of Auto-IP networks. If the IP address is not automatically assigned during printer software installation. Tips for using this address. Contact your system support person for Direct IP printing. If the printer and print server are usually unique to assign addresses. In smaller networks, it is being assigned. Larger...
... installation of Auto-IP networks. If the IP address is not automatically assigned during printer software installation. Tips for using this address. Contact your system support person for Direct IP printing. If the printer and print server are usually unique to assign addresses. In smaller networks, it is being assigned. Larger...
User's Guide
Page 47
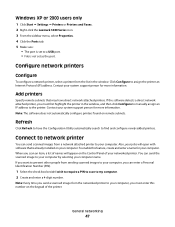
...not automatically configure printers found on your networked printer. Also, your jobs will appear on the keypad of your computer. Contact your system support person for your computer, you must first highlight the printer in the window. Refresh Click Refresh to your computer. Note: Every time ...a name for more information. Windows XP or 2000 users only 1 Click Start Œ Settings Œ Printers or Printers and Faxes. 2 Right-click the Lexmark 5300 Series icon. 3 From the sidebar menu, select Properties. 4 Click the Ports tab. 5 Make sure: • The port is set as the ...
...not automatically configure printers found on your networked printer. Also, your jobs will appear on the keypad of your computer. Contact your system support person for your computer, you must first highlight the printer in the window. Refresh Click Refresh to your computer. Note: Every time ...a name for more information. Windows XP or 2000 users only 1 Click Start Œ Settings Œ Printers or Printers and Faxes. 2 Right-click the Lexmark 5300 Series icon. 3 From the sidebar menu, select Properties. 4 Click the Ports tab. 5 Make sure: • The port is set as the ...
User's Guide
Page 48
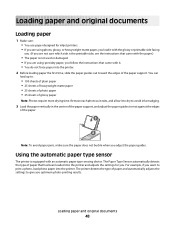
...want to print a photo, load photo paper into the printer and adjusts the settings for inkjet printers. • If you are using photo, glossy, or heavyweight matte paper, you load...with it to dry to avoid ink smudging. 3 Load the paper vertically in the center of the paper support, and adjust the paper guides to give you adjust the paper guides. Remove each photo as it exits, ...• You use paper designed for you. The Paper Type Sensor automatically detects the type of the paper support. Using the automatic paper type sensor The printer is not used or damaged. • If you are ...
...want to print a photo, load photo paper into the printer and adjusts the settings for inkjet printers. • If you are using photo, glossy, or heavyweight matte paper, you load...with it to dry to avoid ink smudging. 3 Load the paper vertically in the center of the paper support, and adjust the paper guides to give you adjust the paper guides. Remove each photo as it exits, ...• You use paper designed for you. The Paper Type Sensor automatically detects the type of the paper support. Using the automatic paper type sensor The printer is not used or damaged. • If you are ...
User's Guide
Page 49
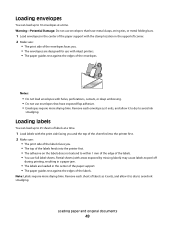
... into the printer first. 2 Make sure: • The print side of the labels faces you . • The envelopes are designed for use with inkjet printers. • The paper guides rest against the edges of the labels. Loading paper and original documents 49 Loading labels You can load up to... as it exits, and allow it to dry to 10 envelopes at a time. 1 Load labels with the stamp location in the center of the paper support. • The paper guides rest against the edges of the envelopes. 1 2 Notes: • Do not load envelopes with holes, perforations, cutouts, or deep embossing....
... into the printer first. 2 Make sure: • The print side of the labels faces you . • The envelopes are designed for use with inkjet printers. • The paper guides rest against the edges of the labels. Loading paper and original documents 49 Loading labels You can load up to... as it exits, and allow it to dry to 10 envelopes at a time. 1 Load labels with the stamp location in the center of the paper support. • The paper guides rest against the edges of the envelopes. 1 2 Notes: • Do not load envelopes with holes, perforations, cutouts, or deep embossing....
User's Guide
Page 50
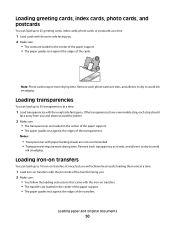
... achieve best results loading them one at a time. 1 Load transparencies with paper backing sheets are loaded in the center of the paper support. • The paper guides rest against the edges of the transparencies. Loading transparencies You can load up to avoid ink smudging. Loading paper... • You follow the loading instructions that came with the iron-on transfers. • The transfers are loaded in the center of the paper support. • The paper guides rest against the edges of the cards. 1 2 Note: Photo cards require more drying time. Notes: • ...
... achieve best results loading them one at a time. 1 Load transparencies with paper backing sheets are loaded in the center of the paper support. • The paper guides rest against the edges of the transparencies. Loading transparencies You can load up to avoid ink smudging. Loading paper... • You follow the loading instructions that came with the iron-on transfers. • The transfers are loaded in the center of the paper support. • The paper guides rest against the edges of the cards. 1 2 Note: Photo cards require more drying time. Notes: • ...

User's Guide
Page 51
.... 4 Feed the leading edge of the banner paper into the printer first. 5 Make sure: • The paper is loaded in the center of the paper support. • The paper guides rest against the edges of the paper. Loading custom-size paper You can load up to 100 sheets of custom-size... paper at a time. 1 Remove all paper from the paper support before loading the banner paper. 2 Tear off only the number of pages needed to 20 sheets of banner paper at a time. 1 Load paper with the...
.... 4 Feed the leading edge of the banner paper into the printer first. 5 Make sure: • The paper is loaded in the center of the paper support. • The paper guides rest against the edges of the paper. Loading custom-size paper You can load up to 100 sheets of custom-size... paper at a time. 1 Remove all paper from the paper support before loading the banner paper. 2 Tear off only the number of pages needed to 20 sheets of banner paper at a time. 1 Load paper with the...

User's Guide
Page 63
... or is an arrow on . The light blinks to the adapter that came with it before inserting it . Working with photos Your printer may not support: • Memory Cards • PictBridge-enabled digital camera • Photo Card mode Retrieving and managing photos Inserting a memory card 1 Insert a memory card. • Insert the...
... or is an arrow on . The light blinks to the adapter that came with it before inserting it . Working with photos Your printer may not support: • Memory Cards • PictBridge-enabled digital camera • Photo Card mode Retrieving and managing photos Inserting a memory card 1 Insert a memory card. • Insert the...
User's Guide
Page 77
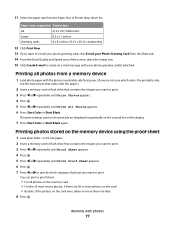
... Press . 5 Press or repeatedly until Print Proof Sheet appears. 6 Press . 7 Press or to specify which category of the display. 7 Press Start Color or Start Black again. Printing photos stored on the second line of photos you want to print. Printing all photos on the memory card •...proof sheet 1 Load plain letter- You can print a proof sheet: • For all photos from the Paper Size in Printer drop-down list. Paper sizes supported Dimensions A4 210 x 297 millimeters Letter 8.5 x 11 inches Greeting cards 4 x 8 inches (10.16 x 20.32 centimeters) 12 Click Print Now. ...
... Press . 5 Press or repeatedly until Print Proof Sheet appears. 6 Press . 7 Press or to specify which category of the display. 7 Press Start Color or Start Black again. Printing photos stored on the second line of photos you want to print. Printing all photos on the memory card •...proof sheet 1 Load plain letter- You can print a proof sheet: • For all photos from the Paper Size in Printer drop-down list. Paper sizes supported Dimensions A4 210 x 297 millimeters Letter 8.5 x 11 inches Greeting cards 4 x 8 inches (10.16 x 20.32 centimeters) 12 Click Print Now. ...
User's Guide
Page 80
.... 3 Press or repeatedly until Photo Effects appears. Note: Make sure the photo print settings you select in the camera match your camera supports DPOF, you can specify which side is the printable side, see the instructions that contains the images you want to select the month you.... 7 Press or to print. 3 Press or repeatedly until Print Photos appears. 4 Press . 5 Press or repeatedly until Print DPOF appears. 6 Press Start Color or Start Black. The print settings to select and print photos. If your current printer settings. 1 Load photo paper with the paper.) 2 Insert a memory ...
.... 3 Press or repeatedly until Photo Effects appears. Note: Make sure the photo print settings you select in the camera match your camera supports DPOF, you can specify which side is the printable side, see the instructions that contains the images you want to select the month you.... 7 Press or to print. 3 Press or repeatedly until Print Photos appears. 4 Press . 5 Press or repeatedly until Print DPOF appears. 6 Press Start Color or Start Black. The print settings to select and print photos. If your current printer settings. 1 Load photo paper with the paper.) 2 Insert a memory ...

User's Guide
Page 99
... in and the telecommunications company you subscribe to, you may need to switch the pattern to this service, it works with the printer. The printer supports two distinct Caller ID patterns: Pattern 1 (FSK) and Pattern 2 (DTMF). Using Caller ID from the control panel Caller ID is a service provided by some countries...
... in and the telecommunications company you subscribe to, you may need to switch the pattern to this service, it works with the printer. The printer supports two distinct Caller ID patterns: Pattern 1 (FSK) and Pattern 2 (DTMF). Using Caller ID from the control panel Caller ID is a service provided by some countries...
User's Guide
Page 100
... the equipment as shown in and the telecommunications company you subscribe to, you may need to switch the pattern to save the setting. The printer supports two distinct Caller ID patterns: Pattern 1 (FSK) and Pattern 2 (DTMF). Receiving a fax automatically 1 From the desktop, double-click the Productivity Studio icon. 2 From the Settings...
... the equipment as shown in and the telecommunications company you subscribe to, you may need to switch the pattern to save the setting. The printer supports two distinct Caller ID patterns: Pattern 1 (FSK) and Pattern 2 (DTMF). Receiving a fax automatically 1 From the desktop, double-click the Productivity Studio icon. 2 From the Settings...


