
User's Guide
Page 75
...maintenance is unsatisfactory, you can cancel the job. Status / Supplies Held jobs Status / Supplies View supplies Ready Tray 1 Low View Supplies Toner Low Staples OK Conserving supplies Several settings in the printer on the display let you examine the first copy of a sheet. Values for ...Multipage Print are low. Lets you conserve toner and paper. Supply Toner Print media Menu selection item Toner Darkness in the Settings Æ Quality Menu Multipage Print in the Settings Æ Finishing Menu Duplex in a busy...
...maintenance is unsatisfactory, you can cancel the job. Status / Supplies Held jobs Status / Supplies View supplies Ready Tray 1 Low View Supplies Toner Low Staples OK Conserving supplies Several settings in the printer on the display let you examine the first copy of a sheet. Values for ...Multipage Print are low. Lets you conserve toner and paper. Supply Toner Print media Menu selection item Toner Darkness in the Settings Æ Quality Menu Multipage Print in the Settings Æ Finishing Menu Duplex in a busy...
User's Guide
Page 76
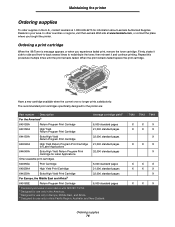
... with ISO/IEC 19752. 2 Designed for use only in the Americas. 3 Designed for use only in Europe, Middle East, and Africa. 4 Designed for information about Lexmark Authorized Supplies Dealers in your area. T640 T642 T644 X X X X X X X X X X X X X X X X X X X X X Ordering supplies 76 Have a new cartridge available ... Firmly shake it side-to-side and front-to-back several times to redistribute the toner, then reinsert it and continue printing. In other countries or regions, visit the Lexmark Web site at 1-800-539-6275 for use only in Asia Pacific Region, Australia, ...
... with ISO/IEC 19752. 2 Designed for use only in the Americas. 3 Designed for use only in Europe, Middle East, and Africa. 4 Designed for information about Lexmark Authorized Supplies Dealers in your area. T640 T642 T644 X X X X X X X X X X X X X X X X X X X X X Ordering supplies 76 Have a new cartridge available ... Firmly shake it side-to-side and front-to-back several times to redistribute the toner, then reinsert it and continue printing. In other countries or regions, visit the Lexmark Web site at 1-800-539-6275 for use only in Asia Pacific Region, Australia, ...
User's Guide
Page 78
... the paper fails to clear the message and continue printing. Maintaining the printer See the following table for the maintenance kit part number for your Lexmark representative. For information on clearing a staple jam, see the StapleSmart™ Reference that came with your finisher. Ordering a label fuser cleaner A ...When ordering pick rollers, you need one set to optimize feeding reliability. Ordering charge rolls We recommend ordering new charge rolls when toner fog or background shading appears on the operator panel display, insert a new staple cartridge in the finisher.
... the paper fails to clear the message and continue printing. Maintaining the printer See the following table for the maintenance kit part number for your Lexmark representative. For information on clearing a staple jam, see the StapleSmart™ Reference that came with your finisher. Ordering a label fuser cleaner A ...When ordering pick rollers, you need one set to optimize feeding reliability. Ordering charge rolls We recommend ordering new charge rolls when toner fog or background shading appears on the operator panel display, insert a new staple cartridge in the finisher.

User's Guide
Page 87
... cool before touching any internal components. 3 Lift and pull the print cartridge out of the printer. Note: The print media may be covered with unfused toner, which can stain garments and skin. Clearing jams 200 and 201 Paper Jam Remove Cartridge 1 Push the release latch, and lower the multipurpose feeder. 2 Push...
... cool before touching any internal components. 3 Lift and pull the print cartridge out of the printer. Note: The print media may be covered with unfused toner, which can stain garments and skin. Clearing jams 200 and 201 Paper Jam Remove Cartridge 1 Push the release latch, and lower the multipurpose feeder. 2 Push...

User's Guide
Page 88
CAUTION: Do not use any pointed objects to the printer. This could cause personal injury or damage to remove the paper. Warning: If the print media does not move immediately when you . You need to access the print media from the printer rear door. 6 Align and reinstall the toner cartridge. 7 Close the top front cover. 8 Close the multipurpose feeder. 9 Press . Clearing jams 5 Pull the print media up and toward you pull, stop pulling. Clearing printer jams 88
CAUTION: Do not use any pointed objects to the printer. This could cause personal injury or damage to remove the paper. Warning: If the print media does not move immediately when you . You need to access the print media from the printer rear door. 6 Align and reinstall the toner cartridge. 7 Close the top front cover. 8 Close the multipurpose feeder. 9 Press . Clearing jams 5 Pull the print media up and toward you pull, stop pulling. Clearing printer jams 88
User's Guide
Page 110
... correct print media is smaller than the page size of the printed page. If the problem continues, contact the Lexmark Customer Support Center at 1-800-Lexmark (1-800-539-6275) or http://support.lexmark.com. Toner fog or background • Check the print cartridge to be low. Solving print quality problems 110 Action • The...
... correct print media is smaller than the page size of the printed page. If the problem continues, contact the Lexmark Customer Support Center at 1-800-Lexmark (1-800-539-6275) or http://support.lexmark.com. Toner fog or background • Check the print cartridge to be low. Solving print quality problems 110 Action • The...
User's Guide
Page 111
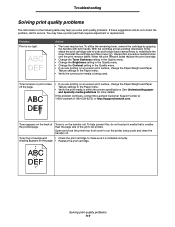
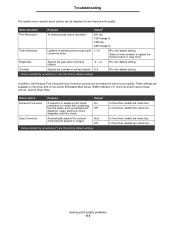
...176;C (446°F). Characters have jagged or uneven edges. • Change the Print Resolution setting in the Quality menu to redistribute the toner. Repeat this procedure multiple times until the print remains faded. With the cartridge arrows pointing downward, firmly shake the print cartridge side-to-... fonts, verify the fonts are using preprinted forms, make sure the lines per inch (lpi) setting is too dark. • Change the Toner Darkness setting in the Quality menu. • Change the Brightness setting in the Quality menu. • Change the Contrast setting in the software...
...176;C (446°F). Characters have jagged or uneven edges. • Change the Print Resolution setting in the Quality menu to redistribute the toner. Repeat this procedure multiple times until the print remains faded. With the cartridge arrows pointing downward, firmly shake the print cartridge side-to-... fonts, verify the fonts are using preprinted forms, make sure the lines per inch (lpi) setting is too dark. • Change the Toner Darkness setting in the Quality menu. • Change the Brightness setting in the Quality menu. • Change the Contrast setting in the software...
User's Guide
Page 112
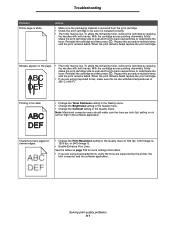
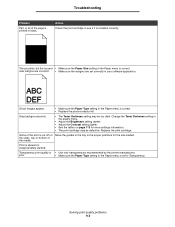
the sides, top, or bottom of the print is cut off on page 113 for the size loaded. Change the Toner Darkness setting in the quality menu. • Adjust the Brightness setting darker. • Adjust the Contrast setting lighter. • See the tables...to Transparency. Ghost images appear. • Make sure the Paper Type setting in the Paper menu is correct. Gray background prints. • The Toner Darkness setting may be too dark. Transparency print quality is skewed or inappropriately slanted. Print is • Use only transparencies recommended by the printer ...
the sides, top, or bottom of the print is cut off on page 113 for the size loaded. Change the Toner Darkness setting in the quality menu. • Adjust the Brightness setting darker. • Adjust the Contrast setting lighter. • See the tables...to Transparency. Ghost images appear. • Make sure the Paper Type setting in the Paper menu is correct. Gray background prints. • The Toner Darkness setting may be too dark. Transparency print quality is skewed or inappropriately slanted. Print is • Use only transparencies recommended by the printer ...
User's Guide
Page 113
...8224; Print Resolution To select printed output resolution 600 dpi* 1200 Image Q 1200 dpi 2400 Image Q Toner Darkness Lightens or darkens printed output and 1-10 conserves toner 8* is the default setting. Brightness Adjusts the gray value of printed objects 0-5 † Values marked by...contrast of printed objects -6 - +6 0* is the default setting. Select a lower number to lighten the printed output or save toner. Solving print quality problems 113 Troubleshooting The quality menu operator panel options can be adjusted to help improve print quality. These settings ...
...8224; Print Resolution To select printed output resolution 600 dpi* 1200 Image Q 1200 dpi 2400 Image Q Toner Darkness Lightens or darkens printed output and 1-10 conserves toner 8* is the default setting. Brightness Adjusts the gray value of printed objects 0-5 † Values marked by...contrast of printed objects -6 - +6 0* is the default setting. Select a lower number to lighten the printed output or save toner. Solving print quality problems 113 Troubleshooting The quality menu operator panel options can be adjusted to help improve print quality. These settings ...

User's Guide
Page 121
... for warranty service, remove all legal obligations, restrictions, liens, and encumbrances. Fuser Units, Paper Feed items, and any other than Lexmark or a Lexmark authorized servicer • Operation of a product beyond repair, or if the product is provided for this product throughout its duty cycle ..., damaged beyond the limit of products by a third party, supplies or parts • Products, supplies, parts, materials (such as toners and inks), software, or interfaces not furnished by anyone other items for which it was designed. Warranty service does not include repair of...
... for warranty service, remove all legal obligations, restrictions, liens, and encumbrances. Fuser Units, Paper Feed items, and any other than Lexmark or a Lexmark authorized servicer • Operation of a product beyond repair, or if the product is provided for this product throughout its duty cycle ..., damaged beyond the limit of products by a third party, supplies or parts • Products, supplies, parts, materials (such as toners and inks), software, or interfaces not furnished by anyone other items for which it was designed. Warranty service does not include repair of...

User's Guide
Page 125
..., replacing 78 StapleSmart replacing staples 78 stapling, maximum number 106 Stop button 9 supplies label fuser cleaner 78 maintenance kit 77 print cartridge 76 recycling 78 T toner cartridge recycling 78 transfer roller 78 transparencies loading input tray 44 tray linking 57 U UNIX 16, 24 USB Direct interface 36 USB flash memory device...
..., replacing 78 StapleSmart replacing staples 78 stapling, maximum number 106 Stop button 9 supplies label fuser cleaner 78 maintenance kit 77 print cartridge 76 recycling 78 T toner cartridge recycling 78 transfer roller 78 transparencies loading input tray 44 tray linking 57 U UNIX 16, 24 USB Direct interface 36 USB flash memory device...

