User's Guide (3.6 MB)
Page 16
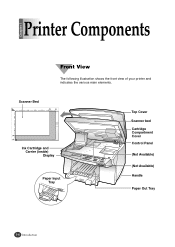
Scanner Bed Ink Cartridge and Carrier (inside) Display Paper Input Tray Top Cover Scanner bed Cartridge Compartment Cover Control Panel (Not Available) (Not Available) Handle Paper Out Tray 1-4 Introduction Chapter 1 Printer Components Front View The following illustration shows the front view of your printer and indicates the various main elements.
Scanner Bed Ink Cartridge and Carrier (inside) Display Paper Input Tray Top Cover Scanner bed Cartridge Compartment Cover Control Panel (Not Available) (Not Available) Handle Paper Out Tray 1-4 Introduction Chapter 1 Printer Components Front View The following illustration shows the front view of your printer and indicates the various main elements.
User's Guide (3.6 MB)
Page 33
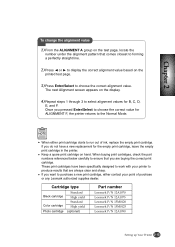
... the Normal Mode. Cartridge type Black cartridge Color cartridge Photo cartridge Standard High yield Standard High yield (optional) Part number Lexmark P/N 12A1970 Lexmark P/N 12A1975 Lexmark P/N 15M0120 Lexmark P/N 15M0125 Lexmark P/N 12A1990 Setting up Your Printer 2-15 Once you want to purchase a new print cartridge, either print cartridge starts to choose the...produce results that you do not have been specifically designed to work with your point of ink, replace the empty print cartridge. G If you pressed Enter/Select to choose the correct value for ALIGNMENT F, the printer...
... the Normal Mode. Cartridge type Black cartridge Color cartridge Photo cartridge Standard High yield Standard High yield (optional) Part number Lexmark P/N 12A1970 Lexmark P/N 12A1975 Lexmark P/N 15M0120 Lexmark P/N 15M0125 Lexmark P/N 12A1990 Setting up Your Printer 2-15 Once you want to purchase a new print cartridge, either print cartridge starts to choose the...produce results that you do not have been specifically designed to work with your point of ink, replace the empty print cartridge. G If you pressed Enter/Select to choose the correct value for ALIGNMENT F, the printer...

User's Guide (3.6 MB)
Page 58
... print job. 5-4 Printing Tasks These items provide specific details about the status of ink remaining in each cartridge. Click this button again to cancel the current print job. Continued Printing a Document About Printer Control Program Window When the Lexmark Z82 Control Program on LPT1 window appears, click the appropriate tab for the options. Click...
... print job. 5-4 Printing Tasks These items provide specific details about the status of ink remaining in each cartridge. Click this button again to cancel the current print job. Continued Printing a Document About Printer Control Program Window When the Lexmark Z82 Control Program on LPT1 window appears, click the appropriate tab for the options. Click...
User's Guide (3.6 MB)
Page 60
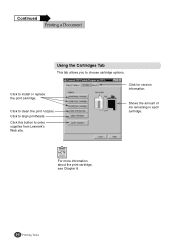
Continued Printing a Document Using the Cartridges Tab This tab allows you to align printheads. Click to choose cartridge options. For more information about the print cartridge, see Chapter 8. 5-6 Printing Tasks Click for version information. Click this button to clean the print nozzles. Click to order supplies from Lexmark's Web site. Click to install or replace the print cartridge. Shows the amount of ink remaining in each cartridge.
Continued Printing a Document Using the Cartridges Tab This tab allows you to align printheads. Click to choose cartridge options. For more information about the print cartridge, see Chapter 8. 5-6 Printing Tasks Click for version information. Click this button to clean the print nozzles. Click to order supplies from Lexmark's Web site. Click to install or replace the print cartridge. Shows the amount of ink remaining in each cartridge.
User's Guide (3.6 MB)
Page 91
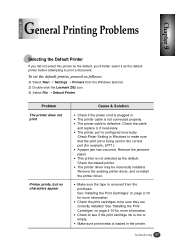
...correct port (for example, LPT1). G The printer driver may be sure they are correctly installed. G Check to see if the print cartridge ink is being sent to make sure that the print job is low or empty. G The printer cable is configured incorrectly. Check the ... is removed from the Windows task bar. 2) Double-click the Lexmark Z82 icon. 3) Select File ➝ Default Printer. Check the default printer. G Check the print cartridges to print a document. G A paper jam has occurred. See 'Installing the Print Cartridges' on page 2-10 for more information. G This printer is ...
...correct port (for example, LPT1). G The printer driver may be sure they are correctly installed. G Check to see if the print cartridge ink is being sent to make sure that the print job is low or empty. G The printer cable is configured incorrectly. Check the ... is removed from the Windows task bar. 2) Double-click the Lexmark Z82 icon. 3) Select File ➝ Default Printer. Check the default printer. G Check the print cartridges to print a document. G A paper jam has occurred. See 'Installing the Print Cartridges' on page 2-10 for more information. G This printer is ...
User's Guide (3.6 MB)
Page 93
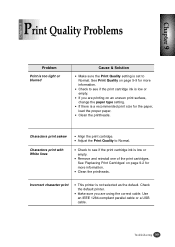
...to see if the print cartridge ink is set to Normal. Characters print askew Characters print with White lines G Align the print cartridge. Use an IEEE 1284-compliant parallel cable or a USB cable. 9-9 Troubleshooting 9-9 G Remove and reinstall one of the print cartridges. Check the default printer. ... type setting. G If there is not selected as the default. See 'Replacing Print Cartridges' on page 5-9 for the paper, load the proper paper. G Check to see if the print cartridge ink is low or empty. Chapter 9 Chapter 9 Print Quality Problems Problem Print is too light...
...to see if the print cartridge ink is set to Normal. Characters print askew Characters print with White lines G Align the print cartridge. Use an IEEE 1284-compliant parallel cable or a USB cable. 9-9 Troubleshooting 9-9 G Remove and reinstall one of the print cartridges. Check the default printer. ... type setting. G If there is not selected as the default. See 'Replacing Print Cartridges' on page 5-9 for the paper, load the proper paper. G Check to see if the print cartridge ink is low or empty. Chapter 9 Chapter 9 Print Quality Problems Problem Print is too light...
User's Guide (3.6 MB)
Page 94
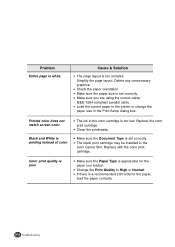
.... G Clean the printheads. G If there is appropriate for the paper, load the paper correctly. 9-10 Troubleshooting 9-10 G The black print cartridge may be installed in the Print Setup dialog box. Delete any unnecessary graphics. Printed color does not match screen color G The... ink in the color cartridge is too complex. Simplify the page layout. Replace with the color print cartridge. Color print quality is poor G Make sure the Paper Type is a recommended print side for...
.... G Clean the printheads. G If there is appropriate for the paper, load the paper correctly. 9-10 Troubleshooting 9-10 G The black print cartridge may be installed in the Print Setup dialog box. Delete any unnecessary graphics. Printed color does not match screen color G The... ink in the color cartridge is too complex. Simplify the page layout. Replace with the color print cartridge. Color print quality is poor G Make sure the Paper Type is a recommended print side for...
User's Guide (3.6 MB)
Page 99
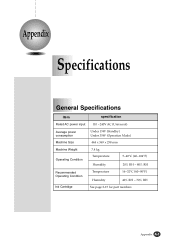
Appendix Specifications General Specifications Item specification Rated AC power input 110 ~240V AC (Universal) Average power consumption Machine Size Under 15W (Standby) Under 35W (Operation Mode) 444 x 369 x 258 mm Machine Weight Operating Condition 7.8 kg Temperature Humidity 5~40°C (40~104°F) 20% RH ~ 80% RH Recommended Operating Condition Temperature Humidity 16~32°C (60~90°F) 40% RH ~ 70% RH Ink Cartridge See page 2-15 for part numbers Appendix A-1
Appendix Specifications General Specifications Item specification Rated AC power input 110 ~240V AC (Universal) Average power consumption Machine Size Under 15W (Standby) Under 35W (Operation Mode) 444 x 369 x 258 mm Machine Weight Operating Condition 7.8 kg Temperature Humidity 5~40°C (40~104°F) 20% RH ~ 80% RH Recommended Operating Condition Temperature Humidity 16~32°C (60~90°F) 40% RH ~ 70% RH Ink Cartridge See page 2-15 for part numbers Appendix A-1

