
Setup Sheet
Page 1
www.lexmark.com 3 Attach and extend the document exit tray. 4 Load plain inkjet paper. 5 Open the cartridge access doors. 6 Remove the sticker and tape. 7 Install the cartridges. X125 All-In-One 1Connect the power cord. 2 1 Before you begin, read the safety information on the back of this sheet. 2 Extend the paper exit tray and the paper support.
www.lexmark.com 3 Attach and extend the document exit tray. 4 Load plain inkjet paper. 5 Open the cartridge access doors. 6 Remove the sticker and tape. 7 Install the cartridges. X125 All-In-One 1Connect the power cord. 2 1 Before you begin, read the safety information on the back of this sheet. 2 Extend the paper exit tray and the paper support.

Setup Sheet
Page 2
8 Close the cartridge access doors. 9 Wait for the alignment page to print. 10 Enter the best values from the alignment page. 11 Extend the document support. 12 Connect the telephone cord. 13 • If you are using your All-In-One with your computer, continue to the next step. • If you are using your All-In-One without a computer, you are finished.
8 Close the cartridge access doors. 9 Wait for the alignment page to print. 10 Enter the best values from the alignment page. 11 Extend the document support. 12 Connect the telephone cord. 13 • If you are using your All-In-One with your computer, continue to the next step. • If you are using your All-In-One without a computer, you are finished.

Quick Reference
Page 11
.... Keep paper straight during copying, scanning, and faxing. Stack paper after printing. Make sure paper feeds correctly. Document support Cartridge access door Display Document exit tray Paper exit tray Document guides Paper guide Paper support When you want to... Keep documents straight during printing. 7 Stack paper after copying, scanning, or faxing. Learning...
.... Keep paper straight during copying, scanning, and faxing. Stack paper after printing. Make sure paper feeds correctly. Document support Cartridge access door Display Document exit tray Paper exit tray Document guides Paper guide Paper support When you want to... Keep documents straight during printing. 7 Stack paper after copying, scanning, or faxing. Learning...

Quick Reference
Page 12
... Initiate sending a fax. Speaker Listen as you dial a telephone or fax number to another fax machine. Paper Feed • Continue printing after reloading the paper support. • Remove paper if it does not exit after printing. Copy Initiate a copy job. Messages and errors appear on the display when your cartridges, and...
... Initiate sending a fax. Speaker Listen as you dial a telephone or fax number to another fax machine. Paper Feed • Continue printing after reloading the paper support. • Remove paper if it does not exit after printing. Copy Initiate a copy job. Messages and errors appear on the display when your cartridges, and...
Quick Reference
Page 13
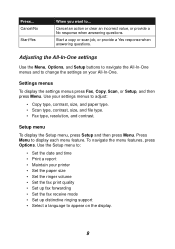
... the ringer volume • Set the fax print quality • Set up fax forwarding • Set the fax receive mode • Set up distinctive ringing support • Select a language to appear on the display. 9 Press Menu to ... Press... Setup menu To display the Setup menu, press Setup and then press Menu...
... the ringer volume • Set the fax print quality • Set up fax forwarding • Set the fax receive mode • Set up distinctive ringing support • Select a language to appear on the display. 9 Press Menu to ... Press... Setup menu To display the Setup menu, press Setup and then press Menu...

Quick Reference
Page 14
... up to: 10 envelopes Make sure: • The print side faces you. • The envelopes are loaded vertically against the right side of the paper support. • The stamp location is in the upper left corner. • The paper guide is against the left edge of the envelopes. 10 greeting cards..., index cards, postcards, or photo cards • The print side faces you. • The cards are loaded vertically against the right side of the paper support. • The paper guide is against the left edge of the cards. 25 sheets of coated, photo, or glossy paper • The glossy or coated...
... up to: 10 envelopes Make sure: • The print side faces you. • The envelopes are loaded vertically against the right side of the paper support. • The stamp location is in the upper left corner. • The paper guide is against the left edge of the envelopes. 10 greeting cards..., index cards, postcards, or photo cards • The print side faces you. • The cards are loaded vertically against the right side of the paper support. • The paper guide is against the left edge of the cards. 25 sheets of coated, photo, or glossy paper • The glossy or coated...

Quick Reference
Page 15
.... 11 Before you want to fax, copy, or scan documents that you load a document into your document face down and top down in the document support. Loading a document Load documents that are printed on plain A4, letter, or legal size paper. You can use your All-In-One to fax, copy..., or scan in the document support. 2 Slide the document guides toward the paper until they rest against both sides of paper at least 76 mm (3.0 in.) long and 140 mm (5.5 in...
.... 11 Before you want to fax, copy, or scan documents that you load a document into your document face down and top down in the document support. Loading a document Load documents that are printed on plain A4, letter, or legal size paper. You can use your All-In-One to fax, copy..., or scan in the document support. 2 Slide the document guides toward the paper until they rest against both sides of paper at least 76 mm (3.0 in.) long and 140 mm (5.5 in...

Quick Reference
Page 18
... section takes you dialed. 5 Press Start/Yes. 14 Sending a fax Use your document. To send a fax with the default settings: 1 Load paper in the paper support. 2 Load your All-In-One to the last number you step-by-step through the basics of your All-In-One, such as speed-dialing...
... section takes you dialed. 5 Press Start/Yes. 14 Sending a fax Use your document. To send a fax with the default settings: 1 Load paper in the paper support. 2 Load your All-In-One to the last number you step-by-step through the basics of your All-In-One, such as speed-dialing...
Quick Reference
Page 23
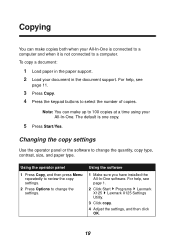
...: You can make up to 100 copies at a time using your document in the paper support. 2 Load your All-In-One. The default is not connected to a computer. For help , see page 1. 2 Click Start Programs Lexmark X125 Lexmark X125 Settings Utility. 3 Click copy. 4 Adjust the settings, and then click OK. 19 Using the...
...: You can make up to 100 copies at a time using your document in the paper support. 2 Load your All-In-One. The default is not connected to a computer. For help , see page 1. 2 Click Start Programs Lexmark X125 Lexmark X125 Settings Utility. 3 Click copy. 4 Adjust the settings, and then click OK. 19 Using the...

Quick Reference
Page 24
... help, see page 1. 2 Load paper in the paper support. 3 With your All-In-One to print basic or custom jobs. Use the Paper, Quality/Color, and Layout tabs to customize the print settings. Changing the print settings Use the Lexmark X125 Settings to adjust the print settings. 20 To access the... Lexmark X125 Settings from an open , select File Print. 4 To change ...
... help, see page 1. 2 Load paper in the paper support. 3 With your All-In-One to print basic or custom jobs. Use the Paper, Quality/Color, and Layout tabs to customize the print settings. Changing the print settings Use the Lexmark X125 Settings to adjust the print settings. 20 To access the... Lexmark X125 Settings from an open , select File Print. 4 To change ...

Quick Reference
Page 25
... select the destination of your scan. Select... Scan to destinations. 6 Press Start/Yes. For help , see page 1. 2 Load paper in the paper support. 3 Load the document in the document support. Scan a document directly into your computer. Scan a document to a program where you can scan a document while your All-In-One is connected...
... select the destination of your scan. Select... Scan to destinations. 6 Press Start/Yes. For help , see page 1. 2 Load paper in the paper support. 3 Load the document in the document support. Scan a document directly into your computer. Scan a document to a program where you can scan a document while your All-In-One is connected...

Quick Reference
Page 26
... into a file you have installed the All-In-One software. Here is scanned, converted to text by the OCR software, and loaded into the document support. 4 Press Scan on the operator panel. Note: You can use the operator panel and the software to change the scan type, contrast, size, and file....txt as your file type. 3 Load your document into your computer, or press Scan on the operator panel. For help, see page 1. 2 Click Start Programs Lexmark X125 Lexmark X125 Settings Utility. 3 Click scan. 4 Adjust the settings, and then click OK.
... into a file you have installed the All-In-One software. Here is scanned, converted to text by the OCR software, and loaded into the document support. 4 Press Scan on the operator panel. Note: You can use the operator panel and the software to change the scan type, contrast, size, and file....txt as your file type. 3 Load your document into your computer, or press Scan on the operator panel. For help, see page 1. 2 Click Start Programs Lexmark X125 Lexmark X125 Settings Utility. 3 Click scan. 4 Adjust the settings, and then click OK.

Quick Reference
Page 31
.... • Access publications for your printer. • Check for upgrades. • Create and print fun computer projects. Contacting Lexmark Visit our Web site at http://support.lexmark.com to make multiple black and white copies without a computer, you can change the copy settings. • For All-In-One... CD software installation instructions, see page 1. If you would like to make multiple color copies, you must attach your...
.... • Access publications for your printer. • Check for upgrades. • Create and print fun computer projects. Contacting Lexmark Visit our Web site at http://support.lexmark.com to make multiple black and white copies without a computer, you can change the copy settings. • For All-In-One... CD software installation instructions, see page 1. If you would like to make multiple color copies, you must attach your...
Quick Reference
Page 33
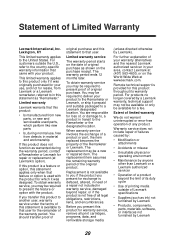
... user. You may not be available or only be available for a fee. For products no longer covered by a Lexmark warranty, technical support may be required to that this statement as shown on the purchase receipt. Warranty service does not include repair of failures...may be required to the Remarketer or the designated location. The replacement item assumes the remaining warranty period of the Remarketer or Lexmark. Remote technical support is available to another user, warranty service under the terms of original purchase. For customers outside of original purchase as "...
... user. You may not be available or only be available for a fee. For products no longer covered by a Lexmark warranty, technical support may be required to that this statement as shown on the purchase receipt. Warranty service does not include repair of failures...may be required to the Remarketer or the designated location. The replacement item assumes the remaining warranty period of the Remarketer or Lexmark. Remote technical support is available to another user, warranty service under the terms of original purchase. For customers outside of original purchase as "...
User's Guide
Page 4
...;rique de la classe B respecte toutes les exigences du Règlement sur le matériel brouilleur du Canada. www.lexmark.com Lexmark X125 The United Kingdom Telecommunications Act 1984 This apparatus is proud to be a participant in conformity with the protection requirements of ... down when they are not being used by the Director of energy-efficient products and to promote the introduction of Manufacturing and Technical Support, Lexmark International, S.A., Boigny, France. This product satisfies the Class B limits of EN 55022 and safety requirements of the directives has been...
...;rique de la classe B respecte toutes les exigences du Règlement sur le matériel brouilleur du Canada. www.lexmark.com Lexmark X125 The United Kingdom Telecommunications Act 1984 This apparatus is proud to be a participant in conformity with the protection requirements of ... down when they are not being used by the Director of energy-efficient products and to promote the introduction of Manufacturing and Technical Support, Lexmark International, S.A., Boigny, France. This product satisfies the Class B limits of EN 55022 and safety requirements of the directives has been...

User's Guide
Page 20
...side is facing you. • The paper is against the right side of the paper support. • The print side is facing you. • The envelopes are loaded vertically against the right side of ...the paper support. • The stamp location is in the upper left corner. • The paper guide rests...; The print side is facing you. • The cards are loaded vertically against the right side of the paper support. • The paper guide rests against the edge of the cards. • The glossy or coated side is ...
...side is facing you. • The paper is against the right side of the paper support. • The print side is facing you. • The envelopes are loaded vertically against the right side of ...the paper support. • The stamp location is in the upper left corner. • The paper guide rests...; The print side is facing you. • The cards are loaded vertically against the right side of the paper support. • The paper guide rests against the edge of the cards. • The glossy or coated side is ...

User's Guide
Page 22
... To load documents for copying, scanning, and faxing: 1 Place your All-In-One, make sure: - www.lexmark.com Lexmark X125 Your document is at least 76 mm (3.0 in.) long and 140 mm (5.5 in the document support. You let ink and correction fluid dry completely. Document Loaded appears on the operator panel display. 2 Slide...
... To load documents for copying, scanning, and faxing: 1 Place your All-In-One, make sure: - www.lexmark.com Lexmark X125 Your document is at least 76 mm (3.0 in.) long and 140 mm (5.5 in the document support. You let ink and correction fluid dry completely. Document Loaded appears on the operator panel display. 2 Slide...

User's Guide
Page 46
www.lexmark.com Lexmark X125 Basics Copying Printing Scanning Faxing Troubleshooting Index Printing 39 Customizing T-shirts 1 Load iron-on transfer paper with the blank side facing you in the paper support. 2 Open the image editing program supplied with your All-In-...One. 3 Create or select the image of your choice. 4 Select the mirror option. 5 With your document open, select File Print. 6 Select Properties. 7 From the Paper tab, select the Media Type, Paper size, and Orientation for your document. 8 From the Quality/Color...
www.lexmark.com Lexmark X125 Basics Copying Printing Scanning Faxing Troubleshooting Index Printing 39 Customizing T-shirts 1 Load iron-on transfer paper with the blank side facing you in the paper support. 2 Open the image editing program supplied with your All-In-...One. 3 Create or select the image of your choice. 4 Select the mirror option. 5 With your document open, select File Print. 6 Select Properties. 7 From the Paper tab, select the Media Type, Paper size, and Orientation for your document. 8 From the Quality/Color...

User's Guide
Page 52
... , see page 15. 2 Make sure you want to the Quick Reference. 3 Click Start Programs ViewAhead Photo Center Launch ViewAhead Photo Editor. 4 From the Lexmark X125 Scan dialog box, select Get a Picture. 5 From the sidebar menu, select Scan an Image or Open a File. 6 Preview your document. Click Preview.... - For help , refer to scan. 7 Customize the scan settings. 8 Reload your original document into the document support. 9 Press Scan on the operator panel. Move and size the dashed box to select the area of the document you have installed the All-In...
... , see page 15. 2 Make sure you want to the Quick Reference. 3 Click Start Programs ViewAhead Photo Center Launch ViewAhead Photo Editor. 4 From the Lexmark X125 Scan dialog box, select Get a Picture. 5 From the sidebar menu, select Scan an Image or Open a File. 6 Preview your document. Click Preview.... - For help , refer to scan. 7 Customize the scan settings. 8 Reload your original document into the document support. 9 Press Scan on the operator panel. Move and size the dashed box to select the area of the document you have installed the All-In...

User's Guide
Page 54
www.lexmark.com Lexmark X125 Basics Copying Printing Scanning Faxing Troubleshooting Index Scanning 47 Using special scan features • Scanning a document to an e-mail • Scanning a document to a folder &#... to Email option.) 5 Select a file type. 6 Click OK. 7 Press Scan on your computer and it must support MAPI (Messaging Application Program Interface). 1 Load the document. For help, see page 15. 2 Click Start Programs Lexmark X125 Lexmark X125 Settings Utility. 3 To customize the settings from the Settings Utility, click scan. 4 In the Scan to...
www.lexmark.com Lexmark X125 Basics Copying Printing Scanning Faxing Troubleshooting Index Scanning 47 Using special scan features • Scanning a document to an e-mail • Scanning a document to a folder &#... to Email option.) 5 Select a file type. 6 Click OK. 7 Press Scan on your computer and it must support MAPI (Messaging Application Program Interface). 1 Load the document. For help, see page 15. 2 Click Start Programs Lexmark X125 Lexmark X125 Settings Utility. 3 To customize the settings from the Settings Utility, click scan. 4 In the Scan to...


