

Getting Started
Page 10
4 Click Next. 5 Click Next. 6 Click Next. 7 If your USB cable is installed onto your computer. 9 When this screen appears: 1 Connect the USB cable to your computer and to your All-In-One. 2 Wait for the printer driver to your All-In-One, disconnect it now. Click OK.. 8 Wait while software is connected to install. 3 Click OK. 8
4 Click Next. 5 Click Next. 6 Click Next. 7 If your USB cable is installed onto your computer. 9 When this screen appears: 1 Connect the USB cable to your computer and to your All-In-One. 2 Wait for the printer driver to your All-In-One, disconnect it now. Click OK.. 8 Wait while software is connected to install. 3 Click OK. 8

Getting Started
Page 16
Printing To print a document: 1 Make sure you have installed the All-In-One software. For help, see page 7. 2 From your software application, select File Print. 3 To customize print settings, click Properties or Printer Preferences. 4 From the Print dialog box, click OK or Print (depending on the software application). 14
Printing To print a document: 1 Make sure you have installed the All-In-One software. For help, see page 7. 2 From your software application, select File Print. 3 To customize print settings, click Properties or Printer Preferences. 4 From the Print dialog box, click OK or Print (depending on the software application). 14

Getting Started
Page 17
To clear a paper jam: 1 Open the operator panel and remove any paper from the printer paper path. 3 Close the cartridge access door, and then close the operator panel firmly until it snaps into a properly grounded electrical outlet. • Your telephone ..., open the cartridge access door and remove any paper from the document path. 2 If paper is still jammed in either the document path or the printer paper path. Troubleshooting Checking first things first When your All-In-One has a problem, first make sure: • The power cord is plugged into your...
To clear a paper jam: 1 Open the operator panel and remove any paper from the printer paper path. 3 Close the cartridge access door, and then close the operator panel firmly until it snaps into a properly grounded electrical outlet. • Your telephone ..., open the cartridge access door and remove any paper from the document path. 2 If paper is still jammed in either the document path or the printer paper path. Troubleshooting Checking first things first When your All-In-One has a problem, first make sure: • The power cord is plugged into your...

Getting Started
Page 20
...Lexmark at Lexmark's option) without charge. The replacement item assumes the remaining warranty period of the Remarketer or Lexmark. Also, such product must be provided at www.lexmark... Lexmark ... Lexmark is legally liable. Lexmark's... will Lexmark be...other than Lexmark product ...Lexmark for a fee. Lexmark...advise Lexmark ...Lexmark's official published specifications • Is in your product to the Remarketer or Lexmark... Lexmark or a Lexmark ...Lexmark supplies (such as shown on the date of original purchase as toner cartridges, inkjet...Maintenance by a Lexmark warranty, technical ...Lexmark...
...Lexmark at Lexmark's option) without charge. The replacement item assumes the remaining warranty period of the Remarketer or Lexmark. Also, such product must be provided at www.lexmark... Lexmark ... Lexmark is legally liable. Lexmark's... will Lexmark be...other than Lexmark product ...Lexmark for a fee. Lexmark...advise Lexmark ...Lexmark's official published specifications • Is in your product to the Remarketer or Lexmark... Lexmark or a Lexmark ...Lexmark supplies (such as shown on the date of original purchase as toner cartridges, inkjet...Maintenance by a Lexmark warranty, technical ...Lexmark...

User's Guide for Windows 98, Me, and 2000
Page 17
Change how or where images are scanned. Set Printer Properties or access the Fax Setup Utility. Change settings related to bring up the Print Control Program Document Quality tab. Click the Paper Type/Print ... pattern in the background of a scanned image. • Enable and set the sharpen level of the scanned image. Set the scan frame position and size. Lexmark X63 Select this tab: Image Scan Page Copy/Fax Email Application OCR (text editing) Descreen/Sharpen To: Adjust the properties of an image.
Change how or where images are scanned. Set Printer Properties or access the Fax Setup Utility. Change settings related to bring up the Print Control Program Document Quality tab. Click the Paper Type/Print ... pattern in the background of a scanned image. • Enable and set the sharpen level of the scanned image. Set the scan frame position and size. Lexmark X63 Select this tab: Image Scan Page Copy/Fax Email Application OCR (text editing) Descreen/Sharpen To: Adjust the properties of an image.

User's Guide for Windows 98, Me, and 2000
Page 18
...; View your ink levels. • Clean the nozzles. • Align cartridges for best quality. • View cartridge part numbers and order supplies directly from the Lexmark Web site. Basics Copying Printing Scanning Faxing Troubleshooting Index Basics 10 Using the Print Control Program The Print Control Program lets you monitor the...
...; View your ink levels. • Clean the nozzles. • Align cartridges for best quality. • View cartridge part numbers and order supplies directly from the Lexmark Web site. Basics Copying Printing Scanning Faxing Troubleshooting Index Basics 10 Using the Print Control Program The Print Control Program lets you monitor the...

User's Guide for Windows 98, Me, and 2000
Page 19
Lexmark X63 Basics Copying Printing Scanning Faxing Troubleshooting Index Windows 2000 Click this tab: Status Cartridges Options Basics 11 To: • Monitor the status of your print job. • Cancel your print job. • Print a test page. • View your ink levels. • View your ink levels. • Align cartridges for best quality. • Clean the nozzles. • View cartridge part numbers and order supplies directly from the Lexmark Web site. • Control how and when the Control Program displays. • Disable the printer shortcut.
Lexmark X63 Basics Copying Printing Scanning Faxing Troubleshooting Index Windows 2000 Click this tab: Status Cartridges Options Basics 11 To: • Monitor the status of your print job. • Cancel your print job. • Print a test page. • View your ink levels. • View your ink levels. • Align cartridges for best quality. • Clean the nozzles. • View cartridge part numbers and order supplies directly from the Lexmark Web site. • Control how and when the Control Program displays. • Disable the printer shortcut.

User's Guide for Windows 98, Me, and 2000
Page 20
Basics Copying Printing Scanning Faxing Troubleshooting Index Basics 12 Loading the paper Load up to 100 sheets of plain paper. 1 Place the paper against the right side of the paper support with the print side facing you. 2 Squeeze and slide the paper guide to the right until it rests against the left edge of the paper. Lexmark X63 Note: Do not force the paper into the printer.
Basics Copying Printing Scanning Faxing Troubleshooting Index Basics 12 Loading the paper Load up to 100 sheets of plain paper. 1 Place the paper against the right side of the paper support with the print side facing you. 2 Squeeze and slide the paper guide to the right until it rests against the left edge of the paper. Lexmark X63 Note: Do not force the paper into the printer.

User's Guide for Windows 98, Me, and 2000
Page 23
Lexmark X63 Basics Copying Printing Scanning Faxing Troubleshooting Index Basics 15 Replacing the cartridges Your All-In-One uses the following cartridges: Black 12A1970 Color 15M0120 High Yield Black High Yield Color Photo 12A1975 15M0125 12A1990 1 Make sure the printer is busy. Operator panel Cartridge access door The cartridge carrier moves to the loading position, unless the printer is on. 2 Pull the operator panel toward you, and then open the cartridge access door.
Lexmark X63 Basics Copying Printing Scanning Faxing Troubleshooting Index Basics 15 Replacing the cartridges Your All-In-One uses the following cartridges: Black 12A1970 Color 15M0120 High Yield Black High Yield Color Photo 12A1975 15M0125 12A1990 1 Make sure the printer is busy. Operator panel Cartridge access door The cartridge carrier moves to the loading position, unless the printer is on. 2 Pull the operator panel toward you, and then open the cartridge access door.

User's Guide for Windows 98, Me, and 2000
Page 28
... print cartridge from the printer and left exposed for an extended period of time. • If a print cartridge runs out of ink, leave the empty cartridge in the printer until you are ready to replace it in the printer may cause printer problems. Lexmark's printer warranty does not cover ...repair of failures or damage caused by a refilled cartridge. Lexmark X63 The print cartridge does not print correctly if removed...
... print cartridge from the printer and left exposed for an extended period of time. • If a print cartridge runs out of ink, leave the empty cartridge in the printer until you are ready to replace it in the printer may cause printer problems. Lexmark's printer warranty does not cover ...repair of failures or damage caused by a refilled cartridge. Lexmark X63 The print cartridge does not print correctly if removed...

User's Guide for Windows 98, Me, and 2000
Page 32
Poster Prints an image on multiple pages. Using special copy features 1 Click Start Programs Lexmark X63 Scan & Copy Control Program. 2 From the Fit to Page area, scroll and select Poster, Clone, or Autofit. 3 To select the collate feature, click the Paper Type/Print Quality button and select the Paper tab. Basics Copying Printing Scanning Faxing Troubleshooting Index Copying 24 3 Select the Copy/Fax tab. 4 Click Printer Properties. 5 Customize the copy settings. 6 Click OK. Original 2 x 2 3 x 3 4 x 4 Lexmark X63
Poster Prints an image on multiple pages. Using special copy features 1 Click Start Programs Lexmark X63 Scan & Copy Control Program. 2 From the Fit to Page area, scroll and select Poster, Clone, or Autofit. 3 To select the collate feature, click the Paper Type/Print Quality button and select the Paper tab. Basics Copying Printing Scanning Faxing Troubleshooting Index Copying 24 3 Select the Copy/Fax tab. 4 Click Printer Properties. 5 Customize the copy settings. 6 Click OK. Original 2 x 2 3 x 3 4 x 4 Lexmark X63

User's Guide for Windows 98, Me, and 2000
Page 37
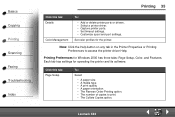
... single document from the software application Open Printer Properties or Printing Preferences from an application to change printer settings only for the documents in the application you make changes to customize your print job. Lexmark X63 Customizing print settings The software includes several... applications that let you are currently creating. 1 Open the application File menu. 2 Choose Print (or Printer) Setup. 3 In the Printer Setup dialog box, click Properties, Options,...
... single document from the software application Open Printer Properties or Printing Preferences from an application to change printer settings only for the documents in the application you make changes to customize your print job. Lexmark X63 Customizing print settings The software includes several... applications that let you are currently creating. 1 Open the application File menu. 2 Choose Print (or Printer) Setup. 3 In the Printer Setup dialog box, click Properties, Options,...

User's Guide for Windows 98, Me, and 2000
Page 38
.../ Quality, and Advanced. Select • A color setting. • A type of your document. The first page will be on top of the stack in the paper exit tray. • Collate your document pages. Lexmark X63 Basics Copying Printing Scanning Faxing Troubleshooting Index Printing 30 Printer Properties for operating the printer and its software. Click this...
.../ Quality, and Advanced. Select • A color setting. • A type of your document. The first page will be on top of the stack in the paper exit tray. • Collate your document pages. Lexmark X63 Basics Copying Printing Scanning Faxing Troubleshooting Index Printing 30 Printer Properties for operating the printer and its software. Click this...

User's Guide for Windows 98, Me, and 2000
Page 39
... Each tab has settings for Windows 2000 has five tabs: General, Options, Page Setup, Color, and Features. Note: Click the Help button on any tab in the Printer Properties to print. • The number of links. Print • Frames. • ...All linked documents. • A table of copies. Basics Copying Printing Scanning Faxing Troubleshooting Index Printing 31 Click this tab: General Options To: Select • A printer. • Which pages to access the printer driver Help. Lexmark...
... Each tab has settings for Windows 2000 has five tabs: General, Options, Page Setup, Color, and Features. Note: Click the Help button on any tab in the Printer Properties to print. • The number of links. Print • Frames. • ...All linked documents. • A table of copies. Basics Copying Printing Scanning Faxing Troubleshooting Index Printing 31 Click this tab: General Options To: Select • A printer. • Which pages to access the printer driver Help. Lexmark...

User's Guide for Windows 98, Me, and 2000
Page 40
... Scanning Faxing Troubleshooting Index Printing 32 Click this tab: Page Setup Color Features To: Select • A paper size. • A media type. • A print quality. • A paper orientation. • The Reverse Order Printing option. • The number of copies to access the printer driver Help. Note: Click the Help button on any tab...
... Scanning Faxing Troubleshooting Index Printing 32 Click this tab: Page Setup Color Features To: Select • A paper size. • A media type. • A print quality. • A paper orientation. • The Reverse Order Printing option. • The number of copies to access the printer driver Help. Note: Click the Help button on any tab...

User's Guide for Windows 98, Me, and 2000
Page 41
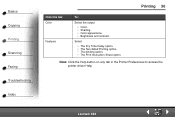
...Booklets. • Two-sided documents. Lexmark X63 Printer Properties for operating the printer and its software. Each tab has settings for Windows 98/Me has seven tabs: Job Finishing, Paper, Document/ Quality, Advanced, General, Details, and Color Management. Basics Copying Printing Scanning Faxing... Troubleshooting Index Printing 33 Customizing all documents from Windows Opening Printer Properties or Printing Preferences from Windows lets you apply the settings to...
...Booklets. • Two-sided documents. Lexmark X63 Printer Properties for operating the printer and its software. Each tab has settings for Windows 98/Me has seven tabs: Job Finishing, Paper, Document/ Quality, Advanced, General, Details, and Color Management. Basics Copying Printing Scanning Faxing... Troubleshooting Index Printing 33 Customizing all documents from Windows Opening Printer Properties or Printing Preferences from Windows lets you apply the settings to...
User's Guide for Windows 98, Me, and 2000
Page 43
...its software. Each tab has settings for Windows 2000 has three tabs: Page Setup, Color, and Features. Note: Click the Help button on any tab in the Printer Properties or Printing Preferences to print. • The Collate Copies option. Basics Copying... of copies to access the printer driver Help. Click this tab: Details Color Management To: • Add or delete printer ports or drivers. • Select a printer driver. • Capture printer ports. • Set timeout settings. • Customize spool and port settings. Set color profiles for the printer. Lexmark X63
...its software. Each tab has settings for Windows 2000 has three tabs: Page Setup, Color, and Features. Note: Click the Help button on any tab in the Printer Properties or Printing Preferences to print. • The Collate Copies option. Basics Copying... of copies to access the printer driver Help. Click this tab: Details Color Management To: • Add or delete printer ports or drivers. • Select a printer driver. • Capture printer ports. • Set timeout settings. • Customize spool and port settings. Set color profiles for the printer. Lexmark X63
User's Guide for Windows 98, Me, and 2000
Page 44
Select • The Dry Time Delay option. • The Two-Sided Printing option. • The binding option. • The Print Instruction Sheet option. Lexmark X63 Basics Copying Printing Scanning Faxing Troubleshooting Index Printing 36 Click this tab: Color Features To: Select the output • Color. • Shading. • Color appearance. • Brightness and contrast. Note: Click the Help button on any tab in the Printer Preferences to access the printer driver Help.
Select • The Dry Time Delay option. • The Two-Sided Printing option. • The binding option. • The Print Instruction Sheet option. Lexmark X63 Basics Copying Printing Scanning Faxing Troubleshooting Index Printing 36 Click this tab: Color Features To: Select the output • Color. • Shading. • Color appearance. • Brightness and contrast. Note: Click the Help button on any tab in the Printer Preferences to access the printer driver Help.

User's Guide for Windows 98, Me, and 2000
Page 45
... Paper Type area, select Iron-On Transfer. Note: Your application may override the envelope settings in Printer Properties. Note: We recommend printing an image on plain paper before printing it on an iron-on inkjet paper. Lexmark X63 From the Paper Type area, select Greeting Card Stock. Basics Copying Printing Scanning Faxing Troubleshooting... Paper or Page Setup Document/Quality Iron-on transfers Document/Quality or Page Setup To make these selections: 1 From the Paper Size area, scroll to Printer Properties. To change printer settings for printing most documents on transfer.
... Paper Type area, select Iron-On Transfer. Note: Your application may override the envelope settings in Printer Properties. Note: We recommend printing an image on plain paper before printing it on an iron-on inkjet paper. Lexmark X63 From the Paper Type area, select Greeting Card Stock. Basics Copying Printing Scanning Faxing Troubleshooting... Paper or Page Setup Document/Quality Iron-on transfers Document/Quality or Page Setup To make these selections: 1 From the Paper Size area, scroll to Printer Properties. To change printer settings for printing most documents on transfer.

User's Guide for Windows 98, Me, and 2000
Page 46
... dry before stacking. From the Paper Type area, select Coated Paper. Note: When printing photos, remove each transparency as it exits the printer and let it dry before stacking. Lexmark X63 From the Paper Type area, select Transparency. Basics Copying Printing Scanning Faxing Troubleshooting Index Printing 38 When printing on: Click this...
... dry before stacking. From the Paper Type area, select Coated Paper. Note: When printing photos, remove each transparency as it exits the printer and let it dry before stacking. Lexmark X63 From the Paper Type area, select Transparency. Basics Copying Printing Scanning Faxing Troubleshooting Index Printing 38 When printing on: Click this...


