User Manual
Page 39
... list. 3 Follow the instructions on the computer screen. Returning Lexmark cartridges for reuse or recycling The Lexmark Cartridge Collection Program diverts millions of . To return Lexmark cartridges for the multiple settings that came in your area. You can reuse the box that the cartridge came with your printer or cartridge and use the contact information provided. Note: See the...
... list. 3 Follow the instructions on the computer screen. Returning Lexmark cartridges for reuse or recycling The Lexmark Cartridge Collection Program diverts millions of . To return Lexmark cartridges for the multiple settings that came in your area. You can reuse the box that the cartridge came with your printer or cartridge and use the contact information provided. Note: See the...
User Manual
Page 66
... withstand temperatures up to 220°C (428°F) if Label Weight is recommended. Printing 66 Adhesive material contaminates the printer and could void the printer and cartridge warranties. • Do not use labels with chemicals that : - Select this setting using card stock Card stock is... not possible, remove a 1.6 mm (0.06 in .) away from the printer control panel Paper menu. - Partial sheets also contaminate the printer and the cartridge with adhesive, and could void the warranty. • If zone coating of its variable characteristics, such...
... withstand temperatures up to 220°C (428°F) if Label Weight is recommended. Printing 66 Adhesive material contaminates the printer and could void the printer and cartridge warranties. • Do not use labels with chemicals that : - Select this setting using card stock Card stock is... not possible, remove a 1.6 mm (0.06 in .) away from the printer control panel Paper menu. - Partial sheets also contaminate the printer and the cartridge with adhesive, and could void the warranty. • If zone coating of its variable characteristics, such...

User Manual
Page 122
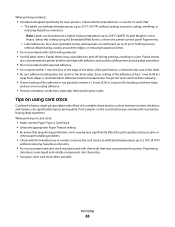
...MM-YYYY YYYY-MM-DD Time Format 12 hour A.M./P.M. 24 hour clock Alarms Alarm Control Cartridge Alarm Timeouts Power Saver Disabled 1-240 Timeouts Screen Timeout 15-300 Description Instructs the printer to run the setup wizard Notes: • Yes is the factory default setting. ... of numbers separated by the country selection in seconds the printer waits before some systems begin entering a minimum power state. Specifies the printer factory default measurements. Note: 30 minutes is 12 hour A.M./P.M. Formats the printer time Note: The factory default setting is the factory default...
...MM-YYYY YYYY-MM-DD Time Format 12 hour A.M./P.M. 24 hour clock Alarms Alarm Control Cartridge Alarm Timeouts Power Saver Disabled 1-240 Timeouts Screen Timeout 15-300 Description Instructs the printer to run the setup wizard Notes: • Yes is the factory default setting. ... of numbers separated by the country selection in seconds the printer waits before some systems begin entering a minimum power state. Specifies the printer factory default measurements. Note: 30 minutes is 12 hour A.M./P.M. Formats the printer time Note: The factory default setting is the factory default...
User Manual
Page 148
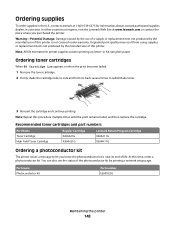
... the photoconductor kit by the manufacturer of this printer is not covered under warranty. Recommended toner cartridges and part numbers Part Name Toner Cartridge High Yield Toner Cartridge Regular Cartridge X264A21G X264H21G Lexmark Return Program Cartridge X264A11G X264H11G Ordering a photoconductor kit The printer issues a message to redistribute toner. 3 Reinsert the cartridge and continue printing. Note: Repeat this time, order...
... the photoconductor kit by the manufacturer of this printer is not covered under warranty. Recommended toner cartridges and part numbers Part Name Toner Cartridge High Yield Toner Cartridge Regular Cartridge X264A21G X264H21G Lexmark Return Program Cartridge X264A11G X264H11G Ordering a photoconductor kit The printer issues a message to redistribute toner. 3 Reinsert the cartridge and continue printing. Note: Repeat this time, order...

User Manual
Page 149
... pad ADF separator roll Part number 40X5470 40X5472 40X5471 Replacing supplies Replacing the toner cartridge When 88 Cartridge is left in your cartridge by pressing the button on the left side of the printer and lowering the door. 1 2 Maintaining the printer 149 To replace the toner cartridge: 1 Open the front door by printing a menu settings page.
... pad ADF separator roll Part number 40X5470 40X5472 40X5471 Replacing supplies Replacing the toner cartridge When 88 Cartridge is left in your cartridge by pressing the button on the left side of the printer and lowering the door. 1 2 Maintaining the printer 149 To replace the toner cartridge: 1 Open the front door by printing a menu settings page.
User Manual
Page 150
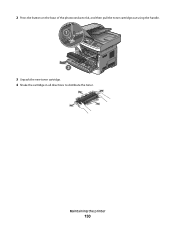
Maintaining the printer 150 2 Press the button on the base of the photoconductor kit, and then pull the toner cartridge out using the handle. 1 2 3 Unpack the new toner cartridge. 4 Shake the cartridge in all directions to distribute the toner.
Maintaining the printer 150 2 Press the button on the base of the photoconductor kit, and then pull the toner cartridge out using the handle. 1 2 3 Unpack the new toner cartridge. 4 Shake the cartridge in all directions to distribute the toner.

User Manual
Page 151
... of the photoconductor kit. Note: The photoconductor kit is one item only. Replacing the photoconductor kit The printer automatically notifies you should immediately order a new photoconductor kit. The cartridge clicks into place when correctly installed. 6 Close the front door. When 84 PC Kit life warning or...or 84 Replace PC Kit on the tracks of the photoconductor kit by aligning the rollers on the toner cartridge with the arrows on the display. While the printer may continue to function properly after the photoconductor kit has reached its official end-of-life, print quality ...
... of the photoconductor kit. Note: The photoconductor kit is one item only. Replacing the photoconductor kit The printer automatically notifies you should immediately order a new photoconductor kit. The cartridge clicks into place when correctly installed. 6 Close the front door. When 84 PC Kit life warning or...or 84 Replace PC Kit on the tracks of the photoconductor kit by aligning the rollers on the toner cartridge with the arrows on the display. While the printer may continue to function properly after the photoconductor kit has reached its official end-of-life, print quality ...

User Manual
Page 152
Pull the toner cartridge up and out using the handle. 2 1 Maintaining the printer 152 To replace the photoconductor kit: 1 Open the front door by pressing the button on the left side of the printer and lowering the front door. 2 Pull the photoconductor kit and toner cartridge out of the printer as a unit by pulling on the toner cartridge handle. 1 2 3 3 Place the unit on a flat, clean surface. 4 Press the button on the base of the photoconductor kit.
Pull the toner cartridge up and out using the handle. 2 1 Maintaining the printer 152 To replace the photoconductor kit: 1 Open the front door by pressing the button on the left side of the printer and lowering the front door. 2 Pull the photoconductor kit and toner cartridge out of the printer as a unit by pulling on the toner cartridge handle. 1 2 3 3 Place the unit on a flat, clean surface. 4 Press the button on the base of the photoconductor kit.
User Manual
Page 153
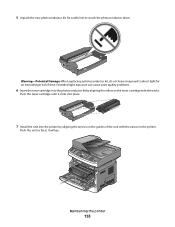
... it clicks into place. 7 Install the unit into the photoconductor kit by aligning the arrows on the toner cartridge with the arrows in the printer. Warning-Potential Damage: When replacing a photoconductor kit, do not leave it will go. Push the unit as far as it exposed to touch... the photoconductor drum. 5 Unpack the new photoconductor kit. Maintaining the printer 153 Extended light exposure can cause print quality problems. 6 Insert the toner cartridge into the printer by aligning the rollers on the guides of time.
... it clicks into place. 7 Install the unit into the photoconductor kit by aligning the arrows on the toner cartridge with the arrows in the printer. Warning-Potential Damage: When replacing a photoconductor kit, do not leave it will go. Push the unit as far as it exposed to touch... the photoconductor drum. 5 Unpack the new photoconductor kit. Maintaining the printer 153 Extended light exposure can cause print quality problems. 6 Insert the toner cartridge into the printer by aligning the rollers on the guides of time.

User Manual
Page 156
.... Note: If you may also choose not to see tray settings, the level of toner in the toner cartridge, the percentage of life remaining in the photoconductor kit, and capacity measurements of the printer, then print a network setup page and locate the IP address in the TCP/IP section. 2 Click Reports.... Server. Note: If you do not know the IP address of your Web browser. To access the device status: 1 Type the printer IP address in the address field of the printer, print a network setup page and locate the IP address in the TCP/IP section. 2 Click Settings. 3 Under Other Settings, ...
.... Note: If you may also choose not to see tray settings, the level of toner in the toner cartridge, the percentage of life remaining in the photoconductor kit, and capacity measurements of the printer, then print a network setup page and locate the IP address in the TCP/IP section. 2 Click Reports.... Server. Note: If you do not know the IP address of your Web browser. To access the device status: 1 Type the printer IP address in the address field of the printer, print a network setup page and locate the IP address in the TCP/IP section. 2 Click Settings. 3 Under Other Settings, ...
User Manual
Page 159
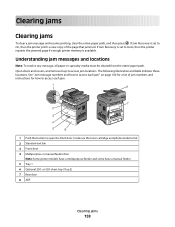
Inside are the toner cartridge and photoconductor kit. 2 Standard exit bin 3 Front door 4 Multipurpose or manual feeder door Note: Some printer models have a multipurpose feeder and some have a manual feeder 5 Tray 1 6 Optional 250- If Jam Recovery is available. Open doors and covers, and remove...path. The following illustration and table indicate these locations. If Jam Recovery is set to Auto, then the printer reprints the jammed page if enough printer memory is set to On, then the printer prints a new copy of jam numbers and instructions for how to access each jam. 1 Push the ...
Inside are the toner cartridge and photoconductor kit. 2 Standard exit bin 3 Front door 4 Multipurpose or manual feeder door Note: Some printer models have a multipurpose feeder and some have a manual feeder 5 Tray 1 6 Optional 250- If Jam Recovery is available. Open doors and covers, and remove...path. The following illustration and table indicate these locations. If Jam Recovery is set to Auto, then the printer reprints the jammed page if enough printer memory is set to On, then the printer prints a new copy of jam numbers and instructions for how to access each jam. 1 Push the ...
User Manual
Page 161
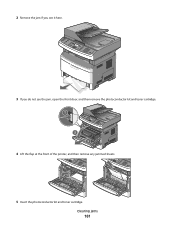
Clearing jams 161 2 Remove the jam if you see it here. 3 If you do not see the jam, open the front door, and then remove the photoconductor kit and toner cartridge. 1 2 3 4 Lift the flap at the front of the printer, and then remove any jammed sheets. 5 Insert the photoconductor kit and toner cartridge.
Clearing jams 161 2 Remove the jam if you see it here. 3 If you do not see the jam, open the front door, and then remove the photoconductor kit and toner cartridge. 1 2 3 4 Lift the flap at the front of the printer, and then remove any jammed sheets. 5 Insert the photoconductor kit and toner cartridge.
User Manual
Page 162
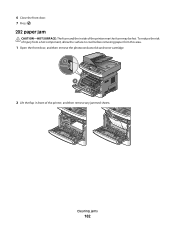
To reduce the risk of injury from a hot component, allow the surface to cool before removing paper from this area. 1 Open the front door, and then remove the photoconductor kit and toner cartridge. 1 2 3 2 Lift the flap in front of the printer near the fuser may be hot. Clearing jams 162 6 Close the front door. 7 Press . 202 paper jam CAUTION-HOT SURFACE: The fuser and the inside of the printer, and then remove any jammed sheets.
To reduce the risk of injury from a hot component, allow the surface to cool before removing paper from this area. 1 Open the front door, and then remove the photoconductor kit and toner cartridge. 1 2 3 2 Lift the flap in front of the printer near the fuser may be hot. Clearing jams 162 6 Close the front door. 7 Press . 202 paper jam CAUTION-HOT SURFACE: The fuser and the inside of the printer, and then remove any jammed sheets.

User Manual
Page 168
If the sheet is visible, gently pull the jammed sheet out. 251 paper jam A sheet of the printer, and then remove any jams. 3 Reinsert the photoconductor kit and toner cartridge. 4 Close the front door. 5 Press . If it is not visible, complete the following steps: 1 Open the front door, and then remove the photoconductor kit and toner cartridge. 1 2 3 2 Lift the flap at the front of paper failed to feed from the multipurpose feeder. Clearing jams 168
If the sheet is visible, gently pull the jammed sheet out. 251 paper jam A sheet of the printer, and then remove any jams. 3 Reinsert the photoconductor kit and toner cartridge. 4 Close the front door. 5 Press . If it is not visible, complete the following steps: 1 Open the front door, and then remove the photoconductor kit and toner cartridge. 1 2 3 2 Lift the flap at the front of paper failed to feed from the multipurpose feeder. Clearing jams 168
User Manual
Page 177
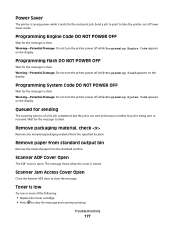
...clear the message. Troubleshooting 177 Queued for the message to clear the message and continue printing. Power Saver The printer is closed. Send a job to print to take the printer out of a fax job completed, but the job is not sent yet because another fax job is being ... remaining packaging material from standard output bin Remove the stack of the following: • Replace the toner cartridge. • Press to clear. Warning-Potential Damage: Do not turn the printer power off while Programming Engine Code appears on the display. Wait for sending The scanning process of Power ...
...clear the message. Troubleshooting 177 Queued for the message to clear the message and continue printing. Power Saver The printer is closed. Send a job to print to take the printer out of a fax job completed, but the job is not sent yet because another fax job is being ... remaining packaging material from standard output bin Remove the stack of the following: • Replace the toner cartridge. • Press to clear. Warning-Potential Damage: Do not turn the printer power off while Programming Engine Code appears on the display. Wait for sending The scanning process of Power ...
User Manual
Page 178
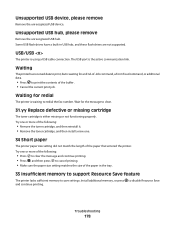
...USB flash drives have a built-in the tray. 35 Insufficient memory to support Resource Save feature The printer lacks sufficient memory to clear. 31.yy Replace defective or missing cartridge The toner cartridge is either missing or not functioning properly. Waiting for the message to save settings. Try one or ...the toner cartridge, and then install a new one or more of the following : • Press to clear the message and continue printing. • Press , and then press to print the contents of the paper in USB hub, and these flash drives are not supported. USB/USB The printer is the...
...USB flash drives have a built-in the tray. 35 Insufficient memory to support Resource Save feature The printer lacks sufficient memory to clear. 31.yy Replace defective or missing cartridge The toner cartridge is either missing or not functioning properly. Waiting for the message to save settings. Try one or ...the toner cartridge, and then install a new one or more of the following : • Press to clear the message and continue printing. • Press , and then press to print the contents of the paper in USB hub, and these flash drives are not supported. USB/USB The printer is the...
User Manual
Page 181
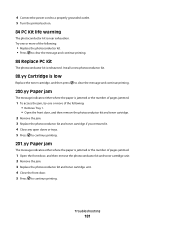
... more of the following : • Remove Tray 1. • Open the front door, and then remove the photoconductor kit and toner cartridge. 2 Remove the jam. 3 Replace the photoconductor kit and toner cartridge if you removed it. 4 Close any open doors or trays. 5 Press to continue printing. 201.yy Paper jam The message indicates... and continue printing. 84 Replace PC Kit The photoconductor kit is near exhaustion. Troubleshooting 181 4 Connect the power cord to a properly grounded outlet. 5 Turn the printer back on. 84 PC Kit life warning The photoconductor kit is exhausted.
... more of the following : • Remove Tray 1. • Open the front door, and then remove the photoconductor kit and toner cartridge. 2 Remove the jam. 3 Replace the photoconductor kit and toner cartridge if you removed it. 4 Close any open doors or trays. 5 Press to continue printing. 201.yy Paper jam The message indicates... and continue printing. 84 Replace PC Kit The photoconductor kit is near exhaustion. Troubleshooting 181 4 Connect the power cord to a properly grounded outlet. 5 Turn the printer back on. 84 PC Kit life warning The photoconductor kit is exhausted.

User Manual
Page 183
... following: • Remove Tray 1. • Open the front door, and then remove the photoconductor kit and toner cartridge. • Remove Tray 2. 2 Remove the jam. 3 Replace the photoconductor kit and toner cartridge if you removed them. 4 Close any open doors or trays. 5 Press to continue printing. 24x.yy Paper jam...pages through the ADF. 1 Remove all pages from the standard exit bin. 2 Check the paper size to ensure that it is supported by the printer. 3 Press to continue printing. 251.yy Paper jam The message indicates either where the paper is jammed or the number of pages jammed. 1 ...
... following: • Remove Tray 1. • Open the front door, and then remove the photoconductor kit and toner cartridge. • Remove Tray 2. 2 Remove the jam. 3 Replace the photoconductor kit and toner cartridge if you removed them. 4 Close any open doors or trays. 5 Press to continue printing. 24x.yy Paper jam...pages through the ADF. 1 Remove all pages from the standard exit bin. 2 Check the paper size to ensure that it is supported by the printer. 3 Press to continue printing. 251.yy Paper jam The message indicates either where the paper is jammed or the number of pages jammed. 1 ...
User Manual
Page 194
... address field of times you have extension phones on the same line as the printer, or subscribe to consider adding a second telephone line for temporarily disabling Call Waiting. THE TONER MAY BE LOW 88 Cartridge low appears when the toner is low. To enable both Voice Mail and the... printer to answer calls, you may disrupt fax transmissions. CHECK THE RING COUNT DELAY SETTINGS The ring count...
... address field of times you have extension phones on the same line as the printer, or subscribe to consider adding a second telephone line for temporarily disabling Call Waiting. THE TONER MAY BE LOW 88 Cartridge low appears when the toner is low. To enable both Voice Mail and the... printer to answer calls, you may disrupt fax transmissions. CHECK THE RING COUNT DELAY SETTINGS The ring count...
User Manual
Page 195
...button to put the printer in Fax mode. Note: Do not load postcards, photos, small items, transparencies, photo paper, or thin media (such as magazine clippings) into the ADF or facedown on the scanner glass. Note: If you experience faded print, replace the cartridge. Can receive but... not send faxes These are possible solutions. MAKE SURE THE FAX TRANSMISSION SPEED IS NOT SET TOO HIGH Decrease the incoming fax transmission speed: 1 Type the printer IP address into the address field of the telephone...
...button to put the printer in Fax mode. Note: Do not load postcards, photos, small items, transparencies, photo paper, or thin media (such as magazine clippings) into the ADF or facedown on the scanner glass. Note: If you experience faded print, replace the cartridge. Can receive but... not send faxes These are possible solutions. MAKE SURE THE FAX TRANSMISSION SPEED IS NOT SET TOO HIGH Decrease the incoming fax transmission speed: 1 Type the printer IP address into the address field of the telephone...


