
Setup Guide (2.8 MB)
Page 2
... and easily accessible. • Refer service or repairs, other than those specified herein may result in hazardous radiation exposure. • Your product uses a printing process that heats the print media, and the heat may be connected to Lexmark International, Inc., Department F95 / 035-3, 740 West New Circle Road, Lexington, Kentucky 40550, U.S.A. Exercise CAUTION: Use of controls or adjustments or performance of printer commands (language) and...
... and easily accessible. • Refer service or repairs, other than those specified herein may result in hazardous radiation exposure. • Your product uses a printing process that heats the print media, and the heat may be connected to Lexmark International, Inc., Department F95 / 035-3, 740 West New Circle Road, Lexington, Kentucky 40550, U.S.A. Exercise CAUTION: Use of controls or adjustments or performance of printer commands (language) and...

Setup Guide (2.8 MB)
Page 4
Connecting the printer to a 2500-sheet drawer and a 500-sheet drawer 25 Removing packaging from the trays 28 Attaching the printer pocket 29 Attaching the operator panel overlay 31 Installing the toner cartridge 32 Installing the photoconductor cartridge 35 Step 6: Install memory and option cards 45 Accessing the printer system board 46 Installing memory cards 48 Installing option cards 52 Installing a hard disk 55 Reinstalling the system board access cover 59 Step 7: Install the duplex option 62 Attaching the manual feed unit 64 Attaching the duplex unit 67 Adjusting the...
Connecting the printer to a 2500-sheet drawer and a 500-sheet drawer 25 Removing packaging from the trays 28 Attaching the printer pocket 29 Attaching the operator panel overlay 31 Installing the toner cartridge 32 Installing the photoconductor cartridge 35 Step 6: Install memory and option cards 45 Accessing the printer system board 46 Installing memory cards 48 Installing option cards 52 Installing a hard disk 55 Reinstalling the system board access cover 59 Step 7: Install the duplex option 62 Attaching the manual feed unit 64 Attaching the duplex unit 67 Adjusting the...

Setup Guide (2.8 MB)
Page 5
...-sheet tray (tray 4 136 Step 11: Attach cables 139 Connecting an external fax modem 142 Connecting an infrared adapter 144 Step 12: Verify setup 145 Printing the menu settings page 145 Changing the Paper Type setting 147 Changing the Paper Size setting 148 Linking trays 149 Configuring output bins 150 Step 13: Load MarkVision and drivers 152 Drivers 153 MarkVision 153 Step 14: Set up network addresses 155 Printing a network setup page 155 TCP/IP 157 Novell NetWare 162 AppleTalk 163 OS/2 Warp server...
...-sheet tray (tray 4 136 Step 11: Attach cables 139 Connecting an external fax modem 142 Connecting an infrared adapter 144 Step 12: Verify setup 145 Printing the menu settings page 145 Changing the Paper Type setting 147 Changing the Paper Size setting 148 Linking trays 149 Configuring output bins 150 Step 13: Load MarkVision and drivers 152 Drivers 153 MarkVision 153 Step 14: Set up network addresses 155 Printing a network setup page 155 TCP/IP 157 Novell NetWare 162 AppleTalk 163 OS/2 Warp server...
Setup Guide (2.8 MB)
Page 7
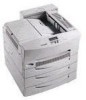
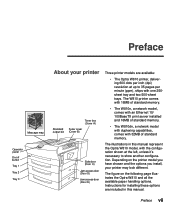
... following page illustrates the Optra W810 and all the available paper handling options. The figure on the printer model you have chosen and the options you install, your printer Standard output bin Toner box (Cover A) Fuser cover (Cover B) Side door (Door C) Jam access door (Door D) Jam access door (Door E) Three printer models are included in this manual. The W810 printer comes with 16MB of standard memory. • The W810n, a network model, comes with an Ethernet 10/ 100BaseTX print server installed and 16MB of standard memory. Instructions for installing these options are...
... following page illustrates the Optra W810 and all the available paper handling options. The figure on the printer model you have chosen and the options you install, your printer Standard output bin Toner box (Cover A) Fuser cover (Cover B) Side door (Door C) Jam access door (Door D) Jam access door (Door E) Three printer models are included in this manual. The W810 printer comes with 16MB of standard memory. • The W810n, a network model, comes with an Ethernet 10/ 100BaseTX print server installed and 16MB of standard memory. Instructions for installing these options are...

Setup Guide (2.8 MB)
Page 9
... Print Servers. Preface ix Conventions It may help you to install printer drivers and utilities. About this book: • Operator panel buttons are printed in a boldface type: Press Go after changing a menu setting. • Messages and menu items that appear on the printer operator panel display are also printed in a boldface type: If Replace Toner appears on the operator panel display, install a new toner cartridge. • Menu items you can select from software programs displayed on your new Optra W810, Optra W810n, or Optra W810dn printer...
... Print Servers. Preface ix Conventions It may help you to install printer drivers and utilities. About this book: • Operator panel buttons are printed in a boldface type: Press Go after changing a menu setting. • Messages and menu items that appear on the printer operator panel display are also printed in a boldface type: If Replace Toner appears on the operator panel display, install a new toner cartridge. • Menu items you can select from software programs displayed on your new Optra W810, Optra W810n, or Optra W810dn printer...
Setup Guide (2.8 MB)
Page 13
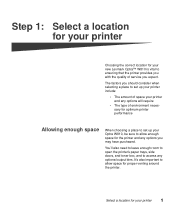
... quality of environment necessary for optimum printer performance Allowing enough space When choosing a place to set up your printer 1 Select a location for your Optra W810, be sure to allow enough space for proper venting around the printer. It's also important to allow space for the printer and any optional output bins. You'll also need to leave enough room to open the printer's paper trays, side doors, and toner...
... quality of environment necessary for optimum printer performance Allowing enough space When choosing a place to set up your printer 1 Select a location for your Optra W810, be sure to allow enough space for proper venting around the printer. It's also important to allow space for the printer and any optional output bins. You'll also need to leave enough room to open the printer's paper trays, side doors, and toner...

Setup Guide (2.8 MB)
Page 47
Each photoconductor cartridge supports approximately 90,000 pages of its life. Reinserting the photoconductor cartridge in the same printer automatically resets the internal counter that require periodic replacement. The printer displays a message when it 's time to replace the photoconductor. Internal printer settings that vary from printer to replace the cartridge. Set up the printer 35 You may want to overdevelop or underdevelop images, resulting in any other printer parts that determines when it 's time to printer could...
Each photoconductor cartridge supports approximately 90,000 pages of its life. Reinserting the photoconductor cartridge in the same printer automatically resets the internal counter that require periodic replacement. The printer displays a message when it 's time to replace the photoconductor. Internal printer settings that vary from printer to replace the cartridge. Set up the printer 35 You may want to overdevelop or underdevelop images, resulting in any other printer parts that determines when it 's time to printer could...

Setup Guide (2.8 MB)
Page 157
.... If Power Saver is set On (the factory default), Power Saver replaces the Ready status message if the printer has not received a print job during a specified period of doors, trays, and bins referenced in messages. 2 From the printer operator panel, press the Menu> button to the buttons on the operator panel. Refer to the Complete Printer Reference on the Lexmark Web site. 1 Turn the printer on. Refer to the User's Reference for details about using the printer operator panel and changing menu settings...
.... If Power Saver is set On (the factory default), Power Saver replaces the Ready status message if the printer has not received a print job during a specified period of doors, trays, and bins referenced in messages. 2 From the printer operator panel, press the Menu> button to the buttons on the operator panel. Refer to the Complete Printer Reference on the Lexmark Web site. 1 Turn the printer on. Refer to the User's Reference for details about using the printer operator panel and changing menu settings...

Setup Guide (2.8 MB)
Page 159
... to use the Paper Type setting to make printing more information.) For these settings. PAPER MENU appears on the second line of media loaded in the tray or feeder. If you change the media in the sources: plain paper, letterhead, transparencies, card stock, a custom media you specified. Refer to the Complete Printer Reference for more information about the paper types supported by each paper source, as well as the tray linking function. (See "Linking trays" on page 149...
... to use the Paper Type setting to make printing more information.) For these settings. PAPER MENU appears on the second line of media loaded in the tray or feeder. If you change the media in the sources: plain paper, letterhead, transparencies, card stock, a custom media you specified. Refer to the Complete Printer Reference for more information about the paper types supported by each paper source, as well as the tray linking function. (See "Linking trays" on page 149...

Setup Guide (2.8 MB)
Page 161
... not enabled. Linking trays If you load the same paper size and type in all the trays you can also link that holds up to 1250 sheets. Verify setup 149 rect size from the factory, tray linking is shipped from the Tray 1 Size menu. If you installed an optional drawer, you can effectively create a single paper source that tray for a total capacity of 1750 sheets or 3750 sheets, depending on the standard Optra W810 printer model...
... not enabled. Linking trays If you load the same paper size and type in all the trays you can also link that holds up to 1250 sheets. Verify setup 149 rect size from the factory, tray linking is shipped from the Tray 1 Size menu. If you installed an optional drawer, you can effectively create a single paper source that tray for a total capacity of 1750 sheets or 3750 sheets, depending on the standard Optra W810 printer model...
Setup Guide (2.8 MB)
Page 165
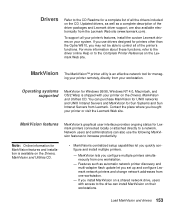
...: Online information for Lexmark printers connected locally or attached directly to a network. MarkVision lets you quickly configure and install multiple printers. - ing your printer remotely, directly from your printer or visit the Lexmark Web site. MarkVision features MarkVision's graphical user interface provides ongoing status for MarkVision features and installation is shipped with access to control all of all your printer's features, install the custom Lexmark drivers on your printer on their workstations. Load MarkVision and drivers 153...
...: Online information for Lexmark printers connected locally or attached directly to a network. MarkVision lets you quickly configure and install multiple printers. - ing your printer remotely, directly from your printer or visit the Lexmark Web site. MarkVision features MarkVision's graphical user interface provides ongoing status for MarkVision features and installation is shipped with access to control all of all your printer's features, install the custom Lexmark drivers on your printer on their workstations. Load MarkVision and drivers 153...
Setup Guide (2.8 MB)
Page 167
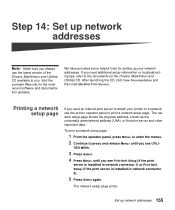
... recent software and documentation updates. Step 14: Set up network addresses Note: Make sure you always use the printer operator panel to press and release Menu> until you used an internal print server to attach your network addresses. If you need additional setup information or troubleshooting tips, refer to you. The network setup page prints. After launching the CD, click View Documentation and then click MarkNet Print Servers. To print a network setup page: 1 From the operator panel, press Menu...
... recent software and documentation updates. Step 14: Set up network addresses Note: Make sure you always use the printer operator panel to press and release Menu> until you used an internal print server to attach your network addresses. If you need additional setup information or troubleshooting tips, refer to you. The network setup page prints. After launching the CD, click View Documentation and then click MarkNet Print Servers. To print a network setup page: 1 From the operator panel, press Menu...

Setup Guide (2.8 MB)
Page 169
.... For example, Network Option 2 appears on the operator panel display if a MarkNet card is installed in network connector 2. 2 Use the menu buttons to set the IP address not documented in the address. Setting the IP address, netmask, and gateway You must be standing at the printer to use the printer operator panel to set the IP address, netmask, and gateway inside the print server. To verify the assignment has happened, print a network setup page and make sure the...
.... For example, Network Option 2 appears on the operator panel display if a MarkNet card is installed in network connector 2. 2 Use the menu buttons to set the IP address not documented in the address. Setting the IP address, netmask, and gateway You must be standing at the printer to use the printer operator panel to set the IP address, netmask, and gateway inside the print server. To verify the assignment has happened, print a network setup page and make sure the...

Setup Guide (2.8 MB)
Page 171
... print server services this method. Managing printers with your Web browser Once the IP address has been set (using Windows NT Server 4.0 or later and running TCP/IP, you use (MSB or canonical). This section explains the setup for queue-based printing where network users print to add network support. 3 Select Print Server TCP/IP Setup Utility. To install the utility: 1 Launch the Drivers, MarkVision and Utilities CD. 2 Choose custom install to a queue defined on a Windows NT server. Setup...
... print server services this method. Managing printers with your Web browser Once the IP address has been set (using Windows NT Server 4.0 or later and running TCP/IP, you use (MSB or canonical). This section explains the setup for queue-based printing where network users print to add network support. 3 Select Print Server TCP/IP Setup Utility. To install the utility: 1 Launch the Drivers, MarkVision and Utilities CD. 2 Choose custom install to a queue defined on a Windows NT server. Setup...

Setup Guide (2.8 MB)
Page 174
Note: The default login name contains the characters !LEX plus all support files and installation procedures from the Lexmark Web site (www.lexmark.com) or from a Windows 95 or Windows 98 workstation running either Novell Client32 or Microsoft Client for NetWare networks. 1 Launch the Drivers, MarkVision and Utilities CD. 2 Choose custom install to add network support. 3 Select NetWare. 4 Install the Netware software component on the workstation. Look for NetWare jobs in...
Note: The default login name contains the characters !LEX plus all support files and installation procedures from the Lexmark Web site (www.lexmark.com) or from a Windows 95 or Windows 98 workstation running either Novell Client32 or Microsoft Client for NetWare networks. 1 Launch the Drivers, MarkVision and Utilities CD. 2 Choose custom install to add network support. 3 Select NetWare. 4 Install the Netware software component on the workstation. Look for NetWare jobs in...
Setup Guide (2.8 MB)
Page 176
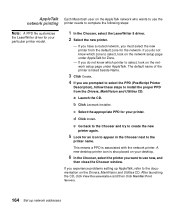
... MarkNet Print Servers. 164 Set up AppleTalk, refer to the documentation on the AppleTalk network who wants to use the network printing printer needs to complete the following steps: Note: A PPD file customizes the LaserWriter driver for your desktop. 6 In the Chooser, select the printer you experience problems setting up network addresses c Select the appropriate PPD for Zone. - If you want to select, look on the network setup page...
... MarkNet Print Servers. 164 Set up AppleTalk, refer to the documentation on the AppleTalk network who wants to use the network printing printer needs to complete the following steps: Note: A PPD file customizes the LaserWriter driver for your desktop. 6 In the Chooser, select the printer you experience problems setting up network addresses c Select the appropriate PPD for Zone. - If you want to select, look on the network setup page...

Setup Guide (2.8 MB)
Page 181
... equipment. Without a network card installed United States and Canada only Federal Communications Commission (FCC) Compliance Information Statement The Lexmark Optra W810 laser printer, Type 4023, has been tested and found to comply with the limits for any interference received, including interference that may result in a violation of purchase or service representative for a Class B computing device, use a properly shielded and grounded cable such as Lexmark part number 1329605. If...
... equipment. Without a network card installed United States and Canada only Federal Communications Commission (FCC) Compliance Information Statement The Lexmark Optra W810 laser printer, Type 4023, has been tested and found to comply with the limits for any interference received, including interference that may result in a violation of purchase or service representative for a Class B computing device, use a properly shielded and grounded cable such as Lexmark part number 1329605. If...
Setup Guide (2.8 MB)
Page 186
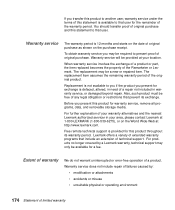
.... Free remote technical support is provided for a fee. You should transfer proof of original purchase and this statement to you if the product you present for warranty service, remove all programs, data, and removable storage media. When warranty service involves the exchange of a product or part, the item replaced becomes the property of a repair not included in need of the Remarketer or Lexmark...
.... Free remote technical support is provided for a fee. You should transfer proof of original purchase and this statement to you if the product you present for warranty service, remove all programs, data, and removable storage media. When warranty service involves the exchange of a product or part, the item replaced becomes the property of a repair not included in need of the Remarketer or Lexmark...

Setup Guide (2.8 MB)
Page 192
... sizes and types supported 121 memory cards flash 48 installing 48 printer 48 menu settings page printing 145 message map vii, 83, 110, 145 metal shield installing 59 removing 46 monitoring your printer using MarkVision 154 moving 2500-sheet optional drawer 4, 13 finisher 120 printer 4 multipurpose tray 122 N network attaching to 139 printing a setup page 155 setting up addresses 155 Novell NetWare configuring the print server 162 O operator panel display ix, 145 operator panel overlay 31 option cards installing 52, 55 internal print server 52 parallel/USB interface card 52 tri-port interface...
... sizes and types supported 121 memory cards flash 48 installing 48 printer 48 menu settings page printing 145 message map vii, 83, 110, 145 metal shield installing 59 removing 46 monitoring your printer using MarkVision 154 moving 2500-sheet optional drawer 4, 13 finisher 120 printer 4 multipurpose tray 122 N network attaching to 139 printing a setup page 155 setting up addresses 155 Novell NetWare configuring the print server 162 O operator panel display ix, 145 operator panel overlay 31 option cards installing 52, 55 internal print server 52 parallel/USB interface card 52 tri-port interface...

Setup Guide (2.8 MB)
Page 193
... 137 print side 124, 132, 137 size sensing 129, 148 sizes supported 121 paper feeding problems 129, 134 paper size label 135 Paper Size setting changing 122, 148 paper trays capacity 121 linking 149 loading 121 media supported 121 Paper Type setting changing 122, 147 parallel cable 139 parallel/USB interface card 52 photoconductor cartridge handling 38 installing 35 protecting from light 4, 38 removing 4 unpacking 35, 37 plugging in duplex unit 69 finisher 118 mailbox 97 manual feed unit 66 printer power cord 140 Power Saver setting 145 print server configuring 155 installed in network models...
... 137 print side 124, 132, 137 size sensing 129, 148 sizes supported 121 paper feeding problems 129, 134 paper size label 135 Paper Size setting changing 122, 148 paper trays capacity 121 linking 149 loading 121 media supported 121 Paper Type setting changing 122, 147 parallel cable 139 parallel/USB interface card 52 photoconductor cartridge handling 38 installing 35 protecting from light 4, 38 removing 4 unpacking 35, 37 plugging in duplex unit 69 finisher 118 mailbox 97 manual feed unit 66 printer power cord 140 Power Saver setting 145 print server configuring 155 installed in network models...

