
Setup Guide
Page 4
... board 24 Installing memory cards 25 Installing an optional firmware card 28 Installing option cards 30 Reinstalling the system board 33 Step 7: Install the optional duplex unit 34 Step 8: Secure the wheels and leveling feet 37 Step 9: Set up the optional mailbox 39 Removing the stacking arm 40 Unpacking the mailbox...
... board 24 Installing memory cards 25 Installing an optional firmware card 28 Installing option cards 30 Reinstalling the system board 33 Step 7: Install the optional duplex unit 34 Step 8: Secure the wheels and leveling feet 37 Step 9: Set up the optional mailbox 39 Removing the stacking arm 40 Unpacking the mailbox...
Setup Guide
Page 7
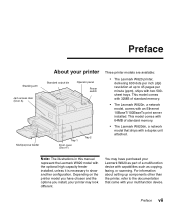
...this manual represent the Lexmark W820 model with the optional high capacity feeder installed, unless it is necessary to 45 pages per inch (dpi) resolution at up components other than the printer, refer to the documentation that ships with a duplex unit attached. Preface ...Stacking arm Jam access door (Door A) Multipurpose feeder About your printer Standard output bin Operator panel Power switch Tray 1 Front cover (Door F) Tray 2 Three printer models are available: • The Lexmark W820 printer, delivering 600 ...
...this manual represent the Lexmark W820 model with the optional high capacity feeder installed, unless it is necessary to 45 pages per inch (dpi) resolution at up components other than the printer, refer to the documentation that ships with a duplex unit attached. Preface ...Stacking arm Jam access door (Door A) Multipurpose feeder About your printer Standard output bin Operator panel Power switch Tray 1 Front cover (Door F) Tray 2 Three printer models are available: • The Lexmark W820 printer, delivering 600 ...
Setup Guide
Page 8
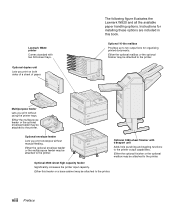
... may be attached to the printer. Either the optional finisher or the optional mailbox may be attached to the printer. viii Preface Optional duplex unit Lets you print without manual feeding. Optional 10-bin mailbox Provides up to the printer. Either the multipurpose feeder or the optional ... bins for installing these options are included in this feeder or a base cabinet may be attached to the printer output capabilities. Lexmark W820 printer Comes standard with transport unit Adds hole punching and stapling functions to the printer. The following figure illustrates the...
... may be attached to the printer. Either the optional finisher or the optional mailbox may be attached to the printer. viii Preface Optional duplex unit Lets you print without manual feeding. Optional 10-bin mailbox Provides up to the printer. Either the multipurpose feeder or the optional ... bins for installing these options are included in this feeder or a base cabinet may be attached to the printer output capabilities. Lexmark W820 printer Comes standard with transport unit Adds hole punching and stapling functions to the printer. The following figure illustrates the...

Setup Guide
Page 14
... amount of space indicated in the figure. 200 mm (8 in.) 700 mm (28 in.) 1(04834inm.)m With a duplex unit and a high capacity feeder or base cabinet When selecting a location for a printer with a high capacity feeder and duplex unit, make sure you install a base cabinet rather than a high capacity feeder, your printer will require...
... amount of space indicated in the figure. 200 mm (8 in.) 700 mm (28 in.) 1(04834inm.)m With a duplex unit and a high capacity feeder or base cabinet When selecting a location for a printer with a high capacity feeder and duplex unit, make sure you install a base cabinet rather than a high capacity feeder, your printer will require...
Setup Guide
Page 18
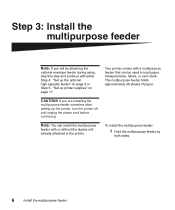
... attaching the optional envelope feeder during setup, skip this step and continue with a multipurpose feeder that can install the multipurpose feeder with or without the duplex unit already attached to load paper, transparencies, labels, or card stock.
... attaching the optional envelope feeder during setup, skip this step and continue with a multipurpose feeder that can install the multipurpose feeder with or without the duplex unit already attached to load paper, transparencies, labels, or card stock.

Setup Guide
Page 34
... operator panel, and then press it into place. 4 Peel the protective covering away from the overlay. Task Install memory and option cards Install the optional duplex unit Secure the wheels and leveling feet Go to the printer operator panel. 1 Locate the overlay packaged with your printer. 2 Peel the protective backing off...
... operator panel, and then press it into place. 4 Peel the protective covering away from the overlay. Task Install memory and option cards Install the optional duplex unit Secure the wheels and leveling feet Go to the printer operator panel. 1 Locate the overlay packaged with your printer. 2 Peel the protective backing off...

Setup Guide
Page 45
Reinstalling the system board 1 Gently push the system board back into the printer. 2 Tighten the two thumbscrews. 3 Reconnect any previously connected cables on the back of the printer. What do I do next? Task Install the optional duplex unit Secure the wheels and leveling feet Go to page ... 34 37 Install memory and option cards 33
Reinstalling the system board 1 Gently push the system board back into the printer. 2 Tighten the two thumbscrews. 3 Reconnect any previously connected cables on the back of the printer. What do I do next? Task Install the optional duplex unit Secure the wheels and leveling feet Go to page ... 34 37 Install memory and option cards 33

Setup Guide
Page 46
... unplug the power cord before installing the duplex unit. Refer to remove the packaging from its packaging. Note: If you print on the duplex unit: two stationary brackets and one extendable bracket. There are installing the duplex unit sometime after having previously installed the ...be removed before continuing. Extendable bracket To install the duplex unit: 1 Make sure the multipurpose feeder is open (down position). 2 Remove the duplex unit from under the plastic grid. Stationary brackets 34 Install the optional duplex unit If you are three metal brackets on both sides...
... unplug the power cord before installing the duplex unit. Refer to remove the packaging from its packaging. Note: If you print on the duplex unit: two stationary brackets and one extendable bracket. There are installing the duplex unit sometime after having previously installed the ...be removed before continuing. Extendable bracket To install the duplex unit: 1 Make sure the multipurpose feeder is open (down position). 2 Remove the duplex unit from under the plastic grid. Stationary brackets 34 Install the optional duplex unit If you are three metal brackets on both sides...

Setup Guide
Page 47
b Tilt the duplex unit toward the printer until the extendable metal bracket on the right snaps into place. 5 Pull out the cable on the left side of the duplex unit and fully extend it. 6 Attach the cable hook to the metal eye on the top of the multipurpose feeder. 3 Hold the duplex unit as shown. 4 Attach the duplex unit to the metal rods on the printer. a Holding the duplex unit parallel with the ground, attach the two stationary metal brackets on the duplex unit to the top of the multipurpose feeder. Install the optional duplex unit 35
b Tilt the duplex unit toward the printer until the extendable metal bracket on the right snaps into place. 5 Pull out the cable on the left side of the duplex unit and fully extend it. 6 Attach the cable hook to the metal eye on the top of the multipurpose feeder. 3 Hold the duplex unit as shown. 4 Attach the duplex unit to the metal rods on the printer. a Holding the duplex unit parallel with the ground, attach the two stationary metal brackets on the duplex unit to the top of the multipurpose feeder. Install the optional duplex unit 35

Setup Guide
Page 48
Do not remove paper before it is fully ejected. Note: When the duplex unit is in operation, the printer partially ejects paper, then draws it back into the connector labeled "Duplex" on the back of the printer. 7 Close the duplex unit by pushing it toward the printer until it latches into place. 8 Plug the duplex unit cable into the duplex unit before it is completely ejected or a paper jam may result. 36 Install the optional duplex unit
Do not remove paper before it is fully ejected. Note: When the duplex unit is in operation, the printer partially ejects paper, then draws it back into the connector labeled "Duplex" on the back of the printer. 7 Close the duplex unit by pushing it toward the printer until it latches into place. 8 Plug the duplex unit cable into the duplex unit before it is completely ejected or a paper jam may result. 36 Install the optional duplex unit
Setup Guide
Page 95
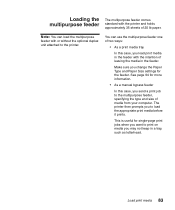
... feeder In this case, you may not keep in the feeder. Loading the multipurpose feeder The multipurpose feeder comes standard with or without the optional duplex unit attached to the printer. Note: You can use the multipurpose feeder one of 20 lb paper. You can load the multipurpose feeder with the...
... feeder In this case, you may not keep in the feeder. Loading the multipurpose feeder The multipurpose feeder comes standard with or without the optional duplex unit attached to the printer. Note: You can use the multipurpose feeder one of 20 lb paper. You can load the multipurpose feeder with the...

Setup Guide
Page 98
7 Slide the guide to the front until it lightly touches the side of the stack. 8 When finished printing from the multipurpose feeder, remove any print media, push the extension guide back in, and push the feeder to the back. 86 Load print media Note: You can load the envelope feeder with or without the duplex unit being attached to the printer. 1 Slide the guide all the way to the closed position. Loading the optional The envelope feeder holds envelope feeder approximately 100 envelopes.
7 Slide the guide to the front until it lightly touches the side of the stack. 8 When finished printing from the multipurpose feeder, remove any print media, push the extension guide back in, and push the feeder to the back. 86 Load print media Note: You can load the envelope feeder with or without the duplex unit being attached to the printer. 1 Slide the guide all the way to the closed position. Loading the optional The envelope feeder holds envelope feeder approximately 100 envelopes.
Setup Guide
Page 116
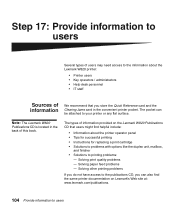
... CD, you store the Quick Reference card and the Clearing Jams card in the back of this book. Note: The Lexmark W820 Publications CD is located in the convenient printer pocket. Step 17: Provide information to users Several types of users may...Instructions for replacing a print cartridge • Solutions to problems with options like the duplex unit, mailbox, and finisher • Solutions to printing problems: - The pocket can also find helpful include: • Information about the Lexmark W820 printer: • Printer users • Key operators / administrators • Help...
... CD, you store the Quick Reference card and the Clearing Jams card in the back of this book. Note: The Lexmark W820 Publications CD is located in the convenient printer pocket. Step 17: Provide information to users Several types of users may...Instructions for replacing a print cartridge • Solutions to problems with options like the duplex unit, mailbox, and finisher • Solutions to printing problems: - The pocket can also find helpful include: • Information about the Lexmark W820 printer: • Printer users • Key operators / administrators • Help...
Setup Guide
Page 119
... feeder 9 2-sided printing 34 A attaching cables 89 memory cards 25 option cards 30 print server 30 B base cabinet 9 C cables attaching 89 duplex unit 36 Ethernet 89, 90 finisher 66 high capacity feeder 16 mailbox 52 parallel 91 power 92 Token-Ring 89, 90 USB 91 card stock... 73 Index cautions ix CD drivers x publications x changing paper settings 94, 95 Coax/Twinax Adapter for SCS 30 D drivers 99 drivers CD x duplex unit installing 34 E envelope feeder envelope sizes 73 icons 87 installing 71 environmental issues 4 F FCC emissions information ii feet See leveling feet finisher installing...
... feeder 9 2-sided printing 34 A attaching cables 89 memory cards 25 option cards 30 print server 30 B base cabinet 9 C cables attaching 89 duplex unit 36 Ethernet 89, 90 finisher 66 high capacity feeder 16 mailbox 52 parallel 91 power 92 Token-Ring 89, 90 USB 91 card stock... 73 Index cautions ix CD drivers x publications x changing paper settings 94, 95 Coax/Twinax Adapter for SCS 30 D drivers 99 drivers CD x duplex unit installing 34 E envelope feeder envelope sizes 73 icons 87 installing 71 environmental issues 4 F FCC emissions information ii feet See leveling feet finisher installing...
Setup Guide
Page 120
...I icons envelope feeder 87 multipurpose feeder 85 paper trays 1, 2, 3 76 paper trays 4 and 5 81 ImageQuick 98 installing Coax/Twinax Adapter 30 duplex unit 34 envelope feeder 71 finisher 53 firmware card 28 flash memory 25 hard disk with adapter card 30 high capacity feeder 9 internal print server...INA) See print server internal print server See print server IP address setting 97 IP settings verifying 98 L labels 73 leveling feet 37 Lexmark W820 Publications CD x Lexmark Web site xi Linux 101 loading envelope feeder 86 multipurpose feeder 84 trays 1, 2, 3 74 trays 4 and 5 80 local printing ...
...I icons envelope feeder 87 multipurpose feeder 85 paper trays 1, 2, 3 76 paper trays 4 and 5 81 ImageQuick 98 installing Coax/Twinax Adapter 30 duplex unit 34 envelope feeder 71 finisher 53 firmware card 28 flash memory 25 hard disk with adapter card 30 high capacity feeder 9 internal print server...INA) See print server internal print server See print server IP address setting 97 IP settings verifying 98 L labels 73 leveling feet 37 Lexmark W820 Publications CD x Lexmark Web site xi Linux 101 loading envelope feeder 86 multipurpose feeder 84 trays 1, 2, 3 74 trays 4 and 5 80 local printing ...
Setup Guide
Page 121
... Adapter for SCS 30 installing 30 internal print server Parallel Interface Card 30 Tri-Port Adapter 30 USB/Parallel Interface Card 30 options base cabinet 9 duplex unit 34 envelope feeder 71 finisher 53 hardware viii high capacity feeder 9 interface cards 30 internal print servers 30 mailbox 39 memory 25 P paper changing...
... Adapter for SCS 30 installing 30 internal print server Parallel Interface Card 30 Tri-Port Adapter 30 USB/Parallel Interface Card 30 options base cabinet 9 duplex unit 34 envelope feeder 71 finisher 53 hardware viii high capacity feeder 9 interface cards 30 internal print servers 30 mailbox 39 memory 25 P paper changing...

User's Guide
Page 4
...: Clearing print media jams 63 Understanding jam messages 63 Locating jams with messages 68 Clearing jams from the printer 71 Clearing jams from the optional duplex unit 84 Clearing jams from the optional envelope feeder 86 Clearing jams from the optional mailbox 87 ii
...: Clearing print media jams 63 Understanding jam messages 63 Locating jams with messages 68 Clearing jams from the printer 71 Clearing jams from the optional duplex unit 84 Clearing jams from the optional envelope feeder 86 Clearing jams from the optional mailbox 87 ii

User's Guide
Page 6
... Chapter 43: Removing the multipurpose feeder 143 Chapter 44: Removing the optional envelope feeder 144 Reinstalling the envelope feeder 145 Chapter 45: Removing the optional duplex unit 146 Chapter 46: Removing the optional mailbox 149 Preparing for disassembly 149 Disconnecting the power cords 149 Using the handling tool 150 Removing the...
... Chapter 43: Removing the multipurpose feeder 143 Chapter 44: Removing the optional envelope feeder 144 Reinstalling the envelope feeder 145 Chapter 45: Removing the optional duplex unit 146 Chapter 46: Removing the optional mailbox 149 Preparing for disassembly 149 Disconnecting the power cords 149 Using the handling tool 150 Removing the...

User's Guide
Page 10
... configured printer with a finisher The following illustration shows the printer configured with an optional finisher, duplex unit, envelope feeder, and high capacity feeder. Transport unit and transport unit cover Finisher top cover Bin 1 Finisher divertor cover Optional duplex unit Bin 2 Finisher door Optional envelope feeder 8 Finisher stand Fully configured printer with a mailbox...
... configured printer with a finisher The following illustration shows the printer configured with an optional finisher, duplex unit, envelope feeder, and high capacity feeder. Transport unit and transport unit cover Finisher top cover Bin 1 Finisher divertor cover Optional duplex unit Bin 2 Finisher door Optional envelope feeder 8 Finisher stand Fully configured printer with a mailbox...
User's Guide
Page 14
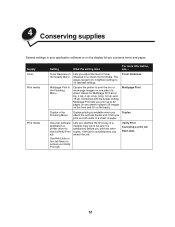
... What the setting does For more page images on one sheet of paper (16 images on the front and 16 on the back). Multipage Print Duplex in the Quality Menu Lets you adjust the level of toner released on a sheet of paper. The values range from 1 (lightest setting) to print ... to 32 pages on both sides of a sheet of print media. Verify Print Canceling a print job Held Jobs 12 Toner Darkness in the Finishing Menu Duplex printing is unsatisfactory, you print the other copies. Values for Multipage Print are 2 Up, 3 Up, 4 Up, 6 Up, 9 Up, 12 Up, and 16 Up. Use ...
... What the setting does For more page images on one sheet of paper (16 images on the front and 16 on the back). Multipage Print Duplex in the Quality Menu Lets you adjust the level of toner released on a sheet of paper. The values range from 1 (lightest setting) to print ... to 32 pages on both sides of a sheet of print media. Verify Print Canceling a print job Held Jobs 12 Toner Darkness in the Finishing Menu Duplex printing is unsatisfactory, you print the other copies. Values for Multipage Print are 2 Up, 3 Up, 4 Up, 6 Up, 9 Up, 12 Up, and 16 Up. Use ...


