Setup Guide
Page 7
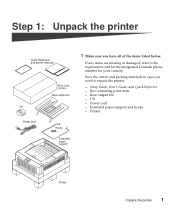
... the carton and packing materials in box) Rear output bin Hooks Extended paper support 1 Make sure you need to the registration card for the designated Lexmark phone number for your country. CD - Step 1: Unpack the printer Quick Reference and printer manuals CD Power cord Print units (in case you have all of the items...
... the carton and packing materials in box) Rear output bin Hooks Extended paper support 1 Make sure you need to the registration card for the designated Lexmark phone number for your country. CD - Step 1: Unpack the printer Quick Reference and printer manuals CD Power cord Print units (in case you have all of the items...
Setup Guide
Page 10
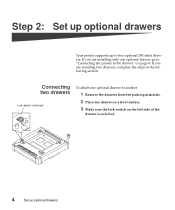
If you are installing two drawers, complete the steps in the following section. Step 2: Set up optional drawers Your printer supports up to the drawer" on the left side of the drawer is unlocked. 4 Set up optional drawers If you are installing only one drawer on a level surface. 3 Make sure the lock switch on page 8. Connecting two drawers Lock switch (unlocked) To attach one optional drawer to another: 1 Remove the drawers from the packing materials. 2 Place one optional drawer, go to "Connecting the printer to two optional 250-sheet drawers.
If you are installing two drawers, complete the steps in the following section. Step 2: Set up optional drawers Your printer supports up to the drawer" on the left side of the drawer is unlocked. 4 Set up optional drawers If you are installing only one drawer on a level surface. 3 Make sure the lock switch on page 8. Connecting two drawers Lock switch (unlocked) To attach one optional drawer to another: 1 Remove the drawers from the packing materials. 2 Place one optional drawer, go to "Connecting the printer to two optional 250-sheet drawers.
Setup Guide
Page 29
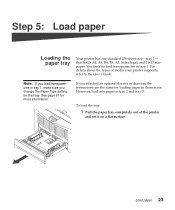
...loading paper in tray 2 and tray 3. To load the tray: 1 Pull the paper tray completely out of media your printer supports, refer to the User's Guide. For details about the types of the printer and set it on a flat surface. cies in tray 1. Load paper 23 You can also load transparencies in tray... 1, make sure you load transparen- Note: If you change the Paper Type setting for more information. Step 5: Load paper Loading the paper tray Your printer has one standard 250-sheet tray-tray 1- See page 61 for that holds A4, A5, B4, B5, A3, letter, legal, and 11x17 size paper...
...loading paper in tray 2 and tray 3. To load the tray: 1 Pull the paper tray completely out of media your printer supports, refer to the User's Guide. For details about the types of the printer and set it on a flat surface. cies in tray 1. Load paper 23 You can also load transparencies in tray... 1, make sure you load transparen- Note: If you change the Paper Type setting for more information. Step 5: Load paper Loading the paper tray Your printer has one standard 250-sheet tray-tray 1- See page 61 for that holds A4, A5, B4, B5, A3, letter, legal, and 11x17 size paper...

Setup Guide
Page 34
Loading the multipurpose feeder You can also use the multipurpose feeder for the multipurpose feeder. Refer to the User's Guide for more details about printing transparencies and envelopes and general media support for manually feeding single sheets of labels, or 15 envelopes in the multipurpose feeder: 1 Firmly press the indentation on the front of the multipurpose feeder to 100 sheets of paper, 30 transparencies, 30 sheets of media. You can load up to release the feeder, and then lower it. 28 Load paper To load paper in the multipurpose feeder.
Loading the multipurpose feeder You can also use the multipurpose feeder for the multipurpose feeder. Refer to the User's Guide for more details about printing transparencies and envelopes and general media support for manually feeding single sheets of labels, or 15 envelopes in the multipurpose feeder: 1 Firmly press the indentation on the front of the multipurpose feeder to 100 sheets of paper, 30 transparencies, 30 sheets of media. You can load up to release the feeder, and then lower it. 28 Load paper To load paper in the multipurpose feeder.

Setup Guide
Page 35
See page 35 for smaller paper sizes. b Insert the tips into place. The extended paper support may not be necessary for recommended storage of the multipurpose feeder. Load paper 29 2 If you plan to print on longer paper (for example, A3 or 11x17), insert the extended paper support shipped with the bent tips pointing toward the printer. c Lower the support into the two holes at the front of the extended paper support when not in use. a Hold the metal support, as shown, with the printer.
See page 35 for smaller paper sizes. b Insert the tips into place. The extended paper support may not be necessary for recommended storage of the multipurpose feeder. Load paper 29 2 If you plan to print on longer paper (for example, A3 or 11x17), insert the extended paper support shipped with the bent tips pointing toward the printer. c Lower the support into the two holes at the front of the extended paper support when not in use. a Hold the metal support, as shown, with the printer.

Setup Guide
Page 36
If you've been using the multipurpose feeder and need to loosen them, then fan them. 3 Flip open the standard paper support. 4 Before loading media, flex the sheets back and forth to load a new stack of media, press the bottom of the feeder until it clicks into the loading position before loading media. 30 Load paper Straighten the edges on a level surface.
If you've been using the multipurpose feeder and need to loosen them, then fan them. 3 Flip open the standard paper support. 4 Before loading media, flex the sheets back and forth to load a new stack of media, press the bottom of the feeder until it clicks into the loading position before loading media. 30 Load paper Straighten the edges on a level surface.

Setup Guide
Page 40
b Pull the support out of the multipurpose feeder. 34 Load paper a Rotate the support to a near vertical position. 3 Fold in the standard paper support. 4 Remove the extended paper support, if installed.
b Pull the support out of the multipurpose feeder. 34 Load paper a Rotate the support to a near vertical position. 3 Fold in the standard paper support. 4 Remove the extended paper support, if installed.

Setup Guide
Page 41
b Hang the extended paper support on the hooks when the multipurpose feeder is not in use. Load paper 35 a Attach the adhesive backed hooks shipped with the printer to the right side of the printer, as shown. Make sure the tips of the support wrap around the back of the printer, as shown. 5 Close the multipurpose feeder. 6 Store the extended paper support.
b Hang the extended paper support on the hooks when the multipurpose feeder is not in use. Load paper 35 a Attach the adhesive backed hooks shipped with the printer to the right side of the printer, as shown. Make sure the tips of the support wrap around the back of the printer, as shown. 5 Close the multipurpose feeder. 6 Store the extended paper support.
Setup Guide
Page 54
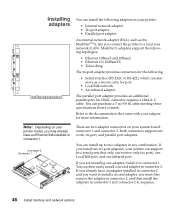
...You can then easily install a second adapter in connector 2. Refer to install a second adapter, you install two tri-port adapters, your printer can support two serial ports (but only one receive-only fax port), one LocalTalk port, and one adapter, install it in connector 1. You can ...purchase a 3 m (9.8 ft) cable meeting these specifications from Lexmark. You can also serve as the MarkNetTM S, lets you are two adapter connectors on your printer...
...You can then easily install a second adapter in connector 2. Refer to install a second adapter, you install two tri-port adapters, your printer can support two serial ports (but only one receive-only fax port), one LocalTalk port, and one adapter, install it in connector 1. You can ...purchase a 3 m (9.8 ft) cable meeting these specifications from Lexmark. You can also serve as the MarkNetTM S, lets you are two adapter connectors on your printer...
Setup Guide
Page 67
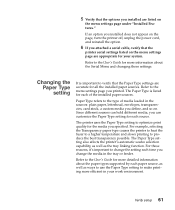
...Menu and changing these reasons, it's important to the type of the installed paper sources. For example, selecting the Transparency paper type causes the printer to heat the fuser to a higher temperature and slows printing to the menu settings page you specified. For these settings. Refer to verify ...ways to use the Paper Type setting to make printing more information about the paper types supported by each source. Verify setup 61 If an option you installed does not appear on the page, turn the printer off, unplug the power cord, and reinstall the option. 6 If you attached a serial...
...Menu and changing these reasons, it's important to the type of the installed paper sources. For example, selecting the Transparency paper type causes the printer to heat the fuser to a higher temperature and slows printing to the menu settings page you specified. For these settings. Refer to verify ...ways to use the Paper Type setting to make printing more information about the paper types supported by each source. Verify setup 61 If an option you installed does not appear on the page, turn the printer off, unplug the power cord, and reinstall the option. 6 If you attached a serial...

Setup Guide
Page 70
... tools that can help you may not be able to printer drivers, you set up a network of printers, monitor the status of the driver packages and Lexmark driver support, are available for printers other than the Optra Color 1200, you may be particularly interested in the printer User's Guide. 64 Load MarkVision and drivers Refer to the User...
... tools that can help you may not be able to printer drivers, you set up a network of printers, monitor the status of the driver packages and Lexmark driver support, are available for printers other than the Optra Color 1200, you may be particularly interested in the printer User's Guide. 64 Load MarkVision and drivers Refer to the User...

Setup Guide
Page 71
...included with the CD for information about launching the CD program for complete information about the contents of your Lexmark color printer. Refer to a CD-ROM drive, you can create installation diskettes from the CD. 1 Launch the CD. Note: To use ... the CD Readme - Create diskettes - Register your operating system. Note: If you only have successfully set up your Optra Color 1200 printer. Install screen fonts - Refer to do. Access Lexmark support phone numbers - Refer to install. Congratulations! You have infre- Load MarkVision and drivers 65 If necessary, you can...
...included with the CD for information about launching the CD program for complete information about the contents of your Lexmark color printer. Refer to a CD-ROM drive, you can create installation diskettes from the CD. 1 Launch the CD. Note: To use ... the CD Readme - Create diskettes - Register your operating system. Note: If you only have successfully set up your Optra Color 1200 printer. Install screen fonts - Refer to do. Access Lexmark support phone numbers - Refer to install. Congratulations! You have infre- Load MarkVision and drivers 65 If necessary, you can...
Setup Guide
Page 73
... online documentation 65 conventions used in manual v Index D disk attaching an adapter ribbon cable 45 available options 45 installing 45, 46 requirements 45 DOS support 64 drawers See optional drawers drivers 64 E Ethernet support 48 extended paper support inserting 29 removing 34 storing 35 external network adapter 53 F fax modem connecting to your...
... online documentation 65 conventions used in manual v Index D disk attaching an adapter ribbon cable 45 available options 45 installing 45, 46 requirements 45 DOS support 64 drawers See optional drawers drivers 64 E Ethernet support 48 extended paper support inserting 29 removing 34 storing 35 external network adapter 53 F fax modem connecting to your...

Setup Guide
Page 74
...drawers 12 language, changing CD program 65 letterhead loading 25, 31 loading paper letterhead 25, 31 multipurpose feeder 28 trays 23 LocalTalk support 48 M Macintosh support 64 68 Index MarkNet Pro adapter 53 MarkNet S adapter 48, 53 MarkNet XLe adapter 53 MarkVision 64 memory installing 41 removing 42...28 opening 28 N network adapter printing setup page 63 removing 49 network, connecting to 53 O online documentation 65 optional drawers connecting to the printer 8 connecting two drawers 4 labels 12 setting up 4 options adapter ribbon cable for disk 45 drawers 4 hard disk 45 infrared adapter 57...
...drawers 12 language, changing CD program 65 letterhead loading 25, 31 loading paper letterhead 25, 31 multipurpose feeder 28 trays 23 LocalTalk support 48 M Macintosh support 64 68 Index MarkNet Pro adapter 53 MarkNet S adapter 48, 53 MarkNet XLe adapter 53 MarkVision 64 memory installing 41 removing 42...28 opening 28 N network adapter printing setup page 63 removing 49 network, connecting to 53 O online documentation 65 optional drawers connecting to the printer 8 connecting two drawers 4 labels 12 setting up 4 options adapter ribbon cable for disk 45 drawers 4 hard disk 45 infrared adapter 57...
Setup Guide
Page 75
...Type settings 61 parallel port adapter installing 48 removing 49 photoconductor installing 15 Power Saver message 60 print unit assembling 15 installing 19 printer clearance requirements 14 drivers 64 placement 13 unpacking 1 weight (without supplies) 13 printing adapter setup page 63 menu settings page 60... the menu settings page 60 system board adapter connectors 48 disk bracket 46 installing 52 memory connectors 41 removing 38 T Token-Ring support 48 toner cartridge installing 17 top cover 19 transparencies loading tray 1 23 trays loading 23 optional drawers 4 tri-port adapter connecting ...
...Type settings 61 parallel port adapter installing 48 removing 49 photoconductor installing 15 Power Saver message 60 print unit assembling 15 installing 19 printer clearance requirements 14 drivers 64 placement 13 unpacking 1 weight (without supplies) 13 printing adapter setup page 63 menu settings page 60... the menu settings page 60 system board adapter connectors 48 disk bracket 46 installing 52 memory connectors 41 removing 38 T Token-Ring support 48 toner cartridge installing 17 top cover 19 transparencies loading tray 1 23 trays loading 23 optional drawers 4 tri-port adapter connecting ...

