Setup Guide
Page 5
... or functions. This manual, by -step format of the steps necessary for installing the four colored print units, installing options, loading paper in the standard or optional trays, loading media in the back of the User's Guide before setting up your printer, refer to install printer drivers and utilities. Preface About this book: • Operator panel buttons are printed in a boldface type: Press Go after changing a menu setting. The easy step-by contrast, provides detailed instructions for basic printer setup.
... or functions. This manual, by -step format of the steps necessary for installing the four colored print units, installing options, loading paper in the standard or optional trays, loading media in the back of the User's Guide before setting up your printer, refer to install printer drivers and utilities. Preface About this book: • Operator panel buttons are printed in a boldface type: Press Go after changing a menu setting. The easy step-by contrast, provides detailed instructions for basic printer setup.

Setup Guide
Page 6
... appear on the operator panel display are also printed in a boldface type: If Black Toner Empty appears on the operator panel display, you must install a new black toner cartridge before you can resume printing. • Notes, warnings, and cautions appear in the left column for easy reference. • Optional steps you may want to skip are identified in a colored arrow at the bottom of selected pages: Colored arrows, like...
... appear on the operator panel display are also printed in a boldface type: If Black Toner Empty appears on the operator panel display, you must install a new black toner cartridge before you can resume printing. • Notes, warnings, and cautions appear in the left column for easy reference. • Optional steps you may want to skip are identified in a colored arrow at the bottom of selected pages: Colored arrows, like...

Setup Guide
Page 8
Toner cartridge Photoconductor The print unit box includes: • 4 color-coded toner cartridges • 4 color-coded photoconductors 2 Unpack the printer
Toner cartridge Photoconductor The print unit box includes: • 4 color-coded toner cartridges • 4 color-coded photoconductors 2 Unpack the printer

Setup Guide
Page 20
... the adhesive-backed sleeve to install the rear output bin, leave room behind the printer as well. ventilated area. If you plan to the designated area. 14 Position the printer In direct sunlight - b Remove the protective paper from the back of the printer to allow for easy paper loading. Leave enough space in a well- ence: a Locate a visible spot in the vicinity...
... the adhesive-backed sleeve to install the rear output bin, leave room behind the printer as well. ventilated area. If you plan to the designated area. 14 Position the printer In direct sunlight - b Remove the protective paper from the back of the printer to allow for easy paper loading. Leave enough space in a well- ence: a Locate a visible spot in the vicinity...

Setup Guide
Page 21
... 4: Install print units Assembling the print units Your printer ships with four color-coded toner cartridges and four photoconductors. Complete the following steps to distribute the toner evenly. 4 Place the toner cartridge on a flat surface. Install print units 15 rial. 3 Gently shake the toner cartridge to install each of the photoconductors into the appropriate toner cartridge: 1 Open the box containing the toner cartridges and photoconductors. 2 Remove a toner cartridge from the packing mate- Together, the toner cartridge and photoconductor create a color-specific print unit.
... 4: Install print units Assembling the print units Your printer ships with four color-coded toner cartridges and four photoconductors. Complete the following steps to distribute the toner evenly. 4 Place the toner cartridge on a flat surface. Install print units 15 rial. 3 Gently shake the toner cartridge to install each of the photoconductors into the appropriate toner cartridge: 1 Open the box containing the toner cartridges and photoconductors. 2 Remove a toner cartridge from the packing mate- Together, the toner cartridge and photoconductor create a color-specific print unit.

Setup Guide
Page 25
Installing the print units Now that you've assembled the print units, you must install them in the bottom of the printer. Do not touch the LEDs inside the top cover or the LEDs transport belt in the printer. Complete the following steps to install each print unit. Transport belt Install print units 19 Each color print unit has its appropriate color-coded position in the printer. We recommend installing the magenta print unit first, followed by cyan, yellow, and black. 1 Press the release button on the printer's top cover. 2 Raise the cover.
Installing the print units Now that you've assembled the print units, you must install them in the bottom of the printer. Do not touch the LEDs inside the top cover or the LEDs transport belt in the printer. Complete the following steps to install each print unit. Transport belt Install print units 19 Each color print unit has its appropriate color-coded position in the printer. We recommend installing the magenta print unit first, followed by cyan, yellow, and black. 1 Press the release button on the printer's top cover. 2 Raise the cover.

Setup Guide
Page 30
If the rear paper guide is in the tray. If you are loading A4 or letter size paper, the tray may experience paper feeding problems or incorrect formatting of pages. Straighten the edges on a level surface. 24 Load paper 2 Squeeze the rear paper guide and slide it to the appropriate position for the appropriate paper size. 3 Before loading paper, flex the sheets back and forth to loosen them, then fan them. The position of the rear paper guide tells the printer the size of the paper in the wrong position, you may already be set up for the size paper you are loading.
If the rear paper guide is in the tray. If you are loading A4 or letter size paper, the tray may experience paper feeding problems or incorrect formatting of pages. Straighten the edges on a level surface. 24 Load paper 2 Squeeze the rear paper guide and slide it to the appropriate position for the appropriate paper size. 3 Before loading paper, flex the sheets back and forth to loosen them, then fan them. The position of the rear paper guide tells the printer the size of the paper in the wrong position, you may already be set up for the size paper you are loading.

Setup Guide
Page 42
... media and prevents curling. To install the rear output bin: 1 Remove the bin from the packing materials. 2 Locate the two posts at the back of the printer. Attaching the rear output bin Posts If you plan to load transparencies, envelopes, labels, or card stock in the multipurpose feeder, you must remove it to access the printer system board or connect cables to the back of the printer. 3 Align...
... media and prevents curling. To install the rear output bin: 1 Remove the bin from the packing materials. 2 Locate the two posts at the back of the printer. Attaching the rear output bin Posts If you plan to load transparencies, envelopes, labels, or card stock in the multipurpose feeder, you must remove it to access the printer system board or connect cables to the back of the printer. 3 Align...
Setup Guide
Page 54
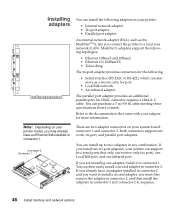
... you connect the printer to the documentation that came with your adapter for the following: • Serial interface (RS-232C or RS-422), which can install the following adapters in connector 1. Its 1284C connector requires a 1284 A-C cable. Refer to a local area network (LAN). You can support two serial ports (but only one receive-only fax port), one LocalTalk port, and one adapter, install it...
... you connect the printer to the documentation that came with your adapter for the following: • Serial interface (RS-232C or RS-422), which can install the following adapters in connector 1. Its 1284C connector requires a 1284 A-C cable. Refer to a local area network (LAN). You can support two serial ports (but only one receive-only fax port), one LocalTalk port, and one adapter, install it...

Setup Guide
Page 59
...-port adapter to connect to the serial connector on page 48 - We recommend Lexmark part number 1329605 (10 ft) or 1427498 (20 ft). Attach the cable to a LocalTalk network For more information about your printer's functions. Attach cables 53 If you installed an optional parallel port adapter, you may not be able to access all of your particular adapter, refer to the server using a parallel or serial cable...
...-port adapter to connect to the serial connector on page 48 - We recommend Lexmark part number 1329605 (10 ft) or 1427498 (20 ft). Attach the cable to a LocalTalk network For more information about your printer's functions. Attach cables 53 If you installed an optional parallel port adapter, you may not be able to access all of your particular adapter, refer to the server using a parallel or serial cable...

Setup Guide
Page 61
... must turn on the printer. 5 Turn the printer power on. 6 From the printer operator panel: a Press the Menu> or or Faxes received print in the same way it would connect to a computer. The modem connects to the printer in black only. You cannot send faxes from your printer. To set up the serial port to receive faxes: 1 Make sure the printer power is off and the power cord is unplugged. 2 Turn the modem power off. 3 Follow the instructions included...
... must turn on the printer. 5 Turn the printer power on. 6 From the printer operator panel: a Press the Menu> or or Faxes received print in the same way it would connect to a computer. The modem connects to the printer in black only. You cannot send faxes from your printer. To set up the serial port to receive faxes: 1 Make sure the printer power is off and the power cord is unplugged. 2 Turn the modem power off. 3 Follow the instructions included...

Setup Guide
Page 62
e Press Menu> or
e Press Menu> or
Setup Guide
Page 65
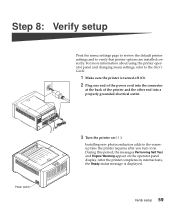
... information about using the printer operator panel and changing menu settings, refer to the warmup time the printer requires after you turn it on. Power switch 3 Turn the printer on the operator panel display. Verify setup 59 Installing new photoconductors adds to the User's Guide. 1 Make sure the printer is displayed. After the printer completes its internal tests, the Ready status message is turned off (O). 2 Plug one end of the power cord into the connector at the back of the printer and the...
... information about using the printer operator panel and changing menu settings, refer to the warmup time the printer requires after you turn it on. Power switch 3 Turn the printer on the operator panel display. Verify setup 59 Installing new photoconductors adds to the User's Guide. 1 Make sure the printer is displayed. After the printer completes its internal tests, the Ready status message is turned off (O). 2 Plug one end of the power cord into the connector at the back of the printer and the...

Setup Guide
Page 66
... the User's Guide for more information about modifying the Power Saver setting. Refer to the User's Guide for helpful tips. Both messages indicate that the printer is set On (the factory default), Power Saver replaces the Ready status message after the specified period of time. Go Stop Printing the menu settings page Complete the following steps to the User's Guide for more information about using the printer operator panel and changing settings from the menus. 1 From the printer operator panel, press the Menu> or...
... the User's Guide for more information about modifying the Power Saver setting. Refer to the User's Guide for helpful tips. Both messages indicate that the printer is set On (the factory default), Power Saver replaces the Ready status message after the specified period of time. Go Stop Printing the menu settings page Complete the following steps to the User's Guide for more information about using the printer operator panel and changing settings from the menus. 1 From the printer operator panel, press the Menu> or...
Setup Guide
Page 67
... media, you specified. The printer uses the Paper Type setting to the type of media loaded in the sources: plain paper, letterhead, envelopes, transparencies, card stock, a custom media you define, and so on the menu settings page are appropriate for each of the installed paper sources. Refer to make printing more information about the paper types supported by each time you printed. If an option you installed does not appear on the page, turn the printer off, unplug the power...
... media, you specified. The printer uses the Paper Type setting to the type of media loaded in the sources: plain paper, letterhead, envelopes, transparencies, card stock, a custom media you define, and so on the menu settings page are appropriate for each of the installed paper sources. Refer to make printing more information about the paper types supported by each time you printed. If an option you installed does not appear on the page, turn the printer off, unplug the power...

Setup Guide
Page 68
Tray 1 Type appears on the second line. 4 Press Select. If you need to change a Paper Type setting: 1 From the printer operator panel, press the Menu> or until PAPER TYPE appears on the second line of the display. 5 Press Select again if you want to change the Tray 1 Type setting. 6 Press Menu> or to scroll to the appropriate source, and then repeat steps 5 through 7. 9 When you are finished changing the Paper Type settings, press the Go button to return the printer to the ready state. 62 Verify setup
Tray 1 Type appears on the second line. 4 Press Select. If you need to change a Paper Type setting: 1 From the printer operator panel, press the Menu> or until PAPER TYPE appears on the second line of the display. 5 Press Select again if you want to change the Tray 1 Type setting. 6 Press Menu> or to scroll to the appropriate source, and then repeat steps 5 through 7. 9 When you are finished changing the Paper Type settings, press the Go button to return the printer to the ready state. 62 Verify setup

Setup Guide
Page 70
... features and installation, refer to the User's Guide for printers other than the Optra Color 1200, you set up a network of printers, monitor the status of the printer's functions. Refer to the MarkVision documentation on the CD. For more information about these functions, refer to the driver online Help or to control all the printer's features, install the custom Lexmark drivers on the World Wide Web. Step 9: Load MarkVision and drivers The compact...
... features and installation, refer to the User's Guide for printers other than the Optra Color 1200, you set up a network of printers, monitor the status of the printer's functions. Refer to the MarkVision documentation on the CD. For more information about these functions, refer to the driver online Help or to control all the printer's features, install the custom Lexmark drivers on the World Wide Web. Step 9: Load MarkVision and drivers The compact...

Setup Guide
Page 71
... have successfully set up your printer most effectively, we recommend that you choose to install. Refer to the booklet included with the CD for information about launching the CD program for your Lexmark color printer. Refer to the User's Guide for online Help. View the CD Readme - This also changes the language of the CD. Install printer drivers - Note: To use your Optra Color 1200 printer. Register your operating system.
... have successfully set up your printer most effectively, we recommend that you choose to install. Refer to the booklet included with the CD for information about launching the CD program for your Lexmark color printer. Refer to the User's Guide for online Help. View the CD Readme - This also changes the language of the CD. Install printer drivers - Note: To use your Optra Color 1200 printer. Register your operating system.

Setup Guide
Page 74
... adapter 53 MarkVision 64 memory installing 41 removing 42 menu settings page, printing 60 multipurpose feeder closing 33 loading 28 opening 28 N network adapter printing setup page 63 removing 49 network, connecting to 53 O online documentation 65 optional drawers connecting to the printer 8 connecting two drawers 4 labels 12 setting up 4 options adapter ribbon cable for disk 45 drawers 4 hard disk 45 infrared adapter 57 memory 41 parallel port adapter 48 tri-port adapters 48 verifying installation 59 OS/2 support 64
... adapter 53 MarkVision 64 memory installing 41 removing 42 menu settings page, printing 60 multipurpose feeder closing 33 loading 28 opening 28 N network adapter printing setup page 63 removing 49 network, connecting to 53 O online documentation 65 optional drawers connecting to the printer 8 connecting two drawers 4 labels 12 setting up 4 options adapter ribbon cable for disk 45 drawers 4 hard disk 45 infrared adapter 57 memory 41 parallel port adapter 48 tri-port adapters 48 verifying installation 59 OS/2 support 64
Setup Guide
Page 75
P paper loading the multipurpose feeder 28 loading trays 23 size sensing 24 paper stop 27 Paper Type settings 61 parallel port adapter installing 48 removing 49 photoconductor installing 15 Power Saver message 60 print unit assembling 15 installing 19 printer clearance requirements 14 drivers 64 placement 13 unpacking 1 weight (without supplies) 13 printing adapter setup page 63 menu settings page 60 R Ready message 59 rear cover 22 rear output bin installing 36 removing 39 rear paper guide 24 receiving faxes 55 Reinstalling 52 S safety information v serial interface connecting a cable 54...
P paper loading the multipurpose feeder 28 loading trays 23 size sensing 24 paper stop 27 Paper Type settings 61 parallel port adapter installing 48 removing 49 photoconductor installing 15 Power Saver message 60 print unit assembling 15 installing 19 printer clearance requirements 14 drivers 64 placement 13 unpacking 1 weight (without supplies) 13 printing adapter setup page 63 menu settings page 60 R Ready message 59 rear cover 22 rear output bin installing 36 removing 39 rear paper guide 24 receiving faxes 55 Reinstalling 52 S safety information v serial interface connecting a cable 54...


