
User's Reference
Page 18
...Extent of warranty We do not warrant uninterrupted or error-free operation of Limited Warranty is set forth in the following paragraph. Lexmark's and the developer's limitations of other economic consequential damages. Warranty service does not include repair of failures caused by: &#... PERIOD. For any lost profits, lost savings, incidental damage, or other than Lexmark supplies (such as toner cartridges, inkjet cartridges, and ribbons) • Use of remedies are not cumulative. Lexmark offers a variety of extended warranty programs that caused the damages. Statement of limited...
...Extent of warranty We do not warrant uninterrupted or error-free operation of Limited Warranty is set forth in the following paragraph. Lexmark's and the developer's limitations of other economic consequential damages. Warranty service does not include repair of failures caused by: &#... PERIOD. For any lost profits, lost savings, incidental damage, or other than Lexmark supplies (such as toner cartridges, inkjet cartridges, and ribbons) • Use of remedies are not cumulative. Lexmark offers a variety of extended warranty programs that caused the damages. Statement of limited...

User's Reference
Page 30
.... Moisture content The amount of moisture in poor print quality. Leave the paper in its original wrapper until you have chosen is too rough, the toner does not fuse to use 75 g/m2 (20 lb) xerographic paper. Grain is exposed to curve at its performance. For the multipurpose feeder, 60 to...
.... Moisture content The amount of moisture in poor print quality. Leave the paper in its original wrapper until you have chosen is too rough, the toner does not fuse to use 75 g/m2 (20 lb) xerographic paper. Grain is exposed to curve at its performance. For the multipurpose feeder, 60 to...

User's Reference
Page 32
...; Use only forms and letterhead printed using an offset lithographic or engraved printing process. • Choose papers that are not affected by the resin in toner or the silicone in doubt, contact your paper supplier. If you are oxidation-set or oil-based should meet these requirements; Inks that are in...
...; Use only forms and letterhead printed using an offset lithographic or engraved printing process. • Choose papers that are not affected by the resin in toner or the silicone in doubt, contact your paper supplier. If you are oxidation-set or oil-based should meet these requirements; Inks that are in...
User's Reference
Page 81
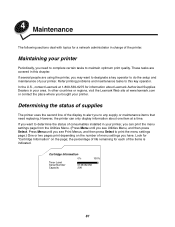
... for each of your printer. Cartridge Information 0% 100% Toner Level Serial Number Capacity 013535245D 20K 81 If several people are covered in this key operator. In other countries or regions, visit the Lexmark Web site at www.lexmark.com or contact the place where you see Print Menus,... indicated. Press Menu until you bought your area. Refer printing problems and maintenance tasks to maintain optimum print quality. In the U.S., contact Lexmark at a time. However, the printer can only display information about one item at 1-800-539-6275 for a network administrator in charge ...
... for each of your printer. Cartridge Information 0% 100% Toner Level Serial Number Capacity 013535245D 20K 81 If several people are covered in this key operator. In other countries or regions, visit the Lexmark Web site at www.lexmark.com or contact the place where you see Print Menus,... indicated. Press Menu until you bought your area. Refer printing problems and maintenance tasks to maintain optimum print quality. In the U.S., contact Lexmark at a time. However, the printer can only display information about one item at 1-800-539-6275 for a network administrator in charge ...
User's Reference
Page 82
... software or on the display let you print on both sides of a sheet of paper. Toner Darkness in the U.S., contact Lexmark at www.lexmark.com or contact the place where you adjust the level of toner released on the back). Use your Verify Print job. Verify Print Canceling a print job Held... Duplex printing is available when you print the other countries or regions, visit the Lexmark Web site at 1-800-539-6275 for Multipage Print are 2 Up, 3 Up, 4 Up, 6 Up, 9 Up, 12 Up, and 16 Up. Toner Darkness Multipage Print in your printer. Lets you examine the first copy of a ...
... software or on the display let you print on both sides of a sheet of paper. Toner Darkness in the U.S., contact Lexmark at www.lexmark.com or contact the place where you adjust the level of toner released on the back). Use your Verify Print job. Verify Print Canceling a print job Held... Duplex printing is available when you print the other countries or regions, visit the Lexmark Web site at 1-800-539-6275 for Multipage Print are 2 Up, 3 Up, 4 Up, 6 Up, 9 Up, 12 Up, and 16 Up. Toner Darkness Multipage Print in your printer. Lets you examine the first copy of a ...
User's Reference
Page 83
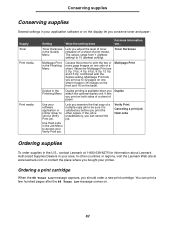
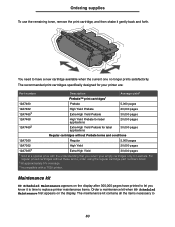
... print cartridges specifically designed for your empty cartridges only to Lexmark. The maintenance kit contains all the items necessary to replace printer maintenance items. Order a maintenance kit when 80 Scheduled Maintenance first appears on the display. Ordering supplies To use the remaining toner, remove the print cartridge, and then shake it is...
... print cartridges specifically designed for your empty cartridges only to Lexmark. The maintenance kit contains all the items necessary to replace printer maintenance items. Order a maintenance kit when 80 Scheduled Maintenance first appears on the display. Ordering supplies To use the remaining toner, remove the print cartridge, and then shake it is...
User's Reference
Page 84
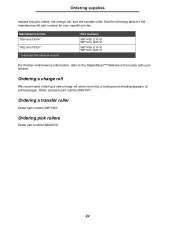
Ordering a charge roll We recommend ordering a new charge roll when toner fog or background shading appears on printed pages. Part numbers 56P1409 (110 V) 56P1410 (220 V) 56P1409 (110 V) 56P1410 (220 V) For finisher maintenance information, refer to...your finisher. See the following table for the maintenance kit part number for : T630 and T630n* T632 and T632n* * n denotes the network version. Order Lexmark part number 99A1017. Ordering pick rollers Order part number 99A0070. 84 Ordering a transfer roller Order part number 56P1357. Ordering supplies replace the pick rollers, the...
Ordering a charge roll We recommend ordering a new charge roll when toner fog or background shading appears on printed pages. Part numbers 56P1409 (110 V) 56P1410 (220 V) 56P1409 (110 V) 56P1410 (220 V) For finisher maintenance information, refer to...your finisher. See the following table for the maintenance kit part number for : T630 and T630n* T632 and T632n* * n denotes the network version. Order Lexmark part number 99A1017. Ordering pick rollers Order part number 99A0070. 84 Ordering a transfer roller Order part number 56P1357. Ordering supplies replace the pick rollers, the...
User's Reference
Page 86
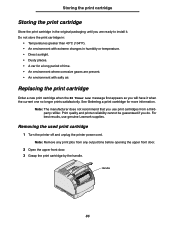
... longer prints satisfactorily. Print quality and printer reliability cannot be guaranteed if you use genuine Lexmark supplies. Note: Remove any print jobs from a thirdparty refiller. Replacing the print cartridge Order a new print cartridge when the 88 Toner Low message first appears so you are present. • An environment with salty air. For...
... longer prints satisfactorily. Print quality and printer reliability cannot be guaranteed if you use genuine Lexmark supplies. Note: Remove any print jobs from a thirdparty refiller. Replacing the print cartridge Order a new print cartridge when the 88 Toner Low message first appears so you are present. • An environment with salty air. For...
User's Reference
Page 88
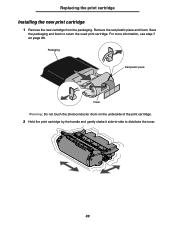
Remove the red plastic piece and foam. Save the packaging and foam to distribute the toner. 88 Packaging Red plastic piece Foam Warning: Do not touch the photoconductor drum on page 89. Replacing the print cartridge Installing the new print cartridge 1 Remove the new cartridge from the packaging. For more information, see step 7 on the underside of the print cartridge. 2 Hold the print cartridge by the handle and gently shake it side-to-side to return the used print cartridge.
Remove the red plastic piece and foam. Save the packaging and foam to distribute the toner. 88 Packaging Red plastic piece Foam Warning: Do not touch the photoconductor drum on page 89. Replacing the print cartridge Installing the new print cartridge 1 Remove the new cartridge from the packaging. For more information, see step 7 on the underside of the print cartridge. 2 Hold the print cartridge by the handle and gently shake it side-to-side to return the used print cartridge.
User's Reference
Page 90
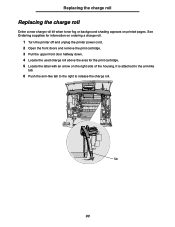
... tab to the right to release the charge roll. Tab 90 Replacing the charge roll Replacing the charge roll Order a new charge roll kit when toner fog or background shading appears on the right side of the housing. See Ordering supplies for information on ordering a charge roll. 1 Turn the printer off...
... tab to the right to release the charge roll. Tab 90 Replacing the charge roll Replacing the charge roll Order a new charge roll kit when toner fog or background shading appears on the right side of the housing. See Ordering supplies for information on ordering a charge roll. 1 Turn the printer off...

User's Reference
Page 94
... on ordering a transfer roller. Refer to replace the transfer roller. Replacing the transfer roller Replacing the transfer roller Order a new transfer roller when light print, toner fog, or background shading appears on printed pages.
... on ordering a transfer roller. Refer to replace the transfer roller. Replacing the transfer roller Replacing the transfer roller Order a new transfer roller when light print, toner fog, or background shading appears on printed pages.
User's Reference
Page 113
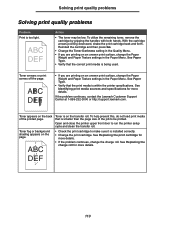
...job to run the printer setup cycle and clean the transfer roll. If the problem continues, contact the Lexmark Customer Support Center at 1-859-232-3000 or http://support.lexmark.com. See Identifying print media sources and specifications for more details. To help prevent this, do not ...load print media that is installed correctly. • Change the print cartridge. DEF 113 ABC DEF Action • The toner may be printed. To utilize...
...job to run the printer setup cycle and clean the transfer roll. If the problem continues, contact the Lexmark Customer Support Center at 1-859-232-3000 or http://support.lexmark.com. See Identifying print media sources and specifications for more details. To help prevent this, do not ...load print media that is installed correctly. • Change the print cartridge. DEF 113 ABC DEF Action • The toner may be printed. To utilize...

User's Reference
Page 114
... uneven edges • Change the Print Resolution setting in the software application. To utilize the remaining toner, remove the cartridge by gripping the handles with both hands. ABC DEF • The toner may be low. Printing is white. Reinstall the cartridge and then press Go. • If ...8226; Make sure the packaging material is not set too high in the Quality Menu to be sure it is installed correctly. • The toner may be low. With the cartridge arrows pointing downward, shake the print cartridge back and forth. Streaks appear on the page. Reinstall the ...
... uneven edges • Change the Print Resolution setting in the software application. To utilize the remaining toner, remove the cartridge by gripping the handles with both hands. ABC DEF • The toner may be low. Printing is white. Reinstall the cartridge and then press Go. • If ...8226; Make sure the packaging material is not set too high in the Quality Menu to be sure it is installed correctly. • The toner may be low. With the cartridge arrows pointing downward, shake the print cartridge back and forth. Streaks appear on the page. Reinstall the ...

User's Reference
Page 126
200 and 201 Paper Jam Remove Cartridge 3 Gently push the feed roller release lever toward the back of the printer. 4 Pull the print media up and toward you pull, stop pulling. You need to access the print media from the printer rear door. If the print media does not move immediately when you . Otherwise, continue with unfused toner, which can stain garments and skin. Note: The print media may be covered with step 8. 126
200 and 201 Paper Jam Remove Cartridge 3 Gently push the feed roller release lever toward the back of the printer. 4 Pull the print media up and toward you pull, stop pulling. You need to access the print media from the printer rear door. If the print media does not move immediately when you . Otherwise, continue with unfused toner, which can stain garments and skin. Note: The print media may be covered with step 8. 126

User's Reference
Page 142
... the upper front door, and then pull it straight out toward you . Lay the cartridge aside. Note: The print media may be covered with unfused toner, which can stain garments and skin. 142 Note: Do not leave the cartridge exposed to avoid touching this area. 23x Paper Jam 2 While grasping the...
... the upper front door, and then pull it straight out toward you . Lay the cartridge aside. Note: The print media may be covered with unfused toner, which can stain garments and skin. 142 Note: Do not leave the cartridge exposed to avoid touching this area. 23x Paper Jam 2 While grasping the...

User's Reference
Page 149
Note: The print media may be covered with unfused toner, which can stain garments and skin. 11 Reinstall the print cartridge. 12 Close the upper and lower front doors. 13 Locate the recessed areas on each side of the printer. 10 Pull the print media up and toward you. 23x Paper Jam 9 Gently push the feed roller release lever toward the back of the duplex front access cover. 14 Slowly pull the duplex front access cover straight out. 149
Note: The print media may be covered with unfused toner, which can stain garments and skin. 11 Reinstall the print cartridge. 12 Close the upper and lower front doors. 13 Locate the recessed areas on each side of the printer. 10 Pull the print media up and toward you. 23x Paper Jam 9 Gently push the feed roller release lever toward the back of the duplex front access cover. 14 Slowly pull the duplex front access cover straight out. 149

User's Reference
Page 155
... duplex front access cover back into the printer. b Open the printer upper and lower front doors. Note: The print media may be covered with unfused toner, which can stain garments and skin. 155 c Remove the print cartridge. Warning: Do not touch the photoconductor drum on the cartridge to avoid touching this...
... duplex front access cover back into the printer. b Open the printer upper and lower front doors. Note: The print media may be covered with unfused toner, which can stain garments and skin. 155 c Remove the print cartridge. Warning: Do not touch the photoconductor drum on the cartridge to avoid touching this...

User's Reference
Page 184
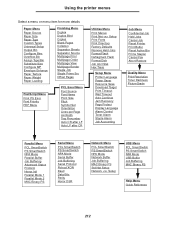
... symbol set is also located on the drivers CD. Refer to the Technical Reference to read the bar code images as Print Resolution, Toner Darkness, and Print Darkness. See Using the printer menus and Print media guidelines for each code point). For more specifically, for information on... of printer bar codes and OCR characters. Before purchasing any specific solutions, print a sample of OCR characters or bar codes on Lexmark's Web site at some code points. ABICOMP Brazil/Portugal ABICOMP International DeskTop Legal MC Text Microsoft Publishing Russian-GOST Ukrainian PCL ITC ...
... symbol set is also located on the drivers CD. Refer to the Technical Reference to read the bar code images as Print Resolution, Toner Darkness, and Print Darkness. See Using the printer menus and Print media guidelines for each code point). For more specifically, for information on... of printer bar codes and OCR characters. Before purchasing any specific solutions, print a sample of OCR characters or bar codes on Lexmark's Web site at some code points. ABICOMP Brazil/Portugal ABICOMP International DeskTop Legal MC Text Microsoft Publishing Russian-GOST Ukrainian PCL ITC ...

User's Reference
Page 186
... Language Power Saver Resource Save Download Target Print Timeout Wait Timeout Auto Continue Jam Recovery Page Protect Print Area Display Language Alarm Control Toner Alarm Quality Settings Print Resolution Toner Darkness PictureGrade Parallel Settings PCL SmartSwitch PS SmartSwitch Parallel Buffer Advanced Status Honor Init 186 Make changes in the Local Printer Setup...
... Language Power Saver Resource Save Download Target Print Timeout Wait Timeout Auto Continue Jam Recovery Page Protect Print Area Display Language Alarm Control Toner Alarm Quality Settings Print Resolution Toner Darkness PictureGrade Parallel Settings PCL SmartSwitch PS SmartSwitch Parallel Buffer Advanced Status Honor Init 186 Make changes in the Local Printer Setup...
User's Reference
Page 212
... Language Power Saver Resource Save Download Target Print Timeout Wait Timeout Auto Continue Jam Recovery Page Protect Display Language Alarm Control Toner Alarm Staple Alarm Job Accounting Job Menu Confidential Job Held Jobs Cancel Job Reset Printer Print Buffer Reset Active Bin Prime ...Stapler Cancel Fax Abort Restore Quality Menu Print Resolution Toner Darkness PictureGrade Parallel Menu PCL SmartSwitch PS SmartSwitch NPA Mode Parallel Buffer Job Buffering Advanced Status Protocol Honor Init Parallel Mode 1 ...
... Language Power Saver Resource Save Download Target Print Timeout Wait Timeout Auto Continue Jam Recovery Page Protect Display Language Alarm Control Toner Alarm Staple Alarm Job Accounting Job Menu Confidential Job Held Jobs Cancel Job Reset Printer Print Buffer Reset Active Bin Prime ...Stapler Cancel Fax Abort Restore Quality Menu Print Resolution Toner Darkness PictureGrade Parallel Menu PCL SmartSwitch PS SmartSwitch NPA Mode Parallel Buffer Job Buffering Advanced Status Protocol Honor Init Parallel Mode 1 ...

