
Hardware Maintenance Manual
Page 3
... the battery pack 22 Related service information 23 Restoring the factory contents by using Recovery Disc Set 23 Start Recovery Disc (one disc 23 Operating System Recovery Disc (one or more discs 23 Applications and Drivers Recovery Disc (one or more discs 23 Supplemental Recovery Disc 23 Passwords 24 Power-on password 24 Hard-disk password 24 Supervisor password 24 Power management 25 Screen blank mode 25 Putting your computer to sleep 25 Shutting down the computer 26 Lenovo Y400/Y500 27 Specifications 27 Status indicators 30 Fn key...
... the battery pack 22 Related service information 23 Restoring the factory contents by using Recovery Disc Set 23 Start Recovery Disc (one disc 23 Operating System Recovery Disc (one or more discs 23 Applications and Drivers Recovery Disc (one or more discs 23 Supplemental Recovery Disc 23 Passwords 24 Power-on password 24 Hard-disk password 24 Supervisor password 24 Power management 25 Screen blank mode 25 Putting your computer to sleep 25 Shutting down the computer 26 Lenovo Y400/Y500 27 Specifications 27 Status indicators 30 Fn key...
Hardware Maintenance Manual
Page 6
...Lenovo Y400/Y500 Hardware Maintenance Manual General safety Follow these rules below to ensure general safety: • Observe a good housekeeping in the area where the machines are fastened or rolled up with labels or stickers. 2 Make sure that is long, fasten it by standing or pushing up above your elbows. Use a slow lifting force. Replace any safety device...service representatives and the customer are not in a hazardous position. • Please remove covers and other parts in a safe place, away from all covers correctly before returning the machine to the customer. • Fan ...
...Lenovo Y400/Y500 Hardware Maintenance Manual General safety Follow these rules below to ensure general safety: • Observe a good housekeeping in the area where the machines are fastened or rolled up with labels or stickers. 2 Make sure that is long, fasten it by standing or pushing up above your elbows. Use a slow lifting force. Replace any safety device...service representatives and the customer are not in a hazardous position. • Please remove covers and other parts in a safe place, away from all covers correctly before returning the machine to the customer. • Fan ...
Hardware Maintenance Manual
Page 7
...work on the machine, unplug the power cord. If you need to protect yourself from grounds such as metal floor strips and machine frames. instructions for safe operational condition. • Do not use the approved probe leads and accessories for that it to power-off controls...inspection - Many customers have handles covered with live electrical currents. Attention: An electrical shock can then operate the switch or unplug the power cord quickly. • Do not work with powered-on a machine that does not insulate you . Removing or installing main units • Before ...
...work on the machine, unplug the power cord. If you need to protect yourself from grounds such as metal floor strips and machine frames. instructions for safe operational condition. • Do not use the approved probe leads and accessories for that it to power-off controls...inspection - Many customers have handles covered with live electrical currents. Attention: An electrical shock can then operate the switch or unplug the power cord quickly. • Do not work with powered-on a machine that does not insulate you . Removing or installing main units • Before ...
Hardware Maintenance Manual
Page 18
... diverse da quelle specificate possono provocare l'esposizione a. Such devices are also sold separately as a CD-ROM drive or a DVD-ROM drive. If one of the International Electrotechnical Commission (IEC) 825 and CENELEC EN 60 825 for Class 1 laser products. Lenovo Y400/Y500 Hardware Maintenance Manual Laser compliance statement Some models of Lenovo computer are equipped from the factory with an optical storage device such as options. und Einstellelemente...
... diverse da quelle specificate possono provocare l'esposizione a. Such devices are also sold separately as a CD-ROM drive or a DVD-ROM drive. If one of the International Electrotechnical Commission (IEC) 825 and CENELEC EN 60 825 for Class 1 laser products. Lenovo Y400/Y500 Hardware Maintenance Manual Laser compliance statement Some models of Lenovo computer are equipped from the factory with an optical storage device such as options. und Einstellelemente...
Hardware Maintenance Manual
Page 20
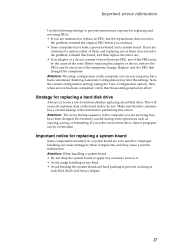
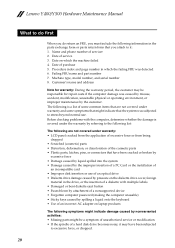
... all software fixes, drivers, and BIOS downloads are customer-installable. Enter the serial number or select a product or use Lenovo smart downloading. 3. The BIOS and device drivers are posted on page 18 Important: BIOS and device driver fixes are installed before completing the service action. To download software fixes, drivers, and BIOS, follow the steps below: 1. see "Important notice for replacing a system board" on page 17 • see "Important information about replacing RoHS compliant FRUs" on the customer support site...
... all software fixes, drivers, and BIOS downloads are customer-installable. Enter the serial number or select a product or use Lenovo smart downloading. 3. The BIOS and device drivers are posted on page 18 Important: BIOS and device driver fixes are installed before completing the service action. To download software fixes, drivers, and BIOS, follow the steps below: 1. see "Important notice for replacing a system board" on page 17 • see "Important information about replacing RoHS compliant FRUs" on the customer support site...
Hardware Maintenance Manual
Page 21
...; Some computers have been changed the symptoms. Attention: The setup configuration on the computer you are servicing may alter the settings. Before replacing the adapter or device, remove the FRUs one by one of the error. Attention: The drive startup sequence in effect. Make sure that changed . This will cause all customer data on a system board are very sensitive. Important service information Use the following strategy to...
...; Some computers have been changed the symptoms. Attention: The setup configuration on the computer you are servicing may alter the settings. Before replacing the adapter or device, remove the FRUs one by one of the error. Attention: The drive startup sequence in effect. Make sure that changed . This will cause all customer data on a system board are very sensitive. Important service information Use the following strategy to...
Hardware Maintenance Manual
Page 23
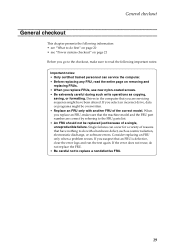
... select an incorrect drive, data or programs might have nothing to do first" on page 20 • see "Power system checkout" on removing and replacing FRUs. • When you replace FRUs, use new nylon-coated screws. • Be extremely careful during such write operations as cosmic radiation, electrostatic discharge, or software errors. If you are servicing sequence might be replaced just because...
... select an incorrect drive, data or programs might have nothing to do first" on page 20 • see "Power system checkout" on removing and replacing FRUs. • When you replace FRUs, use new nylon-coated screws. • Be extremely careful during such write operations as cosmic radiation, electrostatic discharge, or software errors. If you are servicing sequence might be replaced just because...
Hardware Maintenance Manual
Page 24
... computer password (making the computer unusable) • Sticky keys caused by spilling a liquid onto the keyboard • Use of an incompatible card • Improper disk insertion or use . Date of the cosmetic parts • Plastic parts, latches, pins, or connectors that the system was caused by misuse, accident, modification, unsuitable physical or operating environment, or improper maintenance by the customer. Machine type, model number, and serial number 8.
... computer password (making the computer unusable) • Sticky keys caused by spilling a liquid onto the keyboard • Use of an incompatible card • Improper disk insertion or use . Date of the cosmetic parts • Plastic parts, latches, pins, or connectors that the system was caused by misuse, accident, modification, unsuitable physical or operating environment, or improper maintenance by the customer. Machine type, model number, and serial number 8.
Hardware Maintenance Manual
Page 25
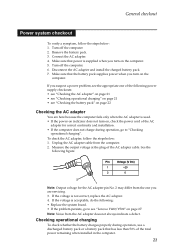
... a power problem, see the appropriate one of the AC adapter cable. Remove the battery pack. 3. Connect the AC adapter. 4. Measure the output voltage at the plug of the following figure: Pin Voltage (V DC) 1 +20 2 0 2 1 Note: Output voltage for correct continuity and installation. • If the computer does not charge during operation, use a discharged battery pack or a battery pack that the battery pack supplies power when you turn...
... a power problem, see the appropriate one of the AC adapter cable. Remove the battery pack. 3. Connect the AC adapter. 4. Measure the output voltage at the plug of the following figure: Pin Voltage (V DC) 1 +20 2 0 2 1 Note: Output voltage for correct continuity and installation. • If the computer does not charge during operation, use a discharged battery pack or a battery pack that the battery pack supplies power when you turn...
Hardware Maintenance Manual
Page 26
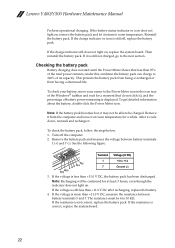
... between battery terminals 1 (+) and 7 (-). If the charge indicator still does not light on . To get detailed information about the battery, double-click the Power Meter icon. Remove the battery pack and measure the voltage between battery terminals 5 and 7. If the voltage is still off the computer. 2. Lenovo Y400/Y500 Hardware Maintenance Manual Perform operational charging. Reinstall the battery pack. If it ), and the percentage of the Windows®...
... between battery terminals 1 (+) and 7 (-). If the charge indicator still does not light on . To get detailed information about the battery, double-click the Power Meter icon. Remove the battery pack and measure the voltage between battery terminals 5 and 7. If the voltage is still off the computer. 2. Lenovo Y400/Y500 Hardware Maintenance Manual Perform operational charging. Reinstall the battery pack. If it ), and the percentage of the Windows®...
Hardware Maintenance Manual
Page 27
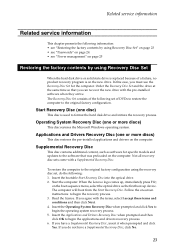
...; see "Passwords" on page 24 • see "Power management" on page 25 Restoring the factory contents by using Recovery Disc Set When the hard disk drive or solid state drive is replaced because of DVDs to restore the computer to the original factory configuration using the recovery disc set of a failure, no product recovery program is used to begin the operating system recovery process. 5. Start Recovery Disc (one or more discs) This disc restores the pre-installed applications and drivers on the boot sequence menu, select...
...; see "Passwords" on page 24 • see "Power management" on page 25 Restoring the factory contents by using Recovery Disc Set When the hard disk drive or solid state drive is replaced because of DVDs to restore the computer to the original factory configuration using the recovery disc set of a failure, no product recovery program is used to begin the operating system recovery process. 5. Start Recovery Disc (one or more discs) This disc restores the pre-installed applications and drivers on the boot sequence menu, select...
Hardware Maintenance Manual
Page 28
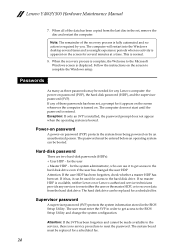
... installed, the password prompt does not appear when the operating system is turned on. The computer will restart into the Windows desktop several minutes at a time. for it appears on the screen whenever the computer is booted. If any services to reset either the user or the master HDP, or to reset the password. The password must be replaced for access to the hard disk drive. Supervisor password A supervisor password...
... installed, the password prompt does not appear when the operating system is turned on. The computer will restart into the Windows desktop several minutes at a time. for it appears on the screen whenever the computer is booted. If any services to reset either the user or the master HDP, or to reset the password. The password must be replaced for access to the hard disk drive. Supervisor password A supervisor password...
Hardware Maintenance Manual
Page 29
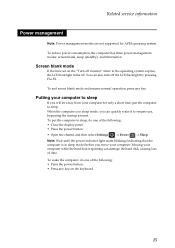
... screen blank mode and resume normal operation, press any key on the "Turn off the LCD backlight by pressing Fn+F2. Screen blank mode If the time set on the keyboard. 25 Related service information Power management Note: Power management modes are not supported for only a short time, put the computer to sleep, do one of the following : • Press the power button. • Press any key. Note: Wait until the power indicator light starts blinking (indicating...
... screen blank mode and resume normal operation, press any key on the "Turn off the LCD backlight by pressing Fn+F2. Screen blank mode If the time set on the keyboard. 25 Related service information Power management Note: Power management modes are not supported for only a short time, put the computer to sleep, do one of the following : • Press the power button. • Press any key. Note: Wait until the power indicator light starts blinking (indicating...
Hardware Maintenance Manual
Page 31
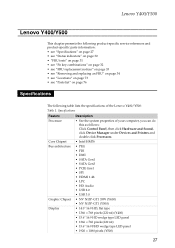
... "Fn key combinations" on page 32 • see "FRU replacement notices" on page 33 • see "Removing and replacing an FRU" on page 34 • see "Locations" on page 73 • see "Parts list" on page 76 Specifications The following table lists the specifications of your computer, you can do this as follows: Click Control Panel, then click Hardware and Sound, click Device Manager under Devices and...
... "Fn key combinations" on page 32 • see "FRU replacement notices" on page 33 • see "Removing and replacing an FRU" on page 34 • see "Locations" on page 73 • see "Parts list" on page 76 Specifications The following table lists the specifications of your computer, you can do this as follows: Click Control Panel, then click Hardware and Sound, click Device Manager under Devices and...
Hardware Maintenance Manual
Page 32
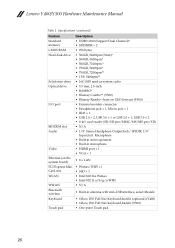
Lenovo Y400/Y500 Hardware Maintenance Manual Table 1. Specifications (continued) Feature Standard memory CMOS RAM Hard disk drive Solid-state drive Optical drive I/O port MODEM slot Audio Video Ethernet (on the system board) PCI Express Mini Card slot WLAN WWAN Bluetooth wireless Keyboard Touch pad Description • DDR3 1600 (Support Dual Channel)* • SODIMM × 2 • 256 bytes • 500GB, 5400rpm (7mm)* • 500GB, 5400rpm* • 500GB, 7200rpm * • 750GB, 5400rpm* • 750GB, 7200rpm** • ...
Lenovo Y400/Y500 Hardware Maintenance Manual Table 1. Specifications (continued) Feature Standard memory CMOS RAM Hard disk drive Solid-state drive Optical drive I/O port MODEM slot Audio Video Ethernet (on the system board) PCI Express Mini Card slot WLAN WWAN Bluetooth wireless Keyboard Touch pad Description • DDR3 1600 (Support Dual Channel)* • SODIMM × 2 • 256 bytes • 500GB, 5400rpm (7mm)* • 500GB, 5400rpm* • 500GB, 7200rpm * • 750GB, 5400rpm* • 750GB, 7200rpm** • ...

Hardware Maintenance Manual
Page 36
... (Y400): Fn Fn Fn + Space (on /off the backlight of Fn with a function key. Turn on select models): Cancel hotkey. Activate the system request. Toggle airplane mode on /off . Activate the break function. Enable/Disable the scroll lock. Activate the pause function. Open Settings charm. Increase/Decrease display brightness. Enable/Disable the touchpad. View current Apps. Open the interface for selecting display options. Open Search charm. Increase/Decrease sound volume. Table 4. Turn on /off the keyboard backlight. 32 Activate the insert...
... (Y400): Fn Fn Fn + Space (on /off the backlight of Fn with a function key. Turn on select models): Cancel hotkey. Activate the system request. Toggle airplane mode on /off . Activate the break function. Enable/Disable the scroll lock. Activate the pause function. Open Settings charm. Increase/Decrease display brightness. Enable/Disable the touchpad. View current Apps. Open the interface for selecting display options. Open Search charm. Increase/Decrease sound volume. Table 4. Turn on /off the keyboard backlight. 32 Activate the insert...
Hardware Maintenance Manual
Page 37
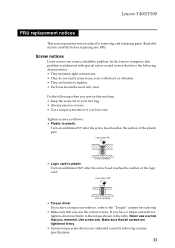
... the torque shown in your tool bag. • Always use new screws. • Use a torque screwdriver if you service this section carefully before replacing any FRU. In the Lenovo computer, this problem is addressed with shock or vibration. • They are calibrated correctly following when you have a torque screwdriver , refer to removing and replacing parts. Do the following country specifications. 33
... the torque shown in your tool bag. • Always use new screws. • Use a torque screwdriver if you service this section carefully before replacing any FRU. In the Lenovo computer, this problem is addressed with shock or vibration. • They are calibrated correctly following when you have a torque screwdriver , refer to removing and replacing parts. Do the following country specifications. 33

Hardware Maintenance Manual
Page 38
... information about connecting and arranging internal cables, see "FRU replacement notices" on page 73. 8. Lenovo Y400/Y500 Hardware Maintenance Manual Removing and replacing an FRU This section presents exploded figures with one hand or using an electrostatic discharge (ESD) strap (P/N 6405959) to remove potential shock reasons. Make sure to be damaged by removing any of the notes that all power cords from electrical outlets, remove the battery pack...
... information about connecting and arranging internal cables, see "FRU replacement notices" on page 73. 8. Lenovo Y400/Y500 Hardware Maintenance Manual Removing and replacing an FRU This section presents exploded figures with one hand or using an electrostatic discharge (ESD) strap (P/N 6405959) to remove potential shock reasons. Make sure to be damaged by removing any of the notes that all power cords from electrical outlets, remove the battery pack...
Hardware Maintenance Manual
Page 43
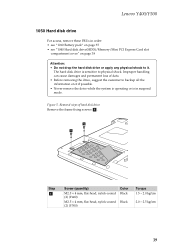
... system is operating or is in suspend mode. a a Step a Screw (quantity) M2.5 × 4 mm, flat-head, nylok-coated (2) (Y400) M2.5 × 4 mm, flat-head, nylok-coated (2) (Y500) Color Black Black Torque 1.5 ~ 2.0 kgfcm 2.0 ~ 2.5 kgfcm 39 Lenovo Y400/Y500 1050 Hard disk drive For access, remove these FRUs in order: • see "1010 Battery pack" on page 35 • see "1040 Hard disk drive(HDD)/Memory/Mini PCI Express Card slot compartment cover" on...
... system is operating or is in suspend mode. a a Step a Screw (quantity) M2.5 × 4 mm, flat-head, nylok-coated (2) (Y400) M2.5 × 4 mm, flat-head, nylok-coated (2) (Y500) Color Black Black Torque 1.5 ~ 2.0 kgfcm 2.0 ~ 2.5 kgfcm 39 Lenovo Y400/Y500 1050 Hard disk drive For access, remove these FRUs in order: • see "1010 Battery pack" on page 35 • see "1040 Hard disk drive(HDD)/Memory/Mini PCI Express Card slot compartment cover" on...
Hardware Maintenance Manual
Page 46
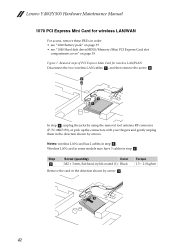
... Hard disk drive(HDD)/Memory/Mini PCI Express Card slot compartment cover" on page 38 Figure 7. b a a In step a, unplug the jacks by using the removal tool antenna RF connector (P/N: 08K7159), or pick up the connectors with your fingers and gently unplug them in the direction shown by arrows. Lenovo Y400/Y500 Hardware Maintenance Manual 1070 PCI Express Mini Card for wireless LAN/WAN Disconnect the two wireless LAN cables a, and then remove the...
... Hard disk drive(HDD)/Memory/Mini PCI Express Card slot compartment cover" on page 38 Figure 7. b a a In step a, unplug the jacks by using the removal tool antenna RF connector (P/N: 08K7159), or pick up the connectors with your fingers and gently unplug them in the direction shown by arrows. Lenovo Y400/Y500 Hardware Maintenance Manual 1070 PCI Express Mini Card for wireless LAN/WAN Disconnect the two wireless LAN cables a, and then remove the...


