
Hardware Maintenance Manual
Page 3
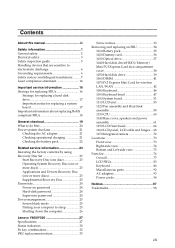
...General checkout 19 What to do first 20 Power system checkout 21 Checking the AC adapter 21 Checking operational charging 21 Checking the battery pack 22 Related service information 23 Restoring the factory contents by using Recovery Disc Set 23 Start Recovery Disc (one disc 23 Operating... 24 Supervisor password 24 Power management 25 Screen blank mode 25 Putting your computer to sleep 25 Shutting down the computer 26 Lenovo Y400/Y500 27 Specifications 27 Status indicators 30 Fn key combinations 32 FRU replacement notices 33 Screw notices 33 Removing and replacing an FRU ...
...General checkout 19 What to do first 20 Power system checkout 21 Checking the AC adapter 21 Checking operational charging 21 Checking the battery pack 22 Related service information 23 Restoring the factory contents by using Recovery Disc Set 23 Start Recovery Disc (one disc 23 Operating... 24 Supervisor password 24 Power management 25 Screen blank mode 25 Putting your computer to sleep 25 Shutting down the computer 26 Lenovo Y400/Y500 27 Specifications 27 Status indicators 30 Fn key combinations 32 FRU replacement notices 33 Screw notices 33 Removing and replacing an FRU ...
Hardware Maintenance Manual
Page 9
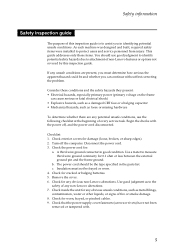
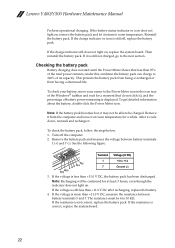
... checklist at the beginning of every service task. Remove the cover. 6. Use a meter to the safety of any obvious non-Lenovo alterations. As each machine was designed and built, required safety items were installed to assist you can cause serious or fatal electrical shock... the power cord. 3. Insulation must determine how serious the apparent hazard could be and whether you in good condition. Check for cracked or bulging batteries. 5. Checklist: 1. Check for worn, frayed, or pinched cables. 9. Turn off , and the power cord disconnected. Check that the power-...
... checklist at the beginning of every service task. Remove the cover. 6. Use a meter to the safety of any obvious non-Lenovo alterations. As each machine was designed and built, required safety items were installed to assist you can cause serious or fatal electrical shock... the power cord. 3. Insulation must determine how serious the apparent hazard could be and whether you in good condition. Check for cracked or bulging batteries. 5. Checklist: 1. Check for worn, frayed, or pinched cables. 9. Turn off , and the power cord disconnected. Check that the power-...
Hardware Maintenance Manual
Page 10
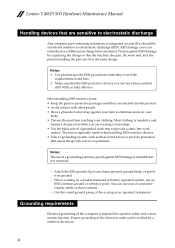
...The mat is especially useful when handling ESD-sensitive devices. • Select a grounding system, such as fully effective. Lenovo Y400/Y500 Hardware Maintenance Manual Handling devices that are sensitive to electrostatic discharge Any computer part containing transistors or integrated circuits (ICs)... on your body. • Prevent the part from touching your clothing. Notes: The use of the ac plug on a double-insulated or battery-operated system, use have been certified (ISO 9000) as those listed below, to guard against ESD damage by a certified electrician. 6 Grounding ...
...The mat is especially useful when handling ESD-sensitive devices. • Select a grounding system, such as fully effective. Lenovo Y400/Y500 Hardware Maintenance Manual Handling devices that are sensitive to electrostatic discharge Any computer part containing transistors or integrated circuits (ICs)... on your body. • Prevent the part from touching your clothing. Notes: The use of the ac plug on a double-insulated or battery-operated system, use have been certified (ISO 9000) as those listed below, to guard against ESD damage by a certified electrician. 6 Grounding ...
Hardware Maintenance Manual
Page 25
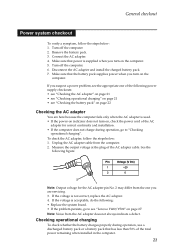
...from the one of the AC adapter for correct continuity and installation. • If the computer does not charge during operation, use a discharged battery pack or a battery pack that power is used. • If the power-on indicator does not turn on the computer. 5. Note: Noise from the computer.... supply checkouts: • see "Checking the AC adapter" on page 21 • see "Checking operational charging" on page 21 • see "Lenovo Y400/Y500" on , check the power cord of the following : • Replace the system board. • If the problem persists, go to see "Checking the...
...from the one of the AC adapter for correct continuity and installation. • If the computer does not charge during operation, use a discharged battery pack or a battery pack that power is used. • If the power-on indicator does not turn on the computer. 5. Note: Noise from the computer.... supply checkouts: • see "Checking the AC adapter" on page 21 • see "Checking operational charging" on page 21 • see "Lenovo Y400/Y500" on , check the power cord of the following : • Replace the system board. • If the problem persists, go to see "Checking the...
Hardware Maintenance Manual
Page 26
... next section. If the voltage is still off the computer. 2. This protects the battery pack from being overcharged or from the computer and leave it is displayed. Lenovo Y400/Y500 Hardware Maintenance Manual Perform operational charging. under this condition the battery pack can charge to +14 7 Ground (-) 3. The resistance must be able to room...
... next section. If the voltage is still off the computer. 2. This protects the battery pack from being overcharged or from the computer and leave it is displayed. Lenovo Y400/Y500 Hardware Maintenance Manual Perform operational charging. under this condition the battery pack can charge to +14 7 Ground (-) 3. The resistance must be able to room...
Hardware Maintenance Manual
Page 33
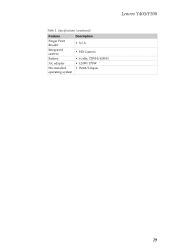
Specifications (continued) Feature Finger Print Reader Integrated camera Battery AC adapter Pre-installed operating system Description • N/A • HD Camera • 6 cells, 72WH/62WH • 120W/170W • Win8/Linpus 29 Lenovo Y400/Y500 Table 1.
Specifications (continued) Feature Finger Print Reader Integrated camera Battery AC adapter Pre-installed operating system Description • N/A • HD Camera • 6 cells, 72WH/62WH • 120W/170W • Win8/Linpus 29 Lenovo Y400/Y500 Table 1.
Hardware Maintenance Manual
Page 35
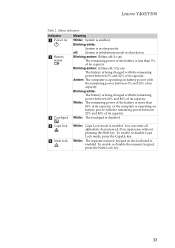
...5% and 20% of its capacity. off /1s on) The remaining power of the battery is operating on battery power with the remaining power between 20% and 80% of its capacity. Blinking white: The battery is in hibernate mode or shut down. d Caps lock e Num lock White: Caps... is in uppercase without pressing the Shift key. Blinking white: System is disabled. Lenovo Y400/Y500 Table 2. To enable or disable Caps Lock mode, press the CapsLk key. White: The separate numeric keypad on b Battery status c Touchpad Meaning White: System is enabled. To enable or disable the numeric...
...5% and 20% of its capacity. off /1s on) The remaining power of the battery is operating on battery power with the remaining power between 20% and 80% of its capacity. Blinking white: The battery is in hibernate mode or shut down. d Caps lock e Num lock White: Caps... is in uppercase without pressing the Shift key. Blinking white: System is disabled. Lenovo Y400/Y500 Table 2. To enable or disable Caps Lock mode, press the CapsLk key. White: The separate numeric keypad on b Battery status c Touchpad Meaning White: System is enabled. To enable or disable the numeric...

Hardware Maintenance Manual
Page 38
... general rules: 1. Remove them in the order in which they are listed at the top of the Lenovo Y580, unless otherwise stated. 34 Before touching it, establish personal grounding by touching a ground point with...springs, and other small parts are in the figure. 7. Verify this section are loose inside the computer. Lenovo Y400/Y500 Hardware Maintenance Manual Removing and replacing an FRU This section presents exploded figures with one hand or using an ...that all power cords from electrical outlets, remove the battery pack, and then disconnect any of damaging parts. 2.
... general rules: 1. Remove them in the order in which they are listed at the top of the Lenovo Y580, unless otherwise stated. 34 Before touching it, establish personal grounding by touching a ground point with...springs, and other small parts are in the figure. 7. Verify this section are loose inside the computer. Lenovo Y400/Y500 Hardware Maintenance Manual Removing and replacing an FRU This section presents exploded figures with one hand or using an ...that all power cords from electrical outlets, remove the battery pack, and then disconnect any of damaging parts. 2.
Hardware Maintenance Manual
Page 39
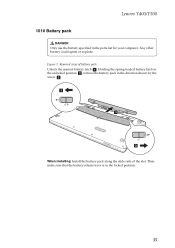
Holding the spring-loaded battery latch in the unlocked position b, remove the battery pack in the locked position. 35 Any other battery could ignite or explode. Then make sure that the battery release lever is in the direction shown by the arrow c. Removal steps of the slot. Lenovo Y400/Y500 1010 Battery pack DANGER Only use the battery specified in the parts list for your computer. a c b When installing: Install the battery pack along the slide rails of battery pack Unlock the manual battery latch a. Figure 1.
Holding the spring-loaded battery latch in the unlocked position b, remove the battery pack in the locked position. 35 Any other battery could ignite or explode. Then make sure that the battery release lever is in the direction shown by the arrow c. Removal steps of the slot. Lenovo Y400/Y500 1010 Battery pack DANGER Only use the battery specified in the parts list for your computer. a c b When installing: Install the battery pack along the slide rails of battery pack Unlock the manual battery latch a. Figure 1.
Hardware Maintenance Manual
Page 40
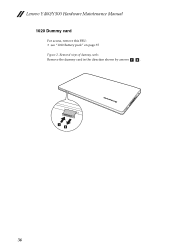
Removal steps of dummy cards Remove the dummy card in the direction shown by arrows a b . Lenovo Y400/Y500 Hardware Maintenance Manual 1020 Dummy card For access, remove this FRU: • see "1010 Battery pack" on page 35 Figure 2. a b 36
Removal steps of dummy cards Remove the dummy card in the direction shown by arrows a b . Lenovo Y400/Y500 Hardware Maintenance Manual 1020 Dummy card For access, remove this FRU: • see "1010 Battery pack" on page 35 Figure 2. a b 36

Hardware Maintenance Manual
Page 41
Gently pull out the optional module in the direction shown by arrow a. a b c 37 Hold the spring-loaded latch in the direction shown by arrow c. Removal steps of optical drive Push the latch in the unlocked position b. Lenovo Y400/Y500 1030 Optical drive For access, remove this FRU: • see "1010 Battery pack" on page 35 Figure 3.
Gently pull out the optional module in the direction shown by arrow a. a b c 37 Hold the spring-loaded latch in the direction shown by arrow c. Removal steps of optical drive Push the latch in the unlocked position b. Lenovo Y400/Y500 1030 Optical drive For access, remove this FRU: • see "1010 Battery pack" on page 35 Figure 3.
Hardware Maintenance Manual
Page 42
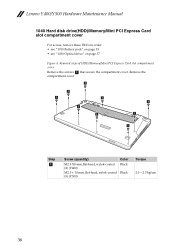
Lenovo Y400/Y500 Hardware Maintenance Manual 1040 Hard disk drive(HDD)/Memory/Mini PCI Express Card slot compartment cover For access, remove these FRUs in order: • see "1010 Battery pack" on page 35 • see "1030 Optical drive" on page 37 Figure 4. a a a a a a a a a Step a Screw (quantity) ...M2.5 X8 mm,flat-head, nylok-coated (8) (Y400) M2.5 × 10 mm, flat-head, nylok-coated (9) (Y500) Color Black Black Torque 2.0 ~ ...
Lenovo Y400/Y500 Hardware Maintenance Manual 1040 Hard disk drive(HDD)/Memory/Mini PCI Express Card slot compartment cover For access, remove these FRUs in order: • see "1010 Battery pack" on page 35 • see "1030 Optical drive" on page 37 Figure 4. a a a a a a a a a Step a Screw (quantity) ...M2.5 X8 mm,flat-head, nylok-coated (8) (Y400) M2.5 × 10 mm, flat-head, nylok-coated (9) (Y500) Color Black Black Torque 2.0 ~ ...
Hardware Maintenance Manual
Page 43
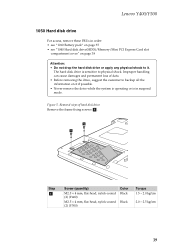
Lenovo Y400/Y500 1050 Hard disk drive For access, remove these FRUs in suspend mode. Improper handling can cause damages and permanent loss of hard disk drive Remove ... (quantity) M2.5 × 4 mm, flat-head, nylok-coated (2) (Y400) M2.5 × 4 mm, flat-head, nylok-coated (2) (Y500) Color Black Black Torque 1.5 ~ 2.0 kgfcm 2.0 ~ 2.5 kgfcm 39 The hard disk drive is in order: • see "1010 Battery pack" on page 35 • see "1040 Hard disk drive(HDD)/Memory/Mini PCI Express Card slot...
Lenovo Y400/Y500 1050 Hard disk drive For access, remove these FRUs in suspend mode. Improper handling can cause damages and permanent loss of hard disk drive Remove ... (quantity) M2.5 × 4 mm, flat-head, nylok-coated (2) (Y400) M2.5 × 4 mm, flat-head, nylok-coated (2) (Y500) Color Black Black Torque 1.5 ~ 2.0 kgfcm 2.0 ~ 2.5 kgfcm 39 The hard disk drive is in order: • see "1010 Battery pack" on page 35 • see "1040 Hard disk drive(HDD)/Memory/Mini PCI Express Card slot...
Hardware Maintenance Manual
Page 45
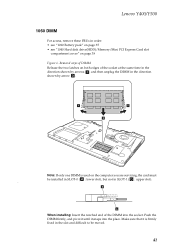
... Removal steps of DIMM Release the two latches on page 38 Figure 6. a a b Note: If only one DIMM is firmly fixed in order: • see "1010 Battery pack" on page 35 • see "1040 Hard disk drive(HDD)/Memory/Mini PCI Express Card slot compartment cover" on both edges of the DIMM... into the place. Make sure that it snaps into the socket. Lenovo Y400/Y500 1060 DIMM For access, remove these FRUs in the slot and difficult to be installed in SLOT-0 ( : lower slot), but not in the direction...
... Removal steps of DIMM Release the two latches on page 38 Figure 6. a a b Note: If only one DIMM is firmly fixed in order: • see "1010 Battery pack" on page 35 • see "1040 Hard disk drive(HDD)/Memory/Mini PCI Express Card slot compartment cover" on both edges of the DIMM... into the place. Make sure that it snaps into the socket. Lenovo Y400/Y500 1060 DIMM For access, remove these FRUs in the slot and difficult to be installed in SLOT-0 ( : lower slot), but not in the direction...
Hardware Maintenance Manual
Page 46
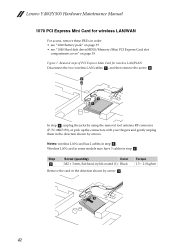
...removal tool antenna RF connector (P/N: 08K7159), or pick up the connectors with your fingers and gently unplug them in order: • see "1010 Battery pack" on page 35 • see "1040 Hard disk drive(HDD)/Memory/Mini PCI Express Card slot compartment cover" on page 38 Figure ...7. Wireless LAN card in some models may have 3 cables in step a. Torque 1.5 ~ 2.0 kgfcm c 42 Lenovo Y400/Y500 Hardware Maintenance Manual 1070 PCI Express Mini Card for wireless LAN/WAN Disconnect the two wireless LAN cables a, and then remove the screw b. Removal steps...
...removal tool antenna RF connector (P/N: 08K7159), or pick up the connectors with your fingers and gently unplug them in order: • see "1010 Battery pack" on page 35 • see "1040 Hard disk drive(HDD)/Memory/Mini PCI Express Card slot compartment cover" on page 38 Figure ...7. Wireless LAN card in some models may have 3 cables in step a. Torque 1.5 ~ 2.0 kgfcm c 42 Lenovo Y400/Y500 Hardware Maintenance Manual 1070 PCI Express Mini Card for wireless LAN/WAN Disconnect the two wireless LAN cables a, and then remove the screw b. Removal steps...

Hardware Maintenance Manual
Page 48
Removal steps of keyboard Y400: Remove two screws a . a a Y500: Remove three screws a . Lenovo Y400/Y500 Hardware Maintenance Manual 1080 Keyboard For access, remove these FRUs in order: • see "1010 Battery pack" on page 35 • see "1030 Optical drive" on page 37 • see "1040 Hard disk drive(HDD)/Memory/Mini PCI Express Card... LAN/WAN" on page 42 Figure 8. a a a Step a Screw (quantity) M2.5 × 4 mm, flat-head, nylok-coated (2) (Y400) M2.5 × 10 mm, flat-head, nylok-coated (3) (Y500) Color Black Black Torque 1.5 ~ 2.0 kgfcm 44
Removal steps of keyboard Y400: Remove two screws a . a a Y500: Remove three screws a . Lenovo Y400/Y500 Hardware Maintenance Manual 1080 Keyboard For access, remove these FRUs in order: • see "1010 Battery pack" on page 35 • see "1030 Optical drive" on page 37 • see "1040 Hard disk drive(HDD)/Memory/Mini PCI Express Card... LAN/WAN" on page 42 Figure 8. a a a Step a Screw (quantity) M2.5 × 4 mm, flat-head, nylok-coated (2) (Y400) M2.5 × 10 mm, flat-head, nylok-coated (3) (Y500) Color Black Black Torque 1.5 ~ 2.0 kgfcm 44

Hardware Maintenance Manual
Page 51
...; 8 mm, flat-head, nylok-coated (3) Black M2 × 3 mm, flat-head, nylok-coated (3) Black Torque 1.5 ~ 2.0 kgfcm 1.0 ~ 1.5 kgfcm 47 Lenovo Y400/Y500 1090 Keyboard bezel For access, remove these FRUs in order: • see "1010 Battery pack" on page 35 • see "1020 Dummy card" on page 36 • see "1030 Optical drive" on...
...; 8 mm, flat-head, nylok-coated (3) Black M2 × 3 mm, flat-head, nylok-coated (3) Black Torque 1.5 ~ 2.0 kgfcm 1.0 ~ 1.5 kgfcm 47 Lenovo Y400/Y500 1090 Keyboard bezel For access, remove these FRUs in order: • see "1010 Battery pack" on page 35 • see "1020 Dummy card" on page 36 • see "1030 Optical drive" on...

Hardware Maintenance Manual
Page 55
Lenovo Y400/Y500 1100 System board Important notices for handling the system board: When handling the system board, bear the following in order: • see "1010 Battery pack" on page 35 • see "1020 Dummy card" on page 36 • see "1030 Optical drive" on page 37 • see "1040 Hard disk ...
Lenovo Y400/Y500 1100 System board Important notices for handling the system board: When handling the system board, bear the following in order: • see "1010 Battery pack" on page 35 • see "1020 Dummy card" on page 36 • see "1030 Optical drive" on page 37 • see "1040 Hard disk ...

Hardware Maintenance Manual
Page 59
... Y400 bb a a Step Screw (quantity) b M2.5 × 4 flat-head, nylok-coated (4) Color Torque Black 1.5 ~2.0 kgfcm 55 Remove screws b . Lenovo Y400/Y500 1110 LCD unit For access, remove these FRUs in the direction shown by arrows a . Removal steps of LCD unit Y400: Release the antenna cables from ...the cable guides in order: • see "1010 Battery pack" on page 35 • see "1020 Dummy card" on page 36 • see "1030 Optical ...
... Y400 bb a a Step Screw (quantity) b M2.5 × 4 flat-head, nylok-coated (4) Color Torque Black 1.5 ~2.0 kgfcm 55 Remove screws b . Lenovo Y400/Y500 1110 LCD unit For access, remove these FRUs in the direction shown by arrows a . Removal steps of LCD unit Y400: Release the antenna cables from ...the cable guides in order: • see "1010 Battery pack" on page 35 • see "1020 Dummy card" on page 36 • see "1030 Optical ...

Hardware Maintenance Manual
Page 62
Lenovo Y400/Y500 Hardware Maintenance Manual 1120 Fan assembly and Heat Sink assembly For access, remove these FRUs in order: • see "1010 Battery pack" on page 35 • see "1020 Dummy card" on page 36 • see "1030 Optical drive" on page 37 • see "1040 Hard disk ...
Lenovo Y400/Y500 Hardware Maintenance Manual 1120 Fan assembly and Heat Sink assembly For access, remove these FRUs in order: • see "1010 Battery pack" on page 35 • see "1020 Dummy card" on page 36 • see "1030 Optical drive" on page 37 • see "1040 Hard disk ...


