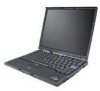
Hardware Maintenance Manual
Page 5
... symptoms 54 Intermittent problems 55 Undetermined problems 55 FRU replacement notices 56 Screw notices 56 © Copyright Lenovo 2007, 2008 Retaining serial numbers 56 Removing and replacing a FRU 59 1010 Battery pack 60 1020 Hard disk drive (2.5-inch) and HDD rubber rails 61 1030 DIMM ... LCD cable 117 Locations 119 Front view for ThinkPad X60, X60s, X61, and X61s 119 Rear view for ThinkPad X60, X60s, X61, and X61s 120 Bottom view for ThinkPad X60, X60s, X61, and X61s 121 Rear View for ThinkPad X6 UltraBase . . . . 122 Bottom View for ThinkPad X6 UltraBase . . . 122 Parts list ...
... symptoms 54 Intermittent problems 55 Undetermined problems 55 FRU replacement notices 56 Screw notices 56 © Copyright Lenovo 2007, 2008 Retaining serial numbers 56 Removing and replacing a FRU 59 1010 Battery pack 60 1020 Hard disk drive (2.5-inch) and HDD rubber rails 61 1030 DIMM ... LCD cable 117 Locations 119 Front view for ThinkPad X60, X60s, X61, and X61s 119 Rear view for ThinkPad X60, X60s, X61, and X61s 120 Bottom view for ThinkPad X60, X60s, X61, and X61s 121 Rear View for ThinkPad X6 UltraBase . . . . 122 Bottom View for ThinkPad X6 UltraBase . . . 122 Parts list ...
Hardware Maintenance Manual
Page 10
... and 3-digit CMV model (Example: 1829-W15). 4 ThinkPad® X60, X60s, X61, and X61s If more than one error code is provided to the customer to the customer. Running Automatic Configuration may also cause false error codes. The PRODUCT ID portion of the data before replacing a hard disk drive. Attention: When handling a system board: v Do not...
... and 3-digit CMV model (Example: 1829-W15). 4 ThinkPad® X60, X60s, X61, and X61s If more than one error code is provided to the customer to the customer. Running Automatic Configuration may also cause false error codes. The PRODUCT ID portion of the data before replacing a hard disk drive. Attention: When handling a system board: v Do not...

Hardware Maintenance Manual
Page 31
...Product Recovery program is displayed, press Continue. When the "Welcome to the original factory state, and click Next. Click OK. 3. Select Restore my hard drive to Rescue and Recovery" screen is on appears. Select I accept these terms and conditions and press OK. A warning appears not to save any...the same time so that recovery is replaced because of 1 into the optical drive, and press OK. Click OK. When this may remain on http://www.lenovo.com/spm Restoring the factory contents by using Product Recovery discs When the hard disk drive is intended only for the computer. In...
...Product Recovery program is displayed, press Continue. When the "Welcome to the original factory state, and click Next. Click OK. 3. Select Restore my hard drive to Rescue and Recovery" screen is on appears. Select I accept these terms and conditions and press OK. A warning appears not to save any...the same time so that recovery is replaced because of 1 into the optical drive, and press OK. Click OK. When this may remain on http://www.lenovo.com/spm Restoring the factory contents by using Product Recovery discs When the hard disk drive is intended only for the computer. In...
Hardware Maintenance Manual
Page 33
...current SVP in order to get access to the hard disk drive. The hard disk drive can be replaced for access to the BIOS Setup Utility and change the system configuration. Remove the backup battery. Note: To check whether the ThinkPad computer supports the Passphrase function, enter the BIOS ...pack. For how to recover data from the hard disk drive. The computer restarts, and the BIOS Setup Utility screen opens. 4. In the Changes have forgotten, do the following: (A) If no master HDP is available, neither Lenovo nor Lenovo authorized servicers provide any services to reset either ...
...current SVP in order to get access to the hard disk drive. The hard disk drive can be replaced for access to the BIOS Setup Utility and change the system configuration. Remove the backup battery. Note: To check whether the ThinkPad computer supports the Passphrase function, enter the BIOS ...pack. For how to recover data from the hard disk drive. The computer restarts, and the BIOS Setup Utility screen opens. 4. In the Changes have forgotten, do the following: (A) If no master HDP is available, neither Lenovo nor Lenovo authorized servicers provide any services to reset either ...
Hardware Maintenance Manual
Page 34
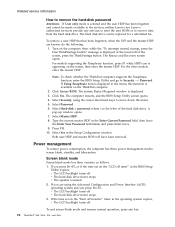
...HDP will have been removed. Related service information How to remove the hard-disk password Attention: If User only mode is selected and the user HDP has been forgotten and cannot be replaced for a scheduled fee. The Rescue and Recovery screen opens. Screen blank...to the servicer, neither Lenovo nor Lenovo authorized servicers provide any key. 28 ThinkPad® X60, X60s, X61, and X61s The computer restarts, and the BIOS Setup Utility screen opens. 4. Select Password. 6. The hard disk drive can be made available to recover data from the hard disk drive. If you are known...
...HDP will have been removed. Related service information How to remove the hard-disk password Attention: If User only mode is selected and the user HDP has been forgotten and cannot be replaced for a scheduled fee. The Rescue and Recovery screen opens. Screen blank...to the servicer, neither Lenovo nor Lenovo authorized servicers provide any key. 28 ThinkPad® X60, X60s, X61, and X61s The computer restarts, and the BIOS Setup Utility screen opens. 4. Select Password. 6. The hard disk drive can be made available to recover data from the hard disk drive. If you are known...
Hardware Maintenance Manual
Page 40
... v Save Log v Full Erase Hard Drive v Quick Erase Hard Drive PC-Doctor for correct continuity and installation. Select one of the categories listed below to display symptoms and solutions: v CHECK SYSTEM HEALTH v SYSTEM AND DEVICE TESTS v LENOVO TROUBLESHOOTING v CENTER v SYSTEM REPORTS...when the ac adapter is used: v If the power problem occurs only when the port replicator is used, replace the port replicator. Power off the computer. 6. Connect the ac adapter. 4. Disconnect the ac adapter and ... check the ac adapter, do the following : 34 ThinkPad® X60, X60s, X61, and X61s
... v Save Log v Full Erase Hard Drive v Quick Erase Hard Drive PC-Doctor for correct continuity and installation. Select one of the categories listed below to display symptoms and solutions: v CHECK SYSTEM HEALTH v SYSTEM AND DEVICE TESTS v LENOVO TROUBLESHOOTING v CENTER v SYSTEM REPORTS...when the ac adapter is used: v If the power problem occurs only when the port replicator is used, replace the port replicator. Power off the computer. 6. Connect the ac adapter. 4. Disconnect the ac adapter and ... check the ac adapter, do the following : 34 ThinkPad® X60, X60s, X61, and X61s
Hardware Maintenance Manual
Page 43
...Common parts list 232 Tools 232 Power cords 232 Notices 234 Trademarks 235 © Copyright Lenovo 2007, 2008 37 ThinkPad X60, X60s, X61, and X61s Product overview 38 Specifications 38 Status indicators for X60, X60s, X61, and X61s . . 41 FRU tests 43 Fn key combinations 45 Symptom-to-FRU index 47 Numeric...number of the system unit 57 Retaining the UUID 57 Reading or writing the ECA information . . 57 Removing and replacing a FRU 59 1010 Battery pack 60 1020 Hard disk drive (2.5-inch) and HDD rubber rails 61 1030 DIMM cover 63 1040 DIMM 64 1050 Keyboard 65 1060 Upper case ...
...Common parts list 232 Tools 232 Power cords 232 Notices 234 Trademarks 235 © Copyright Lenovo 2007, 2008 37 ThinkPad X60, X60s, X61, and X61s Product overview 38 Specifications 38 Status indicators for X60, X60s, X61, and X61s . . 41 FRU tests 43 Fn key combinations 45 Symptom-to-FRU index 47 Numeric...number of the system unit 57 Retaining the UUID 57 Reading or writing the ECA information . . 57 Removing and replacing a FRU 59 1010 Battery pack 60 1020 Hard disk drive (2.5-inch) and HDD rubber rails 61 1030 DIMM cover 63 1040 DIMM 64 1050 Keyboard 65 1060 Upper case ...

Hardware Maintenance Manual
Page 54
.... 01C9 More than one of them . Press to reset the time and date. 48 ThinkPad® X60, X60s, X61, and X61s Remove the Ethernet device that you installed; Reseat the hard disk drive. 2. Run interactive tests of them. System board. Replace the backup battery and run BIOS Setup Utility to ignore the warning message. 2. Charge the...
.... 01C9 More than one of them . Press to reset the time and date. 48 ThinkPad® X60, X60s, X61, and X61s Remove the Ethernet device that you installed; Reseat the hard disk drive. 2. Run interactive tests of them. System board. Replace the backup battery and run BIOS Setup Utility to ignore the warning message. 2. Charge the...
Hardware Maintenance Manual
Page 56
... error. 1. Save and exit. 2. Then run RECOVER TO FACTORY CONTENTS in RECOVER TO FACTORY CONTENTS. If item 4 failed, replace the hard disk drive. 1820 More than one external fingerprint reader is plugged in-Power off and install a memory module to Slot-0 or the lower ... Access Predesktop Area again. 4. Boot from the Recovery CD and perform full recovery from it is attached to the ThinkPad computer, and place the computer on page 64. 2000 Hard Drive Active Protection sensor diagnostics failed. Remove all partitions. Press to load Access Predesktop Area. Run Diagnostics...
... error. 1. Save and exit. 2. Then run RECOVER TO FACTORY CONTENTS in RECOVER TO FACTORY CONTENTS. If item 4 failed, replace the hard disk drive. 1820 More than one external fingerprint reader is plugged in-Power off and install a memory module to Slot-0 or the lower ... Access Predesktop Area again. 4. Boot from the Recovery CD and perform full recovery from it is attached to the ThinkPad computer, and place the computer on page 64. 2000 Hard Drive Active Protection sensor diagnostics failed. Remove all partitions. Press to load Access Predesktop Area. Run Diagnostics...
Hardware Maintenance Manual
Page 61
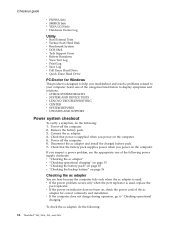
...Power system checkout" on the computer. 5. Devices attached to a variety of the following devices: a. Hard disk drive f. PC Cards 4. Determine whether the problem has been solved. 6. Replace any FRUs. 3. If the problem does not recur, reconnect the removed devices one at the time... test to isolate the failing FRU (do not replace any damaged FRU. 3. External diskette drive or optical drive g. LCD assembly ThinkPad X60, X60s, X61, and X61s 55 DIMM h. Turn on page 34.) 1. System board b. If the problem remains, replace the following : 1. Visually check each FRU for...
...Power system checkout" on the computer. 5. Devices attached to a variety of the following devices: a. Hard disk drive f. PC Cards 4. Determine whether the problem has been solved. 6. Replace any FRUs. 3. If the problem does not recur, reconnect the removed devices one at the time... test to isolate the failing FRU (do not replace any damaged FRU. 3. External diskette drive or optical drive g. LCD assembly ThinkPad X60, X60s, X61, and X61s 55 DIMM h. Turn on page 34.) 1. System board b. If the problem remains, replace the following : 1. Visually check each FRU for...
Hardware Maintenance Manual
Page 67
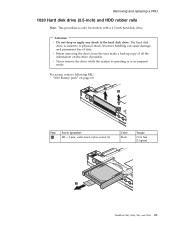
... permanent loss of all the information on page 60 2 1 Step 1 Screw (quantity) M3 × 3 mm, wafer-head, nylon-coated (1) Color Black Torque 0.196 Nm (2 kgfcm) 3 ThinkPad X60, X60s, X61, and X61s 61 Removing and replacing a FRU 1020 Hard disk drive (2.5-inch) and HDD rubber rails Note: This procedure is in suspend mode. v Never remove the...
... permanent loss of all the information on page 60 2 1 Step 1 Screw (quantity) M3 × 3 mm, wafer-head, nylon-coated (1) Color Black Torque 0.196 Nm (2 kgfcm) 3 ThinkPad X60, X60s, X61, and X61s 61 Removing and replacing a FRU 1020 Hard disk drive (2.5-inch) and HDD rubber rails Note: This procedure is in suspend mode. v Never remove the...
Hardware Maintenance Manual
Page 79
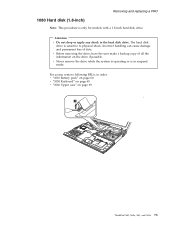
... FRUs, in suspend mode. Removing and replacing a FRU 1080 Hard disk (1.8-inch) Note: This procedure is sensitive to the hard disk drive. The hard disk drive is only for models with a 1.8-inch hard disk drive. Incorrect handling can cause damage and permanent loss of all the information on page 69 1 2 ThinkPad X60, X60s, X61, and X61s 73 Attention v Do not drop...
... FRUs, in suspend mode. Removing and replacing a FRU 1080 Hard disk (1.8-inch) Note: This procedure is sensitive to the hard disk drive. The hard disk drive is only for models with a 1.8-inch hard disk drive. Incorrect handling can cause damage and permanent loss of all the information on page 69 1 2 ThinkPad X60, X60s, X61, and X61s 73 Attention v Do not drop...
Hardware Maintenance Manual
Page 80
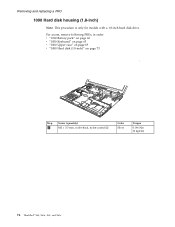
Removing and replacing a FRU 1090 Hard disk housing (1.8-inch) Note: This procedure is only for models with a 1.8-inch hard disk drive. For access, remove following FRUs, in order: v "1010 Battery pack" on page 60 v "1050 Keyboard" on page 65 v "1060 Upper case" on page 69 v "1080 Hard disk (1.8-inch)" on page 73 1 2 Step 1 Screw (quantity) M2 × 3.5 mm, wafer-head, nylon-coated (2) Color Silver Torque 0.196 Nm (2 kgfcm) 74 ThinkPad® X60, X60s, X61, and X61s
Removing and replacing a FRU 1090 Hard disk housing (1.8-inch) Note: This procedure is only for models with a 1.8-inch hard disk drive. For access, remove following FRUs, in order: v "1010 Battery pack" on page 60 v "1050 Keyboard" on page 65 v "1060 Upper case" on page 69 v "1080 Hard disk (1.8-inch)" on page 73 1 2 Step 1 Screw (quantity) M2 × 3.5 mm, wafer-head, nylon-coated (2) Color Silver Torque 0.196 Nm (2 kgfcm) 74 ThinkPad® X60, X60s, X61, and X61s

Hardware Maintenance Manual
Page 98
For 1.8-inch hard disk drive For 2.5-inch hard disk drive 92 ThinkPad® X60, X60s, X61, and X61s Removing and replacing a FRU 1190 Hard disk sub-card For access, remove following FRUs, in order: v "1010 Battery pack" on page 60 v "1020 Hard disk drive (2.5-inch) and HDD rubber rails" on page 61 v "1050 Keyboard" on page 65 v "1060 Upper case" on page...
For 1.8-inch hard disk drive For 2.5-inch hard disk drive 92 ThinkPad® X60, X60s, X61, and X61s Removing and replacing a FRU 1190 Hard disk sub-card For access, remove following FRUs, in order: v "1010 Battery pack" on page 60 v "1020 Hard disk drive (2.5-inch) and HDD rubber rails" on page 61 v "1050 Keyboard" on page 65 v "1060 Upper case" on page...
Hardware Maintenance Manual
Page 99
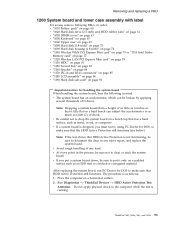
... conductive corrugated material. Run Diagnostics --> ThinkPad Devices --> HDD Active Protection Test. Removing and replacing a FRU 1200 System board and lower case assembly with label For access, remove following FRUs, in order: v "1010 Battery pack" on page 60 v "1020 Hard disk drive (2.5-inch) and HDD rubber rails" ...86 v "1190 Hard disk sub-card" on page 92 Important notices for handling the system board When handling the system board, bear the following in any kind. Note: If the test shows that has a hard surface, such as follows: 1. ThinkPad X60, X60s, X61, and X61s 93 v Avoid rough...
... conductive corrugated material. Run Diagnostics --> ThinkPad Devices --> HDD Active Protection Test. Removing and replacing a FRU 1200 System board and lower case assembly with label For access, remove following FRUs, in order: v "1010 Battery pack" on page 60 v "1020 Hard disk drive (2.5-inch) and HDD rubber rails" ...86 v "1190 Hard disk sub-card" on page 92 Important notices for handling the system board When handling the system board, bear the following in any kind. Note: If the test shows that has a hard surface, such as follows: 1. ThinkPad X60, X60s, X61, and X61s 93 v Avoid rough...
Hardware Maintenance Manual
Page 102
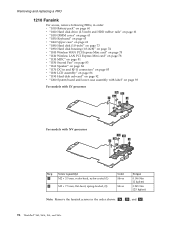
...replacing a FRU 1210 Fansink For access, remove following FRUs, in order: v "1010 Battery pack" on page 60 v "1020 Hard disk drive (2.5-inch) and HDD rubber rails" on page 61 v "1030 DIMM cover" on page 63 v "1050 Keyboard" on page 65 v "1060 Upper case" on page 69 v "1080 Hard disk (1.8-inch)" on page 73 v "1090 Hard... DC-in and RJ-11 connectors" on page 85 v "1180 LCD assembly" on page 86 v "1190 Hard disk sub-card" on page 92 v "1200 System board and lower case assembly with label" on page 93...the fansink screws in the order shown: 3a , 3b , and 3c . 96 ThinkPad® X60, X60s, X61, and X61s
...replacing a FRU 1210 Fansink For access, remove following FRUs, in order: v "1010 Battery pack" on page 60 v "1020 Hard disk drive (2.5-inch) and HDD rubber rails" on page 61 v "1030 DIMM cover" on page 63 v "1050 Keyboard" on page 65 v "1060 Upper case" on page 69 v "1080 Hard disk (1.8-inch)" on page 73 v "1090 Hard... DC-in and RJ-11 connectors" on page 85 v "1180 LCD assembly" on page 86 v "1190 Hard disk sub-card" on page 92 v "1200 System board and lower case assembly with label" on page 93...the fansink screws in the order shown: 3a , 3b , and 3c . 96 ThinkPad® X60, X60s, X61, and X61s


