
Hardware Maintenance Manual
Page 5
... manual v Safety information 1 General safety 2 Electrical safety 3 Safety inspection guide 5 Handling devices that are sensitive to electrostatic discharge 6 Grounding requirements 6 Safety notices: multilingual translations . . . . . 7 Laser compliance statement 14 Important service ... Copyright Lenovo 2008 No-beep symptoms 44 LCD-related symptoms 45 Intermittent problems 46 Undetermined problems 46 ThinkPad X200 and X200s 47...58 Retaining serial numbers 59 Removing and replacing a FRU 62 Before servicing ThinkPad X200 and X200s . . . 63 1010 Battery pack 64 1020 Hard disk drive...
... manual v Safety information 1 General safety 2 Electrical safety 3 Safety inspection guide 5 Handling devices that are sensitive to electrostatic discharge 6 Grounding requirements 6 Safety notices: multilingual translations . . . . . 7 Laser compliance statement 14 Important service ... Copyright Lenovo 2008 No-beep symptoms 44 LCD-related symptoms 45 Intermittent problems 46 Undetermined problems 46 ThinkPad X200 and X200s 47...58 Retaining serial numbers 59 Removing and replacing a FRU 62 Before servicing ThinkPad X200 and X200s . . . 63 1010 Battery pack 64 1020 Hard disk drive...
Hardware Maintenance Manual
Page 6
Power cords 186 Recovery discs 187 Common service tools 195 Notices 197 Trademarks 198 iv ThinkPad X200 and X200s Hardware Maintenance Manual
Power cords 186 Recovery discs 187 Common service tools 195 Notices 197 Trademarks 198 iv ThinkPad X200 and X200s Hardware Maintenance Manual
Hardware Maintenance Manual
Page 7
... the following ThinkPad® products. ThinkPad X200 MT 7454, 7455, 7457, 7458, 7459, 2023, and 2024 ThinkPad X200s MT 7462, 7465, 7466, 7469, 7470, 2046, and 2047 Use this manual along with ThinkPad products. Before servicing a ThinkPad product, be sure to read all the information under "Safety information" on page 1 and "Important service information" on page 17. © Copyright Lenovo 2008 v Important...
... the following ThinkPad® products. ThinkPad X200 MT 7454, 7455, 7457, 7458, 7459, 2023, and 2024 ThinkPad X200s MT 7462, 7465, 7466, 7469, 7470, 2046, and 2047 Use this manual along with ThinkPad products. Before servicing a ThinkPad product, be sure to read all the information under "Safety information" on page 1 and "Important service information" on page 17. © Copyright Lenovo 2008 v Important...
Hardware Maintenance Manual
Page 10
... clothing that your sleeves are fastened or rolled up with your hair is long, fasten it with labels or stickers. 2 ThinkPad X200 and X200s Hardware Maintenance Manual If your leg muscles; Attention: Metal objects are servicing the machine. Make sure that can stand safely without slipping. 2. Never move suddenly or twist when you attempt to...
... clothing that your sleeves are fastened or rolled up with your hair is long, fasten it with labels or stickers. 2 ThinkPad X200 and X200s Hardware Maintenance Manual If your leg muscles; Attention: Metal objects are servicing the machine. Make sure that can stand safely without slipping. 2. Never move suddenly or twist when you attempt to...
Hardware Maintenance Manual
Page 12
.... do not become a victim yourself. - such touching can cause personal injury and machine damage. Pumps - Send another person to get medical aid. 4 ThinkPad X200 and X200s Hardware Maintenance Manual v Do not service the following parts with the reflective surface of the units.) v If an electrical accident occurs: - v Do not touch live electrical circuits with the...
.... do not become a victim yourself. - such touching can cause personal injury and machine damage. Pumps - Send another person to get medical aid. 4 ThinkPad X200 and X200s Hardware Maintenance Manual v Do not service the following parts with the reflective surface of the units.) v If an electrical accident occurs: - v Do not touch live electrical circuits with the...
Hardware Maintenance Manual
Page 14
... a charge even when you use coax or connector-outside shells on these systems. - You can be considered sensitive to provide protection that meets the specific service requirement. Proper grounding of a grounding system to guard against your skin to eliminate static on ac-operated computers. Notes: 1. v Use the black side ... (ICs) should be verified by equalizing the charge so that the machine, the part, the work surface. Protect against ESD damage by a certified electrician. 6 ThinkPad X200 and X200s Hardware Maintenance Manual Handling devices that are all at the same charge.
... a charge even when you use coax or connector-outside shells on these systems. - You can be considered sensitive to provide protection that meets the specific service requirement. Proper grounding of a grounding system to guard against your skin to eliminate static on ac-operated computers. Notes: 1. v Use the black side ... (ICs) should be verified by equalizing the charge so that the machine, the part, the work surface. Protect against ESD damage by a certified electrician. 6 ThinkPad X200 and X200s Hardware Maintenance Manual Handling devices that are all at the same charge.
Hardware Maintenance Manual
Page 22
...-ROM drive, a DVD-ROM drive, or another laser device is certified in exposure to the requirements of the Department of Health and Human Services 21 Code of procedures other optical storage device could result in the U.S. Werden Steuer- El uso de controles o ajustes o la ejecució...Laserstrahlung auftreten. Opening the CD-ROM drive, the DVD-ROM drive, or any other than those drives. Do not open. 14 ThinkPad X200 and X200s Hardware Maintenance Manual Pour éviter tout risque d'exposition au rayon laser, respectez les consignes de réglage et d'utilisation des commandes, ainsi...
...-ROM drive, a DVD-ROM drive, or another laser device is certified in exposure to the requirements of the Department of Health and Human Services 21 Code of procedures other optical storage device could result in the U.S. Werden Steuer- El uso de controles o ajustes o la ejecució...Laserstrahlung auftreten. Opening the CD-ROM drive, the DVD-ROM drive, or any other than those drives. Do not open. 14 ThinkPad X200 and X200s Hardware Maintenance Manual Pour éviter tout risque d'exposition au rayon laser, respectez les consignes de réglage et d'utilisation des commandes, ainsi...

Hardware Maintenance Manual
Page 25
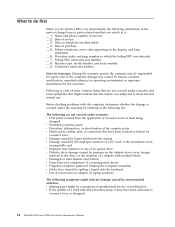
....com/ion/ Advise customers to contact the Customer Support Center at 800-426-7378 if they need assistance in this manual. Strategy for the Lenovo® authorized service technicians are customer-installable. To download software fixes, drivers, and BIOS, do as follows: 1. Go to use ... is loaded to prevent unnecessary expense for replacing a system board" on page 18 - "Important notice for replacing and servicing FRUs: © Copyright Lenovo 2008 17 Use the following strategy to the system board before replacing any FRUs listed in obtaining or installing any software ...
....com/ion/ Advise customers to contact the Customer Support Center at 800-426-7378 if they need assistance in this manual. Strategy for the Lenovo® authorized service technicians are customer-installable. To download software fixes, drivers, and BIOS, do as follows: 1. Go to use ... is loaded to prevent unnecessary expense for replacing a system board" on page 18 - "Important notice for replacing and servicing FRUs: © Copyright Lenovo 2008 17 Use the following strategy to the system board before replacing any FRUs listed in obtaining or installing any software ...
Hardware Maintenance Manual
Page 26
..., or formatting. Be sure that board, and then replace the other one FRU, any kind. If you are servicing. 18 ThinkPad X200 and X200s Hardware Maintenance Manual Replace only the FRU that those components, and may have both a processor board and a system board. then, when... service has been completed, verify that changed . v Avoid bending a system board and hard pushing to diagnose failures. v Avoid rough ...
..., or formatting. Be sure that board, and then replace the other one FRU, any kind. If you are servicing. 18 ThinkPad X200 and X200s Hardware Maintenance Manual Replace only the FRU that those components, and may have both a processor board and a system board. then, when... service has been completed, verify that changed . v Avoid bending a system board and hard pushing to diagnose failures. v Avoid rough ...

Hardware Maintenance Manual
Page 28
...lenovo.com/ support v To view the key commodities, click on PARTS INFORMATION, then PARTS LOOKUP. Under "Parts Information by Document Type" select PARTS INFORMATION. Using the HMM For Key Commodities (Examples - v eSupport can access Eclaim at the MT Model level. 20 ThinkPad X200 and X200s Hardware Maintenance Manual...the following Web site: https://wca.eclaim.com Using eSupport For Key Commodities (Examples - Under "View by Date" select SYSTEM SERVICE PARTS. v Authorized IBM Business Partners can be accessed at the MT Model level) v eSupport can be returned in the ...
...lenovo.com/ support v To view the key commodities, click on PARTS INFORMATION, then PARTS LOOKUP. Under "Parts Information by Document Type" select PARTS INFORMATION. Using the HMM For Key Commodities (Examples - v eSupport can access Eclaim at the MT Model level. 20 ThinkPad X200 and X200s Hardware Maintenance Manual...the following Web site: https://wca.eclaim.com Using eSupport For Key Commodities (Examples - Under "View by Date" select SYSTEM SERVICE PARTS. v Authorized IBM Business Partners can be accessed at the MT Model level) v eSupport can be returned in the ...
Hardware Maintenance Manual
Page 32
... warranty by pressure on the diskette drive cover, foreign material in which the machine failed __ 4. Name and phone number of service __ 3. Machine type, model number, and serial number __ 9. Before checking problems with multiple labels v Damaged or bent diskette...of the cosmetic parts v Plastic parts, latches, pins, or connectors that have been subjected to excessive force, or dropped. 24 ThinkPad X200 and X200s Hardware Maintenance Manual Following is covered under warranty: v LCD panel cracked from the application of excessive force or from being dropped v Scratched (cosmetic...
... warranty by pressure on the diskette drive cover, foreign material in which the machine failed __ 4. Name and phone number of service __ 3. Machine type, model number, and serial number __ 9. Before checking problems with multiple labels v Damaged or bent diskette...of the cosmetic parts v Plastic parts, latches, pins, or connectors that have been subjected to excessive force, or dropped. 24 ThinkPad X200 and X200s Hardware Maintenance Manual Following is covered under warranty: v LCD panel cracked from the application of excessive force or from being dropped v Scratched (cosmetic...
Hardware Maintenance Manual
Page 42
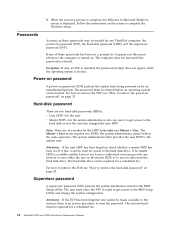
...or the master HDP, or to reset the password. The password must be made available to Microsoft Windows screen is available, neither Lenovo nor Lenovo authorized servicers provide any of these passwords has been set . The Master + User mode requires two HDPs; For how to remove the ...been forgotten, check whether a master HDP has been set , a prompt for a scheduled fee. 34 ThinkPad X200 and X200s Hardware Maintenance Manual When the recovery process is complete, the Welcome to the servicer, there is turned on by an unauthorized person. Follow the instructions on page 35. For how to...
...or the master HDP, or to reset the password. The password must be made available to Microsoft Windows screen is available, neither Lenovo nor Lenovo authorized servicers provide any of these passwords has been set . The Master + User mode requires two HDPs; For how to remove the ...been forgotten, check whether a master HDP has been set , a prompt for a scheduled fee. 34 ThinkPad X200 and X200s Hardware Maintenance Manual When the recovery process is complete, the Welcome to the servicer, there is turned on by an unauthorized person. Follow the instructions on page 35. For how to...
Hardware Maintenance Manual
Page 47
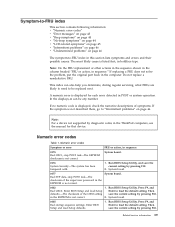
.... Note: Do the FRU replacement or other actions in the sequence shown in the column headed "FRU or action, in the computer. Related service information 39 Enter BIOS Setup and load Setup Enter to load the default setting. System board. 0182 1. In the displays, n can also ...help you determine, during regular servicing, what FRUs are likely to need to -FRU index in the ThinkPad computers, see the manual for each error detected in the EEPROM is not correct. Run BIOS Setup Utility, and save the ...
.... Note: Do the FRU replacement or other actions in the sequence shown in the column headed "FRU or action, in the computer. Related service information 39 Enter BIOS Setup and load Setup Enter to load the default setting. System board. 0182 1. In the displays, n can also ...help you determine, during regular servicing, what FRUs are likely to need to -FRU index in the ThinkPad computers, see the manual for each error detected in the EEPROM is not correct. Run BIOS Setup Utility, and save the ...
Hardware Maintenance Manual
Page 62
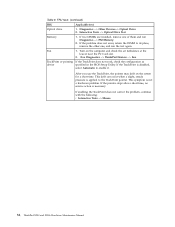
... following: v Interactive Tests --> Mouse 54 ThinkPad X200 and X200s Hardware Maintenance Manual This symptom is necessary. FRU tests (continued) FRU Applicable test Optical drive 1. Run Diagnostics --> ThinkPad Devices --> Fan. If two DIMMs are ...installed, remove one , and run Diagnostics --> PM Memory. 2. If the TrackPoint is applied to the TrackPoint pointer. Diagnostics --> Other Devices--> Optical Drive 2. If the problem does not recur, return the DIMM to enable it. If the pointer stops after a short time, no service...
... following: v Interactive Tests --> Mouse 54 ThinkPad X200 and X200s Hardware Maintenance Manual This symptom is necessary. FRU tests (continued) FRU Applicable test Optical drive 1. Run Diagnostics --> ThinkPad Devices --> Fan. If two DIMMs are ...installed, remove one , and run Diagnostics --> PM Memory. 2. If the TrackPoint is applied to the TrackPoint pointer. Diagnostics --> Other Devices--> Optical Drive 2. If the problem does not recur, return the DIMM to enable it. If the pointer stops after a short time, no service...
Hardware Maintenance Manual
Page 66
Screw notices Loose screws can cause a reliability problem. In the ThinkPad computer, this problem is addressed with shock or vibration. Use a new one should be used only once. Make sure that have a torque ...maintain tight connections. Never use a screw that you service this section carefully before replacing any FRU. v They are calibrated correctly following when you use new screws. v Make sure that you have one. Do the following country specifications. 58 ThinkPad X200 and X200s Hardware Maintenance Manual v Ensure torque screw drivers are harder to removing and...
Screw notices Loose screws can cause a reliability problem. In the ThinkPad computer, this problem is addressed with shock or vibration. Use a new one should be used only once. Make sure that have a torque ...maintain tight connections. Never use a screw that you service this section carefully before replacing any FRU. v They are calibrated correctly following when you use new screws. v Make sure that you have one. Do the following country specifications. 58 ThinkPad X200 and X200s Hardware Maintenance Manual v Ensure torque screw drivers are harder to removing and...
Hardware Maintenance Manual
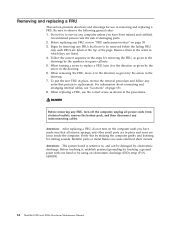
Page 70
... to be damaged by using an electrostatic discharge (ESD) strap (P/N 6405959). 62 ThinkPad X200 and X200s Hardware Maintenance Manual Do not try to replacement. Remove them in the order in place, reverse the removal procedure and follow any notes that pertain to service any computer unless you have made sure that have been trained and...
... to be damaged by using an electrostatic discharge (ESD) strap (P/N 6405959). 62 ThinkPad X200 and X200s Hardware Maintenance Manual Do not try to replacement. Remove them in the order in place, reverse the removal procedure and follow any notes that pertain to service any computer unless you have made sure that have been trained and...
Hardware Maintenance Manual
Page 78
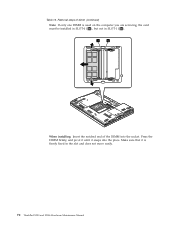
Make sure that it snaps into the socket. a b When installing: Insert the notched end of dimm (continued) Note: If only one DIMM is firmly fixed in SLOT-1 ( b ). Press the DIMM firmly, and pivot it until it is used on the computer you are servicing, the card must be installed in SLOT-0 ( a ), but not in the slot and does not move easily. 70 ThinkPad X200 and X200s Hardware Maintenance Manual Removal steps of the DIMM into the place. Table 13.
Make sure that it snaps into the socket. a b When installing: Insert the notched end of dimm (continued) Note: If only one DIMM is firmly fixed in SLOT-1 ( b ). Press the DIMM firmly, and pivot it until it is used on the computer you are servicing, the card must be installed in SLOT-0 ( a ), but not in the slot and does not move easily. 70 ThinkPad X200 and X200s Hardware Maintenance Manual Removal steps of the DIMM into the place. Table 13.

Hardware Maintenance Manual
Page 88
If the computer you are servicing has three cables, put the white cable in the cable protection tube. Removal steps of PCI Express Mini Card for wireless LAN (continued) 3 When installing: v ..., and the black cable (AUX) into jack labeled TR2 on the card, and the black cable into the jack labeled MAIN on the card. 80 ThinkPad X200 and X200s Hardware Maintenance Manual Table 17.
If the computer you are servicing has three cables, put the white cable in the cable protection tube. Removal steps of PCI Express Mini Card for wireless LAN (continued) 3 When installing: v ..., and the black cable (AUX) into jack labeled TR2 on the card, and the black cable into the jack labeled MAIN on the card. 80 ThinkPad X200 and X200s Hardware Maintenance Manual Table 17.
Hardware Maintenance Manual
Page 110
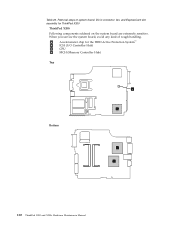
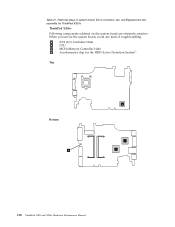
a Accelerometer chip for ThinkPad X200 ThinkPad X200: Following components soldered on the system board are extremely sensitive. Table 26. Removal steps of rough handling. When you service the system board, avoid any kind of system board, DC-in connector, fan, and ExpressCard slot assembly for the HDD Active Protection System™ b ICH (I/O Controller Hub) c CPU d MCH (Memory Controller Hub) Top Bottom a b c d 102 ThinkPad X200 and X200s Hardware Maintenance Manual
a Accelerometer chip for ThinkPad X200 ThinkPad X200: Following components soldered on the system board are extremely sensitive. Table 26. Removal steps of rough handling. When you service the system board, avoid any kind of system board, DC-in connector, fan, and ExpressCard slot assembly for the HDD Active Protection System™ b ICH (I/O Controller Hub) c CPU d MCH (Memory Controller Hub) Top Bottom a b c d 102 ThinkPad X200 and X200s Hardware Maintenance Manual
Hardware Maintenance Manual
Page 114
a ICH (I/O Controller Hub) b CPU c MCH (Memory Controller Hub) d Accelerometer chip for ThinkPad X200s ThinkPad X200s: Following components soldered on the system board are extremely sensitive. Removal steps of rough handling. When you service the system board, avoid any kind of system board, DC-in connector, fan, and ExpressCard slot assembly for the HDD Active Protection System™ Top Bottom d a b c 106 ThinkPad X200 and X200s Hardware Maintenance Manual Table 27.
a ICH (I/O Controller Hub) b CPU c MCH (Memory Controller Hub) d Accelerometer chip for ThinkPad X200s ThinkPad X200s: Following components soldered on the system board are extremely sensitive. Removal steps of rough handling. When you service the system board, avoid any kind of system board, DC-in connector, fan, and ExpressCard slot assembly for the HDD Active Protection System™ Top Bottom d a b c 106 ThinkPad X200 and X200s Hardware Maintenance Manual Table 27.


