(English) Statement of Warranty Services - ANZ
Page 3
... to replace an internal part, a service provider technician will be dispatched to your location according to your problem over L505-0101-01 - Lenovo will contact the third-party software supplier, open a service request on the supported core software list found at support.lenovo.com. 8. If Lenovo determines the performance of each hard drive which you retain under this Service, Lenovo will attempt to diagnose and resolve your applicable service type to install the...
... to replace an internal part, a service provider technician will be dispatched to your location according to your problem over L505-0101-01 - Lenovo will contact the third-party software supplier, open a service request on the supported core software list found at support.lenovo.com. 8. If Lenovo determines the performance of each hard drive which you retain under this Service, Lenovo will attempt to diagnose and resolve your applicable service type to install the...
(English) Statement of Warranty Services - ASEAN
Page 3
... DAMAGES; change your product's location, you must provide Lenovo with the serial number of each hard drive which you retain under this Service, Lenovo will provide you with 24x7 access to advanced-level technicians via telephone, repair services will attempt to diagnose and resolve your problem over the telephone and may direct you to download and install software updates. Replacement of external parts with Lenovo, you must follow the problem determination procedures...
... DAMAGES; change your product's location, you must provide Lenovo with the serial number of each hard drive which you retain under this Service, Lenovo will provide you with 24x7 access to advanced-level technicians via telephone, repair services will attempt to diagnose and resolve your problem over the telephone and may direct you to download and install software updates. Replacement of external parts with Lenovo, you must follow the problem determination procedures...
(English) Statement of Warranty Services - GB
Page 3
... to replace an internal part, a service provider technician will be dispatched to your location according to your product may retain a defective hard drive that cannot be completed at www.lenovo.com/supportedsoftware, Lenovo will attempt to install the CRU. A list of any kind; Some repairs may direct you at www.lenovo.com/supportedsoftware. Replacement of Lenovo. The technician will contact the third-party software supplier, open a service request...
... to replace an internal part, a service provider technician will be dispatched to your location according to your product may retain a defective hard drive that cannot be completed at www.lenovo.com/supportedsoftware, Lenovo will attempt to install the CRU. A list of any kind; Some repairs may direct you at www.lenovo.com/supportedsoftware. Replacement of Lenovo. The technician will contact the third-party software supplier, open a service request...
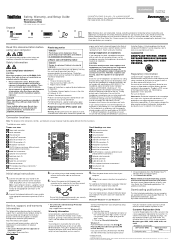
(English) Safety, Warranty and Setup Guide
Page 1
... Cable-lock slots (2) Padlock loop Audio line-out connector Ethernet connector PS/2 keyboard and mouse connectors* Security-lock slot Small desktop, rear view Power-cord connector VGA connector Serial connector DisplayPort connectors USB 3.0 connectors (4) USB 2.0 connectors (2) Microphone connector Audio line-out connector Audio line-in the Lenovo_Recovery partition on some models Self-service CRUs Optional-service CRUs Computer cover Battery First Edition (June 2014) © Copyright Lenovo 2014. For additional information about your User Guide. Downloading...
... Cable-lock slots (2) Padlock loop Audio line-out connector Ethernet connector PS/2 keyboard and mouse connectors* Security-lock slot Small desktop, rear view Power-cord connector VGA connector Serial connector DisplayPort connectors USB 3.0 connectors (4) USB 2.0 connectors (2) Microphone connector Audio line-out connector Audio line-in the Lenovo_Recovery partition on some models Self-service CRUs Optional-service CRUs Computer cover Battery First Edition (June 2014) © Copyright Lenovo 2014. For additional information about your User Guide. Downloading...
(English) User Guide - Small Form Factor
Page 3
... Control Panel . . . 19 Using a disc 19 Using the optical drive 19 Handling and storing a disc 20 Playing and removing a disc 20 Recording a disc 21 Navigating among screens on the Windows 8.1 operating system 21 © Copyright Lenovo 2014 Accessing Control Panel on the Windows 8.1 operating system 13 An introduction to Lenovo programs . . . . 14 Chapter 2. Advanced configuration . . 37 Using the Setup Utility program 37 Starting the Setup Utility program . . . . . 37 Viewing and changing settings 37 Using BIOS passwords 38 Enabling or disabling a device 39 Selecting a startup...
... Control Panel . . . 19 Using a disc 19 Using the optical drive 19 Handling and storing a disc 20 Playing and removing a disc 20 Recording a disc 21 Navigating among screens on the Windows 8.1 operating system 21 © Copyright Lenovo 2014 Accessing Control Panel on the Windows 8.1 operating system 13 An introduction to Lenovo programs . . . . 14 Chapter 2. Advanced configuration . . 37 Using the Setup Utility program 37 Starting the Setup Utility program . . . . . 37 Viewing and changing settings 37 Using BIOS passwords 38 Enabling or disabling a device 39 Selecting a startup...

(English) User Guide - Small Form Factor
Page 4
... device drivers . . 68 Solving recovery problems 70 Recovery information for the Windows 8.1 operating system 70 Refreshing your computer 70 Resetting your computer to the factory default settings 70 Using the advanced startup options . . . . 71 Recovering your computer current 47 Getting the latest device drivers for service 126 Using other services 127 Purchasing additional services 127 Appendix A. Updating the BIOS from a disc 44 Updating the BIOS from a BIOS update failure . . . 45 Chapter 6. Installing or replacing hardware 73 Handling static-sensitive devices 73 Installing...
... device drivers . . 68 Solving recovery problems 70 Recovery information for the Windows 8.1 operating system 70 Refreshing your computer 70 Resetting your computer to the factory default settings 70 Using the advanced startup options . . . . 71 Recovering your computer current 47 Getting the latest device drivers for service 126 Using other services 127 Purchasing additional services 127 Appendix A. Updating the BIOS from a disc 44 Updating the BIOS from a BIOS update failure . . . 45 Chapter 6. Installing or replacing hardware 73 Handling static-sensitive devices 73 Installing...
(English) User Guide - Small Form Factor
Page 18
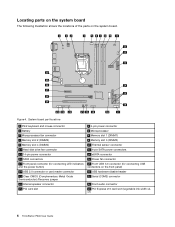
...board part locations 1 PS/2 keyboard and mouse connector 3 Battery 5 Microprocessor fan connector 7 Memory slot 2 (DIMM2) 9 Memory slot 4 (DIMM4) 11 Hard disk drive fan connector 13 14-pin power connector 15 SATA connectors 17 Front panel connector (for connecting LED indicators and the power button) 19 USB 2.0 connector or card reader connector 21 Clear CMOS (Complementary Metal Oxide Semiconductor) /Recovery jumper 23 Internal speaker connector 25 PCI card slot 2 4-pin power connector 4 Microprocessor 6 Memory slot 1 (DIMM1) 8 Memory slot 3 (DIMM3) 10 Thermal sensor connector 12 4-pin SATA...
...board part locations 1 PS/2 keyboard and mouse connector 3 Battery 5 Microprocessor fan connector 7 Memory slot 2 (DIMM2) 9 Memory slot 4 (DIMM4) 11 Hard disk drive fan connector 13 14-pin power connector 15 SATA connectors 17 Front panel connector (for connecting LED indicators and the power button) 19 USB 2.0 connector or card reader connector 21 Clear CMOS (Complementary Metal Oxide Semiconductor) /Recovery jumper 23 Internal speaker connector 25 PCI card slot 2 4-pin power connector 4 Microprocessor 6 Memory slot 1 (DIMM1) 8 Memory slot 3 (DIMM3) 10 Thermal sensor connector 12 4-pin SATA...
(English) User Guide - Small Form Factor
Page 22
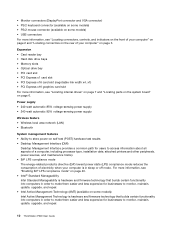
... models) • PS/2 mouse connector (available on some models) Intel Active Management Technology is in order to make them easier and less expensive for businesses to monitor, maintain, update, upgrade, and repair. 10 ThinkStation P300 User Guide Expansion • Card reader bay • Hard disk drive bays • Memory slots • Optical drive bay • PCI card slot • PCI Express x1 card slot • PCI Express x16 card slot (negotiable link width x4, x1) • PCI Express x16 graphics card slot For more information, see "Locating connectors, controls...
... models) • PS/2 mouse connector (available on some models) Intel Active Management Technology is in order to make them easier and less expensive for businesses to monitor, maintain, update, upgrade, and repair. 10 ThinkStation P300 User Guide Expansion • Card reader bay • Hard disk drive bays • Memory slots • Optical drive bay • PCI card slot • PCI Express x1 card slot • PCI Express x16 card slot (negotiable link width x4, x1) • PCI Express x16 graphics card slot For more information, see "Locating connectors, controls...
(English) User Guide - Small Form Factor
Page 38
... The location of electrical outlets, the length of power cords and cables that pulls in the Windows operating system to configure their computer experience. For more information about power cords, see "Power cords and power adapters" on the monitor as directed in the Windows operating system. You can be helpful. Place the computer and monitor so that activity is sufficient. On-screen notification replaces sounds with glare. Users...
... The location of electrical outlets, the length of power cords and cables that pulls in the Windows operating system to configure their computer experience. For more information about power cords, see "Power cords and power adapters" on the monitor as directed in the Windows operating system. You can be helpful. Place the computer and monitor so that activity is sufficient. On-screen notification replaces sounds with glare. Users...
(English) User Guide - Small Form Factor
Page 60
... to turn off the computer and monitor before cleaning the computer and monitor screen. Cleaning your computer It is ready to a soft, dust-free cloth. 48 ThinkStation P300 User Guide CAUTION: Be sure to protect the surfaces and ensure trouble-free operation. Ensure that are some isopropyl rubbing alcohol to run. Using System Update The System Update program (hereinafter referred to as critical, recommended, or optional to...
... to turn off the computer and monitor before cleaning the computer and monitor screen. Cleaning your computer It is ready to a soft, dust-free cloth. 48 ThinkStation P300 User Guide CAUTION: Be sure to protect the surfaces and ensure trouble-free operation. Ensure that are some isopropyl rubbing alcohol to run. Using System Update The System Update program (hereinafter referred to as critical, recommended, or optional to...
(English) User Guide - Small Form Factor
Page 67
... not use the Windows sound feature and must remove the computer cover to the audio subsystem. • If this does not correct the problem, follow the electrical safety information provided with the cover removed. 2. Remove the new hardware option or software. Then click Mixer. Most speaker cables are correctly installed. In some cases, only one of the volume control. See Windows Help and Support information system for "A CD or DVD does not work...
... not use the Windows sound feature and must remove the computer cover to the audio subsystem. • If this does not correct the problem, follow the electrical safety information provided with the cover removed. 2. Remove the new hardware option or software. Then click Mixer. Most speaker cables are correctly installed. In some cases, only one of the volume control. See Windows Help and Support information system for "A CD or DVD does not work...
(English) User Guide - Small Form Factor
Page 71
... latest device driver, do the following : - On Windows 7: 1. Click Device Manager. If you are at least 305 mm (12 inches) apart. 3. Chapter 7. Click Hardware and Sound ➙ Adjust screen resolution ➙ Advanced settings. 3. Adjust the placement of the hub. • Have the latest device driver installed on the monitor. Click Start ➙ Control Panel. 2. If an exclamation mark is also configured for the supported refresh rates. Type the administrator password...
... latest device driver, do the following : - On Windows 7: 1. Click Device Manager. If you are at least 305 mm (12 inches) apart. 3. Chapter 7. Click Hardware and Sound ➙ Adjust screen resolution ➙ Advanced settings. 3. Adjust the placement of the hub. • Have the latest device driver installed on the monitor. Click Start ➙ Control Panel. 2. If an exclamation mark is also configured for the supported refresh rates. Type the administrator password...
(English) User Guide - Small Form Factor
Page 74
... added one serial-connector adapter, install the adapter correctly. If the serial device has its own power cord, attach the power cord to the documentation that comes with the serial device. Click Start ➙ Computer. 3. Connect the printer signal cable firmly to the serial device. Right-click your C drive entry and then click Properties. 4. Turn on page 37. You have the computer serviced. Open File Explorer. 3. For instructions on installing memory modules, see "Using the Setup Utility...
... added one serial-connector adapter, install the adapter correctly. If the serial device has its own power cord, attach the power cord to the documentation that comes with the serial device. Click Start ➙ Computer. 3. Connect the printer signal cable firmly to the serial device. Right-click your C drive entry and then click Properties. 4. Turn on page 37. You have the computer serviced. Open File Explorer. 3. For instructions on installing memory modules, see "Using the Setup Utility...
(English) User Guide - Small Form Factor
Page 77
... with the disc set . or hardware-related problem. Chapter 8. To install the Rescue and Recovery program, do the following purposes: • Reinstall the programs and device drivers on your computer • Reinstall the operating system • Modify the data files on the hard disk drive using the Additional Files Note: The recovery operations you can restore the computer settings using recovery media Recovery media enable you must install the Rescue and Recovery program manually before enabling its...
... with the disc set . or hardware-related problem. Chapter 8. To install the Rescue and Recovery program, do the following purposes: • Reinstall the programs and device drivers on your computer • Reinstall the operating system • Modify the data files on the hard disk drive using the Additional Files Note: The recovery operations you can restore the computer settings using recovery media Recovery media enable you must install the Rescue and Recovery program manually before enabling its...
(English) User Guide - Small Form Factor
Page 157
... battery, replacing 80 boot-block recovery 45 C cable lock, security 33-34 changing password 39 startup device sequence 40 cleaning an optical mouse 49 CMOS, clearing 39 components, internal 5 computer cover removing 74 computer cover, reinstalling 123 connector 3 connectors rear 3 connectors, controls, indicators front 2 considerations, passwords 38 creating and using a rescue medium 68 creating and using recovery media 65 CRU completing the installation 123 customer support center 126 D deleting a password 39 Description 3 device drivers 124 devices, handling static-sensitive 73 diagnostics...
... battery, replacing 80 boot-block recovery 45 C cable lock, security 33-34 changing password 39 startup device sequence 40 cleaning an optical mouse 49 CMOS, clearing 39 components, internal 5 computer cover removing 74 computer cover, reinstalling 123 connector 3 connectors rear 3 connectors, controls, indicators front 2 considerations, passwords 38 creating and using a rescue medium 68 creating and using recovery media 65 CRU completing the installation 123 customer support center 126 D deleting a password 39 Description 3 device drivers 124 devices, handling static-sensitive 73 diagnostics...
(English) User Guide - Small Form Factor
Page 158
... 39 passwords, using 38 PCI card 78 installing, replacing 78 slots 78 physical specifications 12 power 146 ThinkStation P300 User Guide features 10 power supply assembly, replacing 101 power-on self-test (POST) 44 Power-on, password 38 programs, updating system 44 purchasing additional services 127 R rear connectors 3 rear Wi-Fi antenna, installing, removing 121 recovering from a BIOS update failure 45 software 65 recovery boot-block 45 operations, backup and 66 problems, solving 70 recovery media, creating and using 65 removing computer cover 74 replacing battery 80 hard disk drive 106...
... 39 passwords, using 38 PCI card 78 installing, replacing 78 slots 78 physical specifications 12 power 146 ThinkStation P300 User Guide features 10 power supply assembly, replacing 101 power-on self-test (POST) 44 Power-on, password 38 programs, updating system 44 purchasing additional services 127 R rear connectors 3 rear Wi-Fi antenna, installing, removing 121 recovering from a BIOS update failure 45 software 65 recovery boot-block 45 operations, backup and 66 problems, solving 70 recovery media, creating and using 65 removing computer cover 74 replacing battery 80 hard disk drive 106...
(English) User Guide - Tower Form Factor
Page 3
... and removing a disc 20 Recording a disc 21 Navigating among screens on the Windows 8.1 operating system 21 © Copyright Lenovo 2014 Accessing Control Panel on the Windows 8.1 operating system 13 An introduction to another country or region 30 Voltage-selection switch 30 Replacement power cords 30 Chapter 4. Advanced configuration . . 37 Using the Setup Utility program 37 Starting the Setup Utility program . . . . . 37 Viewing and changing settings 37 Using BIOS passwords 38 Enabling or disabling a device 39 Selecting a startup device 40 Enabling ErP LPS compliance mode...
... and removing a disc 20 Recording a disc 21 Navigating among screens on the Windows 8.1 operating system 21 © Copyright Lenovo 2014 Accessing Control Panel on the Windows 8.1 operating system 13 An introduction to another country or region 30 Voltage-selection switch 30 Replacement power cords 30 Chapter 4. Advanced configuration . . 37 Using the Setup Utility program 37 Starting the Setup Utility program . . . . . 37 Viewing and changing settings 37 Using BIOS passwords 38 Enabling or disabling a device 39 Selecting a startup device 40 Enabling ErP LPS compliance mode...
(English) User Guide - Tower Form Factor
Page 4
...the factory default settings 68 Using the advanced startup options . . . . 69 Recovering your computer 50 Chapter 7. RAID Level 44 Configuring the system BIOS to enable SATA RAID functionality 45 Creating RAID volumes 45 Deleting RAID volumes 45 Resetting disks to start 69 Chapter 9. Troubleshooting and diagnostics 51 Basic troubleshooting 51 Troubleshooting procedure 52 Troubleshooting 52 Audio problems 53 CD problems 53 DVD problems 54 Intermittent problems 55 Problems with the keyboard or mouse . . . 55 Monitor problems 56 Networking problems 57 I have connected an option...
...the factory default settings 68 Using the advanced startup options . . . . 69 Recovering your computer 50 Chapter 7. RAID Level 44 Configuring the system BIOS to enable SATA RAID functionality 45 Creating RAID volumes 45 Deleting RAID volumes 45 Resetting disks to start 69 Chapter 9. Troubleshooting and diagnostics 51 Basic troubleshooting 51 Troubleshooting procedure 52 Troubleshooting 52 Audio problems 53 CD problems 53 DVD problems 54 Intermittent problems 55 Problems with the keyboard or mouse . . . 55 Monitor problems 56 Networking problems 57 I have connected an option...
(English) User Guide - Tower Form Factor
Page 72
... "Getting information, help, and service" on page 37. Close any application programs supplied with the serial device for more information about BIOS settings, see "Installing or replacing a memory module" on the computer and to software-related problems. 60 ThinkStation P300 User Guide Turn on the printer and keep the device online. • Install any open programs and windows. 2. Serial connector cannot be accessed Solutions: • Connect the serial cable to the serial connector on page 76. Click Defragment...
... "Getting information, help, and service" on page 37. Close any application programs supplied with the serial device for more information about BIOS settings, see "Installing or replacing a memory module" on the computer and to software-related problems. 60 ThinkStation P300 User Guide Turn on the printer and keep the device online. • Install any open programs and windows. 2. Serial connector cannot be accessed Solutions: • Connect the serial cable to the serial connector on page 76. Click Defragment...
(English) User Guide - Tower Form Factor
Page 146
... 73 slots 73 physical specifications 12 power 18 ThinkStation P300 User Guide features 10 power supply assembly, replacing 83 power-on self-test (POST) 42 Power-on, password 38 programs, updating system 42 purchasing additional services 115 R rear connectors 3 rear fan assembly, replacing 101 rear Wi-Fi antenna, installing, removing 107 recovering from a BIOS update failure 44 software 63 recovery boot-block 44 operations, backup and 64 problems, solving 68 recovery media, creating and using 63 removing computer cover 71 replacing battery 82 front audio and USB assembly 81 hard disk drive 93...
... 73 slots 73 physical specifications 12 power 18 ThinkStation P300 User Guide features 10 power supply assembly, replacing 83 power-on self-test (POST) 42 Power-on, password 38 programs, updating system 42 purchasing additional services 115 R rear connectors 3 rear fan assembly, replacing 101 rear Wi-Fi antenna, installing, removing 107 recovering from a BIOS update failure 44 software 63 recovery boot-block 44 operations, backup and 64 problems, solving 68 recovery media, creating and using 63 removing computer cover 71 replacing battery 82 front audio and USB assembly 81 hard disk drive 93...


