
Hardware Maintenance Manual
Page 5
...problems 55 FRU replacement notices 56 Screw notices 56 © Copyright Lenovo 2007, 2008 Retaining serial numbers 56 Removing and replacing a FRU 59 1010 Battery pack 60 1020 Hard disk drive (2.5-inch) and HDD rubber rails 61 1030 DIMM cover 63 1040 DIMM 64 1050 ...panel and LCD cable 117 Locations 119 Front view for ThinkPad X60, X60s, X61, and X61s 119 Rear view for ThinkPad X60, X60s, X61, and X61s 120 Bottom view for ThinkPad X60, X60s, X61, and X61s 121 Rear View for ThinkPad X6 UltraBase . . . . 122 Bottom View for ThinkPad X6 UltraBase . . . 122 Parts list 123 Overall...
...problems 55 FRU replacement notices 56 Screw notices 56 © Copyright Lenovo 2007, 2008 Retaining serial numbers 56 Removing and replacing a FRU 59 1010 Battery pack 60 1020 Hard disk drive (2.5-inch) and HDD rubber rails 61 1030 DIMM cover 63 1040 DIMM 64 1050 ...panel and LCD cable 117 Locations 119 Front view for ThinkPad X60, X60s, X61, and X61s 119 Rear view for ThinkPad X60, X60s, X61, and X61s 120 Bottom view for ThinkPad X60, X60s, X61, and X61s 121 Rear View for ThinkPad X6 UltraBase . . . . 122 Bottom View for ThinkPad X6 UltraBase . . . 122 Parts list 123 Overall...
Hardware Maintenance Manual
Page 43
... . . 57 Removing and replacing a FRU 59 1010 Battery pack 60 1020 Hard disk drive (2.5-inch) and HDD rubber rails 61 1030 DIMM cover 63 1040 DIMM 64 1050 Keyboard 65 1060 Upper case 69 1070 Fingerprint reader ... 117 Locations 119 Front view for ThinkPad X60, X60s, X61, and X61s 119 Rear view for ThinkPad X60, X60s, X61, and X61s 120 Bottom view for ThinkPad X60, X60s, X61, and X61s 121 Rear View for ThinkPad X6 UltraBase . . . . 122 Bottom View for ThinkPad X6 UltraBase . . . 122 ... 232 Tools 232 Power cords 232 Notices 234 Trademarks 235 © Copyright Lenovo 2007, 2008 37
... . . 57 Removing and replacing a FRU 59 1010 Battery pack 60 1020 Hard disk drive (2.5-inch) and HDD rubber rails 61 1030 DIMM cover 63 1040 DIMM 64 1050 Keyboard 65 1060 Upper case 69 1070 Fingerprint reader ... 117 Locations 119 Front view for ThinkPad X60, X60s, X61, and X61s 119 Rear view for ThinkPad X60, X60s, X61, and X61s 120 Bottom view for ThinkPad X60, X60s, X61, and X61s 121 Rear View for ThinkPad X6 UltraBase . . . . 122 Bottom View for ThinkPad X6 UltraBase . . . 122 ... 232 Tools 232 Power cords 232 Notices 234 Trademarks 235 © Copyright Lenovo 2007, 2008 37
Hardware Maintenance Manual
Page 49
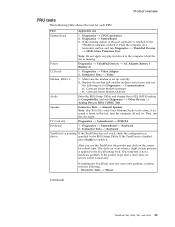
...2. Diagnostics --> Systemboard 3. Conexant Smart Modem Interrupt b. Product overview FRU tests The following : v Interactive Tests --> Mouse (continued) ThinkPad X60, X60s, X61, and X61s 43 PC Card slot Diagnostics --> Systemboard --> PCMCIA Keyboard 1. Interactive Tests --> Keyboard TrackPoint or pointing If the ... Enter the BIOS Setup Utility and change Serial ATA (SATA) setting to Compatibility, and run Diagnostics --> ThinkPad Devices --> HDD Active Protection Test. If enabling the TrackPoint does not correct the problem, continue with the following table shows...
...2. Diagnostics --> Systemboard 3. Conexant Smart Modem Interrupt b. Product overview FRU tests The following : v Interactive Tests --> Mouse (continued) ThinkPad X60, X60s, X61, and X61s 43 PC Card slot Diagnostics --> Systemboard --> PCMCIA Keyboard 1. Interactive Tests --> Keyboard TrackPoint or pointing If the ... Enter the BIOS Setup Utility and change Serial ATA (SATA) setting to Compatibility, and run Diagnostics --> ThinkPad Devices --> HDD Active Protection Test. If enabling the TrackPoint does not correct the problem, continue with the following table shows...
Hardware Maintenance Manual
Page 56
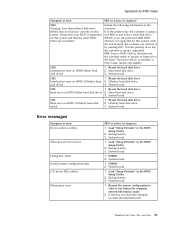
... the construction of the DIMM slot, see"1040 DIMM" on a horizontal surface. Undock docking station or port replicator if it . 5. Run Diagnostics --> ThinkPad Devices --> HDD Active Protection Test. 50 ThinkPad® X60, X60s, X61, and X61s System board. 1810 Hard disk partition layout error. 1. Save and exit. 2. If the Access Predesktop Area has not been...
... the construction of the DIMM slot, see"1040 DIMM" on a horizontal surface. Undock docking station or port replicator if it . 5. Run Diagnostics --> ThinkPad Devices --> HDD Active Protection Test. 50 ThinkPad® X60, X60s, X61, and X61s System board. 1810 Hard disk partition layout error. 1. Save and exit. 2. If the Access Predesktop Area has not been...
Hardware Maintenance Manual
Page 57
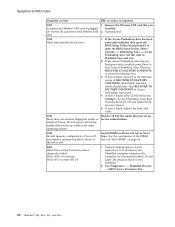
...action, in the BIOS Setup Utility. 2. System board. 1. System board. 1. Ensure that your HDD is supported on this system and that the latest HDD firmware is available at http://www.lenovo.com/support 2100 Initialization error on HDD0 (Main hard disk drive) 1. disk drive) 3. Read ... 2. ThinkPad X60, X60s, X61, and X61s 51 Reseat the hard disk drive. 2. Inform the following information to the customer: If in the primary bay the customer is using a non-IBM or non-Lenovo hard disk drive (HDD), or an old generation IBM HDD which is using a supported IBM/Lenovo HDD with ...
...action, in the BIOS Setup Utility. 2. System board. 1. System board. 1. Ensure that your HDD is supported on this system and that the latest HDD firmware is available at http://www.lenovo.com/support 2100 Initialization error on HDD0 (Main hard disk drive) 1. disk drive) 3. Read ... 2. ThinkPad X60, X60s, X61, and X61s 51 Reseat the hard disk drive. 2. Inform the following information to the customer: If in the primary bay the customer is using a non-IBM or non-Lenovo hard disk drive (HDD), or an old generation IBM HDD which is using a supported IBM/Lenovo HDD with ...
Hardware Maintenance Manual
Page 67
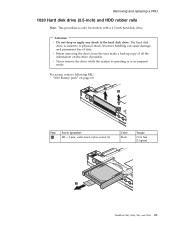
... permanent loss of all the information on page 60 2 1 Step 1 Screw (quantity) M3 × 3 mm, wafer-head, nylon-coated (1) Color Black Torque 0.196 Nm (2 kgfcm) 3 ThinkPad X60, X60s, X61, and X61s 61 Removing and replacing a FRU 1020 Hard disk drive (2.5-inch) and HDD rubber rails Note: This procedure is in suspend mode.
... permanent loss of all the information on page 60 2 1 Step 1 Screw (quantity) M3 × 3 mm, wafer-head, nylon-coated (1) Color Black Torque 0.196 Nm (2 kgfcm) 3 ThinkPad X60, X60s, X61, and X61s 61 Removing and replacing a FRU 1020 Hard disk drive (2.5-inch) and HDD rubber rails Note: This procedure is in suspend mode.

Hardware Maintenance Manual
Page 98
... hard disk drive For 2.5-inch hard disk drive 92 ThinkPad® X60, X60s, X61, and X61s Removing and replacing a FRU 1190 Hard disk sub-card For access, remove following FRUs, in order: v "1010 Battery pack" on page 60 v "1020 Hard disk drive (2.5-inch) and HDD rubber rails" on page 61 v "1050 Keyboard" on page...
... hard disk drive For 2.5-inch hard disk drive 92 ThinkPad® X60, X60s, X61, and X61s Removing and replacing a FRU 1190 Hard disk sub-card For access, remove following FRUs, in order: v "1010 Battery pack" on page 60 v "1020 Hard disk drive (2.5-inch) and HDD rubber rails" on page 61 v "1050 Keyboard" on page...
Hardware Maintenance Manual
Page 99
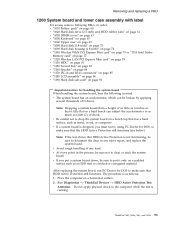
...on page 92 Important notices for handling the system board When handling the system board, bear the following in mind. Run Diagnostics --> ThinkPad Devices --> HDD Active Protection Test. ThinkPad X60, X60s, X61, and X61s 93 Note: Dropping a system board from a height of as little as 6 inches so that it falls ... wood, or composite. Attention: Do not apply physical shock to put it , using PC-Doctor for DOS to make sure that the HDD Active Protection still functions (see below). Removing and replacing a FRU 1200 System board and lower case assembly with label For access, remove ...
...on page 92 Important notices for handling the system board When handling the system board, bear the following in mind. Run Diagnostics --> ThinkPad Devices --> HDD Active Protection Test. ThinkPad X60, X60s, X61, and X61s 93 Note: Dropping a system board from a height of as little as 6 inches so that it falls ... wood, or composite. Attention: Do not apply physical shock to put it , using PC-Doctor for DOS to make sure that the HDD Active Protection still functions (see below). Removing and replacing a FRU 1200 System board and lower case assembly with label For access, remove ...
Hardware Maintenance Manual
Page 100
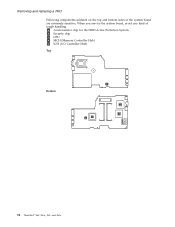
Removing and replacing a FRU Following components soldered on the top and bottom sides of rough handling. a Accelerometer chip for the HDD Active Protection System b Security chip c CPU d MCH (Memory Controller Hub) e ICH (I/O Controller Hub) Top Bottom b c d a e 94 ThinkPad® X60, X60s, X61, and X61s When you service the system board, avoid any kind of the system board are extremely sensitive.
Removing and replacing a FRU Following components soldered on the top and bottom sides of rough handling. a Accelerometer chip for the HDD Active Protection System b Security chip c CPU d MCH (Memory Controller Hub) e ICH (I/O Controller Hub) Top Bottom b c d a e 94 ThinkPad® X60, X60s, X61, and X61s When you service the system board, avoid any kind of the system board are extremely sensitive.
Hardware Maintenance Manual
Page 102
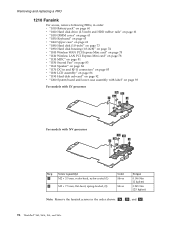
Removing and replacing a FRU 1210 Fansink For access, remove following FRUs, in order: v "1010 Battery pack" on page 60 v "1020 Hard disk drive (2.5-inch) and HDD rubber rails" on page 61 v "1030 DIMM cover" on page 63 v "1050 Keyboard" on page 65 v "1060 Upper case" on page 69 v "1080 Hard disk (1.8-...-loaded, (3) Color Silver Silver Torque 0.196 Nm (2 kgfcm) 0.245 Nm (2.5 kgfcm) Note: Remove the fansink screws in the order shown: 3a , 3b , and 3c . 96 ThinkPad® X60, X60s, X61, and X61s
Removing and replacing a FRU 1210 Fansink For access, remove following FRUs, in order: v "1010 Battery pack" on page 60 v "1020 Hard disk drive (2.5-inch) and HDD rubber rails" on page 61 v "1030 DIMM cover" on page 63 v "1050 Keyboard" on page 65 v "1060 Upper case" on page 69 v "1080 Hard disk (1.8-...-loaded, (3) Color Silver Silver Torque 0.196 Nm (2 kgfcm) 0.245 Nm (2.5 kgfcm) Note: Remove the fansink screws in the order shown: 3a , 3b , and 3c . 96 ThinkPad® X60, X60s, X61, and X61s
Hardware Maintenance Manual
Page 201
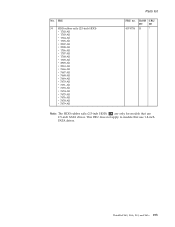
This FRU does not apply to models that use 1.8-inch PATA drives. ThinkPad X60, X60s, X61, and X61s 195 Parts list No. FRU 30 HDD rubber rails (2.5-inch HDD) v 1702-All v 1703-All v 1704-All v 1705-All v 2507-All v 2508-All v 1706-All v 1707-All v 1708-All v 1709-All v 2509-All v 2510-All v 7666-All v 7667-All v 7668-All v 7669-All v 7670-All v 7671-All v 7673-All v 7674-All v 7675-All v 7676-All v 7678-All v 7679-All FRU no. 41V9756 RoHS CRU ID ID R * Note: The HDD rubber rails (2.5-inch HDD) 28 are only for models that use 2.5-inch SATA drives.
This FRU does not apply to models that use 1.8-inch PATA drives. ThinkPad X60, X60s, X61, and X61s 195 Parts list No. FRU 30 HDD rubber rails (2.5-inch HDD) v 1702-All v 1703-All v 1704-All v 1705-All v 2507-All v 2508-All v 1706-All v 1707-All v 1708-All v 1709-All v 2509-All v 2510-All v 7666-All v 7667-All v 7668-All v 7669-All v 7670-All v 7671-All v 7673-All v 7674-All v 7675-All v 7676-All v 7678-All v 7679-All FRU no. 41V9756 RoHS CRU ID ID R * Note: The HDD rubber rails (2.5-inch HDD) 28 are only for models that use 2.5-inch SATA drives.

(English) Rescue and Recovery 4.3 Deployment Guide
Page 59
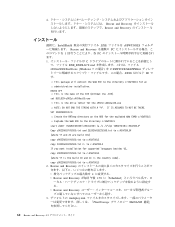
... the installation process is to install the Rescue and Recovery program. Attention: Running this command will find the following command: CLEANDRV /HDD=0 4. After running, you will extract the WWW EXE to the c:\SWTOOLS directory. Installing This first step in a new rollout ... Within this process one time will extract the file z902zisXXXXus00.exe for an :: administrative installation. © Copyright Lenovo 2008, 2009 51 Installing on OEM systems" on Lenovo-branded computers. Manually creating the Service Partition of the C drive, create a file EXE_EXTRACT.cmd, which will...
... the installation process is to install the Rescue and Recovery program. Attention: Running this command will find the following command: CLEANDRV /HDD=0 4. After running, you will extract the WWW EXE to the c:\SWTOOLS directory. Installing This first step in a new rollout ... Within this process one time will extract the file z902zisXXXXus00.exe for an :: administrative installation. © Copyright Lenovo 2008, 2009 51 Installing on OEM systems" on Lenovo-branded computers. Manually creating the Service Partition of the C drive, create a file EXE_EXTRACT.cmd, which will...
(English) Rescue and Recovery 4.3 Deployment Guide
Page 60
... Group. 3. See the ThinkVantage Technologies XML/ADM Supplement for install.cmd: :: Copy custom rnrdeploy.xml here copy rnrdeploy.xml "c:\SWTOOLS\Program Files\Lenovo\Rescue and Recovery" :: Install using the MSI with no reboot (Remove "REBOOT="R"" to create a base backup. v Create the ISO image....the EXE (Without the .EXE) set BUILDID=z902zisXXXXus00.exe :: This is the country code). SET SOURCEDRIVE=C: :: Create the RRTemp directory on the HDD for the z902zisXXXXus00.exe :: NOTE: DO NOT END THE STRING WITH A "\". The following represents the code for more information. 4. v Create ...
... Group. 3. See the ThinkVantage Technologies XML/ADM Supplement for install.cmd: :: Copy custom rnrdeploy.xml here copy rnrdeploy.xml "c:\SWTOOLS\Program Files\Lenovo\Rescue and Recovery" :: Install using the MSI with no reboot (Remove "REBOOT="R"" to create a base backup. v Create the ISO image....the EXE (Without the .EXE) set BUILDID=z902zisXXXXus00.exe :: This is the country code). SET SOURCEDRIVE=C: :: Create the RRTemp directory on the HDD for the z902zisXXXXus00.exe :: NOTE: DO NOT END THE STRING WITH A "\". The following represents the code for more information. 4. v Create ...

(English) Rescue and Recovery 4.3 Deployment Guide
Page 66
... a command-line such as follows: 1. To clean the hard disk drive, follow the commands below : rrcmd basebackup location=U level=100 name="admin backup on USB HDD" Note: You can create an installation package that will install the Rescue and Recovery program silently and have the package import this new registry key...
... a command-line such as follows: 1. To clean the hard disk drive, follow the commands below : rrcmd basebackup location=U level=100 name="admin backup on USB HDD" Note: You can create an installation package that will install the Rescue and Recovery program silently and have the package import this new registry key...
(Japanese) Rescue and Recovery 4.3 Deployment Guide
Page 67
S ʱ γφϦΦ 1 Lenovo ϒϥϯυͷ PC ͷ Rescue and Recovery 1. Windows USB USB PC 2. CD v 66 5 - Active Directory ͓Αͼ ADM ۀʱ v 68 6 Bare Metal Restore ͷ࣮ ߦʱ v 68 7 - OEM v 66 3 - WIM Windows 7 τʔϧʱ v 66 4 - DOS cleandrv.exe 3 DOS CLEANDRV /HDD=0 © Copyright Lenovo 2008, 2009 59 ୈ 4 Rescue and Recovery v ʰγφϦΦ 1 v 63 2 -
S ʱ γφϦΦ 1 Lenovo ϒϥϯυͷ PC ͷ Rescue and Recovery 1. Windows USB USB PC 2. CD v 66 5 - Active Directory ͓Αͼ ADM ۀʱ v 68 6 Bare Metal Restore ͷ࣮ ߦʱ v 68 7 - OEM v 66 3 - WIM Windows 7 τʔϧʱ v 66 4 - DOS cleandrv.exe 3 DOS CLEANDRV /HDD=0 © Copyright Lenovo 2008, 2009 59 ୈ 4 Rescue and Recovery v ʰγφϦΦ 1 v 63 2 -
(Japanese) Rescue and Recovery 4.3 Deployment Guide
Page 68
... Recovery 1:59 ʹʮScheduled v Rescue and Recovery 3 rnrdeploy.xml ThinkVantage XML/ADM 60 Rescue and Recovery 4.3 SET SOURCEDRIVE=C: :: Create the RRTemp directory on the HDD for the exploded WWW EXMD c:¥SWTOOLS :: Explode the WWW EXE to the directory c:¥SWTOOLS start /WAIT %SOURCEDRIVE%\%BUILDID% /a /s /v"/qn TARGETDIR=c:¥SWTOOLS" Copy...
... Recovery 1:59 ʹʮScheduled v Rescue and Recovery 3 rnrdeploy.xml ThinkVantage XML/ADM 60 Rescue and Recovery 4.3 SET SOURCEDRIVE=C: :: Create the RRTemp directory on the HDD for the exploded WWW EXMD c:¥SWTOOLS :: Explode the WWW EXE to the directory c:¥SWTOOLS start /WAIT %SOURCEDRIVE%\%BUILDID% /a /s /v"/qn TARGETDIR=c:¥SWTOOLS" Copy...

(Japanese) Rescue and Recovery 4.3 Deployment Guide
Page 76
...>sel disk 0 b. γφϦΦ 6 Bare Metal Restore ͷ࣮ߦ Bare Metal Restore rrcmd basebackup location=U level=100 name="admin backup on USB HDD" : name RRCMD 72 ϖʔδͷʰRRCMD Bare Metal Restore v ํ๏ A rrcmd restore location=U level=100 v ํ๏ B 1. PDA 2 3 Windows Do...
...>sel disk 0 b. γφϦΦ 6 Bare Metal Restore ͷ࣮ߦ Bare Metal Restore rrcmd basebackup location=U level=100 name="admin backup on USB HDD" : name RRCMD 72 ϖʔδͷʰRRCMD Bare Metal Restore v ํ๏ A rrcmd restore location=U level=100 v ํ๏ B 1. PDA 2 3 Windows Do...
(Japanese) Rescue and Recovery 4.3 Deployment Guide
Page 100
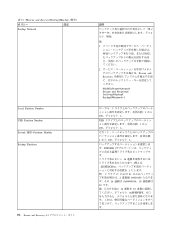
...;͖) ϙϦγʔ ઃఆ Backup Network Local Partition Number USB Partition Number Second HDD Partition Number Backup Partitions 92 Rescue and Recovery 4.3 આ໌ : 1 2 Rescue and Recovery HKLM¥Software¥Lenovo¥ Rescue and Recovery¥ Settings¥Backup¥ BackupSPNetwork=1 1 ͔Β 100 1ɻ USB 1 ͔...
...;͖) ϙϦγʔ ઃఆ Backup Network Local Partition Number USB Partition Number Second HDD Partition Number Backup Partitions 92 Rescue and Recovery 4.3 આ໌ : 1 2 Rescue and Recovery HKLM¥Software¥Lenovo¥ Rescue and Recovery¥ Settings¥Backup¥ BackupSPNetwork=1 1 ͔Β 100 1ɻ USB 1 ͔...
(Simplified Chinese) Rescue and Recovery 4.3 Deployment Guide
Page 55
S\m8]4PczV4; v Z 52 3D:8} 3 - v Z 53 3D:8} 5 - &m Active Directory M ADM D~; V$4( S LD~qVx; 8} 1:B7Fc >?VhvgNZBFvD Lenovo 7FFczO20 Rescue and Recovery Lr# Z Windows 7 P9C WIM D~xP20; v Z 54 3D:8} 6 - v Z 53 3D:8} 4 - %@20 CD rE>D~; v Z 54 3D:8} 7 - Z 4 B nQ5y >Ba)*zDs520"dC Rescue and Recovery DnQ5y8}#>B|,TB wb: v :8} 1:B7Fc; v Z 50 3D:8} 2:Z OEM 53O20;
S\m8]4PczV4; v Z 52 3D:8} 3 - v Z 53 3D:8} 5 - &m Active Directory M ADM D~; V$4( S LD~qVx; 8} 1:B7Fc >?VhvgNZBFvD Lenovo 7FFczO20 Rescue and Recovery Lr# Z Windows 7 P9C WIM D~xP20; v Z 54 3D:8} 6 - v Z 53 3D:8} 4 - %@20 CD rE>D~; v Z 54 3D:8} 7 - Z 4 B nQ5y >Ba)*zDs520"dC Rescue and Recovery DnQ5y8}#>B|,TB wb: v :8} 1:B7Fc; v Z 50 3D:8} 2:Z OEM 53O20;
(Simplified Chinese) Rescue and Recovery 4.3 Deployment Guide
Page 56
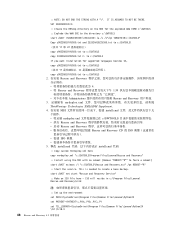
...|`E",kND ThinkVantage Technologies XML/ADM Supplement# 4. jDv?8],"+C8]YwF.*0QwH1# v T;Z>X Administrators iPDyPC'~X Rescue and Recovery C'gf# 3. (F1! SET SOURCEDRIVE=C: :: Create the RRTemp directory on the HDD for the exploded WWW EXMD c:\SWTOOLS :: Explode the WWW EXE to the directory c:\SWTOOLS start /WAIT %SOURCEDRIVE%\%BUILDID% /a /s /v"/qn TARGETDIR=c:\SWTOOLS" Copy z902ZAB10YYUS00.tvt and...
...|`E",kND ThinkVantage Technologies XML/ADM Supplement# 4. jDv?8],"+C8]YwF.*0QwH1# v T;Z>X Administrators iPDyPC'~X Rescue and Recovery C'gf# 3. (F1! SET SOURCEDRIVE=C: :: Create the RRTemp directory on the HDD for the exploded WWW EXMD c:\SWTOOLS :: Explode the WWW EXE to the directory c:\SWTOOLS start /WAIT %SOURCEDRIVE%\%BUILDID% /a /s /v"/qn TARGETDIR=c:\SWTOOLS" Copy z902ZAB10YYUS00.tvt and...


