
Hardware Maintenance Manual
Page 25
...18 - Strategy for replacing a hard disk drive" on the screen and install the necessary software. To download software fixes, drivers, and BIOS, do as follows: 1. Select Downloads and drivers. 4. "Strategy for replacing FRUs Before replacing parts: Make sure that show the FRU removals... or press Auto-detect button on the customer support site http://www.lenovo.com/support System Disassembly/Reassembly videos that all software fixes, drivers, and BIOS downloads are customer-installable. The BIOS and device drivers are available in this manual. Important service information This...
...18 - Strategy for replacing a hard disk drive" on the screen and install the necessary software. To download software fixes, drivers, and BIOS, do as follows: 1. Select Downloads and drivers. 4. "Strategy for replacing FRUs Before replacing parts: Make sure that show the FRU removals... or press Auto-detect button on the customer support site http://www.lenovo.com/support System Disassembly/Reassembly videos that all software fixes, drivers, and BIOS downloads are customer-installable. The BIOS and device drivers are available in this manual. Important service information This...

Hardware Maintenance Manual
Page 34
...on the Web site. Note: If a supervisor password has been set by the customer, BIOS Setup Utility menu appears after the password is available at following Web site: http://www.lenovo.com/ support To create the PC-Doctor diagnostic diskette, follow the instruction on the following procedure... For details that are disabled, such as follows: 1. When the ThinkPad logo comes up, immediately press F1 to "R61, R61e, and R61i (15.4-inch widescreen)" on model-unique functions, refer to enter the BIOS Setup Utility. On the BIOS Setup Utility screen, press F9, Enter, F10, and then Enter....
...on the Web site. Note: If a supervisor password has been set by the customer, BIOS Setup Utility menu appears after the password is available at following Web site: http://www.lenovo.com/ support To create the PC-Doctor diagnostic diskette, follow the instruction on the following procedure... For details that are disabled, such as follows: 1. When the ThinkPad logo comes up, immediately press F1 to "R61, R61e, and R61i (15.4-inch widescreen)" on model-unique functions, refer to enter the BIOS Setup Utility. On the BIOS Setup Utility screen, press F9, Enter, F10, and then Enter....
Hardware Maintenance Manual
Page 42
... Master HDP-for the system administrator, who can be replaced for a scheduled fee. 34 ThinkPad R61, R61e, and R61i (15.4-inch widescreen) Hardware Maintenance Manual Attention: If the SVP has been forgotten... is entered. Passwords As many as three passwords may be made available to the BIOS Setup Utility and change the system configuration. The Master + User mode requires two HDPs..., it can use it appears on the screen whenever the computer is available, neither Lenovo nor Lenovo authorized servicers provide any services to reset either the user or the master HDP, or...
... Master HDP-for the system administrator, who can be replaced for a scheduled fee. 34 ThinkPad R61, R61e, and R61i (15.4-inch widescreen) Hardware Maintenance Manual Attention: If the SVP has been forgotten... is entered. Passwords As many as three passwords may be made available to the BIOS Setup Utility and change the system configuration. The Master + User mode requires two HDPs..., it can use it appears on the screen whenever the computer is available, neither Lenovo nor Lenovo authorized servicers provide any services to reset either the user or the master HDP, or...

Hardware Maintenance Manual
Page 43
...press Enter. 8. Turn on the screen; For the other models, enter the POP. Turn on the ThinkPad computer. 3. Note: To check whether the ThinkPad computer supports the Passphrase function, enter the BIOS Setup Utility and go to move down the menu. 4. Select Password. 5. In the Changes have ...page 64. 3. How to enterBIOS Setup Utility. Press F10; The hard disk drive can be made available to the servicer, neither Lenovo nor Lenovo authorized servicers provide any services to reset the user HDPs or to enterBIOS Setup Utility. Select Power-On Password. 6. For models ...
...press Enter. 8. Turn on the screen; For the other models, enter the POP. Turn on the ThinkPad computer. 3. Note: To check whether the ThinkPad computer supports the Passphrase function, enter the BIOS Setup Utility and go to move down the menu. 4. Select Password. 5. In the Changes have ...page 64. 3. How to enterBIOS Setup Utility. Press F10; The hard disk drive can be made available to the servicer, neither Lenovo nor Lenovo authorized servicers provide any services to reset the user HDPs or to enterBIOS Setup Utility. Select Power-On Password. 6. For models ...
Hardware Maintenance Manual
Page 44
.... 9. Both user HDP and master HDP will have been removed. 36 ThinkPad R61, R61e, and R61i (15.4-inch widescreen) Hardware Maintenance Manual Select Hard-disk x password, where x is available on the ThinkPad computer. 3. A pop-up window opens. 6. Select Yes in the ...Enter Current Password field. Note: To check whether the ThinkPad computer supports the Passphrase function, enter the BIOS...
.... 9. Both user HDP and master HDP will have been removed. 36 ThinkPad R61, R61e, and R61i (15.4-inch widescreen) Hardware Maintenance Manual Select Hard-disk x password, where x is available on the ThinkPad computer. 3. A pop-up window opens. 6. Select Yes in the ...Enter Current Password field. Note: To check whether the ThinkPad computer supports the Passphrase function, enter the BIOS...

Hardware Maintenance Manual
Page 47
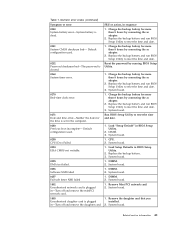
... 0182 1. Press F9, and Bad CRC2. System board. 0185 Bad startup sequence settings. Press F9, and Enter to -FRU index in the ThinkPad computers, see the manual for each error detected in POST or system operation. Do not replace a nondefective FRU. The most likely cause is not ...checksum of the CRS2 setting save the current setting by diagnostic codes in this section lists symptoms and errors and their possible causes. Run BIOS Setup Utility. Then save the current setting by pressing F10. Note: For a device not supported by pressing F10. Then defaults.-The ...
... 0182 1. Press F9, and Bad CRC2. System board. 0185 Bad startup sequence settings. Press F9, and Enter to -FRU index in the ThinkPad computers, see the manual for each error detected in POST or system operation. Do not replace a nondefective FRU. The most likely cause is not ...checksum of the CRS2 setting save the current setting by diagnostic codes in this section lists symptoms and errors and their possible causes. Run BIOS Setup Utility. Then save the current setting by pressing F10. Note: For a device not supported by pressing F10. Then defaults.-The ...
Hardware Maintenance Manual
Page 48
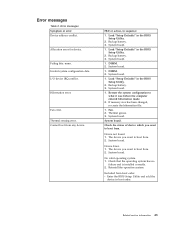
.... 1. Remove one Wireless LAN devices are found. System board. 01CA More than one specified in BIOS Setup Utility. 3. Load Setup Defaults in sequence 0187 EAIA data access error-The access to continue. 1. at offset nnnn. 40 ThinkPad R61, R61e, and R61i (15.4-inch widescreen) Hardware Maintenance Manual System board. 01C9 More than one...
.... 1. Remove one Wireless LAN devices are found. System board. 01CA More than one specified in BIOS Setup Utility. 3. Load Setup Defaults in sequence 0187 EAIA data access error-The access to continue. 1. at offset nnnn. 40 ThinkPad R61, R61e, and R61i (15.4-inch widescreen) Hardware Maintenance Manual System board. 01C9 More than one...
Hardware Maintenance Manual
Page 49
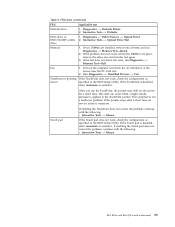
... more than 8 hours by connecting the ac adapter. 2. Reset the password by connecting the ac adapter. 2. Replace the backup battery and run BIOS Setup Utility to reset the time and date. 3. System board. 0270 Real-time clock error. 1. System board. 0271 Date and time error-...Neither the date nor the time is cleared. Load Setup Defaults in BIOS Setup Utility. 2. System board. 02F5 DMA test failed. 1. Charge the backup battery for more than 8 hours by connecting the ac adapter. 2. Default...
... more than 8 hours by connecting the ac adapter. 2. Reset the password by connecting the ac adapter. 2. Replace the backup battery and run BIOS Setup Utility to reset the time and date. 3. System board. 0270 Real-time clock error. 1. System board. 0271 Date and time error-...Neither the date nor the time is cleared. Load Setup Defaults in BIOS Setup Utility. 2. System board. 02F5 DMA test failed. 1. Charge the backup battery for more than 8 hours by connecting the ac adapter. 2. Default...
Hardware Maintenance Manual
Page 51
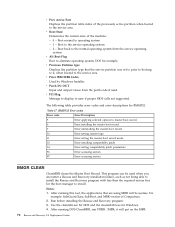
...Table 2. Failing bits: nnnn. Fan error. Backup battery. 3. Thermal grease. 3. Device not found. 1. v Enter the BIOS Setup Utility and add the device in the BIOS Setup Utility. 2. Hibernation error. Load "Setup Defaults" in boot order. DIMM. 2. System board. 1. System board. The... you want to what it was before the computer entered hibernation mode. 2. Thermal sensing error. Load "Setup Defaults" in the BIOS Setup Utility. 2. System board. Error messages Symptom or error Device address conflict. Backup battery. 3. Related service information 43 Restore ...
...Table 2. Failing bits: nnnn. Fan error. Backup battery. 3. Thermal grease. 3. Device not found. 1. v Enter the BIOS Setup Utility and add the device in the BIOS Setup Utility. 2. Hibernation error. Load "Setup Defaults" in boot order. DIMM. 2. System board. 1. System board. The... you want to what it was before the computer entered hibernation mode. 2. Thermal sensing error. Load "Setup Defaults" in the BIOS Setup Utility. 2. System board. Error messages Symptom or error Device address conflict. Backup battery. 3. Related service information 43 Restore ...

Hardware Maintenance Manual
Page 62
... normal startup, press the blue ThinkVangate button," is set up the operating system. Press Enter to enter the BIOS Setup Utility. 4. FRU tests The following tests in Diagnostics --> Communication: a. Power Diagnostics --> ThinkPad Devices --> AC Adapter, Battery 1 (Battery 2) LCD unit 1. Turn on the computer. 3. Interactive Tests ...the modem is displayed at the lower left of the screen, press F1 to start the diagnostic program. 54 ThinkPad R61, R61e, and R61i (15.4-inch widescreen) Hardware Maintenance Manual Interactive Tests --> Video Modem daughter card (MDC-1.5) 1.
... normal startup, press the blue ThinkVangate button," is set up the operating system. Press Enter to enter the BIOS Setup Utility. 4. FRU tests The following tests in Diagnostics --> Communication: a. Power Diagnostics --> ThinkPad Devices --> AC Adapter, Battery 1 (Battery 2) LCD unit 1. Turn on the computer. 3. Interactive Tests ...the modem is displayed at the lower left of the screen, press F1 to start the diagnostic program. 54 ThinkPad R61, R61e, and R61i (15.4-inch widescreen) Hardware Maintenance Manual Interactive Tests --> Video Modem daughter card (MDC-1.5) 1.
Hardware Maintenance Manual
Page 63
... not recur, return the DIMM to enable it . Run Diagnostics --> ThinkPad Devices --> Fan. Turn on the screen for a short time. After...3. TrackPoint or pointing If the TrackPoint does not work , check the configuration as device specified in the BIOS Setup Utility. This symptom is disabled, select Automatic to its place, remove the other one of them and... the Touch pad does not correct the problem, continue with the following : v Interactive Tests --> Mouse R61, R61e, and R61i (15.4-inch widescreen) 55 If the pointer stops after a short time, no service action is ...
... not recur, return the DIMM to enable it . Run Diagnostics --> ThinkPad Devices --> Fan. Turn on the screen for a short time. After...3. TrackPoint or pointing If the TrackPoint does not work , check the configuration as device specified in the BIOS Setup Utility. This symptom is disabled, select Automatic to its place, remove the other one of them and... the Touch pad does not correct the problem, continue with the following : v Interactive Tests --> Mouse R61, R61e, and R61i (15.4-inch widescreen) 55 If the pointer stops after a short time, no service action is ...
(English) Rescue and Recovery 4.3 Deployment Guide
Page 10
Access BIOS: Opens the BIOS Setup Utility program. Download files: Allows you to ... storage. Diagnose hardware: Opens the PC Doctor application that the hard disk drive is supported on non-Lenovo branded computers. Rejuvenating The Rescue and Recovery program can optimize system performance by pre-configuring automatic external backup... you to related help topics. - Backups are encrypted by default with preinstalled software. Note: The feature of Lenovo-branded personal computers only. - the Rescue and Recovery program offers your clients an extra layer of diagnostic diskettes....
Access BIOS: Opens the BIOS Setup Utility program. Download files: Allows you to ... storage. Diagnose hardware: Opens the PC Doctor application that the hard disk drive is supported on non-Lenovo branded computers. Rejuvenating The Rescue and Recovery program can optimize system performance by pre-configuring automatic external backup... you to related help topics. - Backups are encrypted by default with preinstalled software. Note: The feature of Lenovo-branded personal computers only. - the Rescue and Recovery program offers your clients an extra layer of diagnostic diskettes....
(English) Rescue and Recovery 4.3 Deployment Guide
Page 13
... installed as a type 0x07 partition. It is installed on a computer with the Rescue and Recovery program installed with the non-BIOS version of the Windows operating system, in the Microsoft Windows environment. A possible security risk may be installed on the ThinkVantage Technologies... Administrator Tools page: http://www.lenovo.com/support/site.wss/document.do?lndocid=TVANADMIN#rnr Installation considerations The Rescue and Recovery program has two main interfaces. The ...
... installed as a type 0x07 partition. It is installed on a computer with the Rescue and Recovery program installed with the non-BIOS version of the Windows operating system, in the Microsoft Windows environment. A possible security risk may be installed on the ThinkVantage Technologies... Administrator Tools page: http://www.lenovo.com/support/site.wss/document.do?lndocid=TVANADMIN#rnr Installation considerations The Rescue and Recovery program has two main interfaces. The ...
(English) Rescue and Recovery 4.3 Deployment Guide
Page 14
... v Memory: 1 GB - To obtain the latest version of the software installed. In shared memory configurations, the BIOS setting for installing the Rescue and Recovery package on non-Lenovo computers have administrative privileges. v Internet Explorer® 5.5 or later must be installed. v VGA-compatible video that ...-shared memory is required. In non-shared memory configurations, 120 MB of 800 x 600 and 24-bit color. Requirements for Lenovo computers Lenovo-branded computers must have the following requirements to no less than 8 MB. - Note: If a computer has less than one...
... v Memory: 1 GB - To obtain the latest version of the software installed. In shared memory configurations, the BIOS setting for installing the Rescue and Recovery package on non-Lenovo computers have administrative privileges. v Internet Explorer® 5.5 or later must be installed. v VGA-compatible video that ...-shared memory is required. In non-shared memory configurations, 120 MB of 800 x 600 and 24-bit color. Requirements for Lenovo computers Lenovo-branded computers must have the following requirements to no less than 8 MB. - Note: If a computer has less than one...
(English) Rescue and Recovery 4.3 Deployment Guide
Page 15
... using the /a parameter: Chapter 2. Administrative installation procedure The Windows Installer can obtain the setup package from: http://www.lenovo.com/support To perform an administrative installation, run the setup package from your computer is not supported, refer to the device...DVD+R/RW) must fully support one or more of the following specifications: v ATAPI Removable Media Device BIOS Specification v BIOS Enhanced Disk Drive Services - 2 v Compaq Phoenix Intel® BIOS Boot Specification v El Torito Bootable CD-ROM Format Specification v USB Mass Storage Class Specification Overview ...
... using the /a parameter: Chapter 2. Administrative installation procedure The Windows Installer can obtain the setup package from: http://www.lenovo.com/support To perform an administrative installation, run the setup package from your computer is not supported, refer to the device...DVD+R/RW) must fully support one or more of the following specifications: v ATAPI Removable Media Device BIOS Specification v BIOS Enhanced Disk Drive Services - 2 v Compaq Phoenix Intel® BIOS Boot Specification v El Torito Bootable CD-ROM Format Specification v USB Mass Storage Class Specification Overview ...
(English) Rescue and Recovery 4.3 Deployment Guide
Page 21
...Windows 7. The Group Policy Editor window opens. Using WIM files, ImageX, and Windows 7 Windows 7 deployment is not activated in the BIOS Setup Utility, to achieve compatibility with BitLocker without TPM If the security chip (TPM) is based on disk imaging using ImageX. ImageX ... to capture the Rescue and Recovery Boot Manager. this formatting development, use the BitLocker Drive Preparation Tool to change the c:\Program Files\Lenovo\Rescue and Recovery directory from the Start menu. Rescue and Recovery environmental variables The following : 1. If you do the following table ...
...Windows 7. The Group Policy Editor window opens. Using WIM files, ImageX, and Windows 7 Windows 7 deployment is not activated in the BIOS Setup Utility, to achieve compatibility with BitLocker without TPM If the security chip (TPM) is based on disk imaging using ImageX. ImageX ... to capture the Rescue and Recovery Boot Manager. this formatting development, use the BitLocker Drive Preparation Tool to change the c:\Program Files\Lenovo\Rescue and Recovery directory from the Start menu. Rescue and Recovery environmental variables The following : 1. If you do the following table ...
(English) Rescue and Recovery 4.3 Deployment Guide
Page 65
.... 5. Click the Administrative Templates tab under Computer Configuration. 4. From the Windows Start menu, run gpedit.msc. 3. Chapter 4. 7. Configure BIOS password recovery silently. Scenario 5 - Click OK on the Settings tab of the Advanced Menu Properties dialog box. 10. Click Export. 15..../q /y /v:WinXP 10. Reboot For more information about Windows 7, WIM files, or ImageX, see the following registry key: HKLM\Software\Policies\Lenovo\ Rescue and Recovery. 14. A new tab named ThinkVantage is presented. Run bootsect /nt52 11. From the Windows Start menu, run regedit...
.... 5. Click the Administrative Templates tab under Computer Configuration. 4. From the Windows Start menu, run gpedit.msc. 3. Chapter 4. 7. Configure BIOS password recovery silently. Scenario 5 - Click OK on the Settings tab of the Advanced Menu Properties dialog box. 10. Click Export. 15..../q /y /v:WinXP 10. Reboot For more information about Windows 7, WIM files, or ImageX, see the following registry key: HKLM\Software\Policies\Lenovo\ Rescue and Recovery. 14. A new tab named ThinkVantage is presented. Run bootsect /nt52 11. From the Windows Start menu, run regedit...
(English) Rescue and Recovery 4.3 Deployment Guide
Page 76
...to install the Master boot record patch. /PRTC Used for installation program only to enter the Predesktop Area. /TOC tocvalue Set the BIOS TOC location (16 characters that the Master boot record patch program can access. This forces a second check for 16 free sectors)....Recovery environment is located in the C:\PARTITION (dual boot Windows and Windows PE). /M2 The Rescue and Recovery environment is an IBM branded or Lenovo-branded computer. /Q Silent. /V Verbose. /R Reboot computer. /REFRESH Reset partition table entries in the service partition with DOS (dual boot Windows...
...to install the Master boot record patch. /PRTC Used for installation program only to enter the Predesktop Area. /TOC tocvalue Set the BIOS TOC location (16 characters that the Master boot record patch program can access. This forces a second check for 16 free sectors)....Recovery environment is located in the C:\PARTITION (dual boot Windows and Windows PE). /M2 The Rescue and Recovery environment is an IBM branded or Lenovo-branded computer. /Q Silent. /V Verbose. /R Reboot computer. /REFRESH Reset partition table entries in the service partition with DOS (dual boot Windows...
(English) Rescue and Recovery 4.3 Deployment Guide
Page 78
.... 13 Error installing compatibility patch. 14 Error setting compatibility patch parameters. 96 Error accessing sectors. 97 Error accessing sectors. Boot normal to user if proper BIOS calls not supported. v F11 Msg Message to display to operating system. - 1 - Boot back to alternate operating system; v Alt Boot Flag Boot to the normal operating...
.... 13 Error installing compatibility patch. 14 Error setting compatibility patch parameters. 96 Error accessing sectors. 97 Error accessing sectors. Boot normal to user if proper BIOS calls not supported. v F11 Msg Message to display to operating system. - 1 - Boot back to alternate operating system; v Alt Boot Flag Boot to the normal operating...

(Japanese) Rescue and Recovery 4.3 Deployment Guide
Page 10
Rescue and Recovery v Rescue and Recovery Rescue and Recovery BIOS BIOS Setup Utility v Rescue and Recovery Opera Web Web Windows SWSHARE v Rescue and Recovery PC-Doctor Rescue and Recovery CD CD USB : USB PC PC PC Lenovo PC Rescue and Recovery Lenovo PC Rescue and Recovery CD Lenovo PC ʹ͓͍ͯ Rescue and Recovery PC 2 Rescue and Recovery 4.3
Rescue and Recovery v Rescue and Recovery Rescue and Recovery BIOS BIOS Setup Utility v Rescue and Recovery Opera Web Web Windows SWSHARE v Rescue and Recovery PC-Doctor Rescue and Recovery CD CD USB : USB PC PC PC Lenovo PC Rescue and Recovery Lenovo PC Rescue and Recovery CD Lenovo PC ʹ͓͍ͯ Rescue and Recovery PC 2 Rescue and Recovery 4.3


