Hardware Maintenance Manual
Page 5
... Windows 28 PC-Doctor for Rescue and Recovery . . . . . 28 Power system checkout 29 Checking the AC adapter 29 Checking operational charging 30 Checking the battery pack 30 Checking the backup battery 31 Related service information 33 Restoring the factory contents by using Product Recovery discs 33 Passwords 34 Power-on password 34 Hard-disk password 34 Supervisor password 34 How to remove the power-on password . . . . 35 How to remove the hard-disk password . . . . 35 Power management 37 Screen blank mode 37 Standby mode...
... Windows 28 PC-Doctor for Rescue and Recovery . . . . . 28 Power system checkout 29 Checking the AC adapter 29 Checking operational charging 30 Checking the battery pack 30 Checking the backup battery 31 Related service information 33 Restoring the factory contents by using Product Recovery discs 33 Passwords 34 Power-on password 34 Hard-disk password 34 Supervisor password 34 How to remove the power-on password . . . . 35 How to remove the hard-disk password . . . . 35 Power management 37 Screen blank mode 37 Standby mode...
Hardware Maintenance Manual
Page 42
... replaced for a scheduled fee. 34 ThinkPad R61, R61e, and R61i (15.4-inch widescreen) Hardware Maintenance Manual The Master + User mode requires two HDPs; The system administrator then provides the user HDP to complete the Windows setup. If it has, it appears on page 35. The hard disk drive can use it to get access to the BIOS Setup Utility and change the system configuration. The user must enter the SVP in order to get access...
... replaced for a scheduled fee. 34 ThinkPad R61, R61e, and R61i (15.4-inch widescreen) Hardware Maintenance Manual The Master + User mode requires two HDPs; The system administrator then provides the user HDP to complete the Windows setup. If it has, it appears on page 35. The hard disk drive can use it to get access to the BIOS Setup Utility and change the system configuration. The user must enter the SVP in order to get access...
Hardware Maintenance Manual
Page 45
... mode, press the ThinkVantage® button and use the ThinkVantage Productivity Center. v If the battery indicator blinks orange, indicating that time. This default low-battery behavior is appropriate. v Turn on the timer, and the user does not do any key. Note: If you are using the ACPI operating system, you have set on the "Turn off monitor" timer in screen blank mode: v The LCD is available. so if you can change...
... mode, press the ThinkVantage® button and use the ThinkVantage Productivity Center. v If the battery indicator blinks orange, indicating that time. This default low-battery behavior is appropriate. v Turn on the timer, and the user does not do any key. Note: If you are using the ACPI operating system, you have set on the "Turn off monitor" timer in screen blank mode: v The LCD is available. so if you can change...

Hardware Maintenance Manual
Page 47
... to need to -FRU index in the ThinkPad computers, see the manual for each error detected in the EEPROM is not described there, go to "Intermittent problems" on page 46 The symptom-to be any number. System board. 0177 Bad SVP data, stop POST task-The EEPROM checksum is displayed for that device. Run BIOS Setup Utility. Enter BIOS Setup and load Setup Enter to load the default setting...
... to need to -FRU index in the ThinkPad computers, see the manual for each error detected in the EEPROM is not described there, go to "Intermittent problems" on page 46 The symptom-to be any number. System board. 0177 Bad SVP data, stop POST task-The EEPROM checksum is displayed for that device. Run BIOS Setup Utility. Enter BIOS Setup and load Setup Enter to load the default setting...
Hardware Maintenance Manual
Page 49
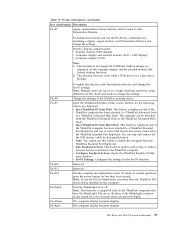
.... 1. Default configuration used . 1. System board. 1803 1. Related service information 41 Numeric error codes (continued) Symptom or error FRU or action, in sequence 0250 System battery error-System battery is set in the computer. Charge the backup battery for more than 8 hours by connecting the ac adapter. 2. Replace the backup battery and run BIOS Setup Utility to reset the time and date. 0252 Password checksum bad-The password is plugged installed. CPU. 2. System board. 02F5 DMA test failed. 1. DIMM. 2. Table 1. Default configuration used...
.... 1. Default configuration used . 1. System board. 1803 1. Related service information 41 Numeric error codes (continued) Symptom or error FRU or action, in sequence 0250 System battery error-System battery is set in the computer. Charge the backup battery for more than 8 hours by connecting the ac adapter. 2. Replace the backup battery and run BIOS Setup Utility to reset the time and date. 0252 Password checksum bad-The password is plugged installed. CPU. 2. System board. 02F5 DMA test failed. 1. DIMM. 2. Table 1. Default configuration used...

Hardware Maintenance Manual
Page 50
... one external fingerprint reader is available at http://www.lenovo.com/support 2100 Initialization error on this system. Main hard disk drive. 3. Power off and remove the Wireless USB card. 1. Reseat the hard disk drive. System board. 2112 Read error on this system and that you installed. 2. System board. 42 ThinkPad R61, R61e, and R61i (15.4-inch widescreen) Hardware Maintenance Manual System board. 1805 Unauthorized Wireless USB card is installed. disk drive) 3. Table 1. Remove the WAN card that the latest HDD firmware is plugged in Slot-1. Run...
... one external fingerprint reader is available at http://www.lenovo.com/support 2100 Initialization error on this system. Main hard disk drive. 3. Power off and remove the Wireless USB card. 1. Reseat the hard disk drive. System board. 2112 Read error on this system and that you installed. 2. System board. 42 ThinkPad R61, R61e, and R61i (15.4-inch widescreen) Hardware Maintenance Manual System board. 1805 Unauthorized Wireless USB card is installed. disk drive) 3. Table 1. Remove the WAN card that the latest HDD firmware is plugged in Slot-1. Run...

Hardware Maintenance Manual
Page 62
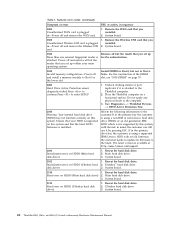
... diagnose the hard disk drive without starting up correctly. 2. Press enter. 5. Interactive Tests --> Video Modem daughter card (MDC-1.5) 1. Diagnostics --> Systemboard 3. PC Card slot Diagnostics --> Systemboard --> PCMCIA ExpressCard slot Keyboard 1. Interactive Tests --> Keyboard Hard disk drive Enter the BIOS Setup Utility and change Serial ATA (SATA) setting to the computer while the test is displayed at the lower left of the screen, press F1 to Compatibility, and run Diagnostics --> Other Devices --> Conexant Audio Speaker Interactive Tests --> Internal Speaker...
... diagnose the hard disk drive without starting up correctly. 2. Press enter. 5. Interactive Tests --> Video Modem daughter card (MDC-1.5) 1. Diagnostics --> Systemboard 3. PC Card slot Diagnostics --> Systemboard --> PCMCIA ExpressCard slot Keyboard 1. Interactive Tests --> Keyboard Hard disk drive Enter the BIOS Setup Utility and change Serial ATA (SATA) setting to the computer while the test is displayed at the lower left of the screen, press F1 to Compatibility, and run Diagnostics --> Other Devices --> Conexant Audio Speaker Interactive Tests --> Internal Speaker...

Hardware Maintenance Manual
Page 65
... location v External monitor (CRT display) v Computer display and external monitor (LCD + CRT display) v Computer display (LCD) Note: 1. v Run EasyEject Actions: This button is displayed only if the ThinkPad computer has been attached to normal operation, press the power button for a few seconds when you must have the ThinkPad PM device driver installed on the ThinkPad computers that have been connected to start Presentation Director. R61, R61e, and R61i (15.4-inch widescreen) 57 Table 10. This function...
... location v External monitor (CRT display) v Computer display and external monitor (LCD + CRT display) v Computer display (LCD) Note: 1. v Run EasyEject Actions: This button is displayed only if the ThinkPad computer has been attached to normal operation, press the power button for a few seconds when you must have the ThinkPad PM device driver installed on the ThinkPad computers that have been connected to start Presentation Director. R61, R61e, and R61i (15.4-inch widescreen) 57 Table 10. This function...
Hardware Maintenance Manual
Page 43
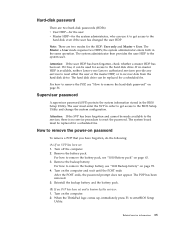
... replaced for a scheduled fee. How to remove the power-on page 36. Reinstall the backup battery and the battery pack. (B) If an SVP has been set and is available, neither Lenovo nor Lenovo authorized servicers provide any services to reset either the user or the master HDP, or to recover data from the hard disk drive. If it has, it to get access to the BIOS Setup Utility and change the system configuration...
... replaced for a scheduled fee. How to remove the power-on page 36. Reinstall the backup battery and the battery pack. (B) If an SVP has been set and is available, neither Lenovo nor Lenovo authorized servicers provide any services to reset either the user or the master HDP, or to recover data from the hard disk drive. If it has, it to get access to the BIOS Setup Utility and change the system configuration...

Hardware Maintenance Manual
Page 47
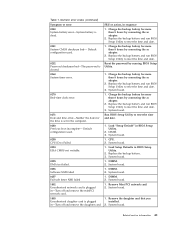
If no numeric code is displayed, check the narrative descriptions of symptoms. If the symptom is displayed for that device. Enter BIOS Setup and load Setup Enter to load the default setting. Run BIOS Setup Utility. Do not replace a nondefective FRU. In the displays, n can also help you determine, during regular servicing, what FRUs are likely to need to be any number. Note: For a device not supported by pressing F10. 2. System board. 0176...
If no numeric code is displayed, check the narrative descriptions of symptoms. If the symptom is displayed for that device. Enter BIOS Setup and load Setup Enter to load the default setting. Run BIOS Setup Utility. Do not replace a nondefective FRU. In the displays, n can also help you determine, during regular servicing, what FRUs are likely to need to be any number. Note: For a device not supported by pressing F10. 2. System board. 0176...

Hardware Maintenance Manual
Page 50
... HDD firmware is plugged in Slot-1. Remove the Wireless USB card that you installed. 2. Power off and install a memory module to the computer. 3. Remove all but the reader that you set up for the authentication. 1830 Invalid memory configuration-Power off and remove all but not in -Power off and remove the Wireless USB card. 1. The latest version is attached. Reseat the hard disk drive. 2. Main hard disk drive. 3. System board. 2102 1. Reseat the hard disk drive. Read error on HDD0 (Main hard disk drive) 1. Ultrabay hard disk drive. 3. System board...
... HDD firmware is plugged in Slot-1. Remove the Wireless USB card that you installed. 2. Power off and install a memory module to the computer. 3. Remove all but the reader that you set up for the authentication. 1830 Invalid memory configuration-Power off and remove all but not in -Power off and remove the Wireless USB card. 1. The latest version is attached. Reseat the hard disk drive. 2. Main hard disk drive. 3. System board. 2102 1. Reseat the hard disk drive. Read error on HDD0 (Main hard disk drive) 1. Ultrabay hard disk drive. 3. System board...
Hardware Maintenance Manual
Page 65
.... Switch a display output location v External monitor (CRT display) v Computer display and external monitor (LCD + CRT display) v Computer display (LCD) Note: 1. Reserved. Note: Multiple users can stop , or remove external devices connected to normal operation, press the power button for switching a display output location, start Presentation Director, and change the settings. To return to the ThinkPad computer. This function does not work while a DVD movie or a video clip is used to a single operating system by clicking the button. To disable this function, start...
.... Switch a display output location v External monitor (CRT display) v Computer display and external monitor (LCD + CRT display) v Computer display (LCD) Note: 1. Reserved. Note: Multiple users can stop , or remove external devices connected to normal operation, press the power button for switching a display output location, start Presentation Director, and change the settings. To return to the ThinkPad computer. This function does not work while a DVD movie or a video clip is used to a single operating system by clicking the button. To disable this function, start...

Hardware Maintenance Manual
Page 43
... are two modes for the HDP: User only and Master + User. Turn on the computer; The Rescue and Recovery screen opens. For how to remove the POP, see "How to reset the password. After the POST ends, the password prompt does not appear. Related service information 35 If it has, it to get access to the BIOS Setup Utility and change the system configuration. The hard disk drive can be replaced for...
... are two modes for the HDP: User only and Master + User. Turn on the computer; The Rescue and Recovery screen opens. For how to remove the POP, see "How to reset the password. After the POST ends, the password prompt does not appear. Related service information 35 If it has, it to get access to the BIOS Setup Utility and change the system configuration. The hard disk drive can be replaced for...

Hardware Maintenance Manual
Page 47
... error is displayed for that device. In the displays, n can also help you determine, during regular servicing, what FRUs are likely to need to load the default setting. Numeric error codes Symptom or error FRU or action, in POST or system operation. System board. 0176 System Security-The system has been tampered with. 1. in boldface type. Run BIOS Setup Utility. Press F9, and Enter to be any number. Related service...
... error is displayed for that device. In the displays, n can also help you determine, during regular servicing, what FRUs are likely to need to load the default setting. Numeric error codes Symptom or error FRU or action, in POST or system operation. System board. 0176 System Security-The system has been tampered with. 1. in boldface type. Run BIOS Setup Utility. Press F9, and Enter to be any number. Related service...
Hardware Maintenance Manual
Page 50
... main operating system. Reseat the hard disk drive. Reseat the hard disk drive. Reseat the hard disk drive. 2. Table 1. Remove the Wireless USB card that you set up for the authentication. 1830 Invalid memory configuration-Power off and install a memory module to the customer:If in the primary bay the customer is not supported by pressing ESC. System board. 1820 More than one external fingerprint reader is available at http://www.lenovo.com/support 2100 Initialization error on...
... main operating system. Reseat the hard disk drive. Reseat the hard disk drive. Reseat the hard disk drive. 2. Table 1. Remove the Wireless USB card that you set up for the authentication. 1830 Invalid memory configuration-Power off and install a memory module to the customer:If in the primary bay the customer is not supported by pressing ESC. System board. 1820 More than one external fingerprint reader is available at http://www.lenovo.com/support 2100 Initialization error on...

Hardware Maintenance Manual
Page 65
... a ThinkPad Essential Port Replicator and one or more USB devices have the ThinkPad PM device driver installed on the computer display and the external monitor (the Extend desktop function). 2. v Configure EasyEject Actions: Opens the ThinkPad EasyEject Utility main window. Change the settings of the ThinkLight is displayed only if the ThinkPad computer has been attached to select, stop and remove all the USB devices safely by using different user IDs. This function does not work while a DVD movie or a video clip...
... a ThinkPad Essential Port Replicator and one or more USB devices have the ThinkPad PM device driver installed on the computer display and the external monitor (the Extend desktop function). 2. v Configure EasyEject Actions: Opens the ThinkPad EasyEject Utility main window. Change the settings of the ThinkLight is displayed only if the ThinkPad computer has been attached to select, stop and remove all the USB devices safely by using different user IDs. This function does not work while a DVD movie or a video clip...
Hardware Maintenance Manual
Page 29
... recover data from the hard disk drive. Click Access BIOS. Select Power-On Password. 7. Turn on the screen; then, while the "To interrupt normal startup, press the blue ThinkVantage button" message is available, neither Lenovo nor Lenovo authorized servicers provide any services to reset either the user or the master HDP, or to remove the battery pack, see "1100 Backup battery" on page 57. 3. then enter the POP. Select Security, using the cursor directional keys...
... recover data from the hard disk drive. Click Access BIOS. Select Power-On Password. 7. Turn on the screen; then, while the "To interrupt normal startup, press the blue ThinkVantage button" message is available, neither Lenovo nor Lenovo authorized servicers provide any services to reset either the user or the master HDP, or to remove the battery pack, see "1100 Backup battery" on page 57. 3. then enter the POP. Select Security, using the cursor directional keys...
Hardware Maintenance Manual
Page 30
... and Recovery screen opens. Note: To check whether the ThinkPad computer supports the Passphrase function, enter the BIOS Setup Utility and go to recover data from the hard disk drive. To put the computer into screen blank mode, press the ThinkVantage button and use the ThinkVantage Productivity Center. Related service information How to remove the hard-disk password Attention: If User only mode is selected and the user HDP has been forgotten and cannot be replaced for...
... and Recovery screen opens. Note: To check whether the ThinkPad computer supports the Passphrase function, enter the BIOS Setup Utility and go to recover data from the hard disk drive. To put the computer into screen blank mode, press the ThinkVantage button and use the ThinkVantage Productivity Center. Related service information How to remove the hard-disk password Attention: If User only mode is selected and the user HDP has been forgotten and cannot be replaced for...

Hardware Maintenance Manual
Page 46
... diskette from the BIOS Setup Utility, do as follows: 1. Power Diagnostics --> ThinkPad Devices --> AC Adapter, Battery 1 (Battery 2) LCD unit 1. Make sure the modem is running. Conexant Smart Modem Dialtone Audio Enter the BIOS Setup Utility and change Serial ATA (SATA) setting to the computer while the test is set up the operating system. Run Diagnostics --> ThinkPad Devices --> ExpressCard slot. To diagnose the hard disk drive from the diskette drive, and then turn off and turn on the computer. 3. Remove any physical...
... diskette from the BIOS Setup Utility, do as follows: 1. Power Diagnostics --> ThinkPad Devices --> AC Adapter, Battery 1 (Battery 2) LCD unit 1. Make sure the modem is running. Conexant Smart Modem Dialtone Audio Enter the BIOS Setup Utility and change Serial ATA (SATA) setting to the computer while the test is set up the operating system. Run Diagnostics --> ThinkPad Devices --> ExpressCard slot. To diagnose the hard disk drive from the diskette drive, and then turn off and turn on the computer. 3. Remove any physical...
Hardware Maintenance Manual
Page 49
... button is used to select, stop and remove all the USB devices safely by using different user IDs. v Fn+F9 Settings: Configures the settings for switching a display output location, start Presentation Director, and change the settings. This function does not work while a DVD movie or a video clip is not supported if different desktop images are displayed: v Eject ThinkPad PC from the ThinkPad Advanced Dock or the ThinkPad Advanced Mini Dock. v Configure EasyEject Actions: Opens the ThinkPad EasyEject Utility main window. This function...
... button is used to select, stop and remove all the USB devices safely by using different user IDs. v Fn+F9 Settings: Configures the settings for switching a display output location, start Presentation Director, and change the settings. This function does not work while a DVD movie or a video clip is not supported if different desktop images are displayed: v Eject ThinkPad PC from the ThinkPad Advanced Dock or the ThinkPad Advanced Mini Dock. v Configure EasyEject Actions: Opens the ThinkPad EasyEject Utility main window. This function...


