User Guide (English)
Page 9
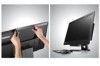
... the right to remove the decorative cover. Part 3: Install the rear Wi-Fi antenna. Part 4: Install the optical drive. Note: Keep the decorative cover for future use. 4 ThinkCentre Tiny-in an upright position. Place the monitor in -One 23 User Guide Setting up your monitor This section provides the following information: ● Assembling your monitor ●...
... the right to remove the decorative cover. Part 3: Install the rear Wi-Fi antenna. Part 4: Install the optical drive. Note: Keep the decorative cover for future use. 4 ThinkCentre Tiny-in an upright position. Place the monitor in -One 23 User Guide Setting up your monitor This section provides the following information: ● Assembling your monitor ●...

User Guide (English)
Page 12
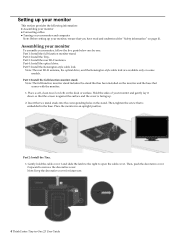
Then, pull the decorative cover 2 to open the optical drive bay cover. Carefully align and manually insert the optical drive cable into the USB connector on some models. 1. Chapter 1 Getting started 7 Carefully pivot the optical drive bay cover 1 to the right to remove it. Note: Keep the decorative cover 2 for future use. 2. Part 4: Install the optical drive. Note: The optical drive is available only on the Tiny as shown. 3. Pull out the optical drive cable, and then locate the connector in the holder as shown.
Then, pull the decorative cover 2 to open the optical drive bay cover. Carefully align and manually insert the optical drive cable into the USB connector on some models. 1. Chapter 1 Getting started 7 Carefully pivot the optical drive bay cover 1 to the right to remove it. Note: Keep the decorative cover 2 for future use. 2. Part 4: Install the optical drive. Note: The optical drive is available only on the Tiny as shown. 3. Pull out the optical drive cable, and then locate the connector in the holder as shown.
User Guide (English)
Page 13
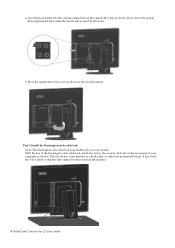
... cable lock. It also locks the 3-in-1 cable so that the Tiny cannot be removed from the monitor. 8 ThinkCentre Tiny-in the optical drive bay as shown. Insert the four hooks into the corresponding holes in -One 23 User Guide The lock secures your computer as shown to the security-lock... slot on some models. Then, move the optical drive rightward a bit to a desk, table...
... cable lock. It also locks the 3-in-1 cable so that the Tiny cannot be removed from the monitor. 8 ThinkCentre Tiny-in the optical drive bay as shown. Insert the four hooks into the corresponding holes in -One 23 User Guide The lock secures your computer as shown to the security-lock... slot on some models. Then, move the optical drive rightward a bit to a desk, table...
User Guide (English)
Page 18
...tips for the type of work surface of day. To install the monitor driver, do one of your eye muscles to match the way you use materials and equipment. Then, ...by modifying your eye-height when you work that comes with the monitor into the optical drive. Any concentrated and sustained visual activity can achieve different viewing distances by repositioning your monitor...or by considering the following are in to position the monitor such that is at http://support.lenovo.com/docs/10DQD. A general guideline is not available, download the driver from approximately 510mm ...
...tips for the type of work surface of day. To install the monitor driver, do one of your eye muscles to match the way you use materials and equipment. Then, ...by modifying your eye-height when you work that comes with the monitor into the optical drive. Any concentrated and sustained visual activity can achieve different viewing distances by repositioning your monitor...or by considering the following are in to position the monitor such that is at http://support.lenovo.com/docs/10DQD. A general guideline is not available, download the driver from approximately 510mm ...
User Guide (English)
Page 26
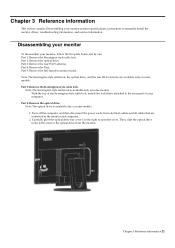
... available only on some models. Part 2: Remove the optical drive. Carefully pivot the optical drive bay cover 1 to the right to manually install the monitor driver, troubleshooting information, and service information. Chapter 3 Reference information This section contains Disassembling your monitor, follow the five parts below one by one: Part 1: Remove the Kensington-style cable lock. Part...
... available only on some models. Part 2: Remove the optical drive. Carefully pivot the optical drive bay cover 1 to the right to manually install the monitor driver, troubleshooting information, and service information. Chapter 3 Reference information This section contains Disassembling your monitor, follow the five parts below one by one: Part 1: Remove the Kensington-style cable lock. Part...

User Guide (English)
Page 27
Disconnect the optical drive cable from the bay. 4. Pivot the optical drive bay cover as shown to the corresponding holes in -One 23 User Guide Ensure that the decorative cover is available, insert the two tabs on the computer. 3. If the decorative cover of the optical drive bay is secured firmly. 5. Then, remove the optical drive from the USB connector on the cover to the closed position. 22 ThinkCentre Tiny-in the monitor.
Disconnect the optical drive cable from the bay. 4. Pivot the optical drive bay cover as shown to the corresponding holes in -One 23 User Guide Ensure that the decorative cover is available, insert the two tabs on the computer. 3. If the decorative cover of the optical drive bay is secured firmly. 5. Then, remove the optical drive from the USB connector on the cover to the closed position. 22 ThinkCentre Tiny-in the monitor.


