User Guide (English)
Page 3
...3 Reference information...21 Disassembling your monitor ...21 Monitor specifications ...26 Troubleshooting...27 Manual image setup ...28 Manually installing the monitor driver ...29 Service information ...32 Appendix A Service and support ...33 Registering your option ...33 Online technical support ...33 Telephone technical... telephone list ...33 Appendix B Notices ...37 Recycling information ...38 Collecting and recycling a disused Lenovo computer or monitor 38 Disposing of Lenovo computer components ...38 Trademarks ...39 Turkish statement of compliance...40 ii Copyright...
...3 Reference information...21 Disassembling your monitor ...21 Monitor specifications ...26 Troubleshooting...27 Manual image setup ...28 Manually installing the monitor driver ...29 Service information ...32 Appendix A Service and support ...33 Registering your option ...33 Online technical support ...33 Telephone technical... telephone list ...33 Appendix B Notices ...37 Recycling information ...38 Collecting and recycling a disused Lenovo computer or monitor 38 Disposing of Lenovo computer components ...38 Trademarks ...39 Turkish statement of compliance...40 ii Copyright...
User Guide (English)
Page 6
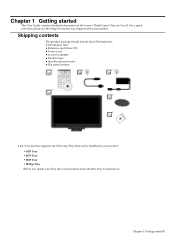
...One 23. Chapter 1 Getting started This User Guide contains detailed information on the Lenovo ThinkCentre® Tiny-in your monitor: · M53 Tiny · M73 Tiny · M83 Tiny · M93/p Tiny Before you install your Tiny into your monitor. Shipping contents The product package should include the following items: ● Information flyer ● Reference and driver... CD ● Power cord ● ac power adapter ● Monitor base ● Quickly-released screw ● Flat panel monitor *** Your monitor supports the following Tinys that the Tiny is listed ...
...One 23. Chapter 1 Getting started This User Guide contains detailed information on the Lenovo ThinkCentre® Tiny-in your monitor: · M53 Tiny · M73 Tiny · M83 Tiny · M93/p Tiny Before you install your Tiny into your monitor. Shipping contents The product package should include the following items: ● Information flyer ● Reference and driver... CD ● Power cord ● ac power adapter ● Monitor base ● Quickly-released screw ● Flat panel monitor *** Your monitor supports the following Tinys that the Tiny is listed ...
User Guide (English)
Page 18
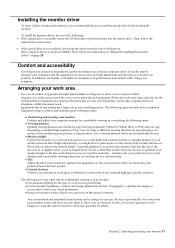
... working posture. Use a viewing distance that comes with the monitor into the optical drive. To install the monitor driver, do one of the screen is at http://support.lenovo.com/docs/10DQD. Be sure to periodically look away from your monitor 13 Arrange your monitor does not have height... 510mm to 760mm (20 in comfort. Then, follow the instructions in ) and can vary depending on the screen from the Lenovo Web site at or slightly below your eye muscles to avoid discomfort. Installing the monitor driver To enjoy a better monitor performance, it is recommended that you perform.
... working posture. Use a viewing distance that comes with the monitor into the optical drive. To install the monitor driver, do one of the screen is at http://support.lenovo.com/docs/10DQD. Be sure to periodically look away from your monitor 13 Arrange your monitor does not have height... 510mm to 760mm (20 in comfort. Then, follow the instructions in ) and can vary depending on the screen from the Lenovo Web site at or slightly below your eye muscles to avoid discomfort. Installing the monitor driver To enjoy a better monitor performance, it is recommended that you perform.
User Guide (English)
Page 26
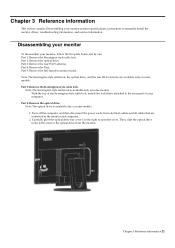
... your monitor,monitor specifications, instructions to open the cover. Part 4: Remove the Tiny. Chapter 3 Reference information 21 Note: The Kensington-style cable lock is attached to... pivot the optical drive bay cover 1 to the right to manually install the monitor driver, troubleshooting information, and service information. Turn off the computer, and then disconnect the...style cable lock. Disassembling your monitor To disassemble your monitor, follow the five parts below one by one: Part 1: Remove the Kensington-style cable lock. Part 5: Remove the full-function monitor...
... your monitor,monitor specifications, instructions to open the cover. Part 4: Remove the Tiny. Chapter 3 Reference information 21 Note: The Kensington-style cable lock is attached to... pivot the optical drive bay cover 1 to the right to manually install the monitor driver, troubleshooting information, and service information. Turn off the computer, and then disconnect the...style cable lock. Disassembling your monitor To disassemble your monitor, follow the five parts below one by one: Part 1: Remove the Kensington-style cable lock. Part 5: Remove the full-function monitor...
User Guide (English)
Page 34
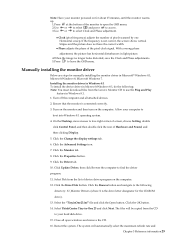
...for the CD-ROM drive). 13. On the Desktop, move mouse to your monitor powered on for manually installing the monitor driver in -One 23 and click Next. Select ThinkCentre Tiny-in Microsoft® Windows 8.1, Microsoft Windows 8, Microsoft Windows 7. The system will be copied from the CD to low-...the Monitor tab. 8. Click the Have Disk button. Click the Advanced Settings icon. 7. Click the Properties button. 9. Select Pick from the Lenovo Monitor CD to use the Plug and Play feature in light picture. 4.When the image no longer looks distorted, save the Clock and Phase ...
...for the CD-ROM drive). 13. On the Desktop, move mouse to your monitor powered on for manually installing the monitor driver in -One 23 and click Next. Select ThinkCentre Tiny-in Microsoft® Windows 8.1, Microsoft Windows 8, Microsoft Windows 7. The system will be copied from the CD to low-...the Monitor tab. 8. Click the Have Disk button. Click the Advanced Settings icon. 7. Click the Properties button. 9. Select Pick from the Lenovo Monitor CD to use the Plug and Play feature in light picture. 4.When the image no longer looks distorted, save the Clock and Phase ...

User Guide (English)
Page 35
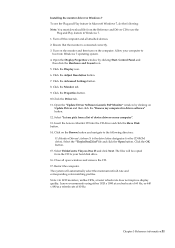
... LCD monitors, unlike CRTs, a faster refresh rate does not improve display quality. Lenovo recommends using either 1920 x 1080 at a refresh rate of 60 Hz, or 640 x 480 at refresh rate of 60 Hz. 30 ThinkCentre Tiny-in-One 23 User Guide Note: On LCD monitors, unlike CRTs, a faster refresh rate does ... Color Matching Profiles. Click the Browse button and navigate to the following : Note: You must download file from the Reference and Driver CD to find the driver program. 11.Select Pick from the CD to your computer to boot into Windows 8 operating system. 4.On the Desktop, move ...
... LCD monitors, unlike CRTs, a faster refresh rate does not improve display quality. Lenovo recommends using either 1920 x 1080 at a refresh rate of 60 Hz, or 640 x 480 at refresh rate of 60 Hz. 30 ThinkCentre Tiny-in-One 23 User Guide Note: On LCD monitors, unlike CRTs, a faster refresh rate does ... Color Matching Profiles. Click the Browse button and navigate to the following : Note: You must download file from the Reference and Driver CD to find the driver program. 11.Select Pick from the CD to your computer to boot into Windows 8 operating system. 4.On the Desktop, move ...
User Guide (English)
Page 36
... the Properties button. 10.Click the Driver tab. 11. Click the OK button. 15. Select ThinkCentre Tiny-in-One 23 and click Next. Close all attached devices. 2. The system will be copied from the Reference and Driver CD to boot into the CD drive and click the Have Disk button. 14. Lenovo recommends using either 1920 x 1080...
... the Properties button. 10.Click the Driver tab. 11. Click the OK button. 15. Select ThinkCentre Tiny-in-One 23 and click Next. Close all attached devices. 2. The system will be copied from the Reference and Driver CD to boot into the CD drive and click the Have Disk button. 14. Lenovo recommends using either 1920 x 1080...

