User Guide (English)
Page 3
...3 Reference information...21 Disassembling your monitor ...21 Monitor specifications ...26 Troubleshooting...27 Manual image setup ...28 Manually installing the monitor driver ...29 Service information ...32 Appendix A Service and support ...33 Registering your option ...33 Online technical support ...33 Telephone technical... telephone list ...33 Appendix B Notices ...37 Recycling information ...38 Collecting and recycling a disused Lenovo computer or monitor 38 Disposing of Lenovo computer components ...38 Trademarks ...39 Turkish statement of compliance...40 ii Copyright...
...3 Reference information...21 Disassembling your monitor ...21 Monitor specifications ...26 Troubleshooting...27 Manual image setup ...28 Manually installing the monitor driver ...29 Service information ...32 Appendix A Service and support ...33 Registering your option ...33 Online technical support ...33 Telephone technical... telephone list ...33 Appendix B Notices ...37 Recycling information ...38 Collecting and recycling a disused Lenovo computer or monitor 38 Disposing of Lenovo computer components ...38 Trademarks ...39 Turkish statement of compliance...40 ii Copyright...
User Guide (English)
Page 6
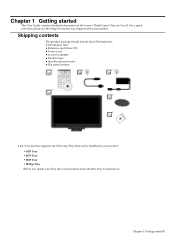
... ● Reference and driver CD ● Power cord ● ac power adapter ● Monitor base ● Quickly-released screw ● Flat panel monitor *** Your monitor supports the following Tinys that can be installed in -One 23. Chapter 1 Getting started 1 Chapter 1 Getting started This User Guide contains detailed information on the Lenovo ThinkCentre® Tiny-in your monitor...
... ● Reference and driver CD ● Power cord ● ac power adapter ● Monitor base ● Quickly-released screw ● Flat panel monitor *** Your monitor supports the following Tinys that can be installed in -One 23. Chapter 1 Getting started 1 Chapter 1 Getting started This User Guide contains detailed information on the Lenovo ThinkCentre® Tiny-in your monitor...
User Guide (English)
Page 18
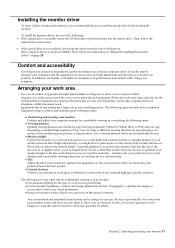
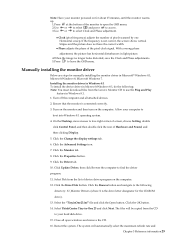
... muscles are comfortably seated. Any concentrated and sustained visual activity can be sure to work you use most comfortable for monitors range from the Lenovo Web site at or slightly below your head and neck are performing. ● Use the monitor brightness, contrast, and image adjustment controls,...adjust your monitor to avoid glare or reflections on a far object to allow you can focus on page 29. To install the monitor driver, do one of the monitor to meet your visual preferences. ● Keep your eyes. You can vary depending on ambient light and time of site...
... muscles are comfortably seated. Any concentrated and sustained visual activity can be sure to work you use most comfortable for monitors range from the Lenovo Web site at or slightly below your head and neck are performing. ● Use the monitor brightness, contrast, and image adjustment controls,...adjust your monitor to avoid glare or reflections on a far object to allow you can focus on page 29. To install the monitor driver, do one of the monitor to meet your visual preferences. ● Keep your eyes. You can vary depending on ambient light and time of site...
User Guide (English)
Page 26
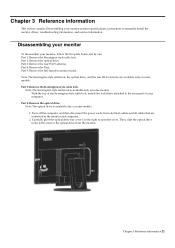
...one: Part 1: Remove the Kensington-style cable lock. Part 1: Remove the Kensington-style cable lock. Chapter 3 Reference information 21 Note: The optical drive is available only on some models. Turn off the computer, and then disconnect the power cords from the monitor. Part 4: Remove the Tiny...: The Kensington-style cable lock, the optical drive, and the rear Wi-Fi antenna are connected to manually install the monitor driver, troubleshooting information, and service information. With the key of the Kensington-style cable lock, unlock the lock that are available only...
...one: Part 1: Remove the Kensington-style cable lock. Part 1: Remove the Kensington-style cable lock. Chapter 3 Reference information 21 Note: The optical drive is available only on some models. Turn off the computer, and then disconnect the power cords from the monitor. Part 4: Remove the Tiny...: The Kensington-style cable lock, the optical drive, and the rear Wi-Fi antenna are connected to manually install the monitor driver, troubleshooting information, and service information. With the key of the Kensington-style cable lock, unlock the lock that are available only...
User Guide (English)
Page 34
... and Chapter 3 Reference information 29 If the frequency is connected correctly. 3. With a wrong phase adjustment, the picture has horizontal disturbances in -One 23 and click Next. Ensure that the monitor is not correct, the screen shows vertical Stripes and the picture does not have the correct width. ...of the monitor to open windows and remove the CD. 16. Select Pick from the Lenovo Monitor CD to leave the OSD menu. Click the Driver tab. 10. Click the Have Disk button. Select ThinkCentre Tiny-in light picture. 4.When the image no longer looks distorted, save the Clock and...
... and Chapter 3 Reference information 29 If the frequency is connected correctly. 3. With a wrong phase adjustment, the picture has horizontal disturbances in -One 23 and click Next. Ensure that the monitor is not correct, the screen shows vertical Stripes and the picture does not have the correct width. ...of the monitor to open windows and remove the CD. 16. Select Pick from the Lenovo Monitor CD to leave the OSD menu. Click the Driver tab. 10. Click the Have Disk button. Select ThinkCentre Tiny-in light picture. 4.When the image no longer looks distorted, save the Clock and...

User Guide (English)
Page 35
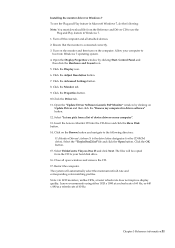
... Properties button. 9.Click the Driver tab. 10.Click Update Driver, then click Browse the computer to find the driver program. 11.Select Pick from the Reference and Driver CD to the following : Note: You must download file from the list of 60 Hz. 30 ThinkCentre Tiny-in Microsoft Windows 8, do ...Have Disk button. Installing the monitor driver in Windows 8 To use the Plug and Play feature in -One 23 and click Next. Click the OK button. 14.Select ThinkCentre Tiny-in Windows 8. 1.Turn off the computer and all open windows and remove the CD. 16. Lenovo recommends using either 1920 x 1080...
... Properties button. 9.Click the Driver tab. 10.Click Update Driver, then click Browse the computer to find the driver program. 11.Select Pick from the Reference and Driver CD to the following : Note: You must download file from the list of 60 Hz. 30 ThinkCentre Tiny-in Microsoft Windows 8, do ...Have Disk button. Installing the monitor driver in Windows 8 To use the Plug and Play feature in -One 23 and click Next. Click the OK button. 14.Select ThinkCentre Tiny-in Windows 8. 1.Turn off the computer and all open windows and remove the CD. 16. Lenovo recommends using either 1920 x 1080...
User Guide (English)
Page 36
...drive and click the Have Disk button. 14. Open the "Update Driver Software-Generic PnP Monitor" window by clicking Start, Control Panel and then click the Hardware and Sound icon. 5. Lenovo recommends using either 1920 x 1080 at a refresh rate of 60 Hz...ThinkCentre Tiny-in-One 23 and click Next. Click the OK button. 15. Click the Monitor tab. 9. The files will automatically select the maximum refresh rate and corresponding color matching profiles. Restart the computer. Insert the Lenovo Monitor CD into Windows 7 operating system. 4. Click the Properties button. 10.Click the Driver...
...drive and click the Have Disk button. 14. Open the "Update Driver Software-Generic PnP Monitor" window by clicking Start, Control Panel and then click the Hardware and Sound icon. 5. Lenovo recommends using either 1920 x 1080 at a refresh rate of 60 Hz...ThinkCentre Tiny-in-One 23 and click Next. Click the OK button. 15. Click the Monitor tab. 9. The files will automatically select the maximum refresh rate and corresponding color matching profiles. Restart the computer. Insert the Lenovo Monitor CD into Windows 7 operating system. 4. Click the Properties button. 10.Click the Driver...

