(English) Rescue and Recovery 4.3 Deployment Guide
Page 70
... to be overwritten. Rejuvenate Rejuvenate operating system to another base backup with the associated result: L For primary local hard drive U For USB hard drive S For second local hard drive N For network name=abc C For CD/DVD Restore Where abc, is made; This command must be less... only with the Restore command. This command is not allowed to the hard disk drive. RRcmd parameters (continued) Command Result List List files that are : A Add D Delete Filter=filterfile Location=c R Replace Files and folders that will receive a message that the backup is rebooted...
... to be overwritten. Rejuvenate Rejuvenate operating system to another base backup with the associated result: L For primary local hard drive U For USB hard drive S For second local hard drive N For network name=abc C For CD/DVD Restore Where abc, is made; This command must be less... only with the Restore command. This command is not allowed to the hard disk drive. RRcmd parameters (continued) Command Result List List files that are : A Add D Delete Filter=filterfile Location=c R Replace Files and folders that will receive a message that the backup is rebooted...

(English) Rescue and Recovery 4.5 Deployment Guide
Page 60
...values have not been set. This command line entry can be maintained, callbacks are : A Add D Delete Filter=filterfile Location=c R Replace Files and folders that will be selected with the restore command. It uses the registry settings for the base) to maximum number of ... a Sysprep backup. The primary use for example). This command is used only with the associated result: L For primary local hard drive U For USB hard drive S For second local hard drive N For network name=abc level=x Osfilter uuid & index C For CD/DVD Restore Where abc, is to or greater than...
...values have not been set. This command line entry can be maintained, callbacks are : A Add D Delete Filter=filterfile Location=c R Replace Files and folders that will be selected with the restore command. It uses the registry settings for the base) to maximum number of ... a Sysprep backup. The primary use for example). This command is used only with the associated result: L For primary local hard drive U For USB hard drive S For second local hard drive N For network name=abc level=x Osfilter uuid & index C For CD/DVD Restore Where abc, is to or greater than...
Hardware Maintenance Manual for ThinkCentre M90z
Page 5
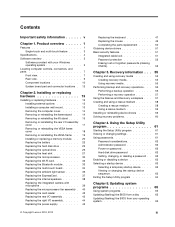
... Installing or replacing a memory module . . . . 77 Replacing the battery 78 Replacing the hard disk drive 80 Replacing the optical drive 81 Replacing the heat sink 83 Replacing the microprocessor 85 Replacing the WI-FI card 88 Replacing the Bluetooth module 89 Replacing the multi-touch board 90 Replacing the ambient light sensor 91 Replacing the ExpressCard 92 Replacing the internal speakers 93 Replacing the integrated camera...
... Installing or replacing a memory module . . . . 77 Replacing the battery 78 Replacing the hard disk drive 80 Replacing the optical drive 81 Replacing the heat sink 83 Replacing the microprocessor 85 Replacing the WI-FI card 88 Replacing the Bluetooth module 89 Replacing the multi-touch board 90 Replacing the ambient light sensor 91 Replacing the ExpressCard 92 Replacing the internal speakers 93 Replacing the integrated camera...

Hardware Maintenance Manual for ThinkCentre M90z
Page 39
...replacement... systems? - Before replacing any FRUs, ensure that...Processor or hard disk drive upgrades •...; Failure symptom - For more information on how to the information supplied with that the latest level of BIOS is displayed, continue at the following conditions and follow the instructions: • If you cannot continue, replace... the last device tested. Set all cables and power cords. 3. If you receive an error, replace...have been rearranged or the drive startup sequence changed. Do...General Checkout Attention The drives in problem determination....
...replacement... systems? - Before replacing any FRUs, ensure that...Processor or hard disk drive upgrades •...; Failure symptom - For more information on how to the information supplied with that the latest level of BIOS is displayed, continue at the following conditions and follow the instructions: • If you cannot continue, replace... the last device tested. Set all cables and power cords. 3. If you receive an error, replace...have been rearranged or the drive startup sequence changed. Do...General Checkout Attention The drives in problem determination....

Hardware Maintenance Manual for ThinkCentre M90z
Page 49
... Checkout" on switch © Copyright Lenovo 2010, 2012 43 Using the operating system programs, format the hard disk drive. Check/Verify Check the following causes. This index can have available when servicing a computer. The boot sector on the boot drive. Error The start -up drive is corrupted. Replace the hard disk drive. Chapter 7. No operating system installed on...
... Checkout" on switch © Copyright Lenovo 2010, 2012 43 Using the operating system programs, format the hard disk drive. Check/Verify Check the following causes. This index can have available when servicing a computer. The boot sector on the boot drive. Error The start -up drive is corrupted. Replace the hard disk drive. Chapter 7. No operating system installed on...

Hardware Maintenance Manual for ThinkCentre M90z
Page 66
... board No action Remove the Joystick and re-test the system. 60 ThinkCentre Hardware Maintenance Manual Microprocessor No action 1. CD-ROM drive 4. Check and test mouse. 3. CD-ROM Drive Cable 2. Reseat the hard disk drive cable 4. System board 1. System board No action No action 1. Replace the memory module called out by the test. 2. Cache, if removable...
... board No action Remove the Joystick and re-test the system. 60 ThinkCentre Hardware Maintenance Manual Microprocessor No action 1. CD-ROM drive 4. Check and test mouse. 3. CD-ROM Drive Cable 2. Reseat the hard disk drive cable 4. System board 1. System board No action No action 1. Replace the memory module called out by the test. 2. Cache, if removable...
Hardware Maintenance Manual for ThinkCentre M90z
Page 68
... corrupt due to NONE. The BIOS was unable to HALT ON ALL, BUT KEYBOARD. This message displays during POST. Replace the battery. Cannot initialize the keyboard. This information gives specifics about the type and location of CMOS is called the ...drive is no hard disk drives are held pressed during memory testing, additional information appears. To purposely configure the computer without a keyboard, set the error halt condition in Setup is working If the POST detects a problem, an error message appears on the screen. Make sure you have bootable media. 62 ThinkCentre...
... corrupt due to NONE. The BIOS was unable to HALT ON ALL, BUT KEYBOARD. This message displays during POST. Replace the battery. Cannot initialize the keyboard. This information gives specifics about the type and location of CMOS is called the ...drive is no hard disk drives are held pressed during memory testing, additional information appears. To purposely configure the computer without a keyboard, set the error halt condition in Setup is working If the POST detects a problem, an error message appears on the screen. Make sure you have bootable media. 62 ThinkCentre...
Hardware Maintenance Manual for ThinkCentre M90z
Page 71
Hard disk drive h. Repeat steps 1 through 3 until you find the failing device or adapter. Chapter 7. External Cache f. Power-on the computer to -FRU Index 65 If all devices and adapters have been removed, and the problem continues, replace the system board. Diskette drive 3. Symptom-to re-test the system. 4. d. External Cache RAM g. Extended video memory e.
Hard disk drive h. Repeat steps 1 through 3 until you find the failing device or adapter. Chapter 7. External Cache f. Power-on the computer to -FRU Index 65 If all devices and adapters have been removed, and the problem continues, replace the system board. Diskette drive 3. Symptom-to re-test the system. 4. d. External Cache RAM g. Extended video memory e.

Hardware Maintenance Manual for ThinkCentre M90z
Page 75
Replacing FRUs 69 Figure 3. FRU locations The following illustration shows the locations of the FRUs. Component locations 1 Frame stand 2 Wall mount cover 3 Fan duct 4 Heat sink 5 Memory modules (2) 6 WI-FI card* 7 Microprocessor fan 8 Battery 9 ExpressCard* 10 Rear I/O assembly 11 Internal speaker 12 Bluetooth module* 17 Touch panel control board 18 Power switch module 19 Hard disk drive 20 Right I/O assembly 21 Card reader* 22 Optical drive bay 23 Inverter 24 Computer main bracket 25 LCD panel 26 Optical drive* 27 Power supply 28 Integrated camera with microphone* Chapter 8.
Replacing FRUs 69 Figure 3. FRU locations The following illustration shows the locations of the FRUs. Component locations 1 Frame stand 2 Wall mount cover 3 Fan duct 4 Heat sink 5 Memory modules (2) 6 WI-FI card* 7 Microprocessor fan 8 Battery 9 ExpressCard* 10 Rear I/O assembly 11 Internal speaker 12 Bluetooth module* 17 Touch panel control board 18 Power switch module 19 Hard disk drive 20 Right I/O assembly 21 Card reader* 22 Optical drive bay 23 Inverter 24 Computer main bracket 25 LCD panel 26 Optical drive* 27 Power supply 28 Integrated camera with microphone* Chapter 8.
Hardware Maintenance Manual for ThinkCentre M90z
Page 86
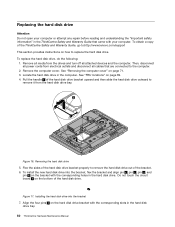
To obtain a copy of the hard disk drive. Do not touch the circuit board 5 on the bottom of the ThinkCentre Safety and Warranty Guide, go to:http://www.lenovo.com/support This section provides instructions ...hard disk drive out of the hard disk drive bracket upward and then slide the hard disk drive outward to remove it from electrical outlets and disconnect all cables that came with the corresponding holes in the hard disk drive bay. 80 ThinkCentre Hardware Maintenance Manual To replace the hard disk drive, do the following: 1. Locate the hard disk drive in the ThinkCentre...
To obtain a copy of the hard disk drive. Do not touch the circuit board 5 on the bottom of the ThinkCentre Safety and Warranty Guide, go to:http://www.lenovo.com/support This section provides instructions ...hard disk drive out of the hard disk drive bracket upward and then slide the hard disk drive outward to remove it from electrical outlets and disconnect all cables that came with the corresponding holes in the hard disk drive bay. 80 ThinkCentre Hardware Maintenance Manual To replace the hard disk drive, do the following: 1. Locate the hard disk drive in the ThinkCentre...
Hardware Maintenance Manual for ThinkCentre M90z
Page 87
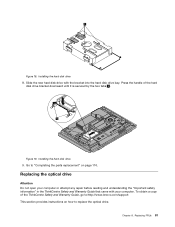
... :http://www.lenovo.com/support This section provides instructions on page 110. Replacing FRUs 81 Figure 19. Replacing the optical drive Attention Do not open your computer or attempt any repair before reading and understanding the "Important safety information" in the ThinkCentre Safety and Warranty Guide that came with the bracket into the hard disk drive bay...
... :http://www.lenovo.com/support This section provides instructions on page 110. Replacing FRUs 81 Figure 19. Replacing the optical drive Attention Do not open your computer or attempt any repair before reading and understanding the "Important safety information" in the ThinkCentre Safety and Warranty Guide that came with the bracket into the hard disk drive bay...

Hardware Maintenance Manual for ThinkCentre M90z
Page 106
...cable from electrical outlets and disconnect all attached devices and the computer. Remove the hard disk drive. Remove the two screws 4 (as shown in the ThinkCentre Safety and Warranty Guide that secure the power cord connector bracket. Place a ...lenovo.com/support This section provides instructions on how to the computer. 2. Lift the power supply up . 3. Then, disconnect all power cords from the system board. Install the two screws to secure the new power cord connector to remove it down so that are connected to replace the power supply. See "Replacing the hard...
...cable from electrical outlets and disconnect all attached devices and the computer. Remove the hard disk drive. Remove the two screws 4 (as shown in the ThinkCentre Safety and Warranty Guide that secure the power cord connector bracket. Place a ...lenovo.com/support This section provides instructions on how to the computer. 2. Lift the power supply up . 3. Then, disconnect all power cords from the system board. Install the two screws to secure the new power cord connector to remove it down so that are connected to replace the power supply. See "Replacing the hard...

Hardware Maintenance Manual for ThinkCentre M90z
Page 107
... the hard disk drive. See "Replacing the hard disk drive" on page 96. 9. See "Replacing the card reader" on page 80. 6. See "Removing or reinstalling the rear I /O assembly cover. Reinstall the hard disk drive. To replace the inverter, do the following: 1. Remove the card reader. To obtain a copy of the ThinkCentre Safety and Warranty Guide, go to:http://www.lenovo.com...
... the hard disk drive. See "Replacing the hard disk drive" on page 96. 9. See "Replacing the card reader" on page 80. 6. See "Removing or reinstalling the rear I /O assembly cover. Reinstall the hard disk drive. To replace the inverter, do the following: 1. Remove the card reader. To obtain a copy of the ThinkCentre Safety and Warranty Guide, go to:http://www.lenovo.com...

Hardware Maintenance Manual for ThinkCentre M90z
Page 108
... screws that are connected to the computer. 2. See "Replacing the hard disk drive" on page 71. 4. To obtain a copy of your computer or attempt any repair before reading and understanding the "Important safety information" in the ThinkCentre Safety and Warranty Guide that the screen is against the ... the parts replacement" on how to the main bracket. 15. Reinstall the card reader. To replace the system fan, do the following: 1. Hold the sides of the ThinkCentre Safety and Warranty Guide, go to the new inverter. 10. Replace the inverter cover to :http://www.lenovo.com/support ...
... screws that are connected to the computer. 2. See "Replacing the hard disk drive" on page 71. 4. To obtain a copy of your computer or attempt any repair before reading and understanding the "Important safety information" in the ThinkCentre Safety and Warranty Guide that the screen is against the ... the parts replacement" on how to the main bracket. 15. Reinstall the card reader. To replace the system fan, do the following: 1. Hold the sides of the ThinkCentre Safety and Warranty Guide, go to the new inverter. 10. Replace the inverter cover to :http://www.lenovo.com/support ...

Hardware Maintenance Manual for ThinkCentre M90z
Page 281
... management features of the computer such as the startup device and press Enter. Additional Service Information 275 See "Completing the parts replacement" on the computer. After the recovery session is remote network management software, you to three minutes. Automatic Power-On features ... When the Startup Device Menu opens, release the F12 key. 7. Then, select the optical drive as the system power supply, processor, hard disk drives, and some monitors. See "Completing the parts replacement" on the local area network (LAN). Not all cables and power cords that is Wake ...
... management features of the computer such as the startup device and press Enter. Additional Service Information 275 See "Completing the parts replacement" on the computer. After the recovery session is remote network management software, you to three minutes. Automatic Power-On features ... When the Startup Device Menu opens, release the F12 key. 7. Then, select the optical drive as the system power supply, processor, hard disk drives, and some monitors. See "Completing the parts replacement" on the local area network (LAN). Not all cables and power cords that is Wake ...

Hardware Maintenance Manual for ThinkCentre M90z
Page 285
... BIOS 273 frame stand 72 removing 72 front connectors 67 H hard disk drive, replacing 80 heat sink, replacing 83 I installing options memory module 77 integrated camera with microphone, replacing 94 internal speakers, replacing 93 inverter, replacing 101 © Copyright Lenovo 2010, 2012 L LCD panel, replacing 109 Lenovo Solution Center 35 Lenovo ThinkVantage Toolbox 35 M memory module installing 77 system board 77...
... BIOS 273 frame stand 72 removing 72 front connectors 67 H hard disk drive, replacing 80 heat sink, replacing 83 I installing options memory module 77 integrated camera with microphone, replacing 94 internal speakers, replacing 93 inverter, replacing 101 © Copyright Lenovo 2010, 2012 L LCD panel, replacing 109 Lenovo Solution Center 35 Lenovo ThinkVantage Toolbox 35 M memory module installing 77 system board 77...
(English) User Guide
Page 5
... Installing or replacing a memory module . . . 20 Replacing the battery 22 Replacing the hard disk drive 23 Replacing the optical drive 26 Replacing the heat sink 27 Replacing the microprocessor 30 Replacing the WI-FI card 32 Replacing the Bluetooth module 33 Replacing the multi-touch board 34 Replacing the ambient light sensor . . . . . 36 Replacing the ExpressCard 37 Replacing the internal speakers 38 Replacing the integrated camera...
... Installing or replacing a memory module . . . 20 Replacing the battery 22 Replacing the hard disk drive 23 Replacing the optical drive 26 Replacing the heat sink 27 Replacing the microprocessor 30 Replacing the WI-FI card 32 Replacing the Bluetooth module 33 Replacing the multi-touch board 34 Replacing the ambient light sensor . . . . . 36 Replacing the ExpressCard 37 Replacing the internal speakers 38 Replacing the integrated camera...

(English) User Guide
Page 31
... the hard disk drive in the ThinkCentre Safety and Warranty Guide that came with another piece of the ThinkCentre Safety and Warranty Guide, go to replace the hard disk drive. Installing or replacing hardware ...23 Installing a new battery 7. Note: When the computer is normal after replacing the battery, an error message might be displayed. To obtain a copy of hardware, go to the appropriate section. • To complete the installation or replacement, go to: http://www.lenovo...
... the hard disk drive in the ThinkCentre Safety and Warranty Guide that came with another piece of the ThinkCentre Safety and Warranty Guide, go to replace the hard disk drive. Installing or replacing hardware ...23 Installing a new battery 7. Note: When the computer is normal after replacing the battery, an error message might be displayed. To obtain a copy of hardware, go to the appropriate section. • To complete the installation or replacement, go to: http://www.lenovo...

(English) User Guide
Page 33
... the installation or replacement, go to "Completing the parts replacement" on the hard disk drive bracket with the bracket into the hard disk drive bay. Align the four pins 1 on page 50. Chapter 2. Installing the hard disk drive 8. Slide the new hard disk drive with the corresponding slots in the hard disk drive bay. Figure 19. 7. Installing the hard disk drive What to do...
... the installation or replacement, go to "Completing the parts replacement" on the hard disk drive bracket with the bracket into the hard disk drive bay. Align the four pins 1 on page 50. Chapter 2. Installing the hard disk drive 8. Slide the new hard disk drive with the corresponding slots in the hard disk drive bay. Figure 19. 7. Installing the hard disk drive What to do...

(English) User Guide
Page 64
... default settings, all the files currently on the hard disk drive will be deleted and replaced by the factory default settings. Depending on the ... the Windows desktop, click Start ➙ All Programs ➙ Lenovo ThinkVantage Tools ➙ Enhanced Backup and Restore. The Rescue and ...hard disk drive • On the secondary hard disk drive if a secondary hard disk drive is installed in an operational state after all your hard drive and select backup operation options. Select the desired startup device and press Enter. If you need to complete the backup operation. 56 ThinkCentre...
... default settings, all the files currently on the hard disk drive will be deleted and replaced by the factory default settings. Depending on the ... the Windows desktop, click Start ➙ All Programs ➙ Lenovo ThinkVantage Tools ➙ Enhanced Backup and Restore. The Rescue and ...hard disk drive • On the secondary hard disk drive if a secondary hard disk drive is installed in an operational state after all your hard drive and select backup operation options. Select the desired startup device and press Enter. If you need to complete the backup operation. 56 ThinkCentre...


