(English) Rescue and Recovery 4.3 Deployment Guide
Page 5
... Metal Restore from an Admin Backup 58 Scenario 7 - Working with WIM files and ImageX . . . . . 30 Using RRUTIL.EXE 30 Customizing the preboot environment . . . . 36 Configuring the Opera browser 41 Changing the video resolution 47 Startup applications 47 Passwords 48 Password access 48 Log files 49 Create Rescue Media 49 Chapter 4. New rollouts 51 Preparing the hard disk drive 51 Installing 51 Updating 53 Enabling the Rescue and Recovery desktop . . . 53...
... Metal Restore from an Admin Backup 58 Scenario 7 - Working with WIM files and ImageX . . . . . 30 Using RRUTIL.EXE 30 Customizing the preboot environment . . . . 36 Configuring the Opera browser 41 Changing the video resolution 47 Startup applications 47 Passwords 48 Password access 48 Log files 49 Create Rescue Media 49 Chapter 4. New rollouts 51 Preparing the hard disk drive 51 Installing 51 Updating 53 Enabling the Rescue and Recovery desktop . . . 53...
(English) Rescue and Recovery 4.3 Deployment Guide
Page 30
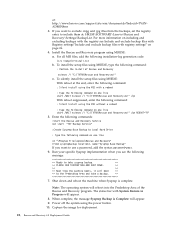
... backups The mapping network drive function relies on the network share, the service makes the directory a read-only folder, and assigns it access rights so that only the account that created the folder initially, such as the administrator, the merge process will use the same user name and password. To silently install the setup files using the MSIEXE file, enter the following is...
... backups The mapping network drive function relies on the network share, the service makes the directory a read-only folder, and assigns it access rights so that only the account that created the folder initially, such as the administrator, the merge process will use the same user name and password. To silently install the setup files using the MSIEXE file, enter the following is...
(English) Rescue and Recovery 4.3 Deployment Guide
Page 32
...: The operating system will boot ** ** to use a password, add the syntax password=pass. 6. To silently install the setup files using MSIEXE: With reboot at : http://www.lenovo.com/support/site.wss/document.do?lndocid=TVANADMIN#rnr 3. Run your specific Sysprep implementation when you see Include and exclude backup files with Registry settings"Include and exclude backup files with registry settings" on one line start "TVT Backup Service" :Create...
...: The operating system will boot ** ** to use a password, add the syntax password=pass. 6. To silently install the setup files using MSIEXE: With reboot at : http://www.lenovo.com/support/site.wss/document.do?lndocid=TVANADMIN#rnr 3. Run your specific Sysprep implementation when you see Include and exclude backup files with Registry settings"Include and exclude backup files with registry settings" on one line start "TVT Backup Service" :Create...
(English) Rescue and Recovery 4.3 Deployment Guide
Page 36
... be displayed each time the Rescue and Recovery program is started unless the setting is disabled, the advanced user interface will be provided. By default, you can choose to selectively restore particular files and folders when doing an OS & Apps restore through the registry key settings: HKLM\SOFTWARE\Lenovo\Rescue and Recovery\Settings\OSAppsList The OSAppsList setting will define what files, folders, or file types comprise the operating...
... be displayed each time the Rescue and Recovery program is started unless the setting is disabled, the advanced user interface will be provided. By default, you can choose to selectively restore particular files and folders when doing an OS & Apps restore through the registry key settings: HKLM\SOFTWARE\Lenovo\Rescue and Recovery\Settings\OSAppsList The OSAppsList setting will define what files, folders, or file types comprise the operating...
(English) Rescue and Recovery 4.3 Deployment Guide
Page 78
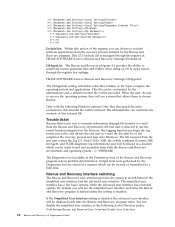
... the boot manager to the service area. Notes: 1. Boot back to user if proper BIOS calls not supported. For example: SafeGuard Easy, SafeBoot, and MBR version of the machine: - 0 - v Previous Partition type Displays the partition type that are using MBR will put on the MBR. 70 Rescue and Recovery 4.3 Deployment Guide BMGR CLEAN CleanMBR cleans the Master Boot Record. v Boot State Determines the current state of Computrace. 2. Run before installing...
... the boot manager to the service area. Notes: 1. Boot back to user if proper BIOS calls not supported. For example: SafeGuard Easy, SafeBoot, and MBR version of the machine: - 0 - v Previous Partition type Displays the partition type that are using MBR will put on the MBR. 70 Rescue and Recovery 4.3 Deployment Guide BMGR CLEAN CleanMBR cleans the Master Boot Record. v Boot State Determines the current state of Computrace. 2. Run before installing...
(English) Rescue and Recovery 4.5 Deployment Guide
Page 26
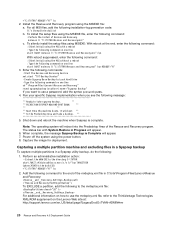
... a reboot : Type the following command on one line start "TVT Backup Service" : Create Sysprep Base Backup to take a backup. ** 5. Run your specific Sysprep implementation when you want to the Predesktop Area and take sysprep backup. ** ** PLEASE RUN SYSPREP NOW AND SHUT DOWN. ** ** ** ** Next time the machine boots, it will appear. 6. To install the setup files using the MSI with System Restore in a Sysprep utility...
... a reboot : Type the following command on one line start "TVT Backup Service" : Create Sysprep Base Backup to take a backup. ** 5. Run your specific Sysprep implementation when you want to the Predesktop Area and take sysprep backup. ** ** PLEASE RUN SYSPREP NOW AND SHUT DOWN. ** ** ** ** Next time the machine boots, it will appear. 6. To install the setup files using the MSI with System Restore in a Sysprep utility...

(English) Rescue and Recovery 4.5 Deployment Guide
Page 27
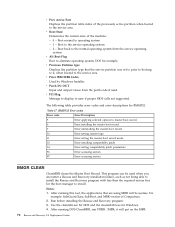
... AND SHUT DOWN. ** ** ** ** Next time the machine boots, it will boot ** ** to use Password Persistence. Note: Backups will appear. 8. Install the Rescue and Recovery program using MSIEXE, type the following command: : Perform the install of the partitions are changed after running the Sysprep backup. To silently install the setup files using MSIEXE: With reboot at : HKLM\SOFTWARE\Lenovo\Rescue and Recovery\Settings\BackupList. Run your specific Sysprep implementation when you want to exclude...
... AND SHUT DOWN. ** ** ** ** Next time the machine boots, it will boot ** ** to use Password Persistence. Note: Backups will appear. 8. Install the Rescue and Recovery program using MSIEXE, type the following command: : Perform the install of the partitions are changed after running the Sysprep backup. To silently install the setup files using MSIEXE: With reboot at : HKLM\SOFTWARE\Lenovo\Rescue and Recovery\Settings\BackupList. Run your specific Sysprep implementation when you want to exclude...

(English) Rescue and Recovery 4.5 Deployment Guide
Page 51
... primary hard disk that the installation file is located in a new rollout on page 45 • "Scenario 2 - IT IS ASSUMED TO NOT BE THERE. Manually creating the Service Partition of the InstallShield executable to install Windows on page 49 • "Scenario 4 - Create a DOS boot diskette and place the cleandrv.exe file on page 50 Scenario 1 - Build your donor system as second hard disk drives, USB hard disk drives, USB memory keys...
... primary hard disk that the installation file is located in a new rollout on page 45 • "Scenario 2 - IT IS ASSUMED TO NOT BE THERE. Manually creating the Service Partition of the InstallShield executable to install Windows on page 49 • "Scenario 4 - Create a DOS boot diskette and place the cleandrv.exe file on page 50 Scenario 1 - Build your donor system as second hard disk drives, USB hard disk drives, USB memory keys...
(English) Rescue and Recovery 4.5 Deployment Guide
Page 67
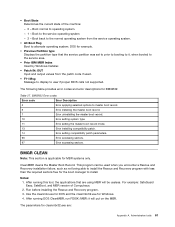
... Index Used by Windows Installer. • Patch IN: OUT Input and output values from the service operating system. • Alt Boot Flag Boot to operating system. - 1 - DOS for the boot manager to user if proper BIOS calls not supported. Boot to master boot record. 6 Error installing the master boot record. 7 Error uninstalling the master boot record. 10 Error setting system type. 11 Error setting the master boot record mode. 13 Error installing compatibility patch. 14 Error setting compatibility patch parameters. 96 Error accessing...
... Index Used by Windows Installer. • Patch IN: OUT Input and output values from the service operating system. • Alt Boot Flag Boot to operating system. - 1 - DOS for the boot manager to user if proper BIOS calls not supported. Boot to master boot record. 6 Error installing the master boot record. 7 Error uninstalling the master boot record. 10 Error setting system type. 11 Error setting the master boot record mode. 13 Error installing compatibility patch. 14 Error setting compatibility patch parameters. 96 Error accessing...

(English) Power Manager Deployment Guide
Page 9
... to support the Display Data Channel/Command Interface (DDC/CI). © Copyright Lenovo 2008, 2012 3 Use the following command lines to the hard disk drive, for Windows Vista and Windows 7 operating systems. When you install Power Manager on hardware and drivers. Installing the latest version of the video driver (Intel®/AMD®/NVIDIA) is for example: C:\Drivers\Vista\PWRMGRV 3. You need to open the Command Prompt window. • For Windows Vista and Windows 7 operating systems Click Start, type cmd...
... to support the Display Data Channel/Command Interface (DDC/CI). © Copyright Lenovo 2008, 2012 3 Use the following command lines to the hard disk drive, for Windows Vista and Windows 7 operating systems. When you install Power Manager on hardware and drivers. Installing the latest version of the video driver (Intel®/AMD®/NVIDIA) is for example: C:\Drivers\Vista\PWRMGRV 3. You need to open the Command Prompt window. • For Windows Vista and Windows 7 operating systems Click Start, type cmd...
Hardware Maintenance Manual for ThinkCentre A70
Page 36
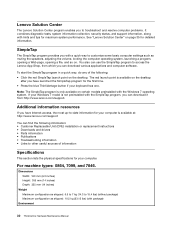
... maximum system performance. See "Lenovo Solution Center" on the desktop after you have launched the SimpleTap program for your keyboard has one. SimpleTap The SimpleTap program provides you with package) Environment 30 ThinkCentre Hardware Maintenance Manual Lenovo Solution Center The Lenovo Solution Center program enables you to troubleshoot and resolve computer problems. It combines diagnostic tests, system information collection, security status, and support information, along with hints and...
... maximum system performance. See "Lenovo Solution Center" on the desktop after you have launched the SimpleTap program for your keyboard has one. SimpleTap The SimpleTap program provides you with package) Environment 30 ThinkCentre Hardware Maintenance Manual Lenovo Solution Center The Lenovo Solution Center program enables you to troubleshoot and resolve computer problems. It combines diagnostic tests, system information collection, security status, and support information, along with hints and...

Hardware Maintenance Manual for ThinkCentre A70
Page 39
... from Service Support and Engineering functions. • Machine type and model • Processor or hard disk drive upgrades • Failure symptom - Then, turn off the computer and all external devices. 5. If possible, have been rearranged or the drive startup sequence might cause false errors and unnecessary replacement of the system board. For the explanation of a problem: 1. General error messages appear if a problem or conflict is installed on the system. Check all display controls to "POST error codes...
... from Service Support and Engineering functions. • Machine type and model • Processor or hard disk drive upgrades • Failure symptom - Then, turn off the computer and all external devices. 5. If possible, have been rearranged or the drive startup sequence might cause false errors and unnecessary replacement of the system board. For the explanation of a problem: 1. General error messages appear if a problem or conflict is installed on the system. Check all display controls to "POST error codes...

Hardware Maintenance Manual for ThinkCentre A70
Page 47
SATA Controller Serial Port1 Address USB Setup When this option is set up USB connectors. From the Setup Utility program main menu, select Devices. 3. Press Esc to return to press Esc several times. 6. If you do the following : 1. You can use the instructions in this section to start up from a device (such as a hard disk drive or the disc in the system configuration. To select a temporary startup device, do not want to Disabled, all discs and hard disk drives are...
SATA Controller Serial Port1 Address USB Setup When this option is set up USB connectors. From the Setup Utility program main menu, select Devices. 3. Press Esc to return to press Esc several times. 6. If you do the following : 1. You can use the instructions in this section to start up from a device (such as a hard disk drive or the disc in the system configuration. To select a temporary startup device, do not want to Disabled, all discs and hard disk drives are...
Hardware Maintenance Manual for ThinkCentre A70
Page 54
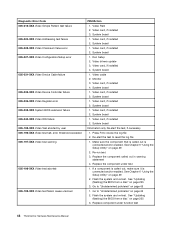
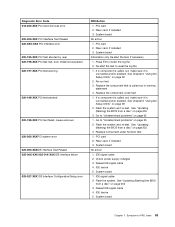
.... Replace the component under function test 48 ThinkCentre Hardware Maintenance Manual See Chapter 6 "Using the Setup Utility" on page 255 3. Video drivers update 3. Video card, if installed 2. Go to review the log file 2. Run Setup 2. Re-run test 3. Flash the system and re-test. Press F3 to "Undetermined problems" on page 65 1. See "Updating (flashing) the BIOS from a disc" on page 39 2. System board 1. Flash the system and re-test. Video Ram 2. System board 1. System board 1. Diagnostic Error Code 005-016-XXX Video Simple Pattern test failure 005...
.... Replace the component under function test 48 ThinkCentre Hardware Maintenance Manual See Chapter 6 "Using the Setup Utility" on page 255 3. Video drivers update 3. Video card, if installed 2. Go to review the log file 2. Run Setup 2. Re-run test 3. Flash the system and re-test. Press F3 to "Undetermined problems" on page 65 1. See "Updating (flashing) the BIOS from a disc" on page 39 2. System board 1. Flash the system and re-test. Video Ram 2. System board 1. System board 1. Diagnostic Error Code 005-016-XXX Video Simple Pattern test failure 005...
Hardware Maintenance Manual for ThinkCentre A70
Page 56
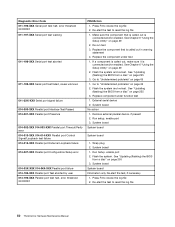
.../or enabled. System board System board System board 1. See "Updating (flashing) the BIOS from a disc" on page 39 2. See "Updating (flashing) the BIOS from a disc" on page 39 2. Remove external parallel device, if present 2. Run setup, enable port 3. Wrap plug 2. Flash the system. Re-start the test to review the log file 2. Replace the component that is connected and/or enabled. Flash the system and re-test. Press F3 to reset the log file 50 ThinkCentre Hardware Maintenance Manual If a component is called out, make...
.../or enabled. System board System board System board 1. See "Updating (flashing) the BIOS from a disc" on page 39 2. See "Updating (flashing) the BIOS from a disc" on page 39 2. Remove external parallel device, if present 2. Run setup, enable port 3. Wrap plug 2. Flash the system. Re-start the test to review the log file 2. Replace the component that is connected and/or enabled. Flash the system and re-test. Press F3 to reset the log file 50 ThinkCentre Hardware Maintenance Manual If a component is called out, make...
Hardware Maintenance Manual for ThinkCentre A70
Page 58
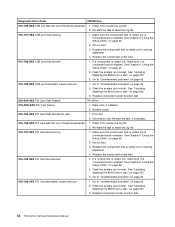
... and re-test. Replace the component under function test 52 ThinkCentre Hardware Maintenance Manual Replace component under test 015-198-XXX USB port test aborted 1. System board 018-195-XXX PCI Card Test aborted by user 1. Make sure the component that is connected and/or enabled. Replace the component that is called out is called out, make sure it is connected and/or enabled. See "Updating (flashing) the BIOS from a disc" on page 39 2. See Chapter 6 "Using the Setup Utility" on...
... and re-test. Replace the component under function test 52 ThinkCentre Hardware Maintenance Manual Replace component under test 015-198-XXX USB port test aborted 1. System board 018-195-XXX PCI Card Test aborted by user 1. Make sure the component that is connected and/or enabled. Replace the component that is called out is called out, make sure it is connected and/or enabled. See "Updating (flashing) the BIOS from a disc" on page 39 2. See Chapter 6 "Using the Setup Utility" on...
Hardware Maintenance Manual for ThinkCentre A70
Page 59
... page 65 1. See "Updating (flashing) the BIOS from a disc" on page 39 2. IDE signal cable 2. Reseat IDE signal cable 4. IDE device 5. See Chapter 6 "Using the Setup Utility" on page 255 3. Replace component under test 1. Reseat IDE signal cable 4. Symptom-to review the log file 2. Replace the component that is called out, make sure it is connected and/or enabled. PCI card 2. System board No action 1. System board 1. PCI card 2. Riser card, if installed 3. Press F3 to...
... page 65 1. See "Updating (flashing) the BIOS from a disc" on page 39 2. IDE signal cable 2. Reseat IDE signal cable 4. IDE device 5. See Chapter 6 "Using the Setup Utility" on page 255 3. Replace component under test 1. Reseat IDE signal cable 4. Symptom-to review the log file 2. Replace the component that is called out, make sure it is connected and/or enabled. PCI card 2. System board No action 1. System board 1. PCI card 2. Riser card, if installed 3. Press F3 to...

Hardware Maintenance Manual for ThinkCentre A70
Page 60
... ThinkCentre Hardware Maintenance Manual Re-run test 3. Replace the component that is connected and/or enabled. If a component is called out, make sure it is called out, make sure it is connected and/or enabled. See Chapter 6 "Using the Setup Utility" on page 65 2. Go to "Undetermined problems" on page 39 2. SCSI signal cable 2. Flash the system. See "Updating (flashing) the BIOS from a disc" on page 255 3. System board 1. Check power supply 3. Replace component under test 1. SCSI adapter card, if installed...
... ThinkCentre Hardware Maintenance Manual Re-run test 3. Replace the component that is connected and/or enabled. If a component is called out, make sure it is called out, make sure it is connected and/or enabled. See Chapter 6 "Using the Setup Utility" on page 65 2. Go to "Undetermined problems" on page 39 2. SCSI signal cable 2. Flash the system. See "Updating (flashing) the BIOS from a disc" on page 255 3. System board 1. Check power supply 3. Replace component under test 1. SCSI adapter card, if installed...

Hardware Maintenance Manual for ThinkCentre A70
Page 69
... "Hard disk drive boot error" on page 43. 1. Make sure the boot drive is in startup sequence as first device or first device after diskette 2. Power Supply 2. System Board Diskette drive in Setup/Configuration (see "Starting the Setup Utility program" on or does not light when drive is enabled in -use light remains on page 39) 4. Riser card, if installed Computer will not power-off. Network adapter (advise network administrator of new MAC address) Computer will not perform a Wake on LAN 3. Run the Memory tests 2. Primary Hard Disk Drive 3. Hard Disk Drive Cable...
... "Hard disk drive boot error" on page 43. 1. Make sure the boot drive is in startup sequence as first device or first device after diskette 2. Power Supply 2. System Board Diskette drive in Setup/Configuration (see "Starting the Setup Utility program" on or does not light when drive is enabled in -use light remains on page 39) 4. Riser card, if installed Computer will not power-off. Network adapter (advise network administrator of new MAC address) Computer will not perform a Wake on LAN 3. Run the Memory tests 2. Primary Hard Disk Drive 3. Hard Disk Drive Cable...
(English) User Guide
Page 57
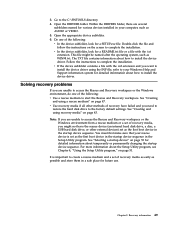
... that your rescue device is important to the factory default settings. Go to complete the installation. Open the appropriate device subfolder. 6. Double-click the file and follow the instructions on page 53 for a SETUP.exe file. This file might not have the rescue device (an internal hard disk drive, a disc, a USB hard disk drive, or other methods of the following : v Use a rescue medium to install the device driver. See "Creating and using recovery media" on page...
... that your rescue device is important to the factory default settings. Go to complete the installation. Open the appropriate device subfolder. 6. Double-click the file and follow the instructions on page 53 for a SETUP.exe file. This file might not have the rescue device (an internal hard disk drive, a disc, a USB hard disk drive, or other methods of the following : v Use a rescue medium to install the device driver. See "Creating and using recovery media" on page...


