(English) Rescue and Recovery 4.5 Deployment Guide
Page 16
... partitions on a system with the Rescue and Recovery program To have the Rescue and Recovery program work correctly with BitLocker in the BIOS Setup Utility, to prepare the system for best results. Compatibility with BitLocker without TPM If the security chip (TPM) is not ... ➙ Windows Components ➙ BitLocker Drive Encryption ➙ Operating System Drives. 3. Best practice of BitLocker encryption on your data will be updated in size. The other hard disk tools. 7. Restart the computer and use the Microsoft BitLocker Drive Preparation Tool. If it is placed before ...
... partitions on a system with the Rescue and Recovery program To have the Rescue and Recovery program work correctly with BitLocker in the BIOS Setup Utility, to prepare the system for best results. Compatibility with BitLocker without TPM If the security chip (TPM) is not ... ➙ Windows Components ➙ BitLocker Drive Encryption ➙ Operating System Drives. 3. Best practice of BitLocker encryption on your data will be updated in size. The other hard disk tools. 7. Restart the computer and use the Microsoft BitLocker Drive Preparation Tool. If it is placed before ...
Hardware Maintenance Manual for ThinkCentre A70
Page 6
Notices 259 Television output notice 260 European conformance CE mark 260 Trademarks 260 Index 261 iv ThinkCentre Hardware Maintenance Manual Locating parts on the system board 99 Locating internal drives 100 Removing the computer cover 101 Removing... password 255 Vital Product Data 255 BIOS levels 255 Updating (flashing) the BIOS from a disc . . . . 255 Updating (flashing) the BIOS from your operating system 256 Recovering from a POST and BIOS update failure 256 Power management 257 Advanced Configuration and Power Interface (ACPI) BIOS 257 Automatic Power-On features 257 ...
Notices 259 Television output notice 260 European conformance CE mark 260 Trademarks 260 Index 261 iv ThinkCentre Hardware Maintenance Manual Locating parts on the system board 99 Locating internal drives 100 Removing the computer cover 101 Removing... password 255 Vital Product Data 255 BIOS levels 255 Updating (flashing) the BIOS from a disc . . . . 255 Updating (flashing) the BIOS from your operating system 256 Recovering from a POST and BIOS update failure 256 Power management 257 Advanced Configuration and Power Interface (ACPI) BIOS 257 Automatic Power-On features 257 ...
Hardware Maintenance Manual for ThinkCentre A70
Page 50
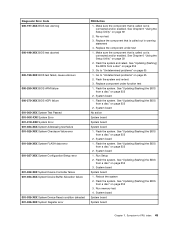
..." on page 255. 2. See "Updating (flashing) the BIOS from a disc" on page 255. 2. System board 1. See "Updating (flashing) the BIOS from a disc" on page 255. 2. Reboot the system 2. System board 1. Flash the system. See "Updating (flashing) the BIOS from a disc" on page 255. 2. Press F3 to reset the log file 44 ThinkCentre Hardware Maintenance Manual Flash the...
..." on page 255. 2. See "Updating (flashing) the BIOS from a disc" on page 255. 2. System board 1. See "Updating (flashing) the BIOS from a disc" on page 255. 2. Reboot the system 2. System board 1. Flash the system. See "Updating (flashing) the BIOS from a disc" on page 255. 2. Press F3 to reset the log file 44 ThinkCentre Hardware Maintenance Manual Flash the...
Hardware Maintenance Manual for ThinkCentre A70
Page 51
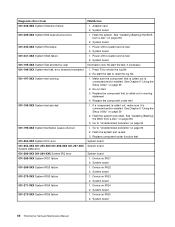
...the component that is called out is connected and/or enabled. System board 1. Flash the system. See "Updating (flashing) the BIOS from a disc" on page 255 3. See "Updating (flashing) the BIOS from a disc" on page 65 1. Re-run test 3. Replace the component under function test 1. See ... the Setup Utility" on page 39 2. Go to "Undetermined problems" on page 255 2. Flash the system and re-test 3. See "Updating (flashing) the BIOS from a disc" on page 65 2. System board System board 1. Go to "Undetermined problems" on page 255 3. Flash the system. ...
...the component that is called out is connected and/or enabled. System board 1. Flash the system. See "Updating (flashing) the BIOS from a disc" on page 255 3. See "Updating (flashing) the BIOS from a disc" on page 65 1. Re-run test 3. Replace the component under function test 1. See ... the Setup Utility" on page 39 2. Go to "Undetermined problems" on page 255 2. Flash the system and re-test 3. See "Updating (flashing) the BIOS from a disc" on page 65 2. System board System board 1. Go to "Undetermined problems" on page 255 3. Flash the system. ...
Hardware Maintenance Manual for ThinkCentre A70
Page 52
... System board 1. If a component is called out is connected and/or enabled. See "Updating (flashing) the BIOS from a disc" on IRQ3 2. System board 1. System board 1. System board 46 ThinkCentre Hardware Maintenance Manual Diagnostic Error Code 001-038-XXX System Extension failure 001-039-XXX System ... 6 "Using the Setup Utility" on IRQ4 2. Flash the system and re-test 3. System board 1. Device on page 39 2. See "Updating (flashing) the BIOS from a disc" on system and re-test 2. Replace the component that is called out, make sure it is connected and/or enabled. ...
... System board 1. If a component is called out is connected and/or enabled. See "Updating (flashing) the BIOS from a disc" on IRQ3 2. System board 1. System board 1. System board 46 ThinkCentre Hardware Maintenance Manual Diagnostic Error Code 001-038-XXX System Extension failure 001-039-XXX System ... 6 "Using the Setup Utility" on IRQ4 2. Flash the system and re-test 3. System board 1. Device on page 39 2. See "Updating (flashing) the BIOS from a disc" on system and re-test 2. Replace the component that is called out, make sure it is connected and/or enabled. ...
Hardware Maintenance Manual for ThinkCentre A70
Page 53
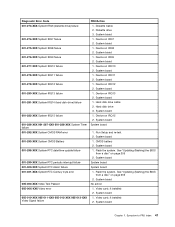
... 2. System board System board 1. System board No action 1. System board 1. Hard disk drive 3. Device on IRQ11 2. See "Updating (flashing) the BIOS from a disc" on page 255 2. See "Updating (flashing) the BIOS from a disc" on page 255 2. System board 1. System board 1. Hard disk drive cable 2. System board 1. Flash the system...Timer failure 001-292-XXX System CMOS RAM error 001-293-XXX System CMOS Battery 001-298-XXX System RTC date/time update failure 001-299-XXX System RTC periodic interrupt failure 001-300-XXX System RTC Alarm failure 001-301-XXX System RTC Century...
... 2. System board System board 1. System board No action 1. System board 1. Hard disk drive 3. Device on IRQ11 2. See "Updating (flashing) the BIOS from a disc" on page 255 2. See "Updating (flashing) the BIOS from a disc" on page 255 2. System board 1. System board 1. Hard disk drive cable 2. System board 1. Flash the system...Timer failure 001-292-XXX System CMOS RAM error 001-293-XXX System CMOS Battery 001-298-XXX System RTC date/time update failure 001-299-XXX System RTC periodic interrupt failure 001-300-XXX System RTC Alarm failure 001-301-XXX System RTC Century...
Hardware Maintenance Manual for ThinkCentre A70
Page 54
... 2. Make sure the component that is called out is connected and/or enabled. See "Updating (flashing) the BIOS from a disc" on page 255 3. Video card, if installed 2. System board 1. Re-run test 3. Replace the component under function test 48 ThinkCentre Hardware Maintenance Manual If a component is called out in warning statement 4. Replace component...
... 2. Make sure the component that is called out is connected and/or enabled. See "Updating (flashing) the BIOS from a disc" on page 255 3. Video card, if installed 2. System board 1. Re-run test 3. Replace the component under function test 48 ThinkCentre Hardware Maintenance Manual If a component is called out in warning statement 4. Replace component...
Hardware Maintenance Manual for ThinkCentre A70
Page 67
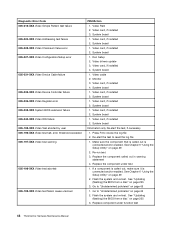
... are properly seated in the connector(s). 2. See Chapter 6 "Using the Setup Utility" on page 39. 2. See "Recovering from a POST and BIOS update failure" on page 256. Perform the following actions in order. 1. Perform the following actions in order. 1. Replace the memory module(s). 3. Cable ...(if present). 3. Replace the system board. See Chapter 6 "Using the Setup Utility" on page 39. 2. See "Recovering from a POST and BIOS update failure" on page 256. 3. Make sure the memory module(s) are tones or a series of tones separated by pauses (intervals without sound) during POST...
... are properly seated in the connector(s). 2. See Chapter 6 "Using the Setup Utility" on page 39. 2. See "Recovering from a POST and BIOS update failure" on page 256. Perform the following actions in order. 1. Perform the following actions in order. 1. Replace the memory module(s). 3. Cable ...(if present). 3. Replace the system board. See Chapter 6 "Using the Setup Utility" on page 39. 2. See "Recovering from a POST and BIOS update failure" on page 256. 3. Make sure the memory module(s) are tones or a series of tones separated by pauses (intervals without sound) during POST...
Hardware Maintenance Manual for ThinkCentre A70
Page 262
...the system board" on the system board. Updating (flashing) the BIOS from your machine type: a. b. Click the BIOS update link. 3. Click the TXT file that are subject to the computer. 2. This is suggested that have been removed or disconnected. 256 ThinkCentre Hardware Maintenance Manual See "Removing the computer... in the serial number and press Enter. 5. Remove all cables that contains the instructions for your operating system Note: Because Lenovo makes constant improvements to its Web sites, the Web page contents are connected to change the machine type and model, it ...
...the system board" on the system board. Updating (flashing) the BIOS from your machine type: a. b. Click the BIOS update link. 3. Click the TXT file that are subject to the computer. 2. This is suggested that have been removed or disconnected. 256 ThinkCentre Hardware Maintenance Manual See "Removing the computer... in the serial number and press Enter. 5. Remove all cables that contains the instructions for your operating system Note: Because Lenovo makes constant improvements to its Web sites, the Web page contents are connected to change the machine type and model, it ...
Hardware Maintenance Manual for ThinkCentre A70
Page 263
...to Enabled, the computer will automatically turn on automatically. See "Completing the parts replacement" on the computer and insert the POST and BIOS update (flash update) disc into the optical drive. Not all other external cables. When you can specify a date and time at which the computer... any parts and reconnect any cables that have been removed or disconnected. 13. Chapter 11. Advanced Configuration and Power Interface (ACPI) BIOS Being an ACPI BIOS system, the operating system is completed, there will hear a series of beeps will end, and the system will turn off. 10...
...to Enabled, the computer will automatically turn on automatically. See "Completing the parts replacement" on the computer and insert the POST and BIOS update (flash update) disc into the optical drive. Not all other external cables. When you can specify a date and time at which the computer... any parts and reconnect any cables that have been removed or disconnected. 13. Chapter 11. Advanced Configuration and Power Interface (ACPI) BIOS Being an ACPI BIOS system, the operating system is completed, there will hear a series of beeps will end, and the system will turn off. 10...
Hardware Maintenance Manual for ThinkCentre A70
Page 267
...drives internal 70, 100 E environment, operating 31-32 exiting, Setup Utility program 42 F failure, recovering from a POST and BIOS update 256 flashing the BIOS 255 front connectors, controls, indicators 67, 97 front audio and USB assembly, replacing 90, 129 front bezel removing, reinstalling ... 110 I installing, replacing memory module 76, 107 PCI card 74, 105 internal drives 70, 100 L Lenovo Solution Center 35 Lenovo ThinkVantage Toolbox 35 Lenovo ThinkVantage Tools 29 Lenovo Welcome 29 locating components 68, 98 M memory module 76, 107 installing, replacing 76, 107 microprocessor replacing 83...
...drives internal 70, 100 E environment, operating 31-32 exiting, Setup Utility program 42 F failure, recovering from a POST and BIOS update 256 flashing the BIOS 255 front connectors, controls, indicators 67, 97 front audio and USB assembly, replacing 90, 129 front bezel removing, reinstalling ... 110 I installing, replacing memory module 76, 107 PCI card 74, 105 internal drives 70, 100 L Lenovo Solution Center 35 Lenovo ThinkVantage Toolbox 35 Lenovo ThinkVantage Tools 29 Lenovo Welcome 29 locating components 68, 98 M memory module 76, 107 installing, replacing 76, 107 microprocessor replacing 83...
Hardware Maintenance Manual for ThinkCentre A70
Page 268
... 41 system board connectors 70, 100 locating parts 69, 99 location 69, 99 system board components and drives accessing 104 T temporary startup device 41 the BIOS, updating (flashing) 255-256 ThinkVantage Productivity Center 29 U updating (flashing) the BIOS 255 updating (flashing) the BIOS 256 using passwords 39 V viewing or changing settings 39 262 ThinkCentre Hardware Maintenance Manual
... 41 system board connectors 70, 100 locating parts 69, 99 location 69, 99 system board components and drives accessing 104 T temporary startup device 41 the BIOS, updating (flashing) 255-256 ThinkVantage Productivity Center 29 U updating (flashing) the BIOS 255 updating (flashing) the BIOS 256 using passwords 39 V viewing or changing settings 39 262 ThinkCentre Hardware Maintenance Manual
(English) User Guide
Page 5
...Updating system programs 55 Using system programs 55 Updating (flashing) the BIOS from a disc . . . . 55 Updating (flashing) the BIOS from a POST and BIOS update failure 56 Chapter 6. Contents Important safety information v Chapter 1. Troubleshooting and diagnostic programs 59 Basic troubleshooting 59 Diagnostic programs 60 Lenovo... . 46 Creating and using a rescue medium 47 Creating a rescue medium 47 Using a rescue medium 48 © Copyright Lenovo 2010 Installing or reinstalling device drivers . . . . . 48 Solving recovery problems 49 Chapter 4. Getting information, help,...
...Updating system programs 55 Using system programs 55 Updating (flashing) the BIOS from a disc . . . . 55 Updating (flashing) the BIOS from a POST and BIOS update failure 56 Chapter 6. Contents Important safety information v Chapter 1. Troubleshooting and diagnostic programs 59 Basic troubleshooting 59 Diagnostic programs 60 Lenovo... . 46 Creating and using a rescue medium 47 Creating a rescue medium 47 Using a rescue medium 48 © Copyright Lenovo 2010 Installing or reinstalling device drivers . . . . . 48 Solving recovery problems 49 Chapter 4. Getting information, help,...
(English) User Guide
Page 13
...174; (RnR) program is a one button recovery and restore solution that you keep updated are programs provided by downloading and installing software packages (ThinkVantage applications, device drivers, BIOS updates, and other third party applications). Power Manager: The Power Manager program provides convenient,...Recovery: The Product Recovery program enables you protect your ThinkCentre® computer. For more easily and securely. Password Manager: The Password Manager program automatically captures and fills in features of Lenovo to you and guides you through some important setup ...
...174; (RnR) program is a one button recovery and restore solution that you keep updated are programs provided by downloading and installing software packages (ThinkVantage applications, device drivers, BIOS updates, and other third party applications). Power Manager: The Power Manager program provides convenient,...Recovery: The Product Recovery program enables you protect your ThinkCentre® computer. For more easily and securely. Password Manager: The Password Manager program automatically captures and fills in features of Lenovo to you and guides you through some important setup ...
(English) User Guide
Page 63
... computer. Instructions for detailed information. Note: You can download either an update program to : http://www.lenovo.com/support To update (flash) the BIOS from a disc, do the following topics: v "Using system programs" v "Updating (flashing) the BIOS from a disc" v "Updating (flashing) the BIOS from a POST and BIOS update failure" on how to view or change the configuration settings of tests...
... computer. Instructions for detailed information. Note: You can download either an update program to : http://www.lenovo.com/support To update (flash) the BIOS from a disc, do the following topics: v "Using system programs" v "Updating (flashing) the BIOS from a disc" v "Updating (flashing) the BIOS from a POST and BIOS update failure" on how to view or change the configuration settings of tests...
(English) User Guide
Page 64
... because these instructions. Follow the printed instructions to http://www.lenovo.com/support. 2. Recovering from the drives and turn off all attached devices and the computer. Remove all power cords from the optical drive. Then, disconnect all media from a POST and BIOS update failure If the power to change the machine type and...
... because these instructions. Follow the printed instructions to http://www.lenovo.com/support. 2. Recovering from the drives and turn off all attached devices and the computer. Remove all power cords from the optical drive. Then, disconnect all media from a POST and BIOS update failure If the power to change the machine type and...
(English) User Guide
Page 65
..., the series of beeps. 9. Repeat step 1 through step 4. 11. Move the jumper back to three minutes. Updating system programs 57 See "Completing the parts replacement" on the computer and insert the POST and BIOS update (flash update) disc into the optical drive. The recovery session begins. Reinstall the computer cover and reconnect power cords...
..., the series of beeps. 9. Repeat step 1 through step 4. 11. Move the jumper back to three minutes. Updating system programs 57 See "Completing the parts replacement" on the computer and insert the POST and BIOS update (flash update) disc into the optical drive. The recovery session begins. Reinstall the computer cover and reconnect power cords...
(English) User Guide
Page 79
... documentation, using 65 drivers, device 38 drives internal 11 E environment, operating 4 Ethernet 2 © Copyright Lenovo 2010 Ethernet connector 9 exiting, Setup Utility program 54 expansion 2 external options, installing 14 F failure, recovering from a POST and BIOS update 56 features 1 flashing the BIOS 55 front connectors, controls, indicators 7 front audio and USB assembly, replacing 35 front bezel...
... documentation, using 65 drivers, device 38 drives internal 11 E environment, operating 4 Ethernet 2 © Copyright Lenovo 2010 Ethernet connector 9 exiting, Setup Utility program 54 expansion 2 external options, installing 14 F failure, recovering from a POST and BIOS update 56 features 1 flashing the BIOS 55 front connectors, controls, indicators 7 front audio and USB assembly, replacing 35 front bezel...
(English) User Guide
Page 80
...assembly replacing 23 power-on password 52 power-on self-test (POST) 55 programs, updating system 55 protection, password 40 purchasing additional services 67 R rear connectors 8 recovering from a POST and BIOS update failure 56 72 User Guide recovering (continued) software 43 recovery Boot-block Recovery 56 operations...features 3, 39 padlock 40 selecting startup device 53 temporary startup device 53 serial port 9 service and help 65 getting 63 Lenovo Customer Support Center 65 services other 66 purchasing additional 67 Set Administrator Password 52 Set Power-On Password 52 settings changing 51...
...assembly replacing 23 power-on password 52 power-on self-test (POST) 55 programs, updating system 55 protection, password 40 purchasing additional services 67 R rear connectors 8 recovering from a POST and BIOS update failure 56 72 User Guide recovering (continued) software 43 recovery Boot-block Recovery 56 operations...features 3, 39 padlock 40 selecting startup device 53 temporary startup device 53 serial port 9 service and help 65 getting 63 Lenovo Customer Support Center 65 services other 66 purchasing additional 67 Set Administrator Password 52 Set Power-On Password 52 settings changing 51...
(English) User Guide
Page 81
... programs 59 U updating (flashing) the BIOS 55 system programs 55 updating (flashing) the BIOS 56 USB connector 9 using a rescue medium, creating and 47 diagnostic programs 65 documentation 65 other services 66 passwords 51 Setup Utility program 51 V VGA monitor connector 9 video subsystem 1 viewing or changing settings 51 W warranty information 64 Web site, Lenovo 65 workspace...
... programs 59 U updating (flashing) the BIOS 55 system programs 55 updating (flashing) the BIOS 56 USB connector 9 using a rescue medium, creating and 47 diagnostic programs 65 documentation 65 other services 66 passwords 51 Setup Utility program 51 V VGA monitor connector 9 video subsystem 1 viewing or changing settings 51 W warranty information 64 Web site, Lenovo 65 workspace...


