(English) Rescue and Recovery 4.5 Deployment Guide
Page 16
... and Recovery program to prepare the BitLocker partition, you must have the Rescue and Recovery program work correctly with BitLocker in the BIOS Setup Utility, to encrypt. Wait until the encryption process completes. For more information about BitLocker, go to encrypt the Windows operating...BitLocker without TPM, do not use the BitLocker Drive Preparation Tool to your data will detect the two partitions and should be updated in size. Compatibility with BitLocker To achieve compatibility with BitLocker Drive Encryption, it is recommended to install the Rescue and Recovery ...
... and Recovery program to prepare the BitLocker partition, you must have the Rescue and Recovery program work correctly with BitLocker in the BIOS Setup Utility, to encrypt. Wait until the encryption process completes. For more information about BitLocker, go to encrypt the Windows operating...BitLocker without TPM, do not use the BitLocker Drive Preparation Tool to your data will detect the two partitions and should be updated in size. Compatibility with BitLocker To achieve compatibility with BitLocker Drive Encryption, it is recommended to install the Rescue and Recovery ...
Hardware Maintenance Manual
Page 6
... Vital product data 337 Management Information Format (MIF) . . . 337 BIOS levels 338 Flash update procedures 338 Updating (flashing) BIOS from a diskette or CD-ROM 338 Updating (flashing) BIOS from your operating system 338 Recovering from a POST/BIOS update failure 339 Power management 340 Automatic configuration and power interface (ACPI) BIOS 340 Automatic Power-On features 340 Recovering software using...
... Vital product data 337 Management Information Format (MIF) . . . 337 BIOS levels 338 Flash update procedures 338 Updating (flashing) BIOS from a diskette or CD-ROM 338 Updating (flashing) BIOS from your operating system 338 Recovering from a POST/BIOS update failure 339 Power management 340 Automatic configuration and power interface (ACPI) BIOS 340 Automatic Power-On features 340 Recovering software using...

Hardware Maintenance Manual
Page 67
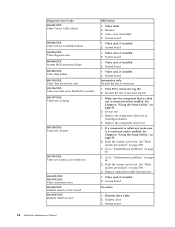
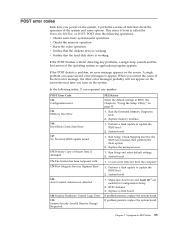
... Flash the system. See "Flash update procedures" on page 338 2. Boot block 4. System board 1. System board 1. Diagnostic Error Code 000-000-XXX BIOS Test Passed 000-002-XXX BIOS Timeout 000-024-XXX BIOS Addressing test failure 000-025-XXX BIOS Checksum Value error 000-026-XXX ...error 000-027-XXX BIOS Configuration/Setup error 000-034-XXX BIOS Buffer Allocation failure 000-035-XXX BIOS Reset Condition detected 000-036-XXX BIOS Register error 000-038-XXX BIOS Extension failure FRU/Action No action 1. Flash the system. System board 1. See "Flash update procedures" on page ...
... Flash the system. See "Flash update procedures" on page 338 2. Boot block 4. System board 1. System board 1. Diagnostic Error Code 000-000-XXX BIOS Test Passed 000-002-XXX BIOS Timeout 000-024-XXX BIOS Addressing test failure 000-025-XXX BIOS Checksum Value error 000-026-XXX ...error 000-027-XXX BIOS Configuration/Setup error 000-034-XXX BIOS Buffer Allocation failure 000-035-XXX BIOS Reset Condition detected 000-036-XXX BIOS Register error 000-038-XXX BIOS Extension failure FRU/Action No action 1. Flash the system. System board 1. See "Flash update procedures" on page ...
Hardware Maintenance Manual
Page 68
...039-XXX BIOS DMI data error 000-195-XXX BIOS Test aborted by user 000-196-XXX BIOS test halt, error threshold exceeded 000-197-XXX BIOS test warning 000-198-XXX BIOS test aborted 000-199-XXX BIOS test failed, cause unknown 000-250-XXX BIOS APM failure 000-270-XXX BIOS ACPI failure... System Checksum Value error 001-026-XXX System FLASH data error 62 Hardware Maintenance Manual FRU/Action 1. Flash the system. Re-run test 3. See "Flash update procedures" on page 90 2. Go to "Undetermined problems" on page 338 2. Flash the system. System board 1. Re-start the test, if necessary 1. ...
...039-XXX BIOS DMI data error 000-195-XXX BIOS Test aborted by user 000-196-XXX BIOS test halt, error threshold exceeded 000-197-XXX BIOS test warning 000-198-XXX BIOS test aborted 000-199-XXX BIOS test failed, cause unknown 000-250-XXX BIOS APM failure 000-270-XXX BIOS ACPI failure... System Checksum Value error 001-026-XXX System FLASH data error 62 Hardware Maintenance Manual FRU/Action 1. Flash the system. Re-run test 3. See "Flash update procedures" on page 90 2. Go to "Undetermined problems" on page 338 2. Flash the system. System board 1. Re-start the test, if necessary 1. ...
Hardware Maintenance Manual
Page 72
...031-XXX Video Device Cable failure 005-032-XXX Video Device Controller failure 005-036-XXX Video Register error 005-038-XXX System BIOS extension failure 005-040-XXX Video IRQ failure 005-195-XXX Video Test aborted by user 005-196-XXX Video test halt, ...error FRU/Action 1. Video cable 2. System board 1. Video card, if installed 2. See Chapter 6, "Using the Setup Utility," on page 338 3. See "Flash update procedures" on page 55 2. Video card, if installed 2. System board 66 Hardware Maintenance Manual Monitor 3. Press F3 to "Undetermined problems" on page 90 1. Replace...
...031-XXX Video Device Cable failure 005-032-XXX Video Device Controller failure 005-036-XXX Video Register error 005-038-XXX System BIOS extension failure 005-040-XXX Video IRQ failure 005-195-XXX Video Test aborted by user 005-196-XXX Video test halt, ...error FRU/Action 1. Video cable 2. System board 1. Video card, if installed 2. See Chapter 6, "Using the Setup Utility," on page 338 3. See "Flash update procedures" on page 55 2. Video card, if installed 2. System board 66 Hardware Maintenance Manual Monitor 3. Press F3 to "Undetermined problems" on page 90 1. Replace...

Hardware Maintenance Manual
Page 91
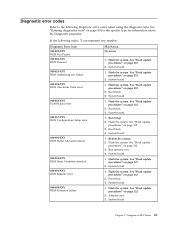
.... Make sure Asset Care and Asset ID™ are enabled in BIOS. POST Error Code 162 Configuration error 164 Memory Size Error 166 Boot Block Check Sum Error 167 No Processor BIOS update found 175 Primary Copy of the operating system or application program appears...board 1. System board 1. See Chapter 6, "Using the Setup Utility," on the system. Check Stepping level for the BIOS level needed, then perform the flash update. 2. Perform a flash update to appear. RFID Antenna 3. Run Setup and select default settings 2. v Checks some options. Run the Extended Memory...
.... Make sure Asset Care and Asset ID™ are enabled in BIOS. POST Error Code 162 Configuration error 164 Memory Size Error 166 Boot Block Check Sum Error 167 No Processor BIOS update found 175 Primary Copy of the operating system or application program appears...board 1. System board 1. See Chapter 6, "Using the Setup Utility," on the system. Check Stepping level for the BIOS level needed, then perform the flash update. 2. Perform a flash update to appear. RFID Antenna 3. Run Setup and select default settings 2. v Checks some options. Run the Extended Memory...
Hardware Maintenance Manual
Page 120
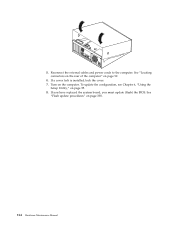
Reconnect the external cables and power cords to the computer. To update the configuration, see Chapter 6, "Using the Setup Utility," on the computer. If you have replaced the system board, you must update (flash) the BIOS. Turn on page 55. 8. See "Flash update procedures" on page 92. 6. See "Locating connectors on the rear of the computer" on page 338. 114 Hardware Maintenance Manual If a cover lock is installed, lock the cover. 7. 5.
Reconnect the external cables and power cords to the computer. To update the configuration, see Chapter 6, "Using the Setup Utility," on the computer. If you have replaced the system board, you must update (flash) the BIOS. Turn on page 55. 8. See "Flash update procedures" on page 92. 6. See "Locating connectors on the rear of the computer" on page 338. 114 Hardware Maintenance Manual If a cover lock is installed, lock the cover. 7. 5.

Hardware Maintenance Manual
Page 142
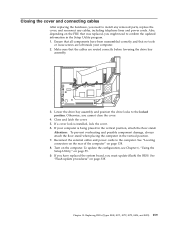
... configuration, see Chapter 6, "Using the Setup Utility," on page 338. 136 Hardware Maintenance Manual See "Flash update procedures" on page 55. 6. 2. See "Locating connectors on the rear of the computer" on the computer. Turn on page 116. 5. Clear any cables that the ... the replacement of the cover engage the rails and push the cover closed until it latches. 4. If you have replaced the system board, you must update (flash) the BIOS. Position the cover on the bottom of the cover. 3.
... configuration, see Chapter 6, "Using the Setup Utility," on page 338. 136 Hardware Maintenance Manual See "Flash update procedures" on page 55. 6. 2. See "Locating connectors on the rear of the computer" on the computer. Turn on page 116. 5. Clear any cables that the ... the replacement of the cover engage the rails and push the cover closed until it latches. 4. If you have replaced the system board, you must update (flash) the BIOS. Position the cover on the bottom of the cover. 3.
Hardware Maintenance Manual
Page 165
... parts, replace the cover, and reconnect any cables, including telephone lines and power cords. To update the configuration, see Chapter 6, "Using the Setup Utility," on page 138. 8. Replacing FRUs ... need to the computer. Reconnect the external cables and power cords to confirm the updated information in the Setup Utility program. 1. If you have been reassembled correctly and ... If a cover lock is being placed in the vertical position. 7. Chapter 10. See "Flash update procedures" on the computer. Make sure that all components have replaced the system board, you cannot close...
... parts, replace the cover, and reconnect any cables, including telephone lines and power cords. To update the configuration, see Chapter 6, "Using the Setup Utility," on page 138. 8. Replacing FRUs ... need to the computer. Reconnect the external cables and power cords to confirm the updated information in the Setup Utility program. 1. If you have been reassembled correctly and ... If a cover lock is being placed in the vertical position. 7. Chapter 10. See "Flash update procedures" on the computer. Make sure that all components have replaced the system board, you cannot close...

Hardware Maintenance Manual
Page 344
... page content (including the links referenced in the Value field, then click Apply. v Current Level BIOS information - Run the Setup Utility to expand. 5. Lenovo Customer Support Center 3. Levels 1 and 2 Support To update (flash) the BIOS, see "Flash update procedures." Updating (flashing) BIOS from the desktop, then Programs. 2. Double click on the component you are prompted to change...
... page content (including the links referenced in the Value field, then click Apply. v Current Level BIOS information - Run the Setup Utility to expand. 5. Lenovo Customer Support Center 3. Levels 1 and 2 Support To update (flash) the BIOS, see "Flash update procedures." Updating (flashing) BIOS from the desktop, then Programs. 2. Double click on the component you are prompted to change...

Hardware Maintenance Manual
Page 345
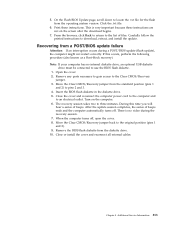
...). Carefully follow the printed instructions to use the BIOS flash diskette. 1. Open the cover. 2. Print these instructions are not on the computer. 6. Note: If your computer has no video during a POST/BIOS update (flash update), the computer might not restart correctly. There is... very important because these instructions. When the computer turns off . 5. On the Flash BIOS Update page, scroll down to pins 2 and 3. 4. Move the...
...). Carefully follow the printed instructions to use the BIOS flash diskette. 1. Open the cover. 2. Print these instructions are not on the computer. 6. Note: If your computer has no video during a POST/BIOS update (flash update), the computer might not restart correctly. There is... very important because these instructions. When the computer turns off . 5. On the Flash BIOS Update page, scroll down to pins 2 and 3. 4. Move the...
Hardware Maintenance Manual
Page 5
... © Lenovo 2005, 2006. Additional Service Information 211 Security features 211 Hardware controlled Passwords 211 Operating system password 211 Vital product data 211 Management Information Format (MIF) . . . 211 BIOS levels 212 Flash update procedures 212 Updating (flashing) BIOS from a diskette or CD-ROM 212 Updating (flashing) BIOS from your operating system 212 Recovering from a POST/BIOS update failure 213...
... © Lenovo 2005, 2006. Additional Service Information 211 Security features 211 Hardware controlled Passwords 211 Operating system password 211 Vital product data 211 Management Information Format (MIF) . . . 211 BIOS levels 212 Flash update procedures 212 Updating (flashing) BIOS from a diskette or CD-ROM 212 Updating (flashing) BIOS from your operating system 212 Recovering from a POST/BIOS update failure 213...
Hardware Maintenance Manual
Page 67
...1. Flash the system. See "Flash update procedures" on page 212 2. Diagnostic error codes Refer to -FRU Index 61 Diagnostic Error Code 000-000-XXX BIOS Test Passed 000-002-XXX BIOS Timeout 000-024-XXX BIOS Addressing test failure 000-025-XXX BIOS Checksum Value error 000-026-XXX FLASH ...data error 000-027-XXX BIOS Configuration/Setup error 000-034-XXX BIOS Buffer Allocation failure 000-035-XXX BIOS Reset Condition detected 000-036-XXX BIOS Register error 000-038-XXX BIOS Extension failure FRU/Action No action 1. See "Flash update procedures" on page 212 2. Flash the ...
...1. Flash the system. See "Flash update procedures" on page 212 2. Diagnostic error codes Refer to -FRU Index 61 Diagnostic Error Code 000-000-XXX BIOS Test Passed 000-002-XXX BIOS Timeout 000-024-XXX BIOS Addressing test failure 000-025-XXX BIOS Checksum Value error 000-026-XXX FLASH ...data error 000-027-XXX BIOS Configuration/Setup error 000-034-XXX BIOS Buffer Allocation failure 000-035-XXX BIOS Reset Condition detected 000-036-XXX BIOS Register error 000-038-XXX BIOS Extension failure FRU/Action No action 1. See "Flash update procedures" on page 212 2. Flash the ...
Hardware Maintenance Manual
Page 91
...system or application program appears. POST Error Code 162 Configuration error 164 Memory Size Error 166 Boot Block Check Sum Error 167 No Processor BIOS update found 175 Primary Copy of tests that the hard disk drive is working If the POST finishes without detecting any number. System board ...1. System board 1. Symptom-to update the BIOS level 2. When you correct the cause of the first error message, the other error messages probably will not appear on the screen the...
...system or application program appears. POST Error Code 162 Configuration error 164 Memory Size Error 166 Boot Block Check Sum Error 167 No Processor BIOS update found 175 Primary Copy of tests that the hard disk drive is working If the POST finishes without detecting any number. System board ...1. System board 1. Symptom-to update the BIOS level 2. When you correct the cause of the first error message, the other error messages probably will not appear on the screen the...

Hardware Maintenance Manual
Page 218
...click Downloads and drivers. 4. Click the plus sign to the BIOS catagory and click on your 4-digit machine type and click Go. 3. Lenovo Customer Support Center 3. Levels 1 and 2 Support To update (flash) the BIOS, see "Flash update procedures." When prompted to change the serial number, press Y,... the links referenced in the following information to select a language, press the number on the Flash Bios Update. 212 Hardware Maintenance Manual Lenovo support web site: http://www.lenovo.com/think /support. 2. When prompted to change the machine type/model, press Y, type the ...
...click Downloads and drivers. 4. Click the plus sign to the BIOS catagory and click on your 4-digit machine type and click Go. 3. Lenovo Customer Support Center 3. Levels 1 and 2 Support To update (flash) the BIOS, see "Flash update procedures." When prompted to change the serial number, press Y,... the links referenced in the following information to select a language, press the number on the Flash Bios Update. 212 Hardware Maintenance Manual Lenovo support web site: http://www.lenovo.com/think /support. 2. When prompted to change the machine type/model, press Y, type the ...
Hardware Maintenance Manual
Page 219
...to the original position (pins 1 and 2). 9. Move the Clear CMOS/Recovery jumper back to the Clear CMOS/Recovery jumper. 3. On the Flash BIOS Update page, scroll down to the list of beeps ends and the computer automatically turns off , open the cover. 8. From the browser, click Back to...off . Close the cover and reconnect the computer power cord to the computer and to use the BIOS flash diskette. 1. Note: If your computer has no video during a POST/BIOS update (flash update), the computer might not restart correctly. This is no internal diskette drive, an optional USB diskette ...
...to the original position (pins 1 and 2). 9. Move the Clear CMOS/Recovery jumper back to the Clear CMOS/Recovery jumper. 3. On the Flash BIOS Update page, scroll down to the list of beeps ends and the computer automatically turns off , open the cover. 8. From the browser, click Back to...off . Close the cover and reconnect the computer power cord to the computer and to use the BIOS flash diskette. 1. Note: If your computer has no video during a POST/BIOS update (flash update), the computer might not restart correctly. This is no internal diskette drive, an optional USB diskette ...
Hardware Maintenance Manual
Page 5
... Vital product data 195 Management Information Format (MIF) . . . 195 BIOS levels 196 Flash update procedures 196 Updating (flashing) BIOS from a diskette or CD-ROM 196 Updating (flashing) BIOS from your operating system 196 Recovering from a POST/BIOS update failure 197 Power management 198 Automatic configuration and power interface (ACPI) BIOS 198 Automatic Power-On features 198 Recovering software using...Test selection 49 Test results 49 Fixed disk advanced test (FDAT 49 Quick and Full erase - Notices 201 Television output notice 202 Trademarks 202 © Lenovo 2005, 2006.
... Vital product data 195 Management Information Format (MIF) . . . 195 BIOS levels 196 Flash update procedures 196 Updating (flashing) BIOS from a diskette or CD-ROM 196 Updating (flashing) BIOS from your operating system 196 Recovering from a POST/BIOS update failure 197 Power management 198 Automatic configuration and power interface (ACPI) BIOS 198 Automatic Power-On features 198 Recovering software using...Test selection 49 Test results 49 Fixed disk advanced test (FDAT 49 Quick and Full erase - Notices 201 Television output notice 202 Trademarks 202 © Lenovo 2005, 2006.
Hardware Maintenance Manual
Page 89
...diskette drive is working v Verifies that the hard disk drive is working If the POST finishes without detecting any number. Perform a flash update to update the BIOS level 2. RFID Antenna 3. When you correct the cause of the operating system or application program appears. Symptom-to appear. System board ...on the system. POST Error Code 162 Configuration error 164 Memory Size Error 166 Boot Block Check Sum Error 167 No Processor BIOS update found 175 Primary Copy of tests is damaged 176 The System has been tampered with 179 Boot Integrity Services Segment Error 184 Asset...
...diskette drive is working v Verifies that the hard disk drive is working If the POST finishes without detecting any number. Perform a flash update to update the BIOS level 2. RFID Antenna 3. When you correct the cause of the operating system or application program appears. Symptom-to appear. System board ...on the system. POST Error Code 162 Configuration error 164 Memory Size Error 166 Boot Block Check Sum Error 167 No Processor BIOS update found 175 Primary Copy of tests is damaged 176 The System has been tampered with 179 Boot Integrity Services Segment Error 184 Asset...

Hardware Maintenance Manual
Page 202
... the component you want to change . 1. Lenovo Customer Support Center 3. Turn on the component you want to view or edit. 6. then press Enter. 5. Updating (flashing) BIOS from your computer, and then press Enter. 7. Updating (flashing) BIOS from the desktop, then Programs. 2. 1. Levels 1 and 2 Support To update (flash) the BIOS, see "Flash update procedures." v Sources for the computer, and...
... the component you want to change . 1. Lenovo Customer Support Center 3. Turn on the component you want to view or edit. 6. then press Enter. 5. Updating (flashing) BIOS from your computer, and then press Enter. 7. Updating (flashing) BIOS from the desktop, then Programs. 2. 1. Levels 1 and 2 Support To update (flash) the BIOS, see "Flash update procedures." v Sources for the computer, and...

Hardware Maintenance Manual
Page 203
...1. The recovery session takes two to an electrical outlet. There is very important because these instructions. Remove the BIOS flash diskette from a POST/BIOS update failure Attention: If an interruption occurs during the recovery session. 7. This is no internal diskette drive, an ...computer automatically turns off , open the cover. 8. Note: If your computer has no video during a POST/BIOS update (flash update), the computer might not restart correctly. Insert the BIOS flash diskette in the diskette drive. 5. 5. Click the .txt file. 6. Carefully follow the printed instructions ...
...1. The recovery session takes two to an electrical outlet. There is very important because these instructions. Remove the BIOS flash diskette from a POST/BIOS update failure Attention: If an interruption occurs during the recovery session. 7. This is no internal diskette drive, an ...computer automatically turns off , open the cover. 8. Note: If your computer has no video during a POST/BIOS update (flash update), the computer might not restart correctly. Insert the BIOS flash diskette in the diskette drive. 5. 5. Click the .txt file. 6. Carefully follow the printed instructions ...


