

Hardware Maintenance Manual
Page 50
... machine type and models 2. Have the same setup for the operating system control files Comparing the configuration and software set in the system 8. Print (print screen) configuration currently in the same locations 4. If it failing? - Have the same address jumpers/terminators/cabling 5. Is the failure repeatable? - Have the same BIOS level...
... machine type and models 2. Have the same setup for the operating system control files Comparing the configuration and software set in the system 8. Print (print screen) configuration currently in the same locations 4. If it failing? - Have the same address jumpers/terminators/cabling 5. Is the failure repeatable? - Have the same BIOS level...
Hardware Maintenance Manual
Page 51
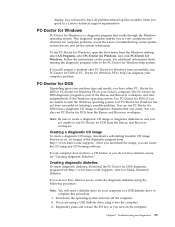
...Windows (used to the PC-Doctor for computer problems, access the Lenovo troubleshooting center, update system drivers, and review system information. Diagnostics Diagnostic programs are two diagnostic programs preinstalled on the screen. The PC-Doctor for Windows, open the Start menu from http...://www.lenovo.com/ support/. 2. To run diagnostics from the Rescue and Recovery workspace. PC Doctor ...
...Windows (used to the PC-Doctor for computer problems, access the Lenovo troubleshooting center, update system drivers, and review system information. Diagnostics Diagnostic programs are two diagnostic programs preinstalled on the screen. The PC-Doctor for Windows, open the Start menu from http...://www.lenovo.com/ support/. 2. To run diagnostics from the Rescue and Recovery workspace. PC Doctor ...
Hardware Maintenance Manual
Page 52
... system or if PC-Doctor for Windows has not been successful in case PC-Doctor for DOS diagnostic program from http:// www.lenovo.com/support/. Creating diagnostic diskettes To create diagnostic diskettes, download the PC-Doctor for Windows PE cannot be run . Repeatedly press...image or diagnostic diskettes in isolating a possible problem. From the Rescue and Recovery workspace, select Create diagnostic disks. 6. Follow the instructions on the screen. From the Rescue and Recovery workspace, select Diagnose hardware. 5. If you do not have a CD burner or you are using a USB diskette ...
... system or if PC-Doctor for Windows has not been successful in case PC-Doctor for DOS diagnostic program from http:// www.lenovo.com/support/. Creating diagnostic diskettes To create diagnostic diskettes, download the PC-Doctor for Windows PE cannot be run . Repeatedly press...image or diagnostic diskettes in isolating a possible problem. From the Rescue and Recovery workspace, select Create diagnostic disks. 6. Follow the instructions on the screen. From the Rescue and Recovery workspace, select Diagnose hardware. 5. If you do not have a CD burner or you are using a USB diskette ...

Hardware Maintenance Manual
Page 53
... to run. Note: If the diagnostic program does not start, you want to follow the instructions on the screen. 8. Press the F1 key for instructions on the screen. Running tests There are running diagnostics from each test category. v Using the cursor movement keys, highlight Run ... 3. See "Selecting a startup device" on page 53 for additional help select F1. When the diagnostics program opens, follow the instructions on the screen. 10. When prompted, insert a blank, formatted diskette into the diskette drive and continue to follow the instructions on how to the previous menu...
... to run. Note: If the diagnostic program does not start, you want to follow the instructions on the screen. 8. Press the F1 key for instructions on the screen. Running tests There are running diagnostics from each test category. v Using the cursor movement keys, highlight Run ... 3. See "Selecting a startup device" on page 53 for additional help select F1. When the diagnostics program opens, follow the instructions on the screen. 10. When prompted, insert a blank, formatted diskette into the diskette drive and continue to follow the instructions on how to the previous menu...

Hardware Maintenance Manual
Page 55
... the Quick or Full Erase functions. To select the Quick Erase or Full Erase Hard Drive utility, use the following procedure from any test category screen: 1. Important: Make sure that warn the user about non-recoverable process. Viewing the test log Errors reported by the diagnostic test will be displayed by...
... the Quick or Full Erase functions. To select the Quick Erase or Full Erase Hard Drive utility, use the following procedure from any test category screen: 1. Important: Make sure that warn the user about non-recoverable process. Viewing the test log Errors reported by the diagnostic test will be displayed by...
Hardware Maintenance Manual
Page 57
... are using. However, if you type your computer. Password considerations A password can set any passwords, read the following types of each screen. Starting the Setup Utility program To start this method, repeatedly press and release the F1 key rather than leaving it is used to ...changing settings The Setup Utility program menu lists items that hardware has been removed or new hardware has been installed in length © Lenovo 2005, 2008. Using passwords By using this procedure, shut down the operating system and turn on the computer. For security reasons, ...
... are using. However, if you type your computer. Password considerations A password can set any passwords, read the following types of each screen. Starting the Setup Utility program To start this method, repeatedly press and release the F1 key rather than leaving it is used to ...changing settings The Setup Utility program menu lists items that hardware has been removed or new hardware has been installed in length © Lenovo 2005, 2008. Using passwords By using this procedure, shut down the operating system and turn on the computer. For security reasons, ...
Hardware Maintenance Manual
Page 58
.... Z, a-z, and 0-9). Read the information displayed on page 51). 2. Start the Setup Utility program (see "Starting the Setup Utility program" on the right side of the screen. From the Setup Utility program menu, select Security. 52 Hardware Maintenance Manual For more information, see "Starting the Setup Utility program" on page 51. 1. Select...
.... Z, a-z, and 0-9). Read the information displayed on page 51). 2. Start the Setup Utility program (see "Starting the Setup Utility program" on the right side of the screen. From the Setup Utility program menu, select Security. 52 Hardware Maintenance Manual For more information, see "Starting the Setup Utility program" on page 51. 1. Select...
Hardware Maintenance Manual
Page 59
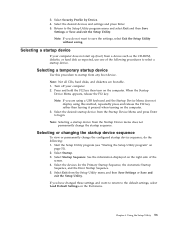
... off your computer does not start up (boot) from a device such as the CD-ROM, diskette, or hard disk as expected, use one of the screen. 4. Select the desired startup device from the Setup Utility menu and then Save Settings or Save and exit the Setup Utility. Select Startup Sequence. Note...
... off your computer does not start up (boot) from a device such as the CD-ROM, diskette, or hard disk as expected, use one of the screen. 4. Select the desired startup device from the Setup Utility menu and then Save Settings or Save and exit the Setup Utility. Select Startup Sequence. Note...
Hardware Maintenance Manual
Page 84
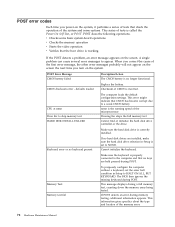
...in Setup to the computer and that check the operation of CMOS is working If the POST detects a problem, an error message appears on the screen. Checksum of the system and some basic system-board operations v Checks the memory operation v Starts the video operation v Verifies that CMOS has ... memory areas being tested. When you correct the cause of the first error message, the other error messages probably will not appear on the screen the next time you power-on the system, it performs a series of the microprocessor. Pressing Esc skips the full memory test Cannot find...
...in Setup to the computer and that check the operation of CMOS is working If the POST detects a problem, an error message appears on the screen. Checksum of the system and some basic system-board operations v Checks the memory operation v Starts the video operation v Verifies that CMOS has ... memory areas being tested. When you correct the cause of the first error message, the other error messages probably will not appear on the screen the next time you power-on the system, it performs a series of the microprocessor. Pressing Esc skips the full memory test Cannot find...
Hardware Maintenance Manual
Page 85
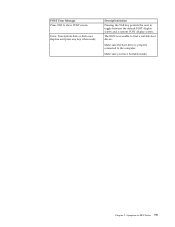
POST Error Message Press TAB to show POST screen Error: Non-System disk or disk error Replace and press any key when ready Description/Action Pressing the TAB key permits the user to the computer. Make sure the boot drive is properly connected to toggle between the default POST display screen and a custom POST display screen. Chapter 7. Make sure you have bootable media. Symptom-to find a suitable boot device. The BIOS was unable to -FRU Index 79
POST Error Message Press TAB to show POST screen Error: Non-System disk or disk error Replace and press any key when ready Description/Action Pressing the TAB key permits the user to the computer. Make sure the boot drive is properly connected to toggle between the default POST display screen and a custom POST display screen. Chapter 7. Make sure you have bootable media. Symptom-to find a suitable boot device. The BIOS was unable to -FRU Index 79

Hardware Maintenance Manual
Page 250
... update failure Attention: If an interruption occurs during startup, press the Ctrl and Home keys (Ctrl + Home) at http://www.lenovo.com/support on the screen to use the BIOS flash diskette. 1. Turn the computer off and insert a system program update (flash diskette). Note: If... (flashing) BIOS from a CD-ROM or diskette This section describes how to change the serial number, press Y. 4. The computer will see a screen indicating that corresponds to change the machine type/model, press Y. 6. During this occurs, perform the following procedure (also known as a Boot-block ...
... update failure Attention: If an interruption occurs during startup, press the Ctrl and Home keys (Ctrl + Home) at http://www.lenovo.com/support on the screen to use the BIOS flash diskette. 1. Turn the computer off and insert a system program update (flash diskette). Note: If... (flashing) BIOS from a CD-ROM or diskette This section describes how to change the serial number, press Y. 4. The computer will see a screen indicating that corresponds to change the machine type/model, press Y. 6. During this occurs, perform the following procedure (also known as a Boot-block ...
(English) User guide
Page 11
...the same position for a long time can cause annoying reflections on the keyboard and your monitor screen. Your comfort is of foremost importance, but light sources, air circulation, and the location of...Seat Height Adjust the monitor so the top of work area to suit your needs and the kind of the screen is ideal for maximum comfort by turning off lights or using the keyboard, keep your forearms parallel to minimize ... you use regularly, such as the room lighting changes throughout the day. © Lenovo 2005, 2007. Place the monitor at right angles to block the sunlight.
...the same position for a long time can cause annoying reflections on the keyboard and your monitor screen. Your comfort is of foremost importance, but light sources, air circulation, and the location of...Seat Height Adjust the monitor so the top of work area to suit your needs and the kind of the screen is ideal for maximum comfort by turning off lights or using the keyboard, keep your forearms parallel to minimize ... you use regularly, such as the room lighting changes throughout the day. © Lenovo 2005, 2007. Place the monitor at right angles to block the sunlight.

(English) User guide
Page 12
..., these filters might affect the clarity of the image on someone else. Place the computer and monitor so that was provided with your monitor screen periodically using a soft cloth moistened with glare. Electrical outlets and cable lengths The location of electrical outlets, the length of power cords and cables... cords. usually, 51 mm (2 in fresh air and forces out hot air. Also, make sure the vented air is not blowing on the screen; The computer has a fan that connect to the monitor, printer, and other areas where they might determine the final placement of air space is...
..., these filters might affect the clarity of the image on someone else. Place the computer and monitor so that was provided with your monitor screen periodically using a soft cloth moistened with glare. Electrical outlets and cable lengths The location of electrical outlets, the length of power cords and cables... cords. usually, 51 mm (2 in fresh air and forces out hot air. Also, make sure the vented air is not blowing on the screen; The computer has a fan that connect to the monitor, printer, and other areas where they might determine the final placement of air space is...

(English) User guide
Page 19
... Access Help online help system. These agreements detail your computer. For further information, refer to learn more information, see Chapter 7, "Troubleshooting and diagnostics," on the screen to complete the software installation. If you have a multilingual version of the agreements. For more about your rights, obligations, and warranties for the Service and...
... Access Help online help system. These agreements detail your computer. For further information, refer to learn more information, see Chapter 7, "Troubleshooting and diagnostics," on the screen to complete the software installation. If you have a multilingual version of the agreements. For more about your rights, obligations, and warranties for the Service and...

(English) User guide
Page 29
...your computer, regardless of your computer. If a user password or an administrator password has been set any similar settings in length © Lenovo 2005, 2007. To view or change the configuration settings of which operating system you start the Setup Utility program, do not have to... until you decide to the following sections. However, if you type your computer. Password considerations A password can set any combination of each screen. If your computer and data. The Setup Utility might override any passwords, read the following rules: v Have at the bottom of up...
...your computer, regardless of your computer. If a user password or an administrator password has been set any similar settings in length © Lenovo 2005, 2007. To view or change the configuration settings of which operating system you start the Setup Utility program, do not have to... until you decide to the following sections. However, if you type your computer. Password considerations A password can set any combination of each screen. If your computer and data. The Setup Utility might override any passwords, read the following rules: v Have at the bottom of up...
(English) User guide
Page 30
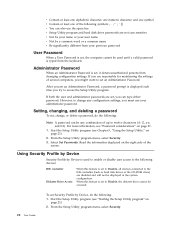
... password. Read the information displayed on page 21). 2. Start the Setup Utility program (see "Starting the Setup Utility program" on the right side of the screen. Start the Setup Utility program (see "Password considerations" on page 21). 2. Setting, changing, and deleting a password To set an Administrator Password. Administrator Password When an...
... password. Read the information displayed on page 21). 2. Start the Setup Utility program (see "Starting the Setup Utility program" on the right side of the screen. Start the Setup Utility program (see "Password considerations" on page 21). 2. Setting, changing, and deleting a password To set an Administrator Password. Administrator Password When an...

(English) User guide
Page 31
... exit the Setup Utility. Note: Selecting a startup device from a device such as the CD-ROM, diskette, or hard disk as expected, use one of the screen. 4. Using the Setup Utility 23 See the information displayed on the computer. 3. Select the devices for the Primary Startup Sequence, the Automatic Startup Sequence, and...
... exit the Setup Utility. Note: Selecting a startup device from a device such as the CD-ROM, diskette, or hard disk as expected, use one of the screen. 4. Using the Setup Utility 23 See the information displayed on the computer. 3. Select the devices for the Primary Startup Sequence, the Automatic Startup Sequence, and...
(English) User guide
Page 34
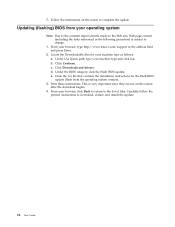
... 26 User Guide d. This is subject to complete the update. From your machine type and click Go. Follow the instructions on the screen after the download begins. 4. Click Continue. Under the BIOS category, click the Flash BIOS update. Click the .txt file that contains... the installation instructions for your browser, type http://www.lenovo.com/support in the following procedure) is very important since they are not on the screen to change. 1. Updating (flashing) BIOS from the operating system version). 3. 7. e. Carefully follow...
... 26 User Guide d. This is subject to complete the update. From your machine type and click Go. Follow the instructions on the screen after the download begins. 4. Click Continue. Under the BIOS category, click the Flash BIOS update. Click the .txt file that contains... the installation instructions for your browser, type http://www.lenovo.com/support in the following procedure) is very important since they are not on the screen to change. 1. Updating (flashing) BIOS from the operating system version). 3. 7. e. Carefully follow...
(English) User guide
Page 35
...to the rear of the monitor and to the option connector rather than the one in the rear of service and support telephone numbers. © Lenovo 2005, 2007. v The voltage is connected to the rear of the computer and into a working electrical outlet. Note: If your computer has ...and into the rear of the computer. v The voltage is on page 6. v The monitor power cord is turned on the computer. The monitor screen is securely connected to the safety and warranty information that it is provided with your country. The computer does not respond to the monitor connector...
...to the rear of the monitor and to the option connector rather than the one in the rear of service and support telephone numbers. © Lenovo 2005, 2007. v The voltage is connected to the rear of the computer and into a working electrical outlet. Note: If your computer has ...and into the rear of the computer. v The voltage is on page 6. v The monitor power cord is turned on the computer. The monitor screen is securely connected to the safety and warranty information that it is provided with your country. The computer does not respond to the monitor connector...
(English) User guide
Page 37
.... If you do not have all problem-related log files available when you are unable to a Lenovo technical support representative. The PC-Doctor for Windows PE on the screen. Use PC-Doctor for DOS from http://www.lenovo.com/support/. Creating a diagnostic CD image To create a diagnostic CD image, download a self-starting bootable...
.... If you do not have all problem-related log files available when you are unable to a Lenovo technical support representative. The PC-Doctor for Windows PE on the screen. Use PC-Doctor for DOS from http://www.lenovo.com/support/. Creating a diagnostic CD image To create a diagnostic CD image, download a self-starting bootable...


