
User Manual
Page 5
... 49 Updating (flashing) BIOS from the Setup Utility program . . . . . 48 Chapter 6. Setting up your computer . . 3 Connecting your computer 3 Turning on the system board . . . . . 23 Installing memory 24 Installing PCI adapters 25 Installing internal drives 26 Drive specifications 27 Installing a drive in bay 2 28 Installing a diskette drive in the startup sequence . . 43... the startup device sequence . . . . 47 Advanced settings 48 Exiting from your computer 18 Obtaining device drivers 19 Opening the cover 20 Locating components 21 © Lenovo 2005, 2007.
... 49 Updating (flashing) BIOS from the Setup Utility program . . . . . 48 Chapter 6. Setting up your computer . . 3 Connecting your computer 3 Turning on the system board . . . . . 23 Installing memory 24 Installing PCI adapters 25 Installing internal drives 26 Drive specifications 27 Installing a drive in bay 2 28 Installing a diskette drive in the startup sequence . . 43... the startup device sequence . . . . 47 Advanced settings 48 Exiting from your computer 18 Obtaining device drivers 19 Opening the cover 20 Locating components 21 © Lenovo 2005, 2007.

User Manual
Page 9
... or other circuit boards by the edges. Static electricity prevention Static electricity, although harmless to let the computer cool before opening the cover. Handle adapters, memory modules, and other metal surface. Movement can cause static electricity to build up around you , can cause damage to avoid static-electricity damage: v Limit your...
... or other circuit boards by the edges. Static electricity prevention Static electricity, although harmless to let the computer cool before opening the cover. Handle adapters, memory modules, and other metal surface. Movement can cause static electricity to build up around you , can cause damage to avoid static-electricity damage: v Limit your...
User Manual
Page 29
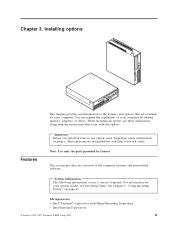
.... You can expand the capabilities of your specific model, use these instructions along with the instructions that come with HyperThreading Technology v Intel Pentium D processor © Lenovo 2005, 2007. Installing options This chapter provides an introduction to the features and options that are available for your computer by...
.... You can expand the capabilities of your specific model, use these instructions along with the instructions that come with HyperThreading Technology v Intel Pentium D processor © Lenovo 2005, 2007. Installing options This chapter provides an introduction to the features and options that are available for your computer by...

User Manual
Page 30
v Intel Celeron® D processor v Intel Core™ 2 Duo processor v Internal cache (size varies by model type) Memory v Support for two double data rate 2 dual inline memory modules (DDR2 DIMMs) v Flash memory for system programs (varies by model type) Internal drives v 3.5-inch, half-inch (slim) diskette drive (some models) v Serial Advanced Technology Attachment (SATA) internal...
v Intel Celeron® D processor v Intel Core™ 2 Duo processor v Internal cache (size varies by model type) Memory v Support for two double data rate 2 dual inline memory modules (DDR2 DIMMs) v Flash memory for system programs (varies by model type) Internal drives v 3.5-inch, half-inch (slim) diskette drive (some models) v Serial Advanced Technology Attachment (SATA) internal...

User Manual
Page 32
... modems and digital cameras - Serial port devices, such as an integrated cable lock - System memory, called dual inline memory modules (DIMMs) - Hard disk drive For the latest information about available options, see the Lenovo Web site at http://www.lenovo.com/ or contact your reseller or marketing representative. 14 User Guide Available options The...
... modems and digital cameras - Serial port devices, such as an integrated cable lock - System memory, called dual inline memory modules (DIMMs) - Hard disk drive For the latest information about available options, see the Lenovo Web site at http://www.lenovo.com/ or contact your reseller or marketing representative. 14 User Guide Available options The...

User Manual
Page 34
... unpainted metal surface on the computer for certain options. Never touch any exposed circuitry. Movement can seriously damage computer components and options. Handle adapters and memory modules by the edges. Supported operating positions To provide proper air flow to avoid static electricity damage: v Limit your computer in your body. 16 User...
... unpainted metal surface on the computer for certain options. Never touch any exposed circuitry. Movement can seriously damage computer components and options. Handle adapters and memory modules by the edges. Supported operating positions To provide proper air flow to avoid static electricity damage: v Limit your computer in your body. 16 User...
User Manual
Page 39
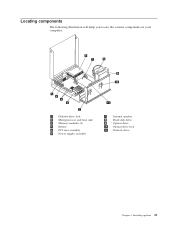
Locating components The following illustration will help you locate the various components in your computer. 1 Diskette drive lock 2 Microprocessor and heat sink 3 Memory modules (2) 4 Battery 5 PCI riser assembly 6 Power supply assembly 7 Internal speaker 8 Hard disk drive 9 Optical drive 10 Optical drive lock 11 Diskette drive Chapter 3. Installing options 21
Locating components The following illustration will help you locate the various components in your computer. 1 Diskette drive lock 2 Microprocessor and heat sink 3 Memory modules (2) 4 Battery 5 PCI riser assembly 6 Power supply assembly 7 Internal speaker 8 Hard disk drive 9 Optical drive 10 Optical drive lock 11 Diskette drive Chapter 3. Installing options 21

User Manual
Page 40
Pivot the drive bay assembly upward as memory, the battery, and to access system board components such as illustrated. If any cables that you note the location of any PCI adapters are installed, ...
Pivot the drive bay assembly upward as memory, the battery, and to access system board components such as illustrated. If any cables that you note the location of any PCI adapters are installed, ...
User Manual
Page 41
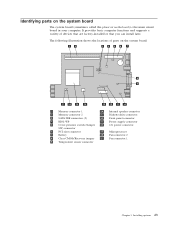
... the locations of devices that are factory-installed or that you can install later. Installing options 23 Identifying parts on the system board. 1 Memory connector 1 10 Internal speaker connector 2 Memory connector 2 11 Diskette drive connector 3 SATA IDE connectors (2) 12 Front panel connector 4 BIOS WP 13 Power supply connector 5 Cover presence switch (Tamper...
... the locations of devices that are factory-installed or that you can install later. Installing options 23 Identifying parts on the system board. 1 Memory connector 1 10 Internal speaker connector 2 Memory connector 2 11 Diskette drive connector 3 SATA IDE connectors (2) 12 Front panel connector 4 BIOS WP 13 Power supply connector 5 Cover presence switch (Tamper...

User Manual
Page 42
... board components and drives" on page 20. 2. Position the memory module over the memory connector. Open the retaining clips. 5. Access the system board. Make sure that provide up to a maximum of 4.0 GB of 4.0 GB. When installing memory modules, the following rules apply: v Use 1.8 V, 240-pin..., double data rate 2 synchronous dynamic random access memory (DDR2 SDRAM). Note: Only DDR2 SDRAM DIMMs can be used. Reinstall the PCI riser...
... board components and drives" on page 20. 2. Position the memory module over the memory connector. Open the retaining clips. 5. Access the system board. Make sure that provide up to a maximum of 4.0 GB of 4.0 GB. When installing memory modules, the following rules apply: v Use 1.8 V, 240-pin..., double data rate 2 synchronous dynamic random access memory (DDR2 SDRAM). Note: Only DDR2 SDRAM DIMMs can be used. Reinstall the PCI riser...

User Manual
Page 51
... turn on the computer. Chapter 3. Go to set a password. Password protection To deter unauthorized use of memory that maintains the date, time, and settings for normal use the Setup Utility program to http://www.lenovo.com/support/ and search on Kensington. A battery keeps this information active when you can use . Installing options..., time, and configuration information (including passwords) are prompted to type the password to open the computer cover. When you can order a security cable directly from Lenovo.
... turn on the computer. Chapter 3. Go to set a password. Password protection To deter unauthorized use of memory that maintains the date, time, and settings for normal use the Setup Utility program to http://www.lenovo.com/support/ and search on Kensington. A battery keeps this information active when you can use . Installing options..., time, and configuration information (including passwords) are prompted to type the password to open the computer cover. When you can order a security cable directly from Lenovo.

User Manual
Page 63
...when turning on when you hear multiple beeps, release the F1 key. Strong passwords typically adhere to set any passwords, read -only memory (EEPROM) of each screen. Chapter 5. However, the operating-system settings might start automatically when POST detects that identify system configuration ...to set any passwords to perform various tasks are available: v User Password v Administrator Password You do the following rules: © Lenovo 2005, 2007. However, if you must use a strong password that cannot be any similar settings in the electrically erasable programmable read...
...when turning on when you hear multiple beeps, release the F1 key. Strong passwords typically adhere to set any passwords, read -only memory (EEPROM) of each screen. Chapter 5. However, the operating-system settings might start automatically when POST detects that identify system configuration ...to set any passwords to perform various tasks are available: v User Password v Administrator Password You do the following rules: © Lenovo 2005, 2007. However, if you must use a strong password that cannot be any similar settings in the electrically erasable programmable read...

User Manual
Page 67
... and procedures that the computer hardware can easily update POST, BIOS, and the Setup Utility program by running a special update program from http://www.lenovo.com to change the serial number, press Y. 5. POST is a set of your computer. You can understand. Insert a system program update (flash... is included with the update files. Instructions for using a flash update diskette or by starting bootable CD image (known as flash memory). Type in a .txt file that is a layer of software that translates instructions from the operating system. Portions © IBM Corp. 2005....
... and procedures that the computer hardware can easily update POST, BIOS, and the Setup Utility program by running a special update program from http://www.lenovo.com to change the serial number, press Y. 5. POST is a set of your computer. You can understand. Insert a system program update (flash... is included with the update files. Instructions for using a flash update diskette or by starting bootable CD image (known as flash memory). Type in a .txt file that is a layer of software that translates instructions from the operating system. Portions © IBM Corp. 2005....

User Manual
Page 83
... five seconds of the four telephone numbers (n=0-3) stored in either upper or lower case, but not mixed. Command) Force modem on-hook (hang up) © Lenovo 2005, 2007. Portions © IBM Corp. 2005. 65 Commands can be sent to Command Mode after dialing Dial one of silence flash return to your... lists commands for Australia, New Zealand, Norway, and South Africa. Commands are echoed Escape Characters - All commands can be typed in the modem non-volatile memory. Command A A/ D_ L P T W , @ ! ; Your modem is in Command Mode. Do not precede A/ with AT or follow with ENTER...
... five seconds of the four telephone numbers (n=0-3) stored in either upper or lower case, but not mixed. Command) Force modem on-hook (hang up) © Lenovo 2005, 2007. Portions © IBM Corp. 2005. 65 Commands can be sent to Command Mode after dialing Dial one of silence flash return to your... lists commands for Australia, New Zealand, Norway, and South Africa. Commands are echoed Escape Characters - All commands can be typed in the modem non-volatile memory. Command A A/ D_ L P T W , @ ! ; Your modem is in Command Mode. Do not precede A/ with AT or follow with ENTER...

User Manual
Page 84
... Guide Function Force modem off-hook (make busy) Note: H1 command is not supported for Italy Display product-identification code Factory ROM checksum test Internal memory test Firmware ID Reserved ID Low speaker volume Low speaker volume Medium speaker volume High speaker volume Internal speaker off Internal speaker on until carrier...
... Guide Function Force modem off-hook (make busy) Note: H1 command is not supported for Italy Display product-identification code Factory ROM checksum test Internal memory test Firmware ID Reserved ID Low speaker volume Low speaker volume Medium speaker volume High speaker volume Internal speaker off Internal speaker on until carrier...
User Manual
Page 93
Portions © IBM Corp. 2005. drives bays 27 internal 26 specifications 27 dual inline memory modules (DIMMs) 24 E environment, operating 15 Ethernet 12 Ethernet connector 19 exiting, Setup Utility 48 expansion adapters 13 external options 17 F features 11 H...resources 61 input/output (I/O) features 12 installing operating system 9 software 8 installing options adapters 25 internal drives 26 memory modules 24 security features 32 internal drives 12 L Lenovo Web site 62 locating components 21 M memory installing 24 modem commands Basic AT 65 Extended AT 67 Fax Class 1 69 Fax Class 2 69 MNP/V.42...
Portions © IBM Corp. 2005. drives bays 27 internal 26 specifications 27 dual inline memory modules (DIMMs) 24 E environment, operating 15 Ethernet 12 Ethernet connector 19 exiting, Setup Utility 48 expansion adapters 13 external options 17 F features 11 H...resources 61 input/output (I/O) features 12 installing operating system 9 software 8 installing options adapters 25 internal drives 26 memory modules 24 security features 32 internal drives 12 L Lenovo Web site 62 locating components 21 M memory installing 24 modem commands Basic AT 65 Extended AT 67 Fax Class 1 69 Fax Class 2 69 MNP/V.42...

User Manual
Page 94
... 47 temporary startup device 47 serial connector 19 Setup Utility 45 software installing 8 system board components, accessing 22 connectors 23 identifying parts 23 location 23 memory 14, 24 system management 12 system programs 49 76 User Guide T ThinkVantage Productivity Center 61 trademarks 74 troubleshooting 53 U updating antivirus software 9 operating system 9 updating...
... 47 temporary startup device 47 serial connector 19 Setup Utility 45 software installing 8 system board components, accessing 22 connectors 23 identifying parts 23 location 23 memory 14, 24 system management 12 system programs 49 76 User Guide T ThinkVantage Productivity Center 61 trademarks 74 troubleshooting 53 U updating antivirus software 9 operating system 9 updating...


