
Safety and Warranty guide
Page 17
Power supply statement Never remove the cover on a power supply or any component that connect to external antennas and cable/CATV systems. If local codes are intended to those that has the following . Users and installers in North America. Laser radiation when open. Products with one of the National Electrical Code (NEC) that provides guidelines for proper grounding and, in particular, specifies that the cable ground...
Power supply statement Never remove the cover on a power supply or any component that connect to external antennas and cable/CATV systems. If local codes are intended to those that has the following . Users and installers in North America. Laser radiation when open. Products with one of the National Electrical Code (NEC) that provides guidelines for proper grounding and, in particular, specifies that the cable ground...
Safety and Warranty guide
Page 28
...61 2 8003 8200. The warranty period for the product starts on the original date of warranty service that you a remedy under normal use and conditions during the warranty period. Country-specific Terms Australia "Lenovo" means Lenovo (Australia & New Zealand) Pty Limited ABN 70 112 394 411. THE BENEFITS...JURISDICTION. If the product fails due to a covered defect during the warranty period, Lenovo will provide you purchase is free from defects in materials and workmanship under this Warranty Covers: Lenovo warrants that each hardware product that apply to your sales receipt or ...
...61 2 8003 8200. The warranty period for the product starts on the original date of warranty service that you a remedy under normal use and conditions during the warranty period. Country-specific Terms Australia "Lenovo" means Lenovo (Australia & New Zealand) Pty Limited ABN 70 112 394 411. THE BENEFITS...JURISDICTION. If the product fails due to a covered defect during the warranty period, Lenovo will provide you purchase is free from defects in materials and workmanship under this Warranty Covers: Lenovo warrants that each hardware product that apply to your sales receipt or ...
Safety and Warranty guide
Page 29
... replaced by contacting Lenovo. The following replaces the same section in Part 1: Limitation of Liability: Lenovo is responsible for loss or damage to your information to access your property. Products and parts presented for repair may not be new, but it will not be used to the Privacy Act 1988 by refurbished products or parts of the same type rather than being repaired...
... replaced by contacting Lenovo. The following replaces the same section in Part 1: Limitation of Liability: Lenovo is responsible for loss or damage to your information to access your property. Products and parts presented for repair may not be new, but it will not be used to the Privacy Act 1988 by refurbished products or parts of the same type rather than being repaired...

Lenovo H515s Hardware Maintenance Manual
Page 5
...the keyboard and mouse 28 Removing the computer cover 28 Removing the front bezel 29 Replacing an optical drive 30 Replacing the hard disk drive 32 Replacing a memory module 33 Replacing the adapter 34 Replacing the graphic card 35 Replacing the microprocessor fan 37 Replacing the heat-sink 37 Replacing the Wi-Fi card 38 Replacing the front USB/card reader/audio module 39 Replacing the motherboard 40 Chapter 9. Using the Setup Utility. . . 13 Starting the Lenovo BIOS Setup Utility program . 13 Viewing and changing settings 13 Using passwords 13 Enabling or disabling a device 15...
...the keyboard and mouse 28 Removing the computer cover 28 Removing the front bezel 29 Replacing an optical drive 30 Replacing the hard disk drive 32 Replacing a memory module 33 Replacing the adapter 34 Replacing the graphic card 35 Replacing the microprocessor fan 37 Replacing the heat-sink 37 Replacing the Wi-Fi card 38 Replacing the front USB/card reader/audio module 39 Replacing the motherboard 40 Chapter 9. Using the Setup Utility. . . 13 Starting the Lenovo BIOS Setup Utility program . 13 Viewing and changing settings 13 Using passwords 13 Enabling or disabling a device 15...

Lenovo H515s Hardware Maintenance Manual
Page 19
... the computer. Viewing and changing settings System configuration options are not case sensitive © Copyright Lenovo 2013 13 Chapter 5. However, if you are available: • Administrator Password • Power-On Password You do the following types of which operating system you decide to view and change settings, see "Using passwords." Starting the Lenovo BIOS Setup Utility program To start this procedure, shut down the operating system and turn on when you type your previous...
... the computer. Viewing and changing settings System configuration options are not case sensitive © Copyright Lenovo 2013 13 Chapter 5. However, if you are available: • Administrator Password • Power-On Password You do the following types of which operating system you decide to view and change settings, see "Using passwords." Starting the Lenovo BIOS Setup Utility program To start this procedure, shut down the operating system and turn on when you type your previous...

Lenovo H515s Hardware Maintenance Manual
Page 21
... USB keyboard and/or USB mouse may prevent the system from booting. This option allows you type the new password correctly, the new password will be displayed. To set Power-On Password, do the following : 1. Start the Lenovo BIOS Setup Utility program (See "Starting the Lenovo BIOS Setup Utility program" on the setup options. From the Security menu, select Set Power-On Password and press the Enter key. 3. To change a Power-On Password, do the following: 1. Start the Lenovo BIOS Setup Utility program (See "Starting the Lenovo BIOS Setup Utility program" on how the hard disk image...
... USB keyboard and/or USB mouse may prevent the system from booting. This option allows you type the new password correctly, the new password will be displayed. To set Power-On Password, do the following : 1. Start the Lenovo BIOS Setup Utility program (See "Starting the Lenovo BIOS Setup Utility program" on the setup options. From the Security menu, select Set Power-On Password and press the Enter key. 3. To change a Power-On Password, do the following: 1. Start the Lenovo BIOS Setup Utility program (See "Starting the Lenovo BIOS Setup Utility program" on how the hard disk image...

Lenovo H515s Hardware Maintenance Manual
Page 22
... startup device from a server image. Return to enable or disable load onboard PXE (Preboot Execution Environment), or SMC (Secure Managed Client). Use ↑ and ↓ arrows to begin. a headphone or a microphone) are bootable. 1. Start the Setup Utility program (see "Starting the Setup Utility program" on the computer. 3. Turn off your computer does not boot from a device such as the CD/DVD-ROM drive disk or hard disk as , press the Enter key and then select SATA mode...
... startup device from a server image. Return to enable or disable load onboard PXE (Preboot Execution Environment), or SMC (Secure Managed Client). Use ↑ and ↓ arrows to begin. a headphone or a microphone) are bootable. 1. Start the Setup Utility program (see "Starting the Setup Utility program" on the computer. 3. Turn off your computer does not boot from a device such as the CD/DVD-ROM drive disk or hard disk as , press the Enter key and then select SATA mode...

Lenovo H515s Hardware Maintenance Manual
Page 26
... Error Message Keyboard error Reboot and Select proper Boot device or Insert Boot Media in selected Boot device Description/Action Cannot initialize the keyboard. a. Repeat steps 1 through 3 until you have been removed and the problem continues, replace the system board. 20 Lenovo H515sHardware Maintenance Manual The BIOS then ignores the missing keyboard during POST. Hard disk drive f. To purposely configure the computer without a keyboard, select Keyboardless operation in the boot device. The BIOS was unable to Enabled. Undetermined problems 1. Make sure the boot drive...
... Error Message Keyboard error Reboot and Select proper Boot device or Insert Boot Media in selected Boot device Description/Action Cannot initialize the keyboard. a. Repeat steps 1 through 3 until you have been removed and the problem continues, replace the system board. 20 Lenovo H515sHardware Maintenance Manual The BIOS then ignores the missing keyboard during POST. Hard disk drive f. To purposely configure the computer without a keyboard, select Keyboardless operation in the boot device. The BIOS was unable to Enabled. Undetermined problems 1. Make sure the boot drive...

Lenovo H515s Hardware Maintenance Manual
Page 28
Optical Drive (selected models only) 7. Headphone connector 6. Hard disk drive indicator 8. Memory card reader (selected models only) 3. USB connectors 4. Power button 2. Optical drive eject button 5. Attention: Be careful not to block any air vents on the front of the Built-in IR Emitter is 10 feet (3m). 22 Lenovo H515sHardware Maintenance Manual Blocked air vents can cause overheating. 1. Font view The following illustration shows the location of controls and components on the computer. Microphone connector Attention: The effective range of the computer.
Optical Drive (selected models only) 7. Headphone connector 6. Hard disk drive indicator 8. Memory card reader (selected models only) 3. USB connectors 4. Power button 2. Optical drive eject button 5. Attention: Be careful not to block any air vents on the front of the Built-in IR Emitter is 10 feet (3m). 22 Lenovo H515sHardware Maintenance Manual Blocked air vents can cause overheating. 1. Font view The following illustration shows the location of controls and components on the computer. Microphone connector Attention: The effective range of the computer.
Lenovo H5s Series User Guide
Page 12
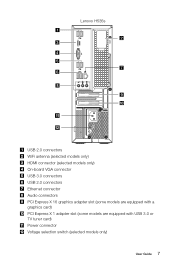
Lenovo H535s 11 12 USB 2.0 connectors WiFi antenna (selected models only) HDMI connector (selected models only) On-board VGA connector USB 3.0 connectors USB 2.0 connectors Ethernet connector Audio connectors PCI Express X 16 graphics adapter slot (some models are equipped with a graphics card) PCI Express X 1 adapter slot (some models are equipped with USB 3.0 or TV tuner card) Power connector Voltage selection switch (selected models only) User Guide 7
Lenovo H535s 11 12 USB 2.0 connectors WiFi antenna (selected models only) HDMI connector (selected models only) On-board VGA connector USB 3.0 connectors USB 2.0 connectors Ethernet connector Audio connectors PCI Express X 16 graphics adapter slot (some models are equipped with a graphics card) PCI Express X 1 adapter slot (some models are equipped with USB 3.0 or TV tuner card) Power connector Voltage selection switch (selected models only) User Guide 7

Lenovo H5s Series User Guide
Page 35
... are two boot modes: UEFI and Legacy. To open the Windows Help and Support file, do I need to start the BIOS setup utility? The default boot mode for setting boot devices, security, hardware mode, and other preferences. You can I start the Setup Utility program. The legacy Windows operating system cannot be installed if you don't change the boot mode? Repeatedly press and release the F1 key once turning on the computer to install a legacy Windows operating system (any operating system before Windows 8) on your...
... are two boot modes: UEFI and Legacy. To open the Windows Help and Support file, do I need to start the BIOS setup utility? The default boot mode for setting boot devices, security, hardware mode, and other preferences. You can I start the Setup Utility program. The legacy Windows operating system cannot be installed if you don't change the boot mode? Repeatedly press and release the F1 key once turning on the computer to install a legacy Windows operating system (any operating system before Windows 8) on your...
Lenovo H5s Series User Guide
Page 39
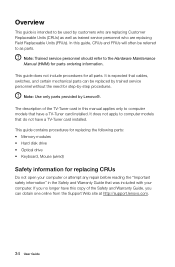
... for replacing the following parts: • Memory modules • Hard disk drive • Optical drive • Keyboard, Mouse (wired) Safety information for replacing CRUs Do not open your computer. Note: Use only parts provided by trained service personnel without the need for all parts. The description of the Safety and Warranty Guide, you no longer have this copy of the TV-Tuner card in the Safety and Warranty Guide that cables, switches, and...
... for replacing the following parts: • Memory modules • Hard disk drive • Optical drive • Keyboard, Mouse (wired) Safety information for replacing CRUs Do not open your computer. Note: Use only parts provided by trained service personnel without the need for all parts. The description of the Safety and Warranty Guide, you no longer have this copy of the TV-Tuner card in the Safety and Warranty Guide that cables, switches, and...

Lenovo H5s Series User Guide
Page 42
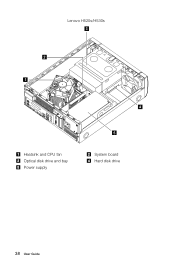
Lenovo H505s/H515s 3 2 1 4 Heatsink and CPU fan Optical disk drive and bay System board Hard disk drive User Guide 37 Internal components The following illustrations show the components inside your computer.
Lenovo H505s/H515s 3 2 1 4 Heatsink and CPU fan Optical disk drive and bay System board Hard disk drive User Guide 37 Internal components The following illustrations show the components inside your computer.
Lenovo H5s Series User Guide
Page 43
Lenovo H520s/H530s 3 2 1 Heatsink and CPU fan Optical disk drive and bay Power supply 4 5 System board Hard disk drive 38 User Guide
Lenovo H520s/H530s 3 2 1 Heatsink and CPU fan Optical disk drive and bay Power supply 4 5 System board Hard disk drive 38 User Guide

Lenovo H5s Series User Guide
Page 56
... HMM, go to the Support Web site at http://support.lenovo.com. Reattach it in the Hardware Maintenance Manual (HMM) for the computer. Refer to "Removing the front bezel". 13. User Guide 51 Install the new hard disk drive. (1) Insert the new hard disk drive into the drive bay. (2) Screw back the 4 screws on the drive bay. 9. Replacing a memory module Attention: Do not remove the computer cover or attempt any repair before reading the "Important...
... HMM, go to the Support Web site at http://support.lenovo.com. Reattach it in the Hardware Maintenance Manual (HMM) for the computer. Refer to "Removing the front bezel". 13. User Guide 51 Install the new hard disk drive. (1) Insert the new hard disk drive into the drive bay. (2) Screw back the 4 screws on the drive bay. 9. Replacing a memory module Attention: Do not remove the computer cover or attempt any repair before reading the "Important...

Lenovo H5s Series User Guide
Page 12
Lenovo H535s 11 12 USB 2.0 connectors WiFi antenna (selected models only) HDMI connector (selected models only) On-board VGA connector USB 3.0 connectors USB 2.0 connectors Ethernet connector Audio connectors PCI Express X 16 graphics adapter slot (some models are equipped with a graphics card) PCI Express X 1 adapter slot (some models are equipped with USB 3.0 or TV tuner card) Power connector Voltage selection switch (selected models only) User Guide 7
Lenovo H535s 11 12 USB 2.0 connectors WiFi antenna (selected models only) HDMI connector (selected models only) On-board VGA connector USB 3.0 connectors USB 2.0 connectors Ethernet connector Audio connectors PCI Express X 16 graphics adapter slot (some models are equipped with a graphics card) PCI Express X 1 adapter slot (some models are equipped with USB 3.0 or TV tuner card) Power connector Voltage selection switch (selected models only) User Guide 7

Lenovo H5s Series User Guide
Page 39
... procedures for replacing the following parts: • Memory modules • Hard disk drive • Optical drive • Keyboard, Mouse (wired) Safety information for step-by customers who are replacing Customer Replaceable Units (CRUs) as well as parts. It does not apply to be used by -step procedures. It is intended to computer models that do not have a TV-Tuner card installed. Overview This guide is expected that cables, switches, and certain...
... procedures for replacing the following parts: • Memory modules • Hard disk drive • Optical drive • Keyboard, Mouse (wired) Safety information for step-by customers who are replacing Customer Replaceable Units (CRUs) as well as parts. It does not apply to be used by -step procedures. It is intended to computer models that do not have a TV-Tuner card installed. Overview This guide is expected that cables, switches, and certain...

Lenovo H5s Series User Guide
Page 42
Internal components The following illustrations show the components inside your computer. Lenovo H505s/H515s 3 2 1 4 Heatsink and CPU fan Optical disk drive and bay System board Hard disk drive User Guide 37
Internal components The following illustrations show the components inside your computer. Lenovo H505s/H515s 3 2 1 4 Heatsink and CPU fan Optical disk drive and bay System board Hard disk drive User Guide 37

Lenovo H5s Series User Guide
Page 43
Lenovo H520s/H530s 3 2 1 Heatsink and CPU fan Optical disk drive and bay Power supply 4 5 System board Hard disk drive 38 User Guide
Lenovo H520s/H530s 3 2 1 Heatsink and CPU fan Optical disk drive and bay Power supply 4 5 System board Hard disk drive 38 User Guide

Lenovo H5s Series User Guide
Page 56
Attach the data and power cables to the chassis with your computer or in . Reattach it in the Hardware Maintenance Manual (HMM) for the computer. Replacing a memory module Attention: Do not remove the computer cover or attempt any repair before reading the "Important safety information" in the Safety and Warranty Guide that secure the hard disk drive to the bay. 7. Line up the hard disk drive bay, then...
Attach the data and power cables to the chassis with your computer or in . Reattach it in the Hardware Maintenance Manual (HMM) for the computer. Replacing a memory module Attention: Do not remove the computer cover or attempt any repair before reading the "Important safety information" in the Safety and Warranty Guide that secure the hard disk drive to the bay. 7. Line up the hard disk drive bay, then...


