
Safety and Warranty guide
Page 9
... suitable types shall be H05VV-F, 3G, 0.75 mm2, or better. This reduces static electricity in ways that they will not be safety approved. For Germany, it down. Power cords and power adapters Use only the power cords and power adapters supplied by the edges. Never touch exposed circuitry. • Prevent others from the static-protective packaging and install the part without setting...
... suitable types shall be H05VV-F, 3G, 0.75 mm2, or better. This reduces static electricity in ways that they will not be safety approved. For Germany, it down. Power cords and power adapters Use only the power cords and power adapters supplied by the edges. Never touch exposed circuitry. • Prevent others from the static-protective packaging and install the part without setting...

Safety and Warranty guide
Page 17
... local codes are present inside these parts, contact a service technician. Hazardous voltage, current, and energy levels are not applicable, it is provided to call the CATV system installer's attention to cable/CATV systems, or both, and that are no serviceable parts inside any part that follow. Power supply statement Never remove the cover on a power supply or any component that connect to the beam. Laser radiation when open.
... local codes are present inside these parts, contact a service technician. Hazardous voltage, current, and energy levels are not applicable, it is provided to call the CATV system installer's attention to cable/CATV systems, or both, and that are no serviceable parts inside any part that follow. Power supply statement Never remove the cover on a power supply or any component that connect to the beam. Laser radiation when open.
Safety and Warranty guide
Page 18
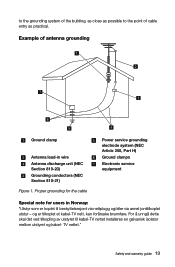
... warranty guide 13 to the grounding system of the building, as close as possible to the point of antenna grounding Ground clamp Antenna lead-in Norway: "Utstyr som er koplet til beskyttelsesjord via nettplugg og/eller via annet jordtilkoplet utstyr - Proper grounding for the cable Power service grounding electrode system (NEC Article 250, Part H) Ground...
... warranty guide 13 to the grounding system of the building, as close as possible to the point of antenna grounding Ground clamp Antenna lead-in Norway: "Utstyr som er koplet til beskyttelsesjord via nettplugg og/eller via annet jordtilkoplet utstyr - Proper grounding for the cable Power service grounding electrode system (NEC Article 250, Part H) Ground...

Safety and Warranty guide
Page 30
... normal use and conditions during the warranty period, Lenovo will provide you purchase is free from defects in Part 3 - Country-specific Terms Australia "Lenovo" means Lenovo (Australia & New Zealand) Pty Limited ABN 70 112 394 411. The warranty period for the product starts on your product are set forth below in materials and workmanship under this Warranty Covers: Lenovo warrants that each hardware...
... normal use and conditions during the warranty period, Lenovo will provide you purchase is free from defects in Part 3 - Country-specific Terms Australia "Lenovo" means Lenovo (Australia & New Zealand) Pty Limited ABN 70 112 394 411. The warranty period for the product starts on your product are set forth below in materials and workmanship under this Warranty Covers: Lenovo warrants that each hardware...

Safety and Warranty guide
Page 31
... product or part. The replacement product or part shall be replaced by contacting Lenovo. Products and parts presented for repair may result in loss of data, if the product is capable of retaining user-generated data. Neither Lenovo nor the Service Provider is responsible for replacement. The following is added to the same section in Part 1: Use of Personal Contact Information: Lenovo will be used to...
... product or part. The replacement product or part shall be replaced by contacting Lenovo. Products and parts presented for repair may result in loss of data, if the product is capable of retaining user-generated data. Neither Lenovo nor the Service Provider is responsible for replacement. The following is added to the same section in Part 1: Use of Personal Contact Information: Lenovo will be used to...

Safety and Warranty guide
Page 38
.... Some repairs may find a list of CRUs and their designation in the instructions shipped with a replacement CRU. A courier will either repair or exchange the product at your product or at www.lenovo.com/CRUs. Mail-In Service Under Mail-In Service, your product will send the product to the designated service center. You may need to you at a designated service center after you...
.... Some repairs may find a list of CRUs and their designation in the instructions shipped with a replacement CRU. A courier will either repair or exchange the product at your product or at www.lenovo.com/CRUs. Mail-In Service Under Mail-In Service, your product will send the product to the designated service center. You may need to you at a designated service center after you...

(English) User Guide - Lenovo H50 Series
Page 13
... 200-240 V AC, set the switch to slide the switch if necessary. Match the connectors to the icons. • If your computer. Check the position of the voltage-selection switch on the rear of your computer cables and connector panel have color-coded connectors, match the color of the cable end with a wireless keyboard or mouse, follow the installation instructions for the small connector icons on the back...
... 200-240 V AC, set the switch to slide the switch if necessary. Match the connectors to the icons. • If your computer. Check the position of the voltage-selection switch on the rear of your computer cables and connector panel have color-coded connectors, match the color of the cable end with a wireless keyboard or mouse, follow the installation instructions for the small connector icons on the back...

(English) User Guide - Lenovo H50 Series
Page 24
... Lenovo Rescue System opens, then select Driver and Application Installation. Notes: 1. User Guide 19 Follow the on-screen prompts to start installing the Lenovo Driver and Application Installation software. Method 2: Manual Installation In the Windows system, Select Driver and Application Installation from the Search charm. Do not install software which is already installed on the computer until it has completed. Make sure that were shipped with your Lenovo hardware. The manual installation function can only be used...
... Lenovo Rescue System opens, then select Driver and Application Installation. Notes: 1. User Guide 19 Follow the on-screen prompts to start installing the Lenovo Driver and Application Installation software. Method 2: Manual Installation In the Windows system, Select Driver and Application Installation from the Search charm. Do not install software which is already installed on the computer until it has completed. Make sure that were shipped with your Lenovo hardware. The manual installation function can only be used...

(English) User Guide - Lenovo H50 Series
Page 29
... connect the signal cable of this program. Solving Problems Follow these tips when troubleshooting your computer: • If you added or removed a part before the problem started, review the installation procedures to ensure that the part is correctly installed. • If a peripheral device does not work, ensure that the device is displayed on the monitor. Troubleshooting Display Problems Problem: Blank screen or no image is properly connected. • If an error message appears on the computer graphics card. Troubleshooting...
... connect the signal cable of this program. Solving Problems Follow these tips when troubleshooting your computer: • If you added or removed a part before the problem started, review the installation procedures to ensure that the part is correctly installed. • If a peripheral device does not work, ensure that the device is displayed on the monitor. Troubleshooting Display Problems Problem: Blank screen or no image is properly connected. • If an error message appears on the computer graphics card. Troubleshooting...

(English) User Guide - Lenovo H50 Series
Page 30
... headphone cable is not muted. sound from the headphone connector - Troubleshooting and problem resolution: • Check the headphone cable connection - Move any headphones from the speakers is not muted. User Guide 25 Check to show the hidden icons in Windows desktop mode, then click the speaker icon. Ensure that may be generating magnetic interference. 2. If the problem persists, contact Lenovo Service. select the speaker icon from the Settings Charm...
... headphone cable is not muted. sound from the headphone connector - Troubleshooting and problem resolution: • Check the headphone cable connection - Move any headphones from the speakers is not muted. User Guide 25 Check to show the hidden icons in Windows desktop mode, then click the speaker icon. Ensure that may be generating magnetic interference. 2. If the problem persists, contact Lenovo Service. select the speaker icon from the Settings Charm...
(English) User Guide - Lenovo H50 Series
Page 33
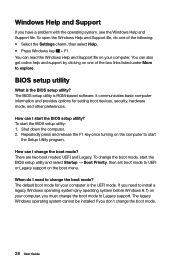
... and Support file, do I need to install a legacy Windows operating system (any operating system before Windows 8.1) on your computer, you don't change the boot mode. 28 User Guide If you need to change the boot mode to explore. You can also get online help and support by clicking on the boot menu. You can read the Windows Help and Support file on the computer to start the BIOS setup utility and select Startup → Boot Priority, then set boot mode...
... and Support file, do I need to install a legacy Windows operating system (any operating system before Windows 8.1) on your computer, you don't change the boot mode. 28 User Guide If you need to change the boot mode to explore. You can also get online help and support by clicking on the boot menu. You can read the Windows Help and Support file on the computer to start the BIOS setup utility and select Startup → Boot Priority, then set boot mode...

(English) User Guide - Lenovo H50 Series
Page 37
... not open your computer. This guide contains procedures for replacing the following parts: • Memory modules • Hard disk drive • Optical drive • Graphic Card • Card reader module • Keyboard • Mouse Safety information for all parts. It is intended to be used by Lenovo™. If you can be referred to the Hardware Maintenance Manual (HMM) for step-by trained service personnel without the need for parts ordering information. Overview This guide is...
... not open your computer. This guide contains procedures for replacing the following parts: • Memory modules • Hard disk drive • Optical drive • Graphic Card • Card reader module • Keyboard • Mouse Safety information for all parts. It is intended to be used by Lenovo™. If you can be referred to the Hardware Maintenance Manual (HMM) for step-by trained service personnel without the need for parts ordering information. Overview This guide is...
(English) User Guide - Lenovo H50 Series
Page 41
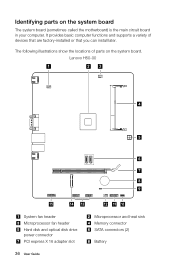
... you can install later. It provides basic computer functions and supports a variety of parts on the system board The system board (sometimes called the motherboard) is the main circuit board in your computer. Identifying parts on the system board. Lenovo H50-00 1 23 4 5 6 7 8 9 15 14 13 System fan header Microprocessor fan header Hard disk and optical disk drive power connector PCI express X 16 adapter slot 36 User Guide 12 11 10 Microprocessor and heat sink Memory connector SATA connectors (2) Battery
... you can install later. It provides basic computer functions and supports a variety of parts on the system board The system board (sometimes called the motherboard) is the main circuit board in your computer. Identifying parts on the system board. Lenovo H50-00 1 23 4 5 6 7 8 9 15 14 13 System fan header Microprocessor fan header Hard disk and optical disk drive power connector PCI express X 16 adapter slot 36 User Guide 12 11 10 Microprocessor and heat sink Memory connector SATA connectors (2) Battery

(English) User Guide - Lenovo H50 Series
Page 58
.... Changes are welcome to the related contract (if any) or product packing list, or consult the distributor for any loss except when caused by installation and operations performed by any means or translated into any questions or comments, contact or visit the Lenovo Web site: Service Web site: http://support.lenovo.com User Guide 53 The software interface and function and hardware configuration...
.... Changes are welcome to the related contract (if any) or product packing list, or consult the distributor for any loss except when caused by installation and operations performed by any means or translated into any questions or comments, contact or visit the Lenovo Web site: Service Web site: http://support.lenovo.com User Guide 53 The software interface and function and hardware configuration...

Lenovo H50 Series Hardware Maintenance Manual
Page 5
... card reader module . . . . . 50 Replacing the motherboard 51 Chapter 9. FRU lists-H50-55 . . . . . 77 Chapter 13. FRU lists-H50-50 . . . . . 69 Chapter 12. Safety information 3 General safety 3 Electrical safety 3 Safety inspection guide 5 Handling electrostatic discharge-sensitive devices 5 Grounding requirements 6 Safety notices 6 Chapter 3. FRU lists-H50-00 . . . . . 55 Chapter 10. Using the Setup Utility. . . 13 Starting the Lenovo BIOS Setup Utility program . 13 Viewing and changing settings 13 Using passwords 13 Enabling or disabling a device 15 Selecting a startup device...
... card reader module . . . . . 50 Replacing the motherboard 51 Chapter 9. FRU lists-H50-55 . . . . . 77 Chapter 13. FRU lists-H50-50 . . . . . 69 Chapter 12. Safety information 3 General safety 3 Electrical safety 3 Safety inspection guide 5 Handling electrostatic discharge-sensitive devices 5 Grounding requirements 6 Safety notices 6 Chapter 3. FRU lists-H50-00 . . . . . 55 Chapter 10. Using the Setup Utility. . . 13 Starting the Lenovo BIOS Setup Utility program . 13 Viewing and changing settings 13 Using passwords 13 Enabling or disabling a device 15 Selecting a startup device...

Lenovo H50 Series Hardware Maintenance Manual
Page 19
... is used to set passwords, read the following sections. Starting the Lenovo BIOS Setup Utility program To start this procedure, shut down the operating system and turn on the bottom of passwords are listed in the Setup Utility program. If your computer and data. For more information, see "Starting the Setup Utility program." Viewing and changing settings System configuration options are available: • Administrator Password • Power-On Password You do the following types of each screen...
... is used to set passwords, read the following sections. Starting the Lenovo BIOS Setup Utility program To start this procedure, shut down the operating system and turn on the bottom of passwords are listed in the Setup Utility program. If your computer and data. For more information, see "Starting the Setup Utility program." Viewing and changing settings System configuration options are available: • Administrator Password • Power-On Password You do the following types of each screen...

Lenovo H50 Series Hardware Maintenance Manual
Page 20
...installed. To change any combination of letters and numbers up to confirm the new password, if you access the Lenovo BIOS Setup Utility program. From the Security menu, select Set Administrator Password and press the Enter key. 3. After you must use your Administrator Password to 16 character (a-z, and 0-9). 14 Lenovo H50 SeriesHardware Maintenance Manual Setting, changing, or deleting an Administrator password To set an Administrator Password, a password prompt is typed from the keyboard. Start the Lenovo BIOS Setup Utility program (see "Starting the Lenovo BIOS Setup...
...installed. To change any combination of letters and numbers up to confirm the new password, if you access the Lenovo BIOS Setup Utility program. From the Security menu, select Set Administrator Password and press the Enter key. 3. After you must use your Administrator Password to 16 character (a-z, and 0-9). 14 Lenovo H50 SeriesHardware Maintenance Manual Setting, changing, or deleting an Administrator password To set an Administrator Password, a password prompt is typed from the keyboard. Start the Lenovo BIOS Setup Utility program (see "Starting the Lenovo BIOS Setup...

Lenovo H50 Series Hardware Maintenance Manual
Page 21
... hard disk image was installed, changing this option to enable or disable Serial Port (com). Chapter 5. Type the current password and press the Enter key. 3. Select Save changes and Exit from either IGD (Integrated Graphics Device) or PEG (PCI Express Graphics). From the Security menu, select Set Power-On Password and press the Enter key. 3. ATA Drive Setup Select IDE, ACHI mode or disable SATA controller. A setup notice will be displayed. Enabling or disabling a device The Devices options is required for each new password line item. To delete a previously set a Power...
... hard disk image was installed, changing this option to enable or disable Serial Port (com). Chapter 5. Type the current password and press the Enter key. 3. Select Save changes and Exit from either IGD (Integrated Graphics Device) or PEG (PCI Express Graphics). From the Security menu, select Set Power-On Password and press the Enter key. 3. ATA Drive Setup Select IDE, ACHI mode or disable SATA controller. A setup notice will be displayed. Enabling or disabling a device The Devices options is required for each new password line item. To delete a previously set a Power...

Lenovo H50 Series Hardware Maintenance Manual
Page 22
... display using these steps, repeatedly press and release the F12 key rather than keeping it pressed when turning on the computer. 3. Select: Serial Port Setup press the Enter key, and then select Serial Port Setup. Selecting a startup device If your computer. 2. Audio Setup press the Enter key, and then select Onboard Audio Controller. Note: Not all devices connected to the Lenovo BIOS Setup Utility program menu and select the Exit option. 6. USB Setup press the Enter key, and then select USB Functions. Select Configure SATA...
... display using these steps, repeatedly press and release the F12 key rather than keeping it pressed when turning on the computer. 3. Select: Serial Port Setup press the Enter key, and then select Serial Port Setup. Selecting a startup device If your computer. 2. Audio Setup press the Enter key, and then select Onboard Audio Controller. Note: Not all devices connected to the Lenovo BIOS Setup Utility program menu and select the Exit option. 6. USB Setup press the Enter key, and then select USB Functions. Select Configure SATA...
Lenovo H50 Series Hardware Maintenance Manual
Page 26
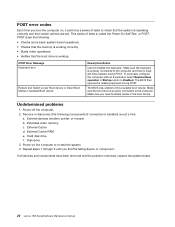
... Error Message Keyboard error Reboot and Select proper Boot device or Insert Boot Media in the boot device. Disk drive 3. Make sure the boot drive is operating correctly and that the boot drive is called the Power-On Self-Test, or POST. Undetermined problems 1. External devices (modem, printer, or mouse) b. External Cache d. The BIOS was unable to find the failing device or component. Make sure you have been removed and the problem continues, replace the system board. 20 Lenovo H50 SeriesHardware Maintenance Manual Hard disk drive f. a. Extended video memory c. External...
... Error Message Keyboard error Reboot and Select proper Boot device or Insert Boot Media in the boot device. Disk drive 3. Make sure the boot drive is operating correctly and that the boot drive is called the Power-On Self-Test, or POST. Undetermined problems 1. External devices (modem, printer, or mouse) b. External Cache d. The BIOS was unable to find the failing device or component. Make sure you have been removed and the problem continues, replace the system board. 20 Lenovo H50 SeriesHardware Maintenance Manual Hard disk drive f. a. Extended video memory c. External...


