Lenovo G460/G560 User Guide V1.0
Page 5
...statement of compliance 64 EU WEEE statements 65 Japan recycling statements 65 Notice for your computer 17 Connecting external devices 18 Chapter 3. Lenovo limited warranty ..... 48 Warranty information 52 Appendix D. Features and specifications 115 Trademarks 116 Index 117 i OneKey Rescue system ..........25 ...hard disk drive 33 Replacing memory 35 Removing the optical drive 37 Appendix A. Learning the basics 9 First use 9 Using AC adapter and battery 11 Using the touchpad 12 Using the keyboard 13 Special keys and buttons 15 System status indicators 16 Securing your...
...statement of compliance 64 EU WEEE statements 65 Japan recycling statements 65 Notice for your computer 17 Connecting external devices 18 Chapter 3. Lenovo limited warranty ..... 48 Warranty information 52 Appendix D. Features and specifications 115 Trademarks 116 Index 117 i OneKey Rescue system ..........25 ...hard disk drive 33 Replacing memory 35 Removing the optical drive 37 Appendix A. Learning the basics 9 First use 9 Using AC adapter and battery 11 Using the touchpad 12 Using the keyboard 13 Special keys and buttons 15 System status indicators 16 Securing your...
Lenovo G460/G560 User Guide V1.0
Page 6
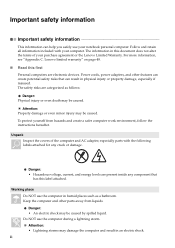
...an electric shock. ii Important safety information Important safety information This information can help you safely use your purchase agreement or the Lenovo Limited Warranty. Lenovo limited warranty" on page 48. „ Read this first Personal computers are categorized as a bathroom. Danger: •... any component that can create potential safety risks that has this document does not alter the terms of the computer and AC adapter, especially parts with your computer. Do NOT use the computer in this label attached. The safety risks are electronic devices...
...an electric shock. ii Important safety information Important safety information This information can help you safely use your purchase agreement or the Lenovo Limited Warranty. Lenovo limited warranty" on page 48. „ Read this first Personal computers are categorized as a bathroom. Danger: •... any component that can create potential safety risks that has this document does not alter the terms of the computer and AC adapter, especially parts with your computer. Do NOT use the computer in this label attached. The safety risks are electronic devices...

Lenovo G460/G560 User Guide V1.0
Page 13
... over extended periods of time may damage your computer Right-side view ab c de a Microphone jack b Headphone jack Connect to an external headphones. e AC power adapter jack Connect the AC adapter here. c Optical drive Read/Burn optical disks. Connect to an external microphones. Note: For details, see "Connecting a universal serial bus (USB) device" on...
... over extended periods of time may damage your computer Right-side view ab c de a Microphone jack b Headphone jack Connect to an external headphones. e AC power adapter jack Connect the AC adapter here. c Optical drive Read/Burn optical disks. Connect to an external microphones. Note: For details, see "Connecting a universal serial bus (USB) device" on...
Lenovo G460/G560 User Guide V1.0
Page 15
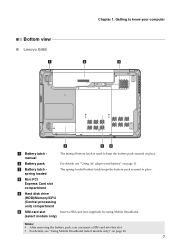
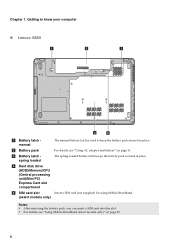
...: • After removing the battery pack, you can insert a SIM card into this slot. • For details, see "Using AC adapter and battery" on page 22. 7 Getting to know your computer Bottom view „ Lenovo G460 a b c d ef a Battery latch manual The manual battery latch is used to keep the battery pack secured in...
...: • After removing the battery pack, you can insert a SIM card into this slot. • For details, see "Using AC adapter and battery" on page 22. 7 Getting to know your computer Bottom view „ Lenovo G460 a b c d ef a Battery latch manual The manual battery latch is used to keep the battery pack secured in...
Lenovo G460/G560 User Guide V1.0
Page 16
...) Notes: • After removing the battery pack, you can insert a SIM card into this slot. • For details, see "Using AC adapter and battery" on page 22. 8 Getting to know your computer „ Lenovo G560 a b c 1 2 d e a Battery latch manual The manual battery latch is used to keep the battery pack secured in place. c Battery latch...
...) Notes: • After removing the battery pack, you can insert a SIM card into this slot. • For details, see "Using AC adapter and battery" on page 22. 8 Getting to know your computer „ Lenovo G560 a b c 1 2 d e a Battery latch manual The manual battery latch is used to keep the battery pack secured in place. c Battery latch...
Lenovo G460/G560 User Guide V1.0
Page 17
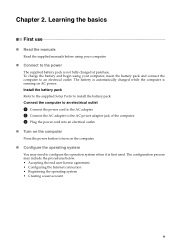
... to an electrical outlet 1 Connect the power cord to the AC adapter. 2 Connect the AC adapter to the AC power adapter jack of the computer. 3 Plug the power cord into an electrical outlet. „ Turn on the computer Press the power button to turn on AC power. Install the battery pack Refer to the supplied Setup Poster...
... to an electrical outlet 1 Connect the power cord to the AC adapter. 2 Connect the AC adapter to the AC power adapter jack of the computer. 3 Plug the power cord into an electrical outlet. „ Turn on the computer Press the power button to turn on AC power. Install the battery pack Refer to the supplied Setup Poster...
Lenovo G460/G560 User Guide V1.0
Page 19
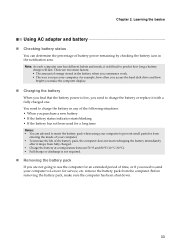
... factors: • The amount of time, or if you need to Lenovo for example, how often you access the hard disk drive and how bright you make sure the computer has been shut down. 11 Learning the basics Using AC adapter and battery „ Checking battery status You can determine the percentage of...
... factors: • The amount of time, or if you need to Lenovo for example, how often you access the hard disk drive and how bright you make sure the computer has been shut down. 11 Learning the basics Using AC adapter and battery „ Checking battery status You can determine the percentage of...
Lenovo G460/G560 User Guide V1.0
Page 30
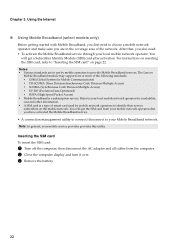
... Mobile Broadband services. You will get the SIM card from the computer. 2 Close the computer display and turn it over. 3 Remove the battery. 22 The Lenovo Mobile Broadband module may support one or more of smart card used by mobile operators to identify their service subscribers on page 22. Inserting the... have activated the Mobile Broadband service. • A connection management utility to connect/disconnect to "Inserting the SIM card" on the mobile network. then disconnect the AC adapter and all cables from your Mobile Broadband network.
... Mobile Broadband services. You will get the SIM card from the computer. 2 Close the computer display and turn it over. 3 Remove the battery. 22 The Lenovo Mobile Broadband module may support one or more of smart card used by mobile operators to identify their service subscribers on page 22. Inserting the... have activated the Mobile Broadband service. • A connection management utility to connect/disconnect to "Inserting the SIM card" on the mobile network. then disconnect the AC adapter and all cables from your Mobile Broadband network.
Lenovo G460/G560 User Guide V1.0
Page 32
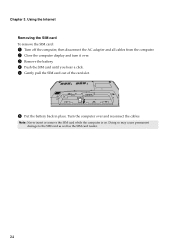
Doing so may cause permanent damage to the SIM card as well as the SIM card reader. 24 Turn the computer over . 3 Remove the battery. 4 Push the SIM card until you hear a click. 5 Gently pull the SIM card out of the card slot. 6 Put the battery back in place. Using the Internet Removing the SIM card To remove the SIM card: 1 Turn off the computer, then disconnect the AC adapter and all cables from the computer. 2 Close the computer display and turn it over and reconnect the cables. Chapter 3. Note: Never insert or remove the SIM card while the computer is on.
Doing so may cause permanent damage to the SIM card as well as the SIM card reader. 24 Turn the computer over . 3 Remove the battery. 4 Push the SIM card until you hear a click. 5 Gently pull the SIM card out of the card slot. 6 Put the battery back in place. Using the Internet Removing the SIM card To remove the SIM card: 1 Turn off the computer, then disconnect the AC adapter and all cables from the computer. 2 Close the computer display and turn it over and reconnect the cables. Chapter 3. Note: Never insert or remove the SIM card while the computer is on.
Lenovo G460/G560 User Guide V1.0
Page 33
... be used to back up the data on the desktop to utilize the features of operating system and preinstalled software). „ Using Lenovo OneKey Recovery (Within Windows operating system) In Windows operating system, double click the OneKey Recovery System Icon on your system partition to ... system) In the event that you can run Lenovo OneKey Recovery under the Windows operating system, and the OneKey Rescue system without an integrated optical drive support the creation of recovery discs may take some time, connect the AC adapter and battery pack to your computer. • Press...
... be used to back up the data on the desktop to utilize the features of operating system and preinstalled software). „ Using Lenovo OneKey Recovery (Within Windows operating system) In Windows operating system, double click the OneKey Recovery System Icon on your system partition to ... system) In the event that you can run Lenovo OneKey Recovery under the Windows operating system, and the OneKey Rescue system without an integrated optical drive support the creation of recovery discs may take some time, connect the AC adapter and battery pack to your computer. • Press...
Lenovo G460/G560 User Guide V1.0
Page 36
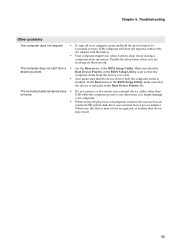
...your password. Press Fn+F2 to have the computer serviced. Do one of your computer to a Lenovo authorized servicer or a marketing representative to have the hard disk drive replaced. The AC adapter is connected to the computer and the power cord is blank, make sure that might negate the ... to exit from the screen saver or to the original factory contents using screen. Chapter 5. If you do not find your computer to a Lenovo authorized servicer or a marketing representative to confirm whether the LCD screen has been turned off. Press the power button. - You must take your...
...your password. Press Fn+F2 to have the computer serviced. Do one of your computer to a Lenovo authorized servicer or a marketing representative to have the hard disk drive replaced. The AC adapter is connected to the computer and the power cord is blank, make sure that might negate the ... to exit from the screen saver or to the original factory contents using screen. Chapter 5. If you do not find your computer to a Lenovo authorized servicer or a marketing representative to confirm whether the LCD screen has been turned off. Press the power button. - You must take your...
Lenovo G460/G560 User Guide V1.0
Page 37
... color quality are installed and configured correctly, have the computer serviced. If they are correctly set. - If you are using the AC adapter, or using 32-bit color mode, change the color depth to resume operation. Troubleshooting Sleep or hibernation problems The critical low-battery ... to create overlay window," appears when you are using the battery, and the battery status indicator is still not reset, remove the AC adapter and the battery. If you try to make the screen brighter. - Unsaved data may have the computer serviced. Incorrect characters appear ...
... color quality are installed and configured correctly, have the computer serviced. If they are correctly set. - If you are using the AC adapter, or using 32-bit color mode, change the color depth to resume operation. Troubleshooting Sleep or hibernation problems The critical low-battery ... to create overlay window," appears when you are using the battery, and the battery status indicator is still not reset, remove the AC adapter and the battery. If you try to make the screen brighter. - Unsaved data may have the computer serviced. Incorrect characters appear ...
Lenovo G460/G560 User Guide V1.0
Page 39
... device does • Do not connect or disconnect any external device cables other than not work. If the computer still does not respond, remove the AC adapter and the battery. • Your computer might damage your computer, press and hold the power button for 4 seconds or more. The computer does not start...; To turn off your computer. • When using a high power consumption external devices such as an external USB optical disk drive, use external device power adapter. Make sure that the computer starts from which the computer starts is enabled.
... device does • Do not connect or disconnect any external device cables other than not work. If the computer still does not respond, remove the AC adapter and the battery. • Your computer might damage your computer, press and hold the power button for 4 seconds or more. The computer does not start...; To turn off your computer. • When using a high power consumption external devices such as an external USB optical disk drive, use external device power adapter. Make sure that the computer starts from which the computer starts is enabled.
Lenovo G460/G560 User Guide V1.0
Page 40
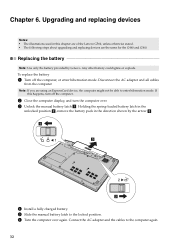
If this chapter are of the Lenovo G560, unless otherwise stated. • The following steps about upgrading and replacing devices are using an ExpressCard device, the computer might not be able to enter hibernation mode. Connect the AC adapter and the cables to the locked position. 6 Turn the ... over . 3 Unlock the manual battery latch a. Replacing the battery Note: Use only the battery provided by the arrow c. Disconnect the AC adapter and all cables from the computer. Holding the spring-loaded battery latch in the unlocked position b, remove the battery pack in this happens,...
If this chapter are of the Lenovo G560, unless otherwise stated. • The following steps about upgrading and replacing devices are using an ExpressCard device, the computer might not be able to enter hibernation mode. Connect the AC adapter and the cables to the locked position. 6 Turn the ... over . 3 Unlock the manual battery latch a. Replacing the battery Note: Use only the battery provided by the arrow c. Disconnect the AC adapter and all cables from the computer. Holding the spring-loaded battery latch in the unlocked position b, remove the battery pack in this happens,...
Lenovo G460/G560 User Guide V1.0
Page 41
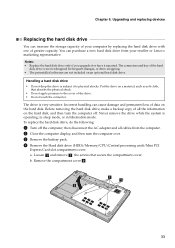
...pack. 4 Remove the Hard disk drive (HDD)/Memory/CPU (Central processing unit)/Mini PCI Express Card slot compartment cover. then disconnect the AC adapter and all the information on an optional hard disk drive. a a' b 33 Upgrading and replacing devices Replacing the hard disk drive You... can increase the storage capacity of your reseller or Lenovo marketing representative. Never remove the drive while the system is very sensitive. Chapter 6. You can cause damage and permanent loss of greater...
...pack. 4 Remove the Hard disk drive (HDD)/Memory/CPU (Central processing unit)/Mini PCI Express Card slot compartment cover. then disconnect the AC adapter and all the information on an optional hard disk drive. a a' b 33 Upgrading and replacing devices Replacing the hard disk drive You... can increase the storage capacity of your reseller or Lenovo marketing representative. Never remove the drive while the system is very sensitive. Chapter 6. You can cause damage and permanent loss of greater...
Lenovo G460/G560 User Guide V1.0
Page 42
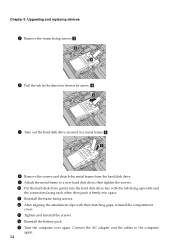
... computer again. 34 D Reinstall the battery pack. E Turn the computer over again. C Tighten and reinstall the screws. c c 6 Pull the tab in a metal frame e. Connect the AC adapter and the cables to a new hard disk drive; then tighten the screws. 0 Put the hard disk drive gently into space. d 7 Take out the hard disk...
... computer again. 34 D Reinstall the battery pack. E Turn the computer over again. C Tighten and reinstall the screws. c c 6 Pull the tab in a metal frame e. Connect the AC adapter and the cables to a new hard disk drive; then tighten the screws. 0 Put the hard disk drive gently into space. d 7 Take out the hard disk...
Lenovo G460/G560 User Guide V1.0
Page 43
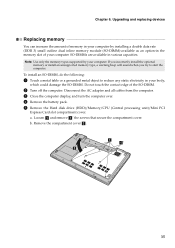
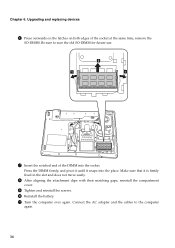
... secure the compartment cover. To install an SO-DIMM, do the following: 1 Touch a metal table or a grounded metal object to start the computer. Disconnect the AC adapter and all cables from the computer. 3 Close the computer display, and turn the computer over. 4 Remove the battery pack. 5 Remove the Hard disk drive (HDD...
... secure the compartment cover. To install an SO-DIMM, do the following: 1 Touch a metal table or a grounded metal object to start the computer. Disconnect the AC adapter and all cables from the computer. 3 Close the computer display, and turn the computer over. 4 Remove the battery pack. 5 Remove the Hard disk drive (HDD...
Lenovo G460/G560 User Guide V1.0
Page 44
.... 0 Reinstall the battery. A Turn the computer over again. b a a 7 Insert the notched end of the socket at the same time, remove the SO-DIMM. Connect the AC adapter and the cables to save the old SO-DIMM for future use. Upgrading and replacing devices 6 Press outwards on the latches on both edges of...
.... 0 Reinstall the battery. A Turn the computer over again. b a a 7 Insert the notched end of the socket at the same time, remove the SO-DIMM. Connect the AC adapter and the cables to save the old SO-DIMM for future use. Upgrading and replacing devices 6 Press outwards on the latches on both edges of...
Lenovo G460/G560 User Guide V1.0
Page 46
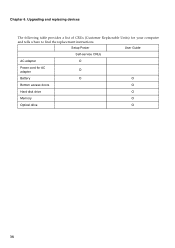
Setup Poster User Guide Self-service CRUs AC adapter O Power cord for your computer and tells where to find the replacement instructions. Chapter 6. Upgrading and replacing devices The following table provides a list of CRUs (Customer Replaceable Units) for AC adapter O Battery O O Bottom access doors O Hard disk drive O Memory O Optical drive O 38
Setup Poster User Guide Self-service CRUs AC adapter O Power cord for your computer and tells where to find the replacement instructions. Chapter 6. Upgrading and replacing devices The following table provides a list of CRUs (Customer Replaceable Units) for AC adapter O Battery O O Bottom access doors O Hard disk drive O Memory O Optical drive O 38
Lenovo G460/G560 User Guide V1.0
Page 51
...; Carry your computer by the bottom. When this is in your car, place it on the back seat to avoid being insolated. • Carry the AC adapter and power cord with the computer. „ Handle storage media and drives properly • If your computer comes with an optical drive, do not touch...
...; Carry your computer by the bottom. When this is in your car, place it on the back seat to avoid being insolated. • Carry the AC adapter and power cord with the computer. „ Handle storage media and drives properly • If your computer comes with an optical drive, do not touch...


