
Lenovo G460/G560 User Guide V1.0
Page 7
... extended length of fire. Attention: • Stressing the cord may cause the cord to be damaged or corroded. Attention: • Extended contact with the computer. Turn off wireless devices where they may block the ventilation slots causing overheating of your computer or other part of your lap, or any cracking, hissing...
... extended length of fire. Attention: • Stressing the cord may cause the cord to be damaged or corroded. Attention: • Extended contact with the computer. Turn off wireless devices where they may block the ventilation slots causing overheating of your computer or other part of your lap, or any cracking, hissing...

Lenovo G460/G560 User Guide V1.0
Page 11
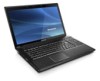
... Rescue system (If OneKey Rescue system has been preinstalled) when the computer is powered off. f Energy Press this button to turn on page 25. e Power button Press this button to open Lenovo Energy Management software. The built-in microphone (with noise reduction) can be used for video communication. (select models only) b Wireless...
... Rescue system (If OneKey Rescue system has been preinstalled) when the computer is powered off. f Energy Press this button to turn on page 25. e Power button Press this button to open Lenovo Energy Management software. The built-in microphone (with noise reduction) can be used for video communication. (select models only) b Wireless...

Lenovo G460/G560 User Guide V1.0
Page 14
c Memory card slot Insert memory cards (not supplied) here. (select models only) Note: For details, see "System status indicators" on page 16. b System status indicators For details, see "Using memory cards (not supplied)" on your computer. Chapter 1. Getting to know your computer Front view a b c a Integrated wireless device switch Use this switch to turn on/off the wireless radio of all wireless devices on page 18. 6
c Memory card slot Insert memory cards (not supplied) here. (select models only) Note: For details, see "System status indicators" on page 16. b System status indicators For details, see "Using memory cards (not supplied)" on your computer. Chapter 1. Getting to know your computer Front view a b c a Integrated wireless device switch Use this switch to turn on/off the wireless radio of all wireless devices on page 18. 6
Lenovo G460/G560 User Guide V1.0
Page 17
... the AC adapter to the AC power adapter jack of the computer. 3 Plug the power cord into an electrical outlet. „ Turn on the computer Press the power button to turn on AC power. To charge the battery and begin using your computer, insert the battery pack and connect the computer to...
... the AC adapter to the AC power adapter jack of the computer. 3 Plug the power cord into an electrical outlet. „ Turn on the computer Press the power button to turn on AC power. To charge the battery and begin using your computer, insert the battery pack and connect the computer to...
Lenovo G460/G560 User Guide V1.0
Page 22
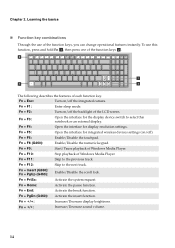
...Skip to the previous track. Fn + / : Increase/Decrease display brightness. Fn + F10: Stop playback of Windows Media Player. Fn + Esc: Turn on /off the integrated camera. Fn + F3: Open the interface for integrated wireless devices settings (on /off ). Fn + F11: Skip to the... next track. Fn + PrtSc: Activate the system request. Fn + PgDn (G460): Activate the insert function. Fn + Insert (G560): Fn + PgUp (G460): Enable/Disable the scroll lock. Fn + End: Activate the break function. Fn + / : Increase/Decrease sound volume. 14 Fn...
...Skip to the previous track. Fn + / : Increase/Decrease display brightness. Fn + F10: Stop playback of Windows Media Player. Fn + Esc: Turn on /off the integrated camera. Fn + F3: Open the interface for integrated wireless devices settings (on /off ). Fn + F11: Skip to the... next track. Fn + PrtSc: Activate the system request. Fn + PgDn (G460): Activate the insert function. Fn + Insert (G560): Fn + PgUp (G460): Enable/Disable the scroll lock. Fn + End: Activate the break function. Fn + / : Increase/Decrease sound volume. 14 Fn...
Lenovo G460/G560 User Guide V1.0
Page 27
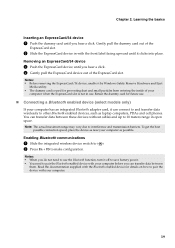
... power. • You need to pair the Bluetooth enabled device with your computer when the ExpressCard slot is used for future use the Bluetooth function, turn it can connect to and transfer data wirelessly to pair the device with the front label facing upward until it by Windows Safely Remove Hardware...
... power. • You need to pair the Bluetooth enabled device with your computer when the ExpressCard slot is used for future use the Bluetooth function, turn it can connect to and transfer data wirelessly to pair the device with the front label facing upward until it by Windows Safely Remove Hardware...
Lenovo G460/G560 User Guide V1.0
Page 30
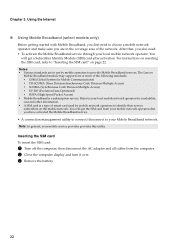
...instructions on inserting the SIM card, refer to your local mobile network operator. Inserting the SIM card To insert the SIM card: 1 Turn off the computer; Using the Internet „ Using Mobile Broadband (select models only) Before getting started with Mobile Broadband, you first need...used by mobile operators to your mobile service provider provides this utility. Refer to "Inserting the SIM card" on the mobile network. The Lenovo Mobile Broadband module may support one or more of the following standards: ƒ GSM (Global System for availability, cost and other information....
...instructions on inserting the SIM card, refer to your local mobile network operator. Inserting the SIM card To insert the SIM card: 1 Turn off the computer; Using the Internet „ Using Mobile Broadband (select models only) Before getting started with Mobile Broadband, you first need...used by mobile operators to your mobile service provider provides this utility. Refer to "Inserting the SIM card" on the mobile network. The Lenovo Mobile Broadband module may support one or more of the following standards: ƒ GSM (Global System for availability, cost and other information....

Lenovo G460/G560 User Guide V1.0
Page 31
Notched Corner 5 Put the battery back in the wrong direction may damage the SIM card slot. Turn the computer over and reconnect the cables. 23 Chapter 3. Note: Inserting the SIM card in place. Using the Internet 4 Insert the SIM card in the card slot as shown in the illustration.
Notched Corner 5 Put the battery back in the wrong direction may damage the SIM card slot. Turn the computer over and reconnect the cables. 23 Chapter 3. Note: Inserting the SIM card in place. Using the Internet 4 Insert the SIM card in the card slot as shown in the illustration.
Lenovo G460/G560 User Guide V1.0
Page 32
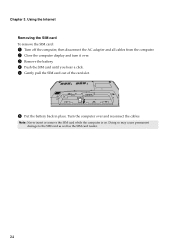
Note: Never insert or remove the SIM card while the computer is on. Using the Internet Removing the SIM card To remove the SIM card: 1 Turn off the computer, then disconnect the AC adapter and all cables from the computer. 2 Close the computer display and turn it over and reconnect the cables. Doing so may cause permanent damage to the SIM card as well as the SIM card reader. 24 Chapter 3. Turn the computer over . 3 Remove the battery. 4 Push the SIM card until you hear a click. 5 Gently pull the SIM card out of the card slot. 6 Put the battery back in place.
Note: Never insert or remove the SIM card while the computer is on. Using the Internet Removing the SIM card To remove the SIM card: 1 Turn off the computer, then disconnect the AC adapter and all cables from the computer. 2 Close the computer display and turn it over and reconnect the cables. Doing so may cause permanent damage to the SIM card as well as the SIM card reader. 24 Chapter 3. Turn the computer over . 3 Remove the battery. 4 Push the SIM card until you hear a click. 5 Gently pull the SIM card out of the card slot. 6 Put the battery back in place.
Lenovo G460/G560 User Guide V1.0
Page 36
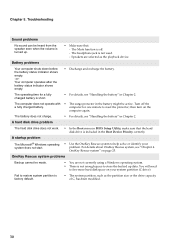
Display problems When I turn on a blank contents of purchase is required, and a fee will be charged for parts and service. • If you still see Chapter 2. If you forget your supervisor password, a Lenovo authorized servicer cannot reset your computer to a Lenovo authorized servicer or a marketing representative to have the password changed. • If you...
Display problems When I turn on a blank contents of purchase is required, and a fee will be charged for parts and service. • If you still see Chapter 2. If you forget your supervisor password, a Lenovo authorized servicer cannot reset your computer to a Lenovo authorized servicer or a marketing representative to have the password changed. • If you...
Lenovo G460/G560 User Guide V1.0
Page 37
... automatically because the battery is on page 42. Troubleshooting Sleep or hibernation problems The critical low-battery error message appears, and the computer immediately turns off. • The battery power is installed correctly. - The computer enters sleep mode • Make sure that : - If the problem...mode. - The monitor type is within range, have the computer serviced. Unsaved data may have the computer serviced. If you cannot turn off state, connect the AC adapter to the computer, then press the power button to resume from sleep mode, your computer is ...
... automatically because the battery is on page 42. Troubleshooting Sleep or hibernation problems The critical low-battery error message appears, and the computer immediately turns off. • The battery power is installed correctly. - The computer enters sleep mode • Make sure that : - If the problem...mode. - The monitor type is within range, have the computer serviced. Unsaved data may have the computer serviced. If you cannot turn off state, connect the AC adapter to the computer, then press the power button to resume from sleep mode, your computer is ...
Lenovo G460/G560 User Guide V1.0
Page 38
...with • The surge protector in the battery might be heard from the speaker even when the volume is turned up data. The battery does not charge. • For details, see "Chapter 4. Turn off . - A startup problem The Microsoft® Windows operating system does not start. • Use ...to reset the protector; OneKey Rescue system" on your problem. Troubleshooting Sound problems No sound can be active. Chapter 5. then turn on the computer again. For details about OneKey Rescue system, see "Handling the battery" in the Boot Device Priority correctly.
...with • The surge protector in the battery might be heard from the speaker even when the volume is turned up data. The battery does not charge. • For details, see "Chapter 4. Turn off . - A startup problem The Microsoft® Windows operating system does not start. • Use ...to reset the protector; OneKey Rescue system" on your problem. Troubleshooting Sound problems No sound can be active. Chapter 5. then turn on the computer again. For details about OneKey Rescue system, see "Handling the battery" in the Boot Device Priority correctly.
Lenovo G460/G560 User Guide V1.0
Page 39
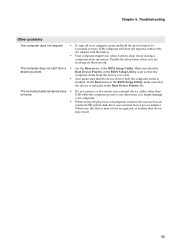
... • Do not connect or disconnect any external device cables other than not work. Chapter 5. Troubleshooting Other problems Your computer does not respond. • To turn off your computer. • When using a high power consumption external devices such as an external USB optical disk drive, use external device power adapter. If...
... • Do not connect or disconnect any external device cables other than not work. Chapter 5. Troubleshooting Other problems Your computer does not respond. • To turn off your computer. • When using a high power consumption external devices such as an external USB optical disk drive, use external device power adapter. If...
Lenovo G460/G560 User Guide V1.0
Page 40
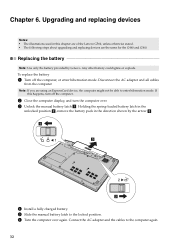
...manual battery latch a. Note: If you are the same for the G460 and G560. Any other battery could ignite or explode. To replace the battery 1 Turn off the computer. 2 Close the computer display, and turn off the computer, or enter hibernation mode. Holding the spring-loaded battery latch ...remove the battery pack in this happens, turn the computer over again. Chapter 6. Connect the AC adapter and the cables to enter hibernation mode. Disconnect the AC adapter and all cables from the computer. If this chapter are of the Lenovo G560, unless otherwise stated. • The ...
...manual battery latch a. Note: If you are the same for the G460 and G560. Any other battery could ignite or explode. To replace the battery 1 Turn off the computer. 2 Close the computer display, and turn off the computer, or enter hibernation mode. Holding the spring-loaded battery latch ...remove the battery pack in this happens, turn the computer over again. Chapter 6. Connect the AC adapter and the cables to enter hibernation mode. Disconnect the AC adapter and all cables from the computer. If this chapter are of the Lenovo G560, unless otherwise stated. • The ...
Lenovo G460/G560 User Guide V1.0
Page 41
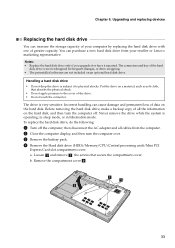
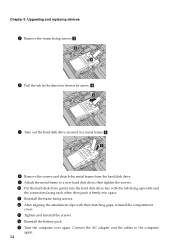
...; Do not touch the connector. a a' b 33 You can purchase a new hard disk drive from the computer. 2 Close the computer display, and then turn the computer off the computer; Incorrect handling can increase the storage capacity of data on the hard disk, and then...the hard disk. b. To replace the hard disk drive, do the following: 1 Turn off . Chapter 6. Upgrading and replacing devices Replacing the hard disk drive You can cause damage and permanent loss of your reseller or Lenovo marketing representative. Notes: • Replace the hard disk drive only if you upgrade...
...; Do not touch the connector. a a' b 33 You can purchase a new hard disk drive from the computer. 2 Close the computer display, and then turn the computer off the computer; Incorrect handling can increase the storage capacity of data on the hard disk, and then...the hard disk. b. To replace the hard disk drive, do the following: 1 Turn off . Chapter 6. Upgrading and replacing devices Replacing the hard disk drive You can cause damage and permanent loss of your reseller or Lenovo marketing representative. Notes: • Replace the hard disk drive only if you upgrade...
Lenovo G460/G560 User Guide V1.0
Page 42
...; d 7 Take out the hard disk drive secured in the direction shown by arrow d. then tighten the screws. 0 Put the hard disk drive gently into space. E Turn the computer over again. C Tighten and reinstall the screws. A Reinstall the frame fixing screws. then push it firmly into the hard disk drive bay with...
...; d 7 Take out the hard disk drive secured in the direction shown by arrow d. then tighten the screws. 0 Put the hard disk drive gently into space. E Turn the computer over again. C Tighten and reinstall the screws. A Reinstall the frame fixing screws. then push it firmly into the hard disk drive bay with...
Lenovo G460/G560 User Guide V1.0
Page 43
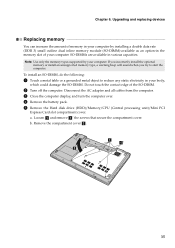
... option-in your body, which could damage the SO-DIMM. Disconnect the AC adapter and all cables from the computer. 3 Close the computer display, and turn the computer over. 4 Remove the battery pack. 5 Remove the Hard disk drive (HDD)/Memory/CPU (Central processing unit)/Mini PCI Express Card slot compartment cover... install an unsupported memory type, a warning beep will sound when you try to reduce any static electricity in the memory slot of the SO-DIMM. 2 Turn off the computer. a. b. Chapter 6. a a' b 35 SO-DIMMs are available in various capacities.
... option-in your body, which could damage the SO-DIMM. Disconnect the AC adapter and all cables from the computer. 3 Close the computer display, and turn the computer over. 4 Remove the battery pack. 5 Remove the Hard disk drive (HDD)/Memory/CPU (Central processing unit)/Mini PCI Express Card slot compartment cover... install an unsupported memory type, a warning beep will sound when you try to reduce any static electricity in the memory slot of the SO-DIMM. 2 Turn off the computer. a. b. Chapter 6. a a' b 35 SO-DIMMs are available in various capacities.
Lenovo G460/G560 User Guide V1.0
Page 44
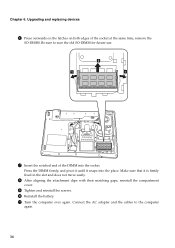
.... Connect the AC adapter and the cables to save the old SO-DIMM for future use. Chapter 6. Make sure that it snaps into the socket. A Turn the computer over again.
.... Connect the AC adapter and the cables to save the old SO-DIMM for future use. Chapter 6. Make sure that it snaps into the socket. A Turn the computer over again.
Lenovo G460/G560 User Guide V1.0
Page 45
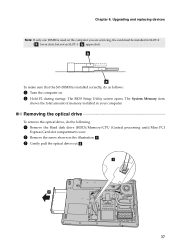
.... 2 Remove the screw shown in the illustration a. 3 Gently pull the optical drive out b. Removing the optical drive To remove the optical drive, do as follows: 1 Turn the computer on the computer you are servicing, the card must be installed in SLOT-0 ( a : lower slot), but not in your computer. Chapter 6. The BIOS...
.... 2 Remove the screw shown in the illustration a. 3 Gently pull the optical drive out b. Removing the optical drive To remove the optical drive, do as follows: 1 Turn the computer on the computer you are servicing, the card must be installed in SLOT-0 ( a : lower slot), but not in your computer. Chapter 6. The BIOS...
Lenovo G460/G560 User Guide V1.0
Page 51
...not possible, place the staticprotective packaging on a smooth, level surface and place the part on your computer, display, or external devices. • Avoid turning the display beyond 130°. „ Carry your computer properly • Before moving it by the display. • Use a quality carrying case ... closing the tray. • When installing your hard disk, follow the instructions shipped with your computer • Avoid placing any media, turn off attached devices, and disconnect cords and cables. • Be sure your computer, be sure to the hard disk drive and data loss...
...not possible, place the staticprotective packaging on a smooth, level surface and place the part on your computer, display, or external devices. • Avoid turning the display beyond 130°. „ Carry your computer properly • Before moving it by the display. • Use a quality carrying case ... closing the tray. • When installing your hard disk, follow the instructions shipped with your computer • Avoid placing any media, turn off attached devices, and disconnect cords and cables. • Be sure your computer, be sure to the hard disk drive and data loss...


