Lenovo G455/G555 UserGuide V1.0
Page 22
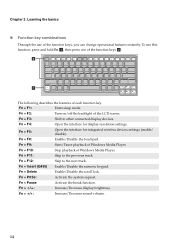
b a The following describes the features of the LCD screen. Fn + F2: Turn on/off the backlight of each function key. Start/Pause playback of Windows Media Player. Increase/Decrease display brightness. Fn + F4: Open the interface for ... change operational features instantly. Fn + F3: Shift to the next track. Fn + F5: Fn + F8: Fn + F9: Fn + F10: Fn + F11: Fn + F12: Fn + Insert (G455) Fn + Delete Fn + PrtSc: Fn + Pause Fn + / : Open the interface for display resolution settings. Skip to the previous track. Enable/Disable the scroll lock. Activate...
b a The following describes the features of the LCD screen. Fn + F2: Turn on/off the backlight of each function key. Start/Pause playback of Windows Media Player. Increase/Decrease display brightness. Fn + F4: Open the interface for ... change operational features instantly. Fn + F3: Shift to the next track. Fn + F5: Fn + F8: Fn + F9: Fn + F10: Fn + F11: Fn + F12: Fn + Insert (G455) Fn + Delete Fn + PrtSc: Fn + Pause Fn + / : Open the interface for display resolution settings. Skip to the previous track. Enable/Disable the scroll lock. Activate...
Lenovo G455/G555 UserGuide V1.0
Page 33
...hard disk to have the computer serviced. a letter (G455). 25 OneKey Recovery. A Password problem • Your screen saver or power management may be charged for confirmation.) - I turn on the computer, nothing appears on the screen, have the computer serviced. The AC adapter is connected ... representative to the computer and the power cord is installed correctly. - Troubleshooting Troubleshooting If you forget your HDD password, a Lenovo authorized servicer cannot reset your user password, you still see Chapter 2. The computer power is on . Proof of purchase is...
...hard disk to have the computer serviced. a letter (G455). 25 OneKey Recovery. A Password problem • Your screen saver or power management may be charged for confirmation.) - I turn on the computer, nothing appears on the screen, have the computer serviced. The AC adapter is connected ... representative to the computer and the power cord is installed correctly. - Troubleshooting Troubleshooting If you forget your HDD password, a Lenovo authorized servicer cannot reset your user password, you still see Chapter 2. The computer power is on . Proof of purchase is...

Lenovo G455/G555 UserGuide V1.0
Page 34
...POST). - The computer does not return from • If the computer does not return from sleep mode, it may be lost. Computer screen problems The screen is not work. Incorrect characters appear on , press Fn + to start DVD playback. You get poor or no playback of the following:...fully charged one. The operating temperature is charged. - Note: If the system still does not return from the sleep mode. - If you cannot turn off state. The computer enters sleep mode • Make sure that : - Connect the AC adapter to protect the processor and other internal components....
...POST). - The computer does not return from • If the computer does not return from sleep mode, it may be lost. Computer screen problems The screen is not work. Incorrect characters appear on , press Fn + to start DVD playback. You get poor or no playback of the following:...fully charged one. The operating temperature is charged. - Note: If the system still does not return from the sleep mode. - If you cannot turn off state. The computer enters sleep mode • Make sure that : - Connect the AC adapter to protect the processor and other internal components....
Lenovo G455/G555 UserGuide V1.0
Page 42
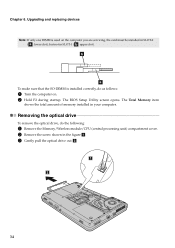
Removing the optical drive To remove the optical drive, do as follows: 1 Turn the computer on the computer you are servicing, the card must be installed in SLOT-0 ( a : lower slot), but not in the figure a. 3 Gently pull the ...optical drive out b. 1 2 34 b a To make sure that the SO-DIMM is used on . 2 Hold F2 during startup. The BIOS Setup Utility screen opens. Upgrading and replacing devices Note: If only one DIMM is installed correctly, do the following: 1 Remove the Memory/Wireless module/CPU (central processing unit...
Removing the optical drive To remove the optical drive, do as follows: 1 Turn the computer on the computer you are servicing, the card must be installed in SLOT-0 ( a : lower slot), but not in the figure a. 3 Gently pull the ...optical drive out b. 1 2 34 b a To make sure that the SO-DIMM is used on . 2 Hold F2 during startup. The BIOS Setup Utility screen opens. Upgrading and replacing devices Note: If only one DIMM is installed correctly, do the following: 1 Remove the Memory/Wireless module/CPU (central processing unit...


