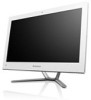
User Guide
Page 4
... 3 Rear view of the computer 4 Installing the computer stand 5 Computer stand 6 Connecting your computer 7 Connecting the power cord 8 Important information about using the computer 9 Wired keyboard (selected models only 10 Connecting to the Internet 10 Using Windows 8 11 Switching between the main Windows 8 interfaces 12 The Charms Bar 12 Shutting down...
... 3 Rear view of the computer 4 Installing the computer stand 5 Computer stand 6 Connecting your computer 7 Connecting the power cord 8 Important information about using the computer 9 Wired keyboard (selected models only 10 Connecting to the Internet 10 Using Windows 8 11 Switching between the main Windows 8 interfaces 12 The Charms Bar 12 Shutting down...
User Guide
Page 12
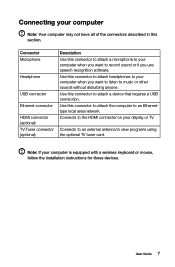
... Microphone Headphone USB connector Ethernet connector HDMI connector (optional) TV-Tuner connector (optional) Description Use this section. Note: If your computer is equipped with a wireless keyboard or mouse, follow the installation instructions for those devices.
... Microphone Headphone USB connector Ethernet connector HDMI connector (optional) TV-Tuner connector (optional) Description Use this section. Note: If your computer is equipped with a wireless keyboard or mouse, follow the installation instructions for those devices.

User Guide
Page 15
Wired keyboard (selected models only) LVT -- IPSs and ISP offerings vary by opening your..., you'll need a contract with an Internet Service Provider (ISP) and some hardware. Your computer has the Lenovo Rescue System installed. Swipe in your computer to start other devices. To learn more about this key to the ...screen, then click Settings.) 2. Note: Broadband modem and router installation procedures vary depending on the computer until the Lenovo Rescue System open. To connect your country. Test the wireless network by country. Consult your ISP for offerings available ...
Wired keyboard (selected models only) LVT -- IPSs and ISP offerings vary by opening your..., you'll need a contract with an Internet Service Provider (ISP) and some hardware. Your computer has the Lenovo Rescue System installed. Swipe in your computer to start other devices. To learn more about this key to the ...screen, then click Settings.) 2. Note: Broadband modem and router installation procedures vary depending on the computer until the Lenovo Rescue System open. To connect your country. Test the wireless network by country. Consult your ISP for offerings available ...

User Guide
Page 31
...a soft cotton cloth, pure water (preferably purified or distilled water) and cotton swabs. Clean your computer, disconnect the computer from the monitor and keyboard every day. LCD monitor should be cleaned daily. Do not use liquid or aerosol cleaners, which may contain flammable substances. Keep all surfaces clean ...and free of sophisticated integrated circuit boards, it gently with water. Do not use the keyboard until it is very important to periodically clean the computer to clean in otherwise inaccessible corners. • To clean the...
...a soft cotton cloth, pure water (preferably purified or distilled water) and cotton swabs. Clean your computer, disconnect the computer from the monitor and keyboard every day. LCD monitor should be cleaned daily. Do not use liquid or aerosol cleaners, which may contain flammable substances. Keep all surfaces clean ...and free of sophisticated integrated circuit boards, it gently with water. Do not use the keyboard until it is very important to periodically clean the computer to clean in otherwise inaccessible corners. • To clean the...
User Guide
Page 32
Hardware Replacement Guide This chapter contains the following topics: Ø Removing the stand base Ø Removing the foot cover Ø Replacing a memory module Ø Replacing the hard disk drive Ø Replacing the optical drive Ø Replacing the adapter Ø Replacing the keyboard and mouse User Guide 27
Hardware Replacement Guide This chapter contains the following topics: Ø Removing the stand base Ø Removing the foot cover Ø Replacing a memory module Ø Replacing the hard disk drive Ø Replacing the optical drive Ø Replacing the adapter Ø Replacing the keyboard and mouse User Guide 27
User Guide
Page 33
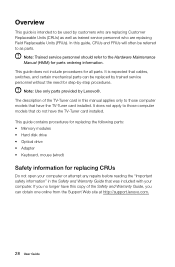
... guide contains procedures for replacing the following parts: • Memory modules • Hard disk drive • Optical drive • Adapter • Keyboard, mouse (wired) Safety information for step-by Lenovo®. In this guide, CRUs and FRUs will often be used by customers who are replacing Customer Replaceable Units (CRUs) as well...
... guide contains procedures for replacing the following parts: • Memory modules • Hard disk drive • Optical drive • Adapter • Keyboard, mouse (wired) Safety information for step-by Lenovo®. In this guide, CRUs and FRUs will often be used by customers who are replacing Customer Replaceable Units (CRUs) as well...
User Guide
Page 45
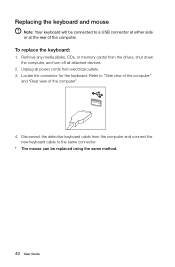
...side or at the rear of the computer". 4. Replacing the keyboard and mouse Note: Your keyboard will be replaced using the same method. 40 User Guide Remove any media (disks, CDs, or memory cards) from the computer and connect the new keyboard cable to the same connector. * The mouse can be ...connected to "Side view of the computer" and "Rear view of the computer. Disconnect the defective keyboard cable from the drives, shut down the computer, and turn off all...
...side or at the rear of the computer". 4. Replacing the keyboard and mouse Note: Your keyboard will be replaced using the same method. 40 User Guide Remove any media (disks, CDs, or memory cards) from the computer and connect the new keyboard cable to the same connector. * The mouse can be ...connected to "Side view of the computer" and "Rear view of the computer. Disconnect the defective keyboard cable from the drives, shut down the computer, and turn off all...
User Guide
Page 49
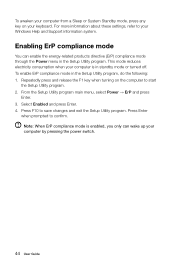
...) compliance mode through the Power menu in the Setup Utility program, do the following: 1. Repeatedly press and release the F1 key when turning on your keyboard. This mode reduces electricity consumption when your Windows Help and Support information system. Press Enter when prompted to save changes and exit the Setup Utility...
...) compliance mode through the Power menu in the Setup Utility program, do the following: 1. Repeatedly press and release the F1 key when turning on your keyboard. This mode reduces electricity consumption when your Windows Help and Support information system. Press Enter when prompted to save changes and exit the Setup Utility...

