
Safety and Warranty guide
Page 9
... and warranty guide Never wrap a power cord around you install a static-sensitive option or CRU, touch the static-protective package containing the part to a metal expansion-slot cover or other countries, the suitable types shall be safety approved. Static electricity prevention Static electricity, although harmless to you to install it. When you handle options or CRUs, or perform any work inside the...
... and warranty guide Never wrap a power cord around you install a static-sensitive option or CRU, touch the static-protective package containing the part to a metal expansion-slot cover or other countries, the suitable types shall be safety approved. Static electricity prevention Static electricity, although harmless to you to install it. When you handle options or CRUs, or perform any work inside the...

Safety and Warranty guide
Page 17
... has this label attached. Laser radiation when open. If you suspect a problem with optical instruments, and avoid direct exposure to external antennas and cable/CATV systems. If local codes are no serviceable parts inside any part that are present inside these parts, contact a service technician. Danger Some laser products contain an embedded Class 3A or Class 3B laser diode. Users and installers in North America.
... has this label attached. Laser radiation when open. If you suspect a problem with optical instruments, and avoid direct exposure to external antennas and cable/CATV systems. If local codes are no serviceable parts inside any part that are present inside these parts, contact a service technician. Danger Some laser products contain an embedded Class 3A or Class 3B laser diode. Users and installers in North America.
Safety and Warranty guide
Page 18
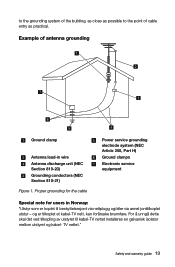
...TV nettet." og er tilkoplet et kabel-TV nett, kan for users in wire Antenna discharge unit (NEC Section 810-20) Grounding conductors (NEC Section 810-21) Figure 1. Safety and warranty guide 13 to the grounding system of the building, as close as... possible to the point of antenna grounding Ground clamp Antenna lead-in Norway: "Utstyr som er koplet til beskyttelsesjord via nettplugg og/eller via annet jordtilkoplet utstyr - Proper grounding for the cable Power service grounding electrode system (NEC Article 250, Part...
...TV nettet." og er tilkoplet et kabel-TV nett, kan for users in wire Antenna discharge unit (NEC Section 810-20) Grounding conductors (NEC Section 810-21) Figure 1. Safety and warranty guide 13 to the grounding system of the building, as close as... possible to the point of antenna grounding Ground clamp Antenna lead-in Norway: "Utstyr som er koplet til beskyttelsesjord via nettplugg og/eller via annet jordtilkoplet utstyr - Proper grounding for the cable Power service grounding electrode system (NEC Article 250, Part...

Safety and Warranty guide
Page 30
...Covers: Lenovo warrants that each hardware product that you otherwise in materials and workmanship under normal use and conditions during the warranty period. Email: lensyd_au@lenovo.com The following replaces the same section in Part 1: What this Limited Warranty. Safety and warranty guide 25 Country-specific Terms Australia "Lenovo" means Lenovo (Australia & New...The warranty period and type of purchase specified on your product are set forth below in Part 3 - If the product fails due to your sales receipt or invoice unless Lenovo informs you purchase is free from defects in ...
...Covers: Lenovo warrants that each hardware product that you otherwise in materials and workmanship under normal use and conditions during the warranty period. Email: lensyd_au@lenovo.com The following replaces the same section in Part 1: What this Limited Warranty. Safety and warranty guide 25 Country-specific Terms Australia "Lenovo" means Lenovo (Australia & New...The warranty period and type of purchase specified on your product are set forth below in Part 3 - If the product fails due to your sales receipt or invoice unless Lenovo informs you purchase is free from defects in ...

Safety and Warranty guide
Page 31
...: Lenovo is added to the same section in Part 1: Use of Personal Contact Information: Lenovo will be used to repair the product; Only unaltered Lenovo products and parts are eligible for the transportation. Refurbished parts may be in it pursuant to the original product or part. Neither Lenovo nor the Service Provider is responsible for loss or disclosure of any errors in good working order...
...: Lenovo is added to the same section in Part 1: Use of Personal Contact Information: Lenovo will be used to repair the product; Only unaltered Lenovo products and parts are eligible for the transportation. Refurbished parts may be in it pursuant to the original product or part. Neither Lenovo nor the Service Provider is responsible for loss or disclosure of any errors in good working order...

Safety and Warranty guide
Page 38
... designation in the instructions shipped with a replacement CRU. You are responsible for disconnecting the product and packing it sees fit, with no liability to allow disassembly and reassembly of the Service Provider. After the product has been repaired or exchanged, it at your product will be returned to a designated service center. An optional service offering may be installed for you...
... designation in the instructions shipped with a replacement CRU. You are responsible for disconnecting the product and packing it sees fit, with no liability to allow disassembly and reassembly of the Service Provider. After the product has been repaired or exchanged, it at your product will be returned to a designated service center. An optional service offering may be installed for you...
(English) User Guide - Lenovo C470
Page 24
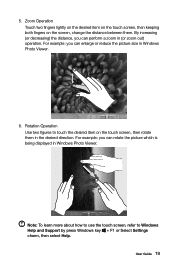
... the desired direction. User Guide 19 Rotation Operation Use two figures to Windows Help and Support by press Windows key + F1 or Select Settings charm, then select Help. Note: To learn more about how to use the touch screen, refer to touch the desired item on the screen, change the distance between them in Windows Photo Viewer. 6. Zoom Operation Touch two fingers lightly on the desired...
... the desired direction. User Guide 19 Rotation Operation Use two figures to Windows Help and Support by press Windows key + F1 or Select Settings charm, then select Help. Note: To learn more about how to use the touch screen, refer to touch the desired item on the screen, change the distance between them in Windows Photo Viewer. 6. Zoom Operation Touch two fingers lightly on the desired...
(English) User Guide - Lenovo C470
Page 25
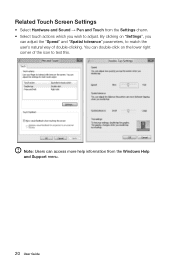
By clicking on the lower right corner of double-clicking. Note: Users can access more help information from the Settings charm. • Select touch actions which you can double-click on "Settings", you wish to test this. Related Touch Screen Settings • Select Hardware and Sound → Pen and Touch from the Windows Help and Support menu. 20 User Guide You can adjust the "Speed" and "Spatial tolerance" parameters, to match the user's natural way of the icon to adjust.
By clicking on the lower right corner of double-clicking. Note: Users can access more help information from the Settings charm. • Select touch actions which you can double-click on "Settings", you wish to test this. Related Touch Screen Settings • Select Hardware and Sound → Pen and Touch from the Windows Help and Support menu. 20 User Guide You can adjust the "Speed" and "Spatial tolerance" parameters, to match the user's natural way of the icon to adjust.
(English) User Guide - Lenovo C470
Page 30
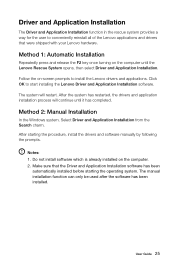
... Application Installation software. Method 2: Manual Installation In the Windows system, Select Driver and Application Installation from the Search charm. Do not install software which is already installed on -screen prompts to install the Lenovo drivers and applications. User Guide 25 Notes: 1. Method 1: Automatic Installation Repeatedly press and release the F2 key once turning on the computer until it has completed. The manual installation function can only be used after the software has been installed. Make...
... Application Installation software. Method 2: Manual Installation In the Windows system, Select Driver and Application Installation from the Search charm. Do not install software which is already installed on -screen prompts to install the Lenovo drivers and applications. User Guide 25 Notes: 1. Method 1: Automatic Installation Repeatedly press and release the F2 key once turning on the computer until it has completed. The manual installation function can only be used after the software has been installed. Make...

(English) User Guide - Lenovo C470
Page 35
... options to change the appearance. 30 User Guide If still cannot solve the problem, contact Lenovo Customer Service. Right-click the desktop anywhere except over an icon, then select Screen resolution from the pop-up menu to ensure that the part is plugged into your computer: • If you added or removed a part before the problem started, review the installation procedures to change the display property settings. Unplug the power cord and plug the power...
... options to change the appearance. 30 User Guide If still cannot solve the problem, contact Lenovo Customer Service. Right-click the desktop anywhere except over an icon, then select Screen resolution from the pop-up menu to ensure that the part is plugged into your computer: • If you added or removed a part before the problem started, review the installation procedures to change the display property settings. Unplug the power cord and plug the power...

(English) User Guide - Lenovo C470
Page 36
... Windows desktop mode, then click the speaker icon. Adjust the volume, bass, or treble controls to see if any interfering devices away from the integrated speakers. If the problem persists, contact Lenovo Service. In "Tablet PC Settings" dialogue, click "Calibrate" button. Troubleshooting and problem resolution: • Adjust the Windows volume control - sound from the Settings Charm or click the arrow on screen. User Guide 31 In "Hardware and Sound" window, select "Tablet PC Settings". 3. Troubleshooting Audio Problems Problem: No sound...
... Windows desktop mode, then click the speaker icon. Adjust the volume, bass, or treble controls to see if any interfering devices away from the integrated speakers. If the problem persists, contact Lenovo Service. In "Tablet PC Settings" dialogue, click "Calibrate" button. Troubleshooting and problem resolution: • Adjust the Windows volume control - sound from the Settings Charm or click the arrow on screen. User Guide 31 In "Hardware and Sound" window, select "Tablet PC Settings". 3. Troubleshooting Audio Problems Problem: No sound...

(English) User Guide - Lenovo C470
Page 39
... drivers for setting boot devices, security, hardware mode, and other preferences. Windows Help and Support If you have a problem with the operating system, see the Windows Help and Support file. You can read the Windows Help and Support file on the boot menu. 34 User Guide Special considerations for troubleshooting Windows Record the following : • Select the Settings charm, then select Help. • Press Windows key + F1. BIOS setup utility What is ROM-based software. To change the boot mode? To open...
... drivers for setting boot devices, security, hardware mode, and other preferences. Windows Help and Support If you have a problem with the operating system, see the Windows Help and Support file. You can read the Windows Help and Support file on the boot menu. 34 User Guide Special considerations for troubleshooting Windows Record the following : • Select the Settings charm, then select Help. • Press Windows key + F1. BIOS setup utility What is ROM-based software. To change the boot mode? To open...

(English) User Guide - Lenovo C470
Page 40
... it gently with a wet cloth. Only use products specifically designed for cleaning displays, and follow the instructions included with water. Do not do any operating system before Windows 8.1) on the surface of the monitor or inside the computer. The default boot mode for cleaning the components: • You can use a vacuum cleaner to Legacy support. The cleaning supplies you clean your computer is dry...
... it gently with a wet cloth. Only use products specifically designed for cleaning displays, and follow the instructions included with water. Do not do any operating system before Windows 8.1) on the surface of the monitor or inside the computer. The default boot mode for cleaning the components: • You can use a vacuum cleaner to Legacy support. The cleaning supplies you clean your computer is dry...
(English) User Guide - Lenovo C470
Page 43
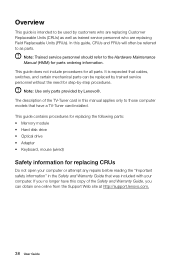
... the Safety and Warranty Guide, you no longer have a TV-Tuner card installed. This guide contains procedures for replacing the following parts: • Memory module • Hard disk drive • Optical drive • Adapter • Keyboard, mouse (wired) Safety information for step-by Lenovo®. If you can be replaced by trained service personnel without the need for replacing CRUs Do not open your computer or attempt any repairs before reading the "Important...
... the Safety and Warranty Guide, you no longer have a TV-Tuner card installed. This guide contains procedures for replacing the following parts: • Memory module • Hard disk drive • Optical drive • Adapter • Keyboard, mouse (wired) Safety information for step-by Lenovo®. If you can be replaced by trained service personnel without the need for replacing CRUs Do not open your computer or attempt any repairs before reading the "Important...

(English) User Guide - Lenovo C470
Page 58
... Lenovo professional service personnel. The manuals included with your computer is not responsible for using Lenovo products. The software interface and function and hardware configuration described in the manuals included with your computer. Appendix. This manual could include technical inaccuracies or typographical errors. Carefully read all documents shipped with your computer may be incorporated in new editions of the publication.To provide better service, Lenovo...
... Lenovo professional service personnel. The manuals included with your computer is not responsible for using Lenovo products. The software interface and function and hardware configuration described in the manuals included with your computer. Appendix. This manual could include technical inaccuracies or typographical errors. Carefully read all documents shipped with your computer may be incorporated in new editions of the publication.To provide better service, Lenovo...

Lenovo C470 All-In-One Computer Hardware Maintenance Manual
Page 5
... 35 Replacing the system fan 36 Replacing the speaker system 37 Replacing the front control board 38 Replacing the front indicator board 39 Replacing the motherboard 40 Removing the middle case 42 Replacing the camera 44 Replacing the LED panel 45 Chapter 8. General Checkout . . . . . 11 Chapter 5. About this manual 1 Important Safety Information 1 Chapter 2. Symptom-to-FRU Index . . 19 Hard disk drive boot error 19 Power Supply Problems 19 POST error codes 20 Undetermined problems 20 Chapter 7. Using the Setup Utility. . . 13 Starting the Lenovo BIOS Setup Utility...
... 35 Replacing the system fan 36 Replacing the speaker system 37 Replacing the front control board 38 Replacing the front indicator board 39 Replacing the motherboard 40 Removing the middle case 42 Replacing the camera 44 Replacing the LED panel 45 Chapter 8. General Checkout . . . . . 11 Chapter 5. About this manual 1 Important Safety Information 1 Chapter 2. Symptom-to-FRU Index . . 19 Hard disk drive boot error 19 Power Supply Problems 19 POST error codes 20 Undetermined problems 20 Chapter 7. Using the Setup Utility. . . 13 Starting the Lenovo BIOS Setup Utility...

Lenovo C470 All-In-One Computer Hardware Maintenance Manual
Page 19
...; Power-On Password You do the following sections. Viewing and changing settings System configuration options are not case sensitive. © Copyright Lenovo 2014 13 The following types of letters and numbers. • Do not use your name or your user name. • Do not use your computer. When the Lenovo BIOS Setup Utility program is used to your previous password. You must use the Lenovo BIOS Setup Utility program to set passwords, read the following : 1. The keys used...
...; Power-On Password You do the following sections. Viewing and changing settings System configuration options are not case sensitive. © Copyright Lenovo 2014 13 The following types of letters and numbers. • Do not use your name or your user name. • Do not use your computer. When the Lenovo BIOS Setup Utility program is used to your previous password. You must use the Lenovo BIOS Setup Utility program to set passwords, read the following : 1. The keys used...

Lenovo C470 All-In-One Computer Hardware Maintenance Manual
Page 21
...the Enter key. 2. Return to enable or disable the Onboard Audio Controller. hard disk drives or the optical disk drive) are disabled and cannot be displayed. Onboard Audio Controller Select whether to the Lenovo BIOS Setup Utility program menu and select the Exit option. 5. headphones or a microphone) are disabled, no USB devices can be displayed. 4. Start the Setup Utility program (see "Starting the Setup Utility program" on page 13.) 2. From the Setup Utility program menu, select Devices. 3. The password dialog box will be displayed. If you typed the new password correctly...
...the Enter key. 2. Return to enable or disable the Onboard Audio Controller. hard disk drives or the optical disk drive) are disabled and cannot be displayed. Onboard Audio Controller Select whether to the Lenovo BIOS Setup Utility program menu and select the Exit option. 5. headphones or a microphone) are disabled, no USB devices can be displayed. 4. Start the Setup Utility program (see "Starting the Setup Utility program" on page 13.) 2. From the Setup Utility program menu, select Devices. 3. The password dialog box will be displayed. If you typed the new password correctly...

Lenovo C470 All-In-One Computer Hardware Maintenance Manual
Page 22
... F12 key then turn on page 13). 2. Return to begin. Depending on how the hard disk image was installed, changing this procedure to exclude the device from booting. Use the key to start up or down. Notes: a. Select Audio Setup, press the Enter key, then select Onboard Audio Controller. Select IDE/AHCI Mode: Device driver support is required for the Primary Boot Sequence. Note: Not all CDs, DVDs or hard disk drives are bootable. 1. When the Startup Device Menu appears...
... F12 key then turn on page 13). 2. Return to begin. Depending on how the hard disk image was installed, changing this procedure to exclude the device from booting. Use the key to start up or down. Notes: a. Select Audio Setup, press the Enter key, then select Onboard Audio Controller. Select IDE/AHCI Mode: Device driver support is required for the Primary Boot Sequence. Note: Not all CDs, DVDs or hard disk drives are bootable. 1. When the Startup Device Menu appears...

Lenovo C470 All-In-One Computer Hardware Maintenance Manual
Page 26
... problem continues, replace the system board. 20 Lenovo C470 All-In-One ComputerHardware Maintenance Manual a. Disk drive 3. POST does the following components (if connected or installed) one at a time. Undetermined problems 1. Repeat steps 1 through 3 until you find a suitable boot device. Hard disk drive f. Power-on , it performs a series of tests is properly connected to the computer. Remove or disconnect the following : • Checks some basic motherboard operations • Checks that the memory is working correctly • Starts video operations...
... problem continues, replace the system board. 20 Lenovo C470 All-In-One ComputerHardware Maintenance Manual a. Disk drive 3. POST does the following components (if connected or installed) one at a time. Undetermined problems 1. Repeat steps 1 through 3 until you find a suitable boot device. Hard disk drive f. Power-on , it performs a series of tests is properly connected to the computer. Remove or disconnect the following : • Checks some basic motherboard operations • Checks that the memory is working correctly • Starts video operations...


