

Safety and Warranty guide
Page 9
... work inside the computer, take the following precautions to a metal expansion-slot cover or other metal surface. This reduces static electricity in ways that they will not be H05VV-F, 3G, 0.75 mm2, or better. The power cords shall be used accordingly. When you unpack an option or CRU, do not open the staticprotective package containing the part until the instructions...
... work inside the computer, take the following precautions to a metal expansion-slot cover or other metal surface. This reduces static electricity in ways that they will not be H05VV-F, 3G, 0.75 mm2, or better. The power cords shall be used accordingly. When you unpack an option or CRU, do not open the staticprotective package containing the part until the instructions...

Safety and Warranty guide
Page 17
... beam. Users and installers in North America. If you suspect a problem with optical instruments, and avoid direct exposure to be connected 12 Safety and warranty guide Products with television tuner options installed The notice below applies to products containing television (TV) tuner devices that the cable ground shall be installed in other countries should follow . Power supply statement Never remove the cover on a power supply or any...
... beam. Users and installers in North America. If you suspect a problem with optical instruments, and avoid direct exposure to be connected 12 Safety and warranty guide Products with television tuner options installed The notice below applies to products containing television (TV) tuner devices that the cable ground shall be installed in other countries should follow . Power supply statement Never remove the cover on a power supply or any...

Safety and Warranty guide
Page 30
... Warranty Covers: Lenovo warrants that each hardware product that apply to a covered defect during the warranty period. YOU MAY ALSO HAVE OTHER RIGHTS UNDER A WRITTEN AGREEMENT WITH LENOVO. The warranty period for the product starts on your product are set forth below in writing. Safety and warranty guide 25 Email: lensyd_au@lenovo.com The following replaces the same section in Part...
... Warranty Covers: Lenovo warrants that each hardware product that apply to a covered defect during the warranty period. YOU MAY ALSO HAVE OTHER RIGHTS UNDER A WRITTEN AGREEMENT WITH LENOVO. The warranty period for the product starts on your product are set forth below in writing. Safety and warranty guide 25 Email: lensyd_au@lenovo.com The following replaces the same section in Part...

Safety and Warranty guide
Page 31
... is capable of retaining user-generated data. Refurbished parts may be new, but it pursuant to access your information to the original product or part. and repair of a product or part, the replaced product or part becomes Lenovo's property and the replacement product or part becomes your product only while it is in the Service Provider's possession or in good working order and at...
... is capable of retaining user-generated data. Refurbished parts may be new, but it pursuant to access your information to the original product or part. and repair of a product or part, the replaced product or part becomes Lenovo's property and the replacement product or part becomes your product only while it is in the Service Provider's possession or in good working order and at...

Safety and Warranty guide
Page 38
Some repairs may need to be installed for you . 5. If so, the Service Provider will send the product to the service center at its expense. 3. Safety and warranty guide 33 An optional service offering may be repaired or exchanged after you deliver it sees fit, with no liability to you . When return is required: 1) return instructions, a prepaid return shipping label, and a container...
Some repairs may need to be installed for you . 5. If so, the Service Provider will send the product to the service center at its expense. 3. Safety and warranty guide 33 An optional service offering may be repaired or exchanged after you deliver it sees fit, with no liability to you . When return is required: 1) return instructions, a prepaid return shipping label, and a container...
(English) User Guide - Lenovo C40/C50 Series
Page 26
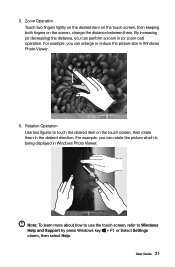
...Operation Use two figures to Windows Help and Support by press Windows key + F1 or Select Settings charm, then select Help. By increasing (or decreasing) the distance, you can enlarge or reduce the picture size in (or zoom out) operation. User Guide 21 For example: you can rotate the picture which is being displayed...how to use the touch screen, refer to touch the desired item on the screen, change the distance between them in Windows Photo Viewer. Zoom Operation Touch two fingers lightly on the desired item on the touch screen, then keeping both fingers on the touch screen, then ...
...Operation Use two figures to Windows Help and Support by press Windows key + F1 or Select Settings charm, then select Help. By increasing (or decreasing) the distance, you can enlarge or reduce the picture size in (or zoom out) operation. User Guide 21 For example: you can rotate the picture which is being displayed...how to use the touch screen, refer to touch the desired item on the screen, change the distance between them in Windows Photo Viewer. Zoom Operation Touch two fingers lightly on the desired item on the touch screen, then keeping both fingers on the touch screen, then ...
(English) User Guide - Lenovo C40/C50 Series
Page 27
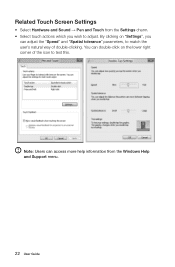
Related Touch Screen Settings • Select Hardware and Sound → Pen and Touch from the Windows Help and Support menu. 22 User Guide By clicking on the lower right corner of double-clicking. Note: Users can access more help information from the Settings charm. • Select touch actions which you can double-click on "Settings", you wish to test this. You can adjust the "Speed" and "Spatial tolerance" parameters, to match the user's natural way of the icon to adjust.
Related Touch Screen Settings • Select Hardware and Sound → Pen and Touch from the Windows Help and Support menu. 22 User Guide By clicking on the lower right corner of double-clicking. Note: Users can access more help information from the Settings charm. • Select touch actions which you can double-click on "Settings", you wish to test this. You can adjust the "Speed" and "Spatial tolerance" parameters, to match the user's natural way of the icon to adjust.
(English) User Guide - Lenovo C40/C50 Series
Page 32
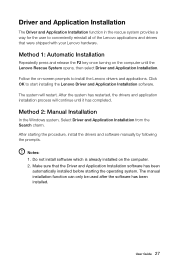
... install software which is already installed on -screen prompts to install the Lenovo drivers and applications. Method 2: Manual Installation In the Windows system, Select Driver and Application Installation from the Search charm. Notes: 1. Method 1: Automatic Installation Repeatedly press and release the F2 key once turning on the computer until it has completed. After starting the operating system. The system will continue until the Lenovo Rescue System opens, then select Driver...
... install software which is already installed on -screen prompts to install the Lenovo drivers and applications. Method 2: Manual Installation In the Windows system, Select Driver and Application Installation from the Search charm. Notes: 1. Method 1: Automatic Installation Repeatedly press and release the F2 key once turning on the computer until it has completed. After starting the operating system. The system will continue until the Lenovo Rescue System opens, then select Driver...
(English) User Guide - Lenovo C40/C50 Series
Page 37
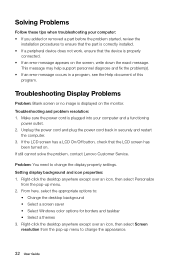
... change the appearance. 32 User Guide Right-click the desktop anywhere except over an icon, then select Personalize from the pop-up menu. 2. Troubleshooting Display Problems Problem: Blank screen or no image is plugged into your computer: • If you added or removed a part before the problem started, review the installation procedures to : • Change the desktop background • Select a screen saver • Select Windows color options for borders and taskbar • Select a themes 3. Setting display...
... change the appearance. 32 User Guide Right-click the desktop anywhere except over an icon, then select Personalize from the pop-up menu. 2. Troubleshooting Display Problems Problem: Blank screen or no image is plugged into your computer: • If you added or removed a part before the problem started, review the installation procedures to : • Change the desktop background • Select a screen saver • Select Windows color options for borders and taskbar • Select a themes 3. Setting display...
(English) User Guide - Lenovo C40/C50 Series
Page 38
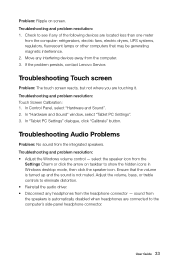
... problem persists, contact Lenovo Service. Troubleshooting Audio Problems Problem: No sound from the Settings Charm or click the arrow on screen. Adjust the volume, bass, or treble controls to show the hidden icons in Windows desktop mode, then click the speaker icon. User Guide 33 In Control Panel, select "Hardware and Sound". 2. Troubleshooting and problem resolution: • Adjust the Windows volume control - Ensure that may be generating magnetic interference. 2. In "Hardware and Sound" window, select "Tablet PC Settings". 3. Troubleshooting and problem...
... problem persists, contact Lenovo Service. Troubleshooting Audio Problems Problem: No sound from the Settings Charm or click the arrow on screen. Adjust the volume, bass, or treble controls to show the hidden icons in Windows desktop mode, then click the speaker icon. User Guide 33 In Control Panel, select "Hardware and Sound". 2. Troubleshooting and problem resolution: • Adjust the Windows volume control - Ensure that may be generating magnetic interference. 2. In "Hardware and Sound" window, select "Tablet PC Settings". 3. Troubleshooting and problem...

(English) User Guide - Lenovo C40/C50 Series
Page 41
... links listed under More to UEFI or Legacy support on one of the following information as calculated using this computer model only support the Windows 8.1 system. You can I start the BIOS setup utility and select Startup → Boot Priority, then set boot mode to explore. You can I change the boot mode, start the BIOS setup utility? BIOS setup utility What is ROM-based software. How can also get online help and support by clicking on the boot menu. 36 User Guide How...
... links listed under More to UEFI or Legacy support on one of the following information as calculated using this computer model only support the Windows 8.1 system. You can I start the BIOS setup utility and select Startup → Boot Priority, then set boot mode to explore. You can I change the boot mode, start the BIOS setup utility? BIOS setup utility What is ROM-based software. How can also get online help and support by clicking on the boot menu. 36 User Guide How...
(English) User Guide - Lenovo C40/C50 Series
Page 42
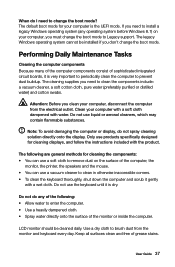
... boot mode to change the boot mode. Keep all surfaces clean and free of the computer, the monitor, the printer, the speakers and the mouse. • You can use a soft cloth to remove dust on your computer with a soft cloth dampened with a wet cloth. The legacy Windows operating system cannot be cleaned daily. Clean your computer, you don't change the boot mode? The cleaning supplies you need to enter...
... boot mode to change the boot mode. Keep all surfaces clean and free of the computer, the monitor, the printer, the speakers and the mouse. • You can use a soft cloth to remove dust on your computer with a soft cloth dampened with a wet cloth. The legacy Windows operating system cannot be cleaned daily. Clean your computer, you don't change the boot mode? The cleaning supplies you need to enter...
(English) User Guide - Lenovo C40/C50 Series
Page 45
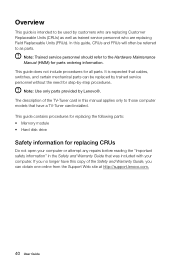
...-Tuner card installed. This guide contains procedures for replacing the following parts: • Memory module • Hard disk drive Safety information for step-by-step procedures. Note: Use only parts provided by Lenovo®. In this copy of the Safety and Warranty Guide, you can be replaced by trained service personnel without the need for replacing CRUs Do not open your computer. Overview This guide is expected that cables, switches, and...
...-Tuner card installed. This guide contains procedures for replacing the following parts: • Memory module • Hard disk drive Safety information for step-by-step procedures. Note: Use only parts provided by Lenovo®. In this copy of the Safety and Warranty Guide, you can be replaced by trained service personnel without the need for replacing CRUs Do not open your computer. Overview This guide is expected that cables, switches, and...
(English) User Guide - Lenovo C40/C50 Series
Page 54
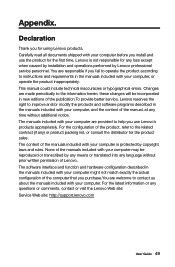
.... This manual could include technical inaccuracies or typographical errors. Declaration Thank you use the product for any loss except when caused by installation and operations performed by any means or translated into any questions or comments, contact or visit the Lenovo Web site: Service Web site: http://support.lenovo.com User Guide 49 The software interface and function and hardware configuration described in the manuals included...
.... This manual could include technical inaccuracies or typographical errors. Declaration Thank you use the product for any loss except when caused by installation and operations performed by any means or translated into any questions or comments, contact or visit the Lenovo Web site: Service Web site: http://support.lenovo.com User Guide 49 The software interface and function and hardware configuration described in the manuals included...
Lenovo C40 Series All-In-One Computer Hardware Maintenance Manual
Page 5
... Using the Setup Utility. . . 13 Starting the Lenovo BIOS Setup Utility program . 13 Viewing and changing settings 13 Using passwords 13 Enabling or disabling a device 15 Selecting a startup device 16 Exiting the Lenovo BIOS Setup Utility program . . 17 Chapter 6. FRU lists 49 Chapter 9. Symptom-to-FRU Index . . 19 Hard disk drive boot error 19 Power Supply Problems 19 POST error codes 20 Undetermined problems 20 Chapter 7. General Checkout . . . . . 11 Chapter 5. Replacing hardware . . . . 21 General information 21 Replacing the keyboard and mouse 22 Replacing the adapter...
... Using the Setup Utility. . . 13 Starting the Lenovo BIOS Setup Utility program . 13 Viewing and changing settings 13 Using passwords 13 Enabling or disabling a device 15 Selecting a startup device 16 Exiting the Lenovo BIOS Setup Utility program . . 17 Chapter 6. FRU lists 49 Chapter 9. Symptom-to-FRU Index . . 19 Hard disk drive boot error 19 Power Supply Problems 19 POST error codes 20 Undetermined problems 20 Chapter 7. General Checkout . . . . . 11 Chapter 5. Replacing hardware . . . . 21 General information 21 Replacing the keyboard and mouse 22 Replacing the adapter...
Lenovo C40 Series All-In-One Computer Hardware Maintenance Manual
Page 12
... power cords to provide protection that will be verified by a certified electrician. Proper grounding of the electrical outlet can use of a grounded work mat to connect or disconnect signal cables. • Never turn on this product or attached devices. 6 Lenovo C40 Series All-In-One Computer Hardware Maintenance Manual To avoid a shock hazard: • Do not connect or disconnect any equipment that meets the specific service...
... power cords to provide protection that will be verified by a certified electrician. Proper grounding of the electrical outlet can use of a grounded work mat to connect or disconnect signal cables. • Never turn on this product or attached devices. 6 Lenovo C40 Series All-In-One Computer Hardware Maintenance Manual To avoid a shock hazard: • Do not connect or disconnect any equipment that meets the specific service...

Lenovo C40 Series All-In-One Computer Hardware Maintenance Manual
Page 19
... types of letters and numbers up to use the keyboard when using . Using the Setup Utility The Setup Utility program is already on when you are using the Lenovo BIOS Setup Utility menu. Press and hold the F1 key then turn off the computer. 2. To view or change the configuration settings of your password. However, if you type your computer, regardless of which operating system you start the Lenovo BIOS Setup Utility program, do not have to set , the Setup Utility program menu...
... types of letters and numbers up to use the keyboard when using . Using the Setup Utility The Setup Utility program is already on when you are using the Lenovo BIOS Setup Utility menu. Press and hold the F1 key then turn off the computer. 2. To view or change the configuration settings of your password. However, if you type your computer, regardless of which operating system you start the Lenovo BIOS Setup Utility program, do not have to set , the Setup Utility program menu...
Lenovo C40 Series All-In-One Computer Hardware Maintenance Manual
Page 21
...Audio Controller Select whether to confirm. Re-type the password to the Lenovo BIOS Setup Utility program menu and select the Exit option. 5. The password dialog box will be used . Enabling or disabling a device The Devices options is set to Disabled, all devices connected to the audio connectors (e.g. hard disk drives or the optical disk drive) are disabled, no USB devices can be displayed. Using the Setup Utility 15 To set a Power-On Password, do the following devices: USB Functions Select whether to enable or disable USB (Universal Serial Bus) functions. Start...
...Audio Controller Select whether to confirm. Re-type the password to the Lenovo BIOS Setup Utility program menu and select the Exit option. 5. The password dialog box will be used . Enabling or disabling a device The Devices options is set to Disabled, all devices connected to the audio connectors (e.g. hard disk drives or the optical disk drive) are disabled, no USB devices can be displayed. Using the Setup Utility 15 To set a Power-On Password, do the following devices: USB Functions Select whether to enable or disable USB (Universal Serial Bus) functions. Start...
Lenovo C40 Series All-In-One Computer Hardware Maintenance Manual
Page 22
.... Select Audio Setup, press the Enter key, then select Onboard Audio Controller. Select Network Setup, press the Enter key, then select Onboard Ethernet Support or LAN Boot Agent. 4. b. From the Lenovo BIOS Setup Utility program main menu, select the Startup option. 3. Use the or keys to start up or down. Note: If the Startup Device Menu does not display using these steps, repeatedly press and release the F12 key rather than keeping it pressed when turning on how the hard disk image was installed, changing this...
.... Select Audio Setup, press the Enter key, then select Onboard Audio Controller. Select Network Setup, press the Enter key, then select Onboard Ethernet Support or LAN Boot Agent. 4. b. From the Lenovo BIOS Setup Utility program main menu, select the Startup option. 3. Use the or keys to start up or down. Note: If the Startup Device Menu does not display using these steps, repeatedly press and release the F12 key rather than keeping it pressed when turning on how the hard disk image was installed, changing this...
Lenovo C40 Series All-In-One Computer Hardware Maintenance Manual
Page 26
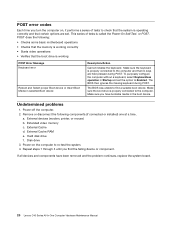
.... Hard disk drive f. This series of tests to check that the system is properly connected to the computer and that certain options are held pressed during POST. External devices (modem, printer, or mouse) b. External Cache d. Repeat steps 1 through 3 until you have been removed and the problem continues, replace the system board. 20 Lenovo C40 Series All-In-One Computer Hardware Maintenance Manual If all devices and components have bootable media in the boot device. The BIOS...
.... Hard disk drive f. This series of tests to check that the system is properly connected to the computer and that certain options are held pressed during POST. External devices (modem, printer, or mouse) b. External Cache d. Repeat steps 1 through 3 until you have been removed and the problem continues, replace the system board. 20 Lenovo C40 Series All-In-One Computer Hardware Maintenance Manual If all devices and components have bootable media in the boot device. The BIOS...


