
Brochure
Page 1
... Fingerprint Keyboard - 35% recycled material (optional) - 100% recycled/recyclable thermoplastic packaging on Eco USFF GREEN COMPUTING • ThinkVantage Power Manager for Computrace - of your stolen PC when it works only with one eco-friendly package. Lenovo® recommends Windows Vista® Business. Use PS/2® ports to $31 annually per system(3) •...
... Fingerprint Keyboard - 35% recycled material (optional) - 100% recycled/recyclable thermoplastic packaging on Eco USFF GREEN COMPUTING • ThinkVantage Power Manager for Computrace - of your stolen PC when it works only with one eco-friendly package. Lenovo® recommends Windows Vista® Business. Use PS/2® ports to $31 annually per system(3) •...

Brochure
Page 2
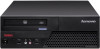
...riskfree because it delivers a client that can disable each USB port individually - board DisplayPort and VGA • Tool-less design - Lenovo® recommends Windows Vista® Business. desk-side support tickets become a thing of organization if needed • A storage-based ... - Built-in conjunction with Lenovo's Secure Managed Client are delivered weekly across the company on Tower Vista model 2 Lenovo THINKCENTRE M58/M58p Desktop THE NEWEST IN ROCK-SOLID DESIGN MEETS GREEN COMPUTING. The costs savings associated with Lenovo's Secure Managed Client solution provides...
...riskfree because it delivers a client that can disable each USB port individually - board DisplayPort and VGA • Tool-less design - Lenovo® recommends Windows Vista® Business. desk-side support tickets become a thing of organization if needed • A storage-based ... - Built-in conjunction with Lenovo's Secure Managed Client are delivered weekly across the company on Tower Vista model 2 Lenovo THINKCENTRE M58/M58p Desktop THE NEWEST IN ROCK-SOLID DESIGN MEETS GREEN COMPUTING. The costs savings associated with Lenovo's Secure Managed Client solution provides...

Brochure
Page 4
... a registered trademark of Discrete Graphics Cards 800 938 838 lenovo.com/hk ©2008 Lenovo. Footnotes: [1] Available in WW. [7] Available on Tower and SFF. [8] Available on Eco USFF. [3] ThinkCentre M58 SFF with 4GB Memory: Total accessible memory will vary depending on safe and effective computing. Intel, the Intel logo, Intel Core, Core Inside...
... a registered trademark of Discrete Graphics Cards 800 938 838 lenovo.com/hk ©2008 Lenovo. Footnotes: [1] Available in WW. [7] Available on Tower and SFF. [8] Available on Eco USFF. [3] ThinkCentre M58 SFF with 4GB Memory: Total accessible memory will vary depending on safe and effective computing. Intel, the Intel logo, Intel Core, Core Inside...

User Manual
Page 4
...Edition (October 2009) © Copyright Lenovo 2009. Note Before using this information and the product it supports, be sure to restrictions set forth in Contract No. LIMITED AND RESTRICTED RIGHTS NOTICE: If products, data, computer software, or services are sold to ...reproduction, or disclosure is subject to read and understand the ThinkCentre Safety and Warranty Guide and "Notices," on page 69. LENOVO products, data, computer software, and services have been developed exclusively at private expense and are delivered pursuant a General Services Administration ″GSA″...
...Edition (October 2009) © Copyright Lenovo 2009. Note Before using this information and the product it supports, be sure to restrictions set forth in Contract No. LIMITED AND RESTRICTED RIGHTS NOTICE: If products, data, computer software, or services are sold to ...reproduction, or disclosure is subject to read and understand the ThinkCentre Safety and Warranty Guide and "Notices," on page 69. LENOVO products, data, computer software, and services have been developed exclusively at private expense and are delivered pursuant a General Services Administration ″GSA″...

User Manual
Page 5
...Lenovo System Toolbox 59 PC-Doctor for Rescue and Recovery . . . . . 60 PC-Doctor for service 65 Using other services 66 Purchasing additional services 67 iii Contents Important safety information v Chapter 1. Updating system programs 53 Using system programs 53 Updating (flashing) BIOS from a disc 53 Updating (flashing) BIOS from your computer... 4 Software overview 5 Software provided with your Windows operating system 5 Locations 7 Locating connectors on the front of your computer 7 Locating connectors on the system board . . . . . 11 Chapter 2. Recovery information . . . 41 ...
...Lenovo System Toolbox 59 PC-Doctor for Rescue and Recovery . . . . . 60 PC-Doctor for service 65 Using other services 66 Purchasing additional services 67 iii Contents Important safety information v Chapter 1. Updating system programs 53 Using system programs 53 Updating (flashing) BIOS from a disc 53 Updating (flashing) BIOS from your computer... 4 Software overview 5 Software provided with your Windows operating system 5 Locations 7 Locating connectors on the front of your computer 7 Locating connectors on the system board . . . . . 11 Chapter 2. Recovery information . . . 41 ...

User Manual
Page 9
...(Peripheral Component Interconnect) Express x16 graphics card slot on page 49. System information The following information covers a variety of the computer features. For information about your specific model, use the Setup Utility program. Chapter 1. See Chapter 4, "Using the Setup ...Utility," on the system board for a discrete graphics card © Copyright Lenovo 2009 1 Product overview Features This chapter describes the computer features, specifications, preinstalled software programs, and part and connector locations. This section provides an overview of...
...(Peripheral Component Interconnect) Express x16 graphics card slot on page 49. System information The following information covers a variety of the computer features. For information about your specific model, use the Setup Utility program. Chapter 1. See Chapter 4, "Using the Setup ...Utility," on the system board for a discrete graphics card © Copyright Lenovo 2009 1 Product overview Features This chapter describes the computer features, specifications, preinstalled software programs, and part and connector locations. This section provides an overview of...

User Manual
Page 11
...operating systems listed here are subject to press. Chapter 1. For more information, see "Software overview" on /off individually Software programs, preinstalled Your computer might be identified by model type) v Linux® 1. Operating system, preinstalled v Microsoft® Windows® 7 v Microsoft Windows Vista&#...page 5. To determine if an operating system has been certified or tested for compatibility1 (varies by Lenovo as compatible with your computer following the publication of the operating system vendor. Corrections and additions to this booklet. Product overview 3
...operating systems listed here are subject to press. Chapter 1. For more information, see "Software overview" on /off individually Software programs, preinstalled Your computer might be identified by model type) v Linux® 1. Operating system, preinstalled v Microsoft® Windows® 7 v Microsoft Windows Vista&#...page 5. To determine if an operating system has been certified or tested for compatibility1 (varies by Lenovo as compatible with your computer following the publication of the operating system vendor. Corrections and additions to this booklet. Product overview 3
User Manual
Page 12
... V ac Input frequency range: 50 to 60 Hz Voltage-selection switch setting: 230 V ac 4 User Guide Specifications This section lists the physical specifications for your computer.
... V ac Input frequency range: 50 to 60 Hz Voltage-selection switch setting: 230 V ac 4 User Guide Specifications This section lists the physical specifications for your computer.

User Manual
Page 13
... you keep the software on your system up , understand, maintain, and enhance your computer. Lenovo ThinkVantage Tools: The Lenovo ThinkVantage® Tools program guides you to a host of information and tools to data. Note: The Lenovo ThinkVantage Tools program is only available on page 63. Note: The ThinkVantage Client Security Solution program is only...
... you keep the software on your system up , understand, maintain, and enhance your computer. Lenovo ThinkVantage Tools: The Lenovo ThinkVantage® Tools program guides you to a host of information and tools to data. Note: The Lenovo ThinkVantage Tools program is only available on page 63. Note: The ThinkVantage Client Security Solution program is only...
User Manual
Page 14
... Reader is preinstalled on password, hard disk drive password, and Windows password. Note: The Lenovo ThinkVantage Toolbox program is preinstalled on computers preinstalled with antivirus software that can use to start the Windows operating system. Lenovo System Toolbox The Lenovo System Toolbox diagnostic program is only available on your hard disk drive with your...
... Reader is preinstalled on password, hard disk drive password, and Windows password. Note: The Lenovo ThinkVantage Toolbox program is preinstalled on computers preinstalled with antivirus software that can use to start the Windows operating system. Lenovo System Toolbox The Lenovo System Toolbox diagnostic program is only available on your hard disk drive with your...

User Manual
Page 15
Product overview 7 Figure 1. Locations Locating connectors on the front of your computer Figure 1 shows the locations of the connectors on the front of your computer. Front connector locations 1 USB connector 2 Microphone connector 3 Headphone connector 4 USB connector Chapter 1. Note: Not all computer models have the following connectors.
Product overview 7 Figure 1. Locations Locating connectors on the front of your computer Figure 1 shows the locations of the connectors on the front of your computer. Front connector locations 1 USB connector 2 Microphone connector 3 Headphone connector 4 USB connector Chapter 1. Note: Not all computer models have the following connectors.

User Manual
Page 16
... color-coded to help you determine where to connect the cables on the rear of the connectors on your computer. Rear connector locations 1 Serial port (some models) 2 Power cord connector 3 Audio line-in connector 4 Audio line-out connector 5 Microphone connector 6 Serial port 7 VGA monitor connector 8 ...
... color-coded to help you determine where to connect the cables on the rear of the connectors on your computer. Rear connector locations 1 Serial port (some models) 2 Power cord connector 3 Audio line-in connector 4 Audio line-out connector 5 Microphone connector 6 Serial port 7 VGA monitor connector 8 ...

User Manual
Page 17
... use a Category 5 Ethernet cable. When you attach an external audio device, a cable is connected between the audio line-out connector of the computer. Audio line-out connector Used to send audio signals from an external audio device, such as a stereo system. Note: To operate the... FCC Class B limits, use speech-recognition software. Connector Description Audio line-in connector Used to receive audio signals from the computer to external devices, such as powered stereo speakers (speakers with built-in amplifiers), headphones, multimedia keyboards, or the audio line-in connector...
... use a Category 5 Ethernet cable. When you attach an external audio device, a cable is connected between the audio line-out connector of the computer. Audio line-out connector Used to send audio signals from an external audio device, such as a stereo system. Note: To operate the... FCC Class B limits, use speech-recognition software. Connector Description Audio line-in connector Used to receive audio signals from the computer to external devices, such as powered stereo speakers (speakers with built-in amplifiers), headphones, multimedia keyboards, or the audio line-in connector...

User Manual
Page 18
Locating components Figure 3 shows the locations of the various components in your computer. Component locations 1 Hard disk drive (some models) 2 Microprocessor, heat sink and fan assembly 3 Internal speaker (some models) 4 Optical drive 5 Memory slots (4) 6 Power supply assembly 10 User Guide To open the computer cover, see "Opening the computer cover" on page 14. Figure 3.
Locating components Figure 3 shows the locations of the various components in your computer. Component locations 1 Hard disk drive (some models) 2 Microprocessor, heat sink and fan assembly 3 Internal speaker (some models) 4 Optical drive 5 Memory slots (4) 6 Power supply assembly 10 User Guide To open the computer cover, see "Opening the computer cover" on page 14. Figure 3.

User Manual
Page 21
... part has been removed from touching the parts and other metal surface. Important: Before you are ready to : http://www.lenovo.com/support Note: Use only computer parts provided by Lenovo. © Copyright Lenovo 2009 13 Handle PCI cards, memory modules, system boards, and microprocessors by adding memory modules, PCI cards, or drives. The...
... part has been removed from touching the parts and other metal surface. Important: Before you are ready to : http://www.lenovo.com/support Note: Use only computer parts provided by Lenovo. © Copyright Lenovo 2009 13 Handle PCI cards, memory modules, system boards, and microprocessors by adding memory modules, PCI cards, or drives. The...

User Manual
Page 22
...the drives, shut down your computer. To open the computer cover. Opening the computer cover Attention Do not open your computer. This includes power cords, input/output (I/O) cables, and any other cables that came with the option to : http://www.lenovo.com/support This section provides ...instructions on page 13 before opening the computer cover. Remove any software or device drivers that secures the computer cover. 14 User Guide For some external options, you make the...
...the drives, shut down your computer. To open the computer cover. Opening the computer cover Attention Do not open your computer. This includes power cords, input/output (I/O) cables, and any other cables that came with the option to : http://www.lenovo.com/support This section provides ...instructions on page 13 before opening the computer cover. Remove any software or device drivers that secures the computer cover. 14 User Guide For some external options, you make the...

User Manual
Page 23
Installing options and replacing hardware 15 Figure 5. 5. Opening the computer cover Chapter 2. Press the buttons on the sides of the computer and pivot the computer cover upward to open.
Installing options and replacing hardware 15 Figure 5. 5. Opening the computer cover Chapter 2. Press the buttons on the sides of the computer and pivot the computer cover upward to open.

User Manual
Page 24
...disk drive. Accessing the system board components and drives This section provides instructions on how to access the internal components. b. See "Opening the computer cover" on page 24. On some models, you disconnect from the drives or the system board. Notes: a. Figure 6. See "Replacing the...double data rate 3 dual inline memory modules) that came with your computer. To access the system board components and drives: 1. To obtain a copy of the ThinkCentre Safety and Warranty Guide, go to: http://www.lenovo.com/support 16 User Guide This section provides instructions on how to...
...disk drive. Accessing the system board components and drives This section provides instructions on how to access the internal components. b. See "Opening the computer cover" on page 24. On some models, you disconnect from the drives or the system board. Notes: a. Figure 6. See "Replacing the...double data rate 3 dual inline memory modules) that came with your computer. To access the system board components and drives: 1. To obtain a copy of the ThinkCentre Safety and Warranty Guide, go to: http://www.lenovo.com/support 16 User Guide This section provides instructions on how to...

User Manual
Page 25
... are replacing an old memory module, open the retaining clips and remove the memory module being replaced as shown. Open the retaining clips. Open the computer cover. Remove any parts that might prevent your access to access the memory slots. To install or replace a memory module: 1. Figure 8. See "Opening the...
... are replacing an old memory module, open the retaining clips and remove the memory module being replaced as shown. Open the retaining clips. Open the computer cover. Remove any parts that might prevent your access to access the memory slots. To install or replace a memory module: 1. Figure 8. See "Opening the...

User Manual
Page 26
Figure 9. To obtain a copy of the ThinkCentre Safety and Warranty Guide, go to: http://www.lenovo.com/support This section provides instructions on the system board. Your computer has one standard PCI card slot and one PCI Express x16 graphics card slot. 18 User Guide Push the memory module straight down ...6. Position the new memory module over the memory slot. Make sure that came with another option, go to do next: v To work with your computer. v To complete the installation, go to install or replace a PCI card. Installing or replacing a PCI card Attention Do not open your...
Figure 9. To obtain a copy of the ThinkCentre Safety and Warranty Guide, go to: http://www.lenovo.com/support This section provides instructions on the system board. Your computer has one standard PCI card slot and one PCI Express x16 graphics card slot. 18 User Guide Push the memory module straight down ...6. Position the new memory module over the memory slot. Make sure that came with another option, go to do next: v To work with your computer. v To complete the installation, go to install or replace a PCI card. Installing or replacing a PCI card Attention Do not open your...


