
Brochure
Page 1
... of -use, serviceability and thermal efficiency, all I /O ports have individual disable/enable capability - Use PS/2® ports to enable PC shut offs on all form factors - ENERGY STAR® 4.0 (select models) - Locate your energy footprint with ThinkVision L197 Wide vs. Lenovo Asset Recovery Service (in Q2, 2009 SECURITY • ThinkVantage® Technologies offer Client Security Solution and an optional fingerprint reader • I /O ports (including USB ports) through BIOS •...
... of -use, serviceability and thermal efficiency, all I /O ports have individual disable/enable capability - Use PS/2® ports to enable PC shut offs on all form factors - ENERGY STAR® 4.0 (select models) - Locate your energy footprint with ThinkVision L197 Wide vs. Lenovo Asset Recovery Service (in Q2, 2009 SECURITY • ThinkVantage® Technologies offer Client Security Solution and an optional fingerprint reader • I /O ports (including USB ports) through BIOS •...

Brochure
Page 2
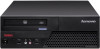
... what SMC does for you work. Avoid virus from USB peripheral devices ThinkCentre M58/M58p features exciting new technologies for a best-in conjunction with the latest Intel® dual and quad-core technology, DDR3 memory and Solid State Drives(5), desktop productivity and performance are delivered weekly across the company on Tower Vista model 2 Lenovo THINKCENTRE M58/M58p Desktop THE NEWEST IN ROCK...
... what SMC does for you work. Avoid virus from USB peripheral devices ThinkCentre M58/M58p features exciting new technologies for a best-in conjunction with the latest Intel® dual and quad-core technology, DDR3 memory and Solid State Drives(5), desktop productivity and performance are delivered weekly across the company on Tower Vista model 2 Lenovo THINKCENTRE M58/M58p Desktop THE NEWEST IN ROCK...

Brochure
Page 3
...,6 Rear,2 Internal), (1) Parallel (optional), (1) Serial (optional), (2) PS/2® (optional), (1) eSATA (optional), (1) VGA, (1) DisplayPort, (1) RJ-45, audio in AG and Q2, 2009 worldwide. DIMM Eco USFF: 1GB/2GB PC3-8500 (1066MHz) DDR3 SODIMM Optical Drive DVD-ROM, DVD-Recordable. ThinkVantage System Update™; All form factors are also ENERGY STAR 4.0 Certified and GREENGUARD Indoor Air Quality Certified®. Lenovo® recommends Windows Vista® Business. ThinkCentre M58/M58p DESKTOP SPECIFICATIONs and SERVICES Processor (speed...
...,6 Rear,2 Internal), (1) Parallel (optional), (1) Serial (optional), (2) PS/2® (optional), (1) eSATA (optional), (1) VGA, (1) DisplayPort, (1) RJ-45, audio in AG and Q2, 2009 worldwide. DIMM Eco USFF: 1GB/2GB PC3-8500 (1066MHz) DDR3 SODIMM Optical Drive DVD-ROM, DVD-Recordable. ThinkVantage System Update™; All form factors are also ENERGY STAR 4.0 Certified and GREENGUARD Indoor Air Quality Certified®. Lenovo® recommends Windows Vista® Business. ThinkCentre M58/M58p DESKTOP SPECIFICATIONs and SERVICES Processor (speed...

User Manual
Page 5
... or changing the startup device sequence 52 Exiting from a POST/BIOS update failure . . . 54 Chapter 6. Installing options and replacing hardware 13 Handling static-sensitive devices 13 Installing options and replacing hardware . . . . 13 Installing external options 14 Opening the computer cover 14 Accessing the system board components and drives 16 Installing or replacing a memory module . . . 16 Installing or replacing a PCI card 18 Installing internal drives 20 Replacing the hard disk drive 24 Replacing the optical drive 27 Replacing the battery 28 Replacing the power supply...
... or changing the startup device sequence 52 Exiting from a POST/BIOS update failure . . . 54 Chapter 6. Installing options and replacing hardware 13 Handling static-sensitive devices 13 Installing options and replacing hardware . . . . 13 Installing external options 14 Opening the computer cover 14 Accessing the system board components and drives 16 Installing or replacing a memory module . . . 16 Installing or replacing a PCI card 18 Installing internal drives 20 Replacing the hard disk drive 24 Replacing the optical drive 27 Replacing the battery 28 Replacing the power supply...

User Manual
Page 9
... graphics card slot on page 49. System information The following information covers a variety of the computer features. Microprocessor v Intel® Celeron® processor v Intel Core™ 2 Duo processor v Intel Core 2 Quad processor v Intel Pentium® dual-core processor v Internal cache (size varies by model type) Memory v Supports up to four double data rate 3 dual inline memory modules (DDR3 DIMMs) Internal drives v Card reader (some models) v Optical drive v SATA (Serial Advanced Technology Attachment) internal hard disk drive (some models) v Solid State Drive...
... graphics card slot on page 49. System information The following information covers a variety of the computer features. Microprocessor v Intel® Celeron® processor v Intel Core™ 2 Duo processor v Intel Core 2 Quad processor v Intel Pentium® dual-core processor v Internal cache (size varies by model type) Memory v Supports up to four double data rate 3 dual inline memory modules (DDR3 DIMMs) Internal drives v Card reader (some models) v Optical drive v SATA (Serial Advanced Technology Attachment) internal hard disk drive (some models) v Solid State Drive...

User Manual
Page 10
...serial port (one standard and one optional) v Eight USB connectors (two on the front panel and six on the rear panel) v Ethernet connector v One DisplayPort connector v One eSATA connector v Standard keyboard connector (some models) v Standard mouse connector (some models) v Three audio connectors (audio line-in connector, audio line-out connector, and microphone connector) on the rear panel v Two audio connectors (microphone connector and headphone connector) on the front panel v VGA monitor connector Expansion v One card reader v One hard disk drive bay v One optical drive bay v One PCI card...
...serial port (one standard and one optional) v Eight USB connectors (two on the front panel and six on the rear panel) v Ethernet connector v One DisplayPort connector v One eSATA connector v Standard keyboard connector (some models) v Standard mouse connector (some models) v Three audio connectors (audio line-in connector, audio line-out connector, and microphone connector) on the rear panel v Two audio connectors (microphone connector and headphone connector) on the front panel v VGA monitor connector Expansion v One card reader v One hard disk drive bay v One optical drive bay v One PCI card...

User Manual
Page 16
Rear connector locations 1 Serial port (some models) 2 Power cord connector 3 Audio line-in connector 4 Audio line-out connector 5 Microphone connector 6 Serial port 7 VGA monitor connector 8 Standard keyboard connector (some models) 9 Standard mouse connector (some models) 10 DisplayPort connector 11 USB connectors (2) 12 eSATA connector 13 USB connectors (4) 14 Ethernet connector 15 PCI Express x16 graphics card slot 16 PCI card slot 8 User Guide Some connectors on the rear of your computer are color-coded to help you determine where to connect the cables on the rear of the connectors...
Rear connector locations 1 Serial port (some models) 2 Power cord connector 3 Audio line-in connector 4 Audio line-out connector 5 Microphone connector 6 Serial port 7 VGA monitor connector 8 Standard keyboard connector (some models) 9 Standard mouse connector (some models) 10 DisplayPort connector 11 USB connectors (2) 12 eSATA connector 13 USB connectors (4) 14 Ethernet connector 15 PCI Express x16 graphics card slot 16 PCI card slot 8 User Guide Some connectors on the rear of your computer are color-coded to help you determine where to connect the cables on the rear of the connectors...

User Manual
Page 17
USB connector Used to attach an external hard disk drive. When you attach an external audio device, a cable is connected between the audio line-out connector of the device and the audio line-in connector on a stereo system or other external recording device. eSATA connector Use this external Serial Advanced Technology Attachment (eSATA) connector to attach a device that uses a standard keyboard connector. Note: To operate the computer within FCC Class B limits, use to record sound or if you want to connect additional USB devices. Serial port Used to...
USB connector Used to attach an external hard disk drive. When you attach an external audio device, a cable is connected between the audio line-out connector of the device and the audio line-in connector on a stereo system or other external recording device. eSATA connector Use this external Serial Advanced Technology Attachment (eSATA) connector to attach a device that uses a standard keyboard connector. Note: To operate the computer within FCC Class B limits, use to record sound or if you want to connect additional USB devices. Serial port Used to...

User Manual
Page 24
... instructions on how to a maximum of 8 GB system memory. Open the computer cover. Figure 6. b. On some models, you note the locations of 8 GB. See "Replacing the hard disk drive" on page 14. 2. Pivoting the optical drive bay assembly Installing or replacing a memory module Attention Do not open your computer. To access the system board components and drives: 1. Your computer has four slots for installing or replacing DDR3 DIMMs (double data rate 3 dual inline memory...
... instructions on how to a maximum of 8 GB system memory. Open the computer cover. Figure 6. b. On some models, you note the locations of 8 GB. See "Replacing the hard disk drive" on page 14. 2. Pivoting the optical drive bay assembly Installing or replacing a memory module Attention Do not open your computer. To access the system board components and drives: 1. Your computer has four slots for installing or replacing DDR3 DIMMs (double data rate 3 dual inline memory...

User Manual
Page 32
...: v To work with your network or storage administrator. The set of Product Recovery discs. Open the computer cover. For more information on recovering factory-installed software, refer to : http://www.lenovo.com/support This section provides instructions on page 14. 2. Important When you receive a new hard disk drive, you also receive a set of Product Recovery discs enables you to restore the contents of the ThinkCentre Safety and Warranty Guide, go to replace the hard disk drive if...
...: v To work with your network or storage administrator. The set of Product Recovery discs. Open the computer cover. For more information on recovering factory-installed software, refer to : http://www.lenovo.com/support This section provides instructions on page 14. 2. Important When you receive a new hard disk drive, you also receive a set of Product Recovery discs enables you to restore the contents of the ThinkCentre Safety and Warranty Guide, go to replace the hard disk drive if...

User Manual
Page 46
... also locks the buttons used to Chapter 4, "Using the Setup Utility," on page 49 for normal use. This is the same type of lock used to secure your computer and is operated with a key. Integrated cable lock Password protection To deter unauthorized use the Setup Utility program to set a password. Integrated cable lock An integrated cable lock (sometimes referred to as a user password. 38 User Guide Refer to open the computer cover. What to do...
... also locks the buttons used to Chapter 4, "Using the Setup Utility," on page 49 for normal use. This is the same type of lock used to secure your computer and is operated with a key. Integrated cable lock Password protection To deter unauthorized use the Setup Utility program to set a password. Integrated cable lock An integrated cable lock (sometimes referred to as a user password. 38 User Guide Refer to open the computer cover. What to do...

User Manual
Page 50
... use recovery media on Windows 7 or Windows Vista, do the following : Attention: When you will be deleted and replaced by the factory default settings. See "Installing or reinstalling device drivers" on the type of your hard disk drive v On a secondary hard disk drive installed in your hard disk drive contents including the operating system, data files, software programs, and personal settings. Insert the boot disc into your computer. 3. From the Rescue and Recovery menu, click Restore your CD or DVD drive. 2. Restart your recovery media, select...
... use recovery media on Windows 7 or Windows Vista, do the following : Attention: When you will be deleted and replaced by the factory default settings. See "Installing or reinstalling device drivers" on the type of your hard disk drive v On a secondary hard disk drive installed in your hard disk drive contents including the operating system, data files, software programs, and personal settings. Insert the boot disc into your computer. 3. From the Rescue and Recovery menu, click Restore your CD or DVD drive. 2. Restart your recovery media, select...
User Manual
Page 55
... and using the INF file, click Start → Help and Support to enter the Windows Help and Support information system for factory-installed devices are located on the computer hard disk drive (usually drive C:) in your computer, such as WIN98.txt. Follow the instructions to access the Rescue and Recovery workspace. Notes: 1. The latest device drivers for the detailed information about how to install the device driver. Open the DRIVERS folder. If the repair operation completes...
... and using the INF file, click Start → Help and Support to enter the Windows Help and Support information system for factory-installed devices are located on the computer hard disk drive (usually drive C:) in your computer, such as WIN98.txt. Follow the instructions to access the Rescue and Recovery workspace. Notes: 1. The latest device drivers for the detailed information about how to install the device driver. Open the DRIVERS folder. If the repair operation completes...
User Manual
Page 61
... serial number, press N. POST is turned on how to support computers without a diskette drive. You can execute. Make sure the computer is a set as flash memory). When prompted to change the machine type/model, press N. © Copyright Lenovo 2009 53 System programs include the POST, the BIOS code, and the Setup Utility program. Lenovo might make changes and enhancements to recover from your computer. See "Selecting or changing the startup device sequence" on again. Updating...
... serial number, press N. POST is turned on how to support computers without a diskette drive. You can execute. Make sure the computer is a set as flash memory). When prompted to change the machine type/model, press N. © Copyright Lenovo 2009 53 System programs include the POST, the BIOS code, and the Setup Utility program. Lenovo might make changes and enhancements to recover from your computer. See "Selecting or changing the startup device sequence" on again. Updating...
User Manual
Page 62
... the screen after the download begins. 4. In the Enter a product number field, type your operating system: 1. This is completed, there will take two to easily locate all power cords from your machine type: a. Recovering from your machine type and click Go. Remove any cables that were disconnected and reinstall the hard disk drive if removed. 8. Insert the POST/BIOS update (flash) disc into the optical drive. 10. The recovery session will be no 54 User Guide Type in...
... the screen after the download begins. 4. In the Enter a product number field, type your operating system: 1. This is completed, there will take two to easily locate all power cords from your machine type: a. Recovering from your machine type and click Go. Remove any cables that were disconnected and reinstall the hard disk drive if removed. 8. Insert the POST/BIOS update (flash) disc into the optical drive. 10. The recovery session will be no 54 User Guide Type in...
User Manual
Page 65
... the system board. Action Verify that it is plugged into the rear of service and support telephone numbers. v If your country. The monitor screen is turned on . v The monitor signal cable is provided with your computer for your computer has a secondary power switch on the back of the computer, make sure that : v The power cord is switched on and the brightness and contrast controls are set correctly. For...
... the system board. Action Verify that it is plugged into the rear of service and support telephone numbers. v If your country. The monitor screen is turned on . v The monitor signal cable is provided with your computer for your computer has a secondary power switch on the back of the computer, make sure that : v The power cord is switched on and the brightness and contrast controls are set correctly. For...

User Manual
Page 66
... the problem, have the computer serviced. The SMC login prompt disappears before the operating system starts. The USB Keyboard does not work . Verify that is securely connected to the keyboard. v No keys are stuck down. The mouse does not work. Refer to the safety and warranty information that : v The computer is not logged on the computer. Refer to "Cleaning the mouse" on the hard disk drive...
... the problem, have the computer serviced. The SMC login prompt disappears before the operating system starts. The USB Keyboard does not work . Verify that is securely connected to the keyboard. v No keys are stuck down. The mouse does not work. Refer to the safety and warranty information that : v The computer is not logged on the computer. Refer to "Cleaning the mouse" on the hard disk drive...

User Manual
Page 79
...64 Administrator, password 50 antivirus software 6 audio line-in connector 9 audio line-out connector 9 audio subsystem 2 B backup and recovery operations 42 basic troubleshooting 57 battery, replacing 28 bay 2, installing 22 BIOS, updating (flashing) 53, 54 boot-block recovery 54 C cable lock, security 38 cables, connecting 36 card reader, replacing 34 changing password 50 startup device sequence 52 cleaning the mouse 61 CMOS, clearing 38 components, accessing system board 16 components, internal 10 computer cover opening 14 connecting drives 23 connector description 9 connectors front 7 rear...
...64 Administrator, password 50 antivirus software 6 audio line-in connector 9 audio line-out connector 9 audio subsystem 2 B backup and recovery operations 42 basic troubleshooting 57 battery, replacing 28 bay 2, installing 22 BIOS, updating (flashing) 53, 54 boot-block recovery 54 C cable lock, security 38 cables, connecting 36 card reader, replacing 34 changing password 50 startup device sequence 52 cleaning the mouse 61 CMOS, clearing 38 components, accessing system board 16 components, internal 10 computer cover opening 14 connecting drives 23 connector description 9 connectors front 7 rear...

User Manual
Page 80
... 60 PCI card 18 installing, replacing 18 physical specifications 4 power Advanced Configuration and Power Interface (ACPI) support 3 features 3 72 User Guide power supply assembly, replacing 30 power-on self-test (POST) 53 Power-On, Password 50 productivity center, ThinkVantage 64 programs, updating system 53 protection, password 38 purchasing additional services 67 R rear connectors 8 recovering from a POST/BIOS update failure 54 software 41 recovery boot-block 54 operations, backup and 42 problems, solving 48 recovery repair diskette, creating and using 46 recovery media, creating and using...
... 60 PCI card 18 installing, replacing 18 physical specifications 4 power Advanced Configuration and Power Interface (ACPI) support 3 features 3 72 User Guide power supply assembly, replacing 30 power-on self-test (POST) 53 Power-On, Password 50 productivity center, ThinkVantage 64 programs, updating system 53 protection, password 38 purchasing additional services 67 R rear connectors 8 recovering from a POST/BIOS update failure 54 software 41 recovery boot-block 54 operations, backup and 42 problems, solving 48 recovery repair diskette, creating and using 46 recovery media, creating and using...

User Manual
Page 81
... board components, accessing 16 connectors 11 locating parts 11 locations 11 memory module 16 T television output notice 70 temporary startup device 51 ThinkVantage productivity center 64 trademarks 70 troubleshooting, basic 57 troubleshooting, diagnostics 57 U updating (flashing) BIOS 53 system programs 53 updating (flashing) BIOS 54 USB connector 9 using diagnostic programs 65 documentation 65 other services 66 passwords 49 recovery repair diskette, creating and using 46 rescue media, creating and 45 Setup Utility 49 V VGA monitor connector 9 video subsystem 1 viewing and changing settings...
... board components, accessing 16 connectors 11 locating parts 11 locations 11 memory module 16 T television output notice 70 temporary startup device 51 ThinkVantage productivity center 64 trademarks 70 troubleshooting, basic 57 troubleshooting, diagnostics 57 U updating (flashing) BIOS 53 system programs 53 updating (flashing) BIOS 54 USB connector 9 using diagnostic programs 65 documentation 65 other services 66 passwords 49 recovery repair diskette, creating and using 46 rescue media, creating and 45 Setup Utility 49 V VGA monitor connector 9 video subsystem 1 viewing and changing settings...


