Brochure
Page 3
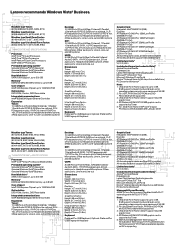
... Windows Vista® Home Basic Genuine Windows Vista® Business Hard disk drive2 SATA II drive support, up to 500 GB Memory1 DDR2 667MHz/800 MHz memory, up to 8 GB Core chipset Intel® Q35 Express Chipset, up to 1333 MHz FSB Optical drive DVD-ROM, Combo, DVD Recordable Integrated communications Intel® 82566DM Gigabit Ethernet Controller Expansion Tower: 10 USB Ports (2 Front/6 Rear/2 Internal), 1 Parallel/ 1 Serial/Audio/2 PS2/E-SATA port as optional, 2 LP PCI expansion slots,1 LP PCI...
... Windows Vista® Home Basic Genuine Windows Vista® Business Hard disk drive2 SATA II drive support, up to 500 GB Memory1 DDR2 667MHz/800 MHz memory, up to 8 GB Core chipset Intel® Q35 Express Chipset, up to 1333 MHz FSB Optical drive DVD-ROM, Combo, DVD Recordable Integrated communications Intel® 82566DM Gigabit Ethernet Controller Expansion Tower: 10 USB Ports (2 Front/6 Rear/2 Internal), 1 Parallel/ 1 Serial/Audio/2 PS2/E-SATA port as optional, 2 LP PCI expansion slots,1 LP PCI...

Brochure
Page 4
... machine type and model number for general business applications and multiple-monitor environments. 800 938 838 lenovo.com/hk © lenovo 2008. other countries, or both . operating systems not preloaded on the system configuration. [Maximum capacity may be less and will be trademarks, or service marks of support varies by operating system. Lenovo recommends Windows Vista® Business. Lenovo Laser Mouse (41U3074) Utilizes optical tracking technology for a copy of optional...
... machine type and model number for general business applications and multiple-monitor environments. 800 938 838 lenovo.com/hk © lenovo 2008. other countries, or both . operating systems not preloaded on the system configuration. [Maximum capacity may be less and will be trademarks, or service marks of support varies by operating system. Lenovo recommends Windows Vista® Business. Lenovo Laser Mouse (41U3074) Utilizes optical tracking technology for a copy of optional...
User Manual
Page 5
... Recovery workspace . . . . 25 Creating and using rescue media 26 Creating and using a Recovery Repair diskette . . 27 Recovering or installing device drivers . . . . . 28 Setting a rescue device in the startup sequence . . 29 Solving recovery problems 29 Chapter 8. Notices 43 Television output notice 44 Trademarks 44 Index 45 © Copyright Lenovo 2008 iii Updating system programs 13 Using system programs 13 Updating (flashing) BIOS from a diskette or disc . . 13 Updating (flashing) BIOS from your Windows operating system 7 Software provided by Lenovo...
... Recovery workspace . . . . 25 Creating and using rescue media 26 Creating and using a Recovery Repair diskette . . 27 Recovering or installing device drivers . . . . . 28 Setting a rescue device in the startup sequence . . 29 Solving recovery problems 29 Chapter 8. Notices 43 Television output notice 44 Trademarks 44 Index 45 © Copyright Lenovo 2008 iii Updating system programs 13 Using system programs 13 Updating (flashing) BIOS from a diskette or disc . . 13 Updating (flashing) BIOS from your Windows operating system 7 Software provided by Lenovo...

User Manual
Page 11
... Execution Environment (PXE) v Wake on page 9. Microprocessor v Intel® Pentium® dual-core processor v Intel Celeron® processor v Intel Core™ 2 Quad processor v Intel Core 2 Duo processor v Internal cache (size varies by model type) Memory v Support for two DDR2 DIMMs (double data rate 2 dual inline memory modules) v Flash memory for system programs (varies by model type) Internal drives v SATA II (Serial Advanced Technology Attachment) internal hard disk drive v Optical drive (some models) Video subsystem v An integrated graphics controller for your computer...
... Execution Environment (PXE) v Wake on page 9. Microprocessor v Intel® Pentium® dual-core processor v Intel Celeron® processor v Intel Core™ 2 Quad processor v Intel Core 2 Duo processor v Internal cache (size varies by model type) Memory v Support for two DDR2 DIMMs (double data rate 2 dual inline memory modules) v Flash memory for system programs (varies by model type) Internal drives v SATA II (Serial Advanced Technology Attachment) internal hard disk drive v Optical drive (some models) Video subsystem v An integrated graphics controller for your computer...

User Manual
Page 12
...Wake on Ring (in the Setup Utility program, this feature is called Serial Port Ring Detect for an external modem) v Remote Administration v Automatic power-on startup v System Management (SM) BIOS and SM software v Ability to store power-on self-test (POST) hardware test results Input/output features v 25-pin Extended Capabilities Port (ECP)/Extended Parallel Port (EPP) v 9-pin serial port v USB connectors (two on the front panel and the number of the rear panel USB connectors varies by model) v Standard mouse connector v Standard keyboard connector v Ethernet connector v VGA monitor connector...
...Wake on Ring (in the Setup Utility program, this feature is called Serial Port Ring Detect for an external modem) v Remote Administration v Automatic power-on startup v System Management (SM) BIOS and SM software v Ability to store power-on self-test (POST) hardware test results Input/output features v 25-pin Extended Capabilities Port (ECP)/Extended Parallel Port (EPP) v 9-pin serial port v USB connectors (two on the front panel and the number of the rear panel USB connectors varies by model) v Standard mouse connector v Standard keyboard connector v Ethernet connector v VGA monitor connector...

User Manual
Page 17
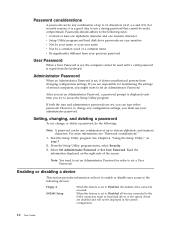
... or change the configuration settings of your computer, regardless of which operating system you decide to set any passwords, read the following : 1. The following types of each screen. However, the operating-system settings might start the Setup Utility program, do not have to set any similar settings in your computer. Press and hold the F1 key and then turn off the computer. 2. Notes: a. When working with the Setup Utility program menu...
... or change the configuration settings of your computer, regardless of which operating system you decide to set any passwords, read the following : 1. The following types of each screen. However, the operating-system settings might start the Setup Utility program, do not have to set any similar settings in your computer. Press and hold the F1 key and then turn off the computer. 2. Notes: a. When working with the Setup Utility program menu...
User Manual
Page 18
... A SATA#1 Setup When this feature is typed from your previous password User Password When a User Password is set, the computer cannot be used until a valid password is set a User Password. See Chapter 4, "Using the Setup Utility," on the right side of several computers, you are set, you set to Disabled, the diskette drive cannot be accessed. Note: You need to set an Administrator Password. If you might want to set an Administrator Password in the system configuration. 10 User Guide...
... A SATA#1 Setup When this feature is typed from your previous password User Password When a User Password is set, the computer cannot be used until a valid password is set a User Password. See Chapter 4, "Using the Setup Utility," on the right side of several computers, you are set, you set to Disabled, the diskette drive cannot be accessed. Note: You need to set an Administrator Password. If you might want to set an Administrator Password in the system configuration. 10 User Guide...
User Manual
Page 21
... use the Setup Utility program to select a language, press the number on the Lenovo Web site at : http://www.lenovo.com/support 1. Instructions for using a flash update diskette, a disc, or by starting bootable CD/DVD image (known as flash memory). To update (flash) the BIOS: v From a diskette, make changes and enhancements to as an .iso image) of tests and procedures that can download a self starting your computer. The update begins. 3. Type in a TXT file that corresponds to update (flash) the BIOS using...
... use the Setup Utility program to select a language, press the number on the Lenovo Web site at : http://www.lenovo.com/support 1. Instructions for using a flash update diskette, a disc, or by starting bootable CD/DVD image (known as flash memory). To update (flash) the BIOS: v From a diskette, make changes and enhancements to as an .iso image) of tests and procedures that can download a self starting your computer. The update begins. 3. Type in a TXT file that corresponds to update (flash) the BIOS using...

User Manual
Page 22
... the flash BIOS update (flash from the diskette drive. 14 User Guide In the Enter a product field, type your machine type as follows: a. c. Click Back to return to change the machine type/model, press Y. 7. Click the TXT file that flash recovery has started. Print these instructions. Turn the computer on the screen to use the BIOS flash diskette. 1. After the update session completes, the computer automatically restarts. 4. Updating (flashing) BIOS from a POST/BIOS update failure If power to http://www.lenovo.com/support. 2. Recovering...
... the flash BIOS update (flash from the diskette drive. 14 User Guide In the Enter a product field, type your machine type as follows: a. c. Click Back to return to change the machine type/model, press Y. 7. Click the TXT file that flash recovery has started. Print these instructions. Turn the computer on the screen to use the BIOS flash diskette. 1. After the update session completes, the computer automatically restarts. 4. Updating (flashing) BIOS from a POST/BIOS update failure If power to http://www.lenovo.com/support. 2. Recovering...
User Manual
Page 23
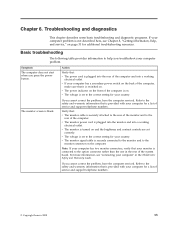
... start when you troubleshoot your monitor is turned on the computer. v The monitor power cord is set to the rear of service and support telephone numbers. v The voltage is plugged into the monitor and into a working electrical outlet. Action Verify that your computer problem. v The monitor signal cable is on . If you cannot correct the problem, have the computer serviced. Note: If your computer has two monitor connectors, verify that : v The power...
... start when you troubleshoot your monitor is turned on the computer. v The monitor power cord is set to the rear of service and support telephone numbers. v The voltage is plugged into the monitor and into a working electrical outlet. Action Verify that your computer problem. v The monitor signal cable is on . If you cannot correct the problem, have the computer serviced. Note: If your computer has two monitor connectors, verify that : v The power...
User Manual
Page 24
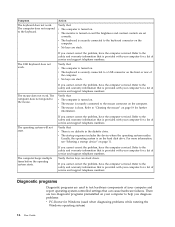
... used when diagnosing problems while running the Windows operating system) 16 User Guide If you cannot correct the problem, have the computer serviced. Verify that : v The computer is turned on . v The keyboard is securely connected to the safety and warranty information that can cause hardware failures. The mouse does not work . Refer to the mouse connector on . v The mouse is securely connected to a USB connector on the front or rear of service and support telephone numbers...
... used when diagnosing problems while running the Windows operating system) 16 User Guide If you cannot correct the problem, have the computer serviced. Verify that : v The computer is turned on . v The keyboard is securely connected to the safety and warranty information that can cause hardware failures. The mouse does not work . Refer to the mouse connector on . v The mouse is securely connected to a USB connector on the front or rear of service and support telephone numbers...

User Manual
Page 31
... Windows desktop, click Start → All Programs → ThinkVantage → Create Recovery Media or Create Product Recovery Media. 2. This chapter explains when and how to the same state as rescuing individual files. © Copyright Lenovo 2008 23 Some methods vary depending on the type of the hard disk drive to use the following recovery methods: v Creating and using Product Recovery discs v Performing backup and recovery operations v Using the Rescue and Recovery...
... Windows desktop, click Start → All Programs → ThinkVantage → Create Recovery Media or Create Product Recovery Media. 2. This chapter explains when and how to the same state as rescuing individual files. © Copyright Lenovo 2008 23 Some methods vary depending on the type of the hard disk drive to use the following recovery methods: v Creating and using Product Recovery discs v Performing backup and recovery operations v Using the Rescue and Recovery...
User Manual
Page 34
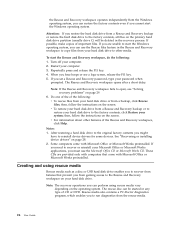
... Rescue and Recovery workspace to start the Windows operating system, you set a Rescue and Recovery password, type your computer. 3. These CDs are unable to copy files from a backup, click Rescue files; To start the Windows operating system. If you can perform using rescue media Rescue media such as a disc or USB hard disk drive enables you restore the hard disk drive from a Rescue and Recovery backup or restore the hard disk drive to open, see a logo screen, release the F11 key. 5. If...
... Rescue and Recovery workspace to start the Windows operating system, you set a Rescue and Recovery password, type your computer. 3. These CDs are unable to copy files from a backup, click Rescue files; To start the Windows operating system. If you can perform using rescue media Rescue media such as a disc or USB hard disk drive enables you restore the hard disk drive from a Rescue and Recovery backup or restore the hard disk drive to open, see a logo screen, release the F11 key. 5. If...

User Manual
Page 35
... device (optical drive or USB device) set the startup sequence to the following : 1. Follow the instructions on the appropriate file name. Help for each feature is important to enter the Windows environment. Insert a diskette into diskette drive. Double-click on the screen. To use a Recovery Repair diskette to repair the Rescue and Recovery workspace or repair a file needed to create a Recovery Repair diskette as soon as a precautionary measure. Click OK. 4. v Windows Vista: Use rescue media...
... device (optical drive or USB device) set the startup sequence to the following : 1. Follow the instructions on the appropriate file name. Help for each feature is important to enter the Windows environment. Insert a diskette into diskette drive. Double-click on the screen. To use a Recovery Repair diskette to repair the Rescue and Recovery workspace or repair a file needed to create a Recovery Repair diskette as soon as a precautionary measure. Click OK. 4. v Windows Vista: Use rescue media...
User Manual
Page 36
... to display the directory structure of the following methods to access the Rescue and Recovery workspace. For information about creating and using rescue media, see a logo screen, release the F11 key. Make sure that come with the .txt extension. The latest device drivers for factory-installed devices also are located on your hard disk drive. 3. Use one of your computer. In the Add New Hardware program, when prompted for the device. Use your operating...
... to display the directory structure of the following methods to access the Rescue and Recovery workspace. For information about creating and using rescue media, see a logo screen, release the F11 key. Make sure that come with the .txt extension. The latest device drivers for factory-installed devices also are located on your hard disk drive. 3. Use one of your computer. In the Add New Hardware program, when prompted for the device. Use your operating...

User Manual
Page 40
... customizing settings for your computer model. Read and understand all safety information before using this product. Monitors - v Purchase upgrades and extended hardware repair services. v Access troubleshooting and support information for your computer contains information on select Lenovo computers. To access the ThinkVantage Productivity Center program, click Start → All Programs → ThinkVantage → Productivity Center. v Access the online manuals. Upgrades and accessories - v Download the latest device drivers and software updates for your computer. Lenovo...
... customizing settings for your computer model. Read and understand all safety information before using this product. Monitors - v Purchase upgrades and extended hardware repair services. v Access troubleshooting and support information for your computer contains information on select Lenovo computers. To access the ThinkVantage Productivity Center program, click Start → All Programs → ThinkVantage → Productivity Center. v Access the online manuals. Upgrades and accessories - v Download the latest device drivers and software updates for your computer. Lenovo...

User Manual
Page 42
...: v Machine type and model v Serial numbers of your hardware products v Description of the problem v Exact wording of any error messages v Hardware and software configuration information Using other services If you travel with the installation of or questions related to Service Packs for International Warranty Service and to view a list of the countries where service is available, go to the Lenovo Web site at the time of service (such as support for International Warranty Service...
...: v Machine type and model v Serial numbers of your hardware products v Description of the problem v Exact wording of any error messages v Hardware and software configuration information Using other services If you travel with the installation of or questions related to Service Packs for International Warranty Service and to view a list of the countries where service is available, go to the Lenovo Web site at the time of service (such as support for International Warranty Service...

User Manual
Page 46
.........,56=K 56Flex, V.90,V.34......, 64=Bell 103, and 69=Bell 212. A, b, c, d, e, f default=12, 1, 300, 56000, 0, 0. Parameter "b" specifies automode operations where: 0=automode disabled, 1= automode enabled with fallback options Normal data link only (same as Profile 1 Disable auto-retrain Enable auto-retrain Displays the current Select Modulation settings Displays a list of support values 38 User Guide Parameter "c" specifies the minimum connection data rate (300- 56000). c=300-56000; e=0-1;
.........,56=K 56Flex, V.90,V.34......, 64=Bell 103, and 69=Bell 212. A, b, c, d, e, f default=12, 1, 300, 56000, 0, 0. Parameter "b" specifies automode operations where: 0=automode disabled, 1= automode enabled with fallback options Normal data link only (same as Profile 1 Disable auto-retrain Enable auto-retrain Displays the current Select Modulation settings Displays a list of support values 38 User Guide Parameter "c" specifies the minimum connection data rate (300- 56000). c=300-56000; e=0-1;

User Manual
Page 53
... BIOS, updating (flashing) 13, 14 books folder, online 31 boot-block recovery 14 C changing password 10 startup device sequence 11 cleaning the mouse 19 commands basic AT 35 fax class 1 39 fax class 2 39 manual modem 35 MNP/V.42/V.42bis/V.44 38 voice 40 considerations, passwords 10 creating and using recovery repair diskette 27 and using rescue media 26 diagnostic CD/DVD image 17 product recovery disc 23 customer support center 33 D deleting password 10 device drivers installing...
... BIOS, updating (flashing) 13, 14 books folder, online 31 boot-block recovery 14 C changing password 10 startup device sequence 11 cleaning the mouse 19 commands basic AT 35 fax class 1 39 fax class 2 39 manual modem 35 MNP/V.42/V.42bis/V.44 38 voice 40 considerations, passwords 10 creating and using recovery repair diskette 27 and using rescue media 26 diagnostic CD/DVD image 17 product recovery disc 23 customer support center 33 D deleting password 10 device drivers installing...

User Manual
Page 54
... operations, backup and recovery 24 optical mouse 19 overview, software 7 P password administrator 10 considerations 10 setting, changing, deleting 10 user 10 passwords, using 9 physical specifications 5 power Advanced Configuration and Power Interface (ACPI) support 4 features 4 power-on self-test (POST) 13 product recovery disc, creating 23 productivity center, ThinkVantage 31 programs, updating system 13 purchasing additional services 34 R recovering device drivers 28 from a POST/BIOS update failure 14 software 23 recovery boot-block 14 operations, backup and 24 problems, solving 29 repair...
... operations, backup and recovery 24 optical mouse 19 overview, software 7 P password administrator 10 considerations 10 setting, changing, deleting 10 user 10 passwords, using 9 physical specifications 5 power Advanced Configuration and Power Interface (ACPI) support 4 features 4 power-on self-test (POST) 13 product recovery disc, creating 23 productivity center, ThinkVantage 31 programs, updating system 13 purchasing additional services 34 R recovering device drivers 28 from a POST/BIOS update failure 14 software 23 recovery boot-block 14 operations, backup and 24 problems, solving 29 repair...


