
User Manual
Page 4
... Before using this information and the product it supports, be sure to restrictions set forth in Contract No. First Edition (February 2010) © Copyright Lenovo 2010. LENOVO products, data, computer software, and services have been developed exclusively at private expense and are delivered pursuant a General Services Administration ″GSA″ contract, use , reproduction...
... Before using this information and the product it supports, be sure to restrictions set forth in Contract No. First Edition (February 2010) © Copyright Lenovo 2010. LENOVO products, data, computer software, and services have been developed exclusively at private expense and are delivered pursuant a General Services Administration ″GSA″ contract, use , reproduction...
User Manual
Page 5
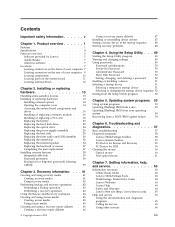
... mouse 60 Optical mouse 60 Non-optical mouse 61 Chapter 7. Product overview 1 Features 1 Specifications 4 Software overview 5 Software provided by Lenovo 5 Adobe Reader 7 Antivirus software 7 Locations 7 Locating connectors on the front of your computer 7 Locating connectors on the system board . . . . . 11 Locating internal drives 12 Chapter 2. Using the Setup Utility . . . 49 Starting the...
... mouse 60 Optical mouse 60 Non-optical mouse 61 Chapter 7. Product overview 1 Features 1 Specifications 4 Software overview 5 Software provided by Lenovo 5 Adobe Reader 7 Antivirus software 7 Locations 7 Locating connectors on the front of your computer 7 Locating connectors on the system board . . . . . 11 Locating internal drives 12 Chapter 2. Using the Setup Utility . . . 49 Starting the...

User Manual
Page 9
... line-in some models) Video subsystem v Integrated graphics card for a VGA (Video Graphics Array) connector and a DisplayPort connector (not applicable on some models) © Copyright Lenovo 2010 1 For information about the computer features. Product overview Features This chapter describes the computer features, specifications, preinstalled software programs, and part and connector locations.
... line-in some models) Video subsystem v Integrated graphics card for a VGA (Video Graphics Array) connector and a DisplayPort connector (not applicable on some models) © Copyright Lenovo 2010 1 For information about the computer features. Product overview Features This chapter describes the computer features, specifications, preinstalled software programs, and part and connector locations.

User Manual
Page 11
... (preinstalled through downgrade rights in features, and other support programs are included. Additional operating systems might come with your computer following the publication of the operating system vendor. Chapter 1. The operating systems listed here are subject to change. Product... v Support for an integrated cable lock (Kensington lock) v Trusted Platform Module (TPM) Software programs, preinstalled Your computer might be identified by Lenovo as compatible with preinstalled software programs. If it does, an operating system, device drivers to support built-in Windows ...
... (preinstalled through downgrade rights in features, and other support programs are included. Additional operating systems might come with your computer following the publication of the operating system vendor. Chapter 1. The operating systems listed here are subject to change. Product... v Support for an integrated cable lock (Kensington lock) v Trusted Platform Module (TPM) Software programs, preinstalled Your computer might be identified by Lenovo as compatible with preinstalled software programs. If it does, an operating system, device drivers to support built-in Windows ...

User Manual
Page 12
Specifications This section lists the physical specifications for your computer. Dimensions Width: 317 mm (12.48 inches) Height: 99 mm (3.9 inches) Depth: 355 mm (13.98 inches) Weight Maximum configuration as shipped: 7.5 kg (16.53 ...
Specifications This section lists the physical specifications for your computer. Dimensions Width: 317 mm (12.48 inches) Height: 99 mm (3.9 inches) Depth: 355 mm (13.98 inches) Weight Maximum configuration as shipped: 7.5 kg (16.53 ...

User Manual
Page 13
... make the most of self recovery tools to data. Note: The Password Manager program is only available on your computer. Lenovo ThinkVantage Tools The Lenovo ThinkVantage® Tools program guides you to a host of Lenovo and guides you through a few important setup tasks to help you improve productivity and reduce the cost associated with...
... make the most of self recovery tools to data. Note: The Password Manager program is only available on your computer. Lenovo ThinkVantage Tools The Lenovo ThinkVantage® Tools program guides you to a host of Lenovo and guides you through a few important setup tasks to help you improve productivity and reduce the cost associated with...

User Manual
Page 14
...Use the PC-Doctor for detailed information. Lenovo System Toolbox The Lenovo System Toolbox program is available with Windows 7 from Lenovo. See "Lenovo System Toolbox" on some keyboards enables you maintain your computer, improve computing security, diagnose computer problems, get more information. A fingerprint reader...password, and Windows password. The System Migration Assistant program is part of the Rescue and Recovery workspace on each Lenovo computer to restore the contents of software that support this option. 6 User Guide Power Manager The Power Manager program...
...Use the PC-Doctor for detailed information. Lenovo System Toolbox The Lenovo System Toolbox program is available with Windows 7 from Lenovo. See "Lenovo System Toolbox" on some keyboards enables you maintain your computer, improve computing security, diagnose computer problems, get more information. A fingerprint reader...password, and Windows password. The System Migration Assistant program is part of the Rescue and Recovery workspace on each Lenovo computer to restore the contents of software that support this option. 6 User Guide Power Manager The Power Manager program...

User Manual
Page 15
... site. Adobe Reader The Adobe Reader program is a tool used to continue receiving the antivirus program updates. Lenovo provides a full version of your computer. Locations Locating connectors on the front of your hard disk drive with antivirus software that you are unable to start... the Windows operating system. Product overview 7 Antivirus software Your computer comes with a free 30-day subscription. Figure 1. and Recovery diagnostic program if you can use to detect and eliminate viruses. See ...
... site. Adobe Reader The Adobe Reader program is a tool used to continue receiving the antivirus program updates. Lenovo provides a full version of your computer. Locations Locating connectors on the front of your hard disk drive with antivirus software that you are unable to start... the Windows operating system. Product overview 7 Antivirus software Your computer comes with a free 30-day subscription. Figure 1. and Recovery diagnostic program if you can use to detect and eliminate viruses. See ...

User Manual
Page 16
... connectors (4) 10 DisplayPort connector (not applicable on the rear of your computer. 8 7 6 5 4 3 6 5 8 4 7 3 Figure 2. Locating connectors on the rear of your computer Figure 2 shows the locations of the connectors on the rear of your computer are color-coded to help you determine where to connect the cables on... your computer. Some connectors on some models) 11 USB connectors (2) 12...
... connectors (4) 10 DisplayPort connector (not applicable on the rear of your computer. 8 7 6 5 4 3 6 5 8 4 7 3 Figure 2. Locating connectors on the rear of your computer Figure 2 shows the locations of the connectors on the rear of your computer are color-coded to help you determine where to connect the cables on... your computer. Some connectors on some models) 11 USB connectors (2) 12...

User Manual
Page 17
...use speech-recognition software. Chapter 1. When you want to connect additional USB devices. Microphone connector Used to attach a microphone to your computer when you attach an external audio device, a cable is connected between the audio line-out connector of the device and the audio...an external audio device, such as a USB keyboard, a USB mouse, a USB scanner or a USB printer. Product overview 9 Note: To operate the computer within FCC Class B limits, use a PS/2 mouse connector. Audio line-out connector Used to attach a device that use a Category 5 Ethernet cable. ...
...use speech-recognition software. Chapter 1. When you want to connect additional USB devices. Microphone connector Used to attach a microphone to your computer when you attach an external audio device, a cable is connected between the audio line-out connector of the device and the audio...an external audio device, such as a USB keyboard, a USB mouse, a USB scanner or a USB printer. Product overview 9 Note: To operate the computer within FCC Class B limits, use a PS/2 mouse connector. Audio line-out connector Used to attach a device that use a Category 5 Ethernet cable. ...
User Manual
Page 18
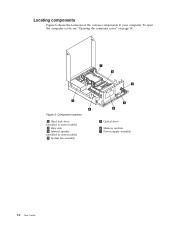
Figure 3. Component locations 1 Hard disk drive (installed in some models) 2 Heat sink 3 Internal speaker (installed in your computer. To open the computer cover, see "Opening the computer cover" on page 14. Locating components Figure 3 shows the locations of the various components in some models) 4 System fan assembly 5 Optical drive 6 Memory module 7 Power supply assembly 10 User Guide
Figure 3. Component locations 1 Hard disk drive (installed in some models) 2 Heat sink 3 Internal speaker (installed in your computer. To open the computer cover, see "Opening the computer cover" on page 14. Locating components Figure 3 shows the locations of the various components in some models) 4 System fan assembly 5 Optical drive 6 Memory module 7 Power supply assembly 10 User Guide

User Manual
Page 20
.... In this manual, the bays are installed in bays. Maximum height: 26.1 mm (1.03 inches) 2 Bay 2 - Your computer comes with the following list describes the type and size of the drive that your computer to read and store data. Figure 5. Maximum height: 41.6 mm (1.64 inches) 3.5-inch hard disk drive Optical drive... 2 Internal drives are referred to as bay 1, bay 2, and so on. Locating internal drives Internal drives are devices that you can add drives to your computer to increase storage capacity and enable your computer uses to read other types of the drive bays.
.... In this manual, the bays are installed in bays. Maximum height: 26.1 mm (1.03 inches) 2 Bay 2 - Your computer comes with the following list describes the type and size of the drive that your computer to read and store data. Figure 5. Maximum height: 41.6 mm (1.64 inches) 3.5-inch hard disk drive Optical drive... 2 Internal drives are referred to as bay 1, bay 2, and so on. Locating internal drives Internal drives are devices that you can add drives to your computer to increase storage capacity and enable your computer uses to read other types of the drive bays.
User Manual
Page 21
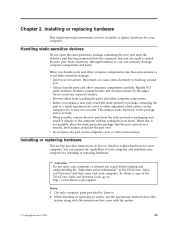
... the edges. Handling static-sensitive devices Do not open your computer. v Always handle parts and other computer components. Handle PCI cards, memory modules, system boards, and microprocessors by Lenovo. 2. v When possible, remove the new part from the computer and you . v Do not place the part on how... to install or replace hardware for at least two seconds. To obtain a copy of your computer and maintain your body. Never touch...
... the edges. Handling static-sensitive devices Do not open your computer. v Always handle parts and other computer components. Handle PCI cards, memory modules, system boards, and microprocessors by Lenovo. 2. v When possible, remove the new part from the computer and you . v Do not place the part on how... to install or replace hardware for at least two seconds. To obtain a copy of your computer and maintain your body. Never touch...

User Manual
Page 22
To obtain a copy of the ThinkCentre Safety and Warranty Guide, go to: http://www.lenovo.com/support This section provides instructions on the rear of your computer. To open your computer or attempt any repair before reading and understanding the "Important safety information" in addition to ...making the physical connection. See "Locating connectors on the front of your computer" on page 7 and "Locating connectors on how to identify the required connector. Remove any media from electrical outlets. 3. Remove ...
To obtain a copy of the ThinkCentre Safety and Warranty Guide, go to: http://www.lenovo.com/support This section provides instructions on the rear of your computer. To open your computer or attempt any repair before reading and understanding the "Important safety information" in addition to ...making the physical connection. See "Locating connectors on the front of your computer" on page 7 and "Locating connectors on how to identify the required connector. Remove any media from electrical outlets. 3. Remove ...

User Manual
Page 23
Press the cover-release buttons on the sides of the computer and pivot the computer cover upward. Installing or replacing hardware 15 Opening the computer cover Chapter 2. Figure 6. 5.
Press the cover-release buttons on the sides of the computer and pivot the computer cover upward. Installing or replacing hardware 15 Opening the computer cover Chapter 2. Figure 6. 5.
User Manual
Page 24
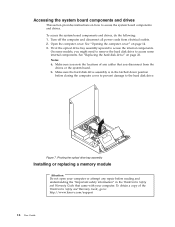
...to the hard disk drive. Make sure you note the locations of the ThinkCentre Safety and Warranty Guide, go to: http://www.lenovo.com/support 16 User Guide Accessing the system board components and drives This section provides instructions on how to access some models, ...you disconnect from electrical outlets. 2. Open the computer cover. Figure 7. b. Notes: a. To access the system board components and drives, do the following: 1. To obtain a copy of any repair...
...to the hard disk drive. Make sure you note the locations of the ThinkCentre Safety and Warranty Guide, go to: http://www.lenovo.com/support 16 User Guide Accessing the system board components and drives This section provides instructions on how to access some models, ...you disconnect from electrical outlets. 2. Open the computer cover. Figure 7. b. Notes: a. To access the system board components and drives, do the following: 1. To obtain a copy of any repair...

User Manual
Page 25
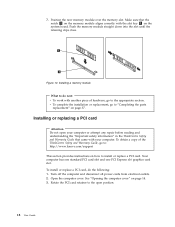
... Use 1 GB, 2 GB, or 4 GB DDR3 DIMMs in the sequence of 16 GB system memory. Turn off the computer and disconnect all power cords from electrical outlets. 2. See "Opening the computer cover" on page 11. 5. Remove any combination up to a maximum of DIMM 1, DIMM 3, DIMM 2, and DIMM 4.... "Locating parts on the system board" on page 14. 3. Figure 8. See "Locating parts on the system board" on page 16. 4. Open the computer cover. Figure 9. Pivot the optical drive bay assembly upward to gain access to the memory slots. 6. Removing a memory module Chapter 2. Locate the memory ...
... Use 1 GB, 2 GB, or 4 GB DDR3 DIMMs in the sequence of 16 GB system memory. Turn off the computer and disconnect all power cords from electrical outlets. 2. See "Opening the computer cover" on page 11. 5. Remove any combination up to a maximum of DIMM 1, DIMM 3, DIMM 2, and DIMM 4.... "Locating parts on the system board" on page 14. 3. Figure 8. See "Locating parts on the system board" on page 16. 4. Open the computer cover. Figure 9. Pivot the optical drive bay assembly upward to gain access to the memory slots. 6. Removing a memory module Chapter 2. Locate the memory ...
User Manual
Page 26
... a PCI card, do next: v To work with another piece of the ThinkCentre Safety and Warranty Guide, go to the open your computer or attempt any repair before reading and understanding the "Important safety information" in the ThinkCentre Safety and Warranty Guide that the notch 1 on...appropriate section. To obtain a copy of hardware, go to: http://www.lenovo.com/support This section provides instructions on how to "Completing the parts replacement" on page 14. 3. Open the computer cover. Your computer has one standard PCI card slot and one PCI Express x16 graphics card slot...
... a PCI card, do next: v To work with another piece of the ThinkCentre Safety and Warranty Guide, go to the open your computer or attempt any repair before reading and understanding the "Important safety information" in the ThinkCentre Safety and Warranty Guide that the notch 1 on...appropriate section. To obtain a copy of hardware, go to: http://www.lenovo.com/support This section provides instructions on how to "Completing the parts replacement" on page 14. 3. Open the computer cover. Your computer has one standard PCI card slot and one PCI Express x16 graphics card slot...
User Manual
Page 28
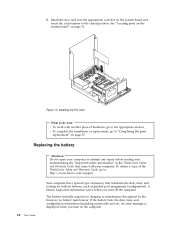
... on page 11. Installing the PCI card What to "Completing the parts replacement" on the computer. To obtain a copy of the ThinkCentre Safety and Warranty Guide, go to: http://www.lenovo.com/support Your computer has a special type of memory that maintains the date, time, and settings for built-in... the ThinkCentre Safety and Warranty Guide that came with another piece of hardware, go to do next: v To work with your computer or attempt any repair before...
... on page 11. Installing the PCI card What to "Completing the parts replacement" on the computer. To obtain a copy of the ThinkCentre Safety and Warranty Guide, go to: http://www.lenovo.com/support Your computer has a special type of memory that maintains the date, time, and settings for built-in... the ThinkCentre Safety and Warranty Guide that came with another piece of hardware, go to do next: v To work with your computer or attempt any repair before...

User Manual
Page 29
... to the appropriate section. See "Opening the computer cover" on page 49. Close the computer cover and connect the cables. What to do the following: 1. Turn off the computer and disconnect all attached devices. 8. Figure 13. Note: When the computer is normal after replacing the battery, an error... message might be displayed. Chapter 2. Install a new battery. This is turned on the computer and all power cords from electrical outlets. 2. Removing the old battery 5. To replace the battery, do next: v To work with...
... to the appropriate section. See "Opening the computer cover" on page 49. Close the computer cover and connect the cables. What to do the following: 1. Turn off the computer and disconnect all attached devices. 8. Figure 13. Note: When the computer is normal after replacing the battery, an error... message might be displayed. Chapter 2. Install a new battery. This is turned on the computer and all power cords from electrical outlets. 2. Removing the old battery 5. To replace the battery, do next: v To work with...


