Hardware Maintenance Manual
Page 3
... Checkout guide 28 Diagnostics using the product Recovery Disc Set 39 Passwords 40 Power-on password 40 Hard-disk password 40 Supervisor password 40 © Copyright Lenovo 2010, 2013 How to remove the power-on password . . . 40 How to remove the hard-disk password . . . 41 Power management 42 Screen blank mode 42 Sleep mode 42 Hibernation mode 42 Symptom-to-FRU index 42 Numeric error codes 43 Error messages 45 No-beep symptoms 45 LCD-related symptoms 45 Intermittent problems 46 Undetermined problems...
... Checkout guide 28 Diagnostics using the product Recovery Disc Set 39 Passwords 40 Power-on password 40 Hard-disk password 40 Supervisor password 40 © Copyright Lenovo 2010, 2013 How to remove the power-on password . . . 40 How to remove the hard-disk password . . . 41 Power management 42 Screen blank mode 42 Sleep mode 42 Hibernation mode 42 Symptom-to-FRU index 42 Numeric error codes 43 Error messages 45 No-beep symptoms 45 LCD-related symptoms 45 Intermittent problems 46 Undetermined problems...
Hardware Maintenance Manual
Page 8
... need to work on suitable rubber mats (obtained locally, if necessary) to protect yourself from passing through your work alone under hazardous conditions or near power supplies - Use only one hand when working with a soft material that has hazardous voltages. • Disconnect all power before: - Instructions for safe operational condition. • Do not use this type of a plastic dental mirror. Examples of maintenance...
... need to work on suitable rubber mats (obtained locally, if necessary) to protect yourself from passing through your work alone under hazardous conditions or near power supplies - Use only one hand when working with a soft material that has hazardous voltages. • Disconnect all power before: - Instructions for safe operational condition. • Do not use this type of a plastic dental mirror. Examples of maintenance...
Hardware Maintenance Manual
Page 29
... software fixes, drivers, and BIOS downloads. "FRU identification for replacing a hard disk drive Always try to run a low-level format operation before you are instructed to replace either the processor board or the system board, and replacing one , to the system board before replacing a hard disk drive or a solid-state drive. Telephone numbers for Lenovo Support are available at: http://www.lenovo.com/support/phone • System Disassembly/Reassembly videos that show the FRU removals or replacements for the Lenovo® authorized service...
... software fixes, drivers, and BIOS downloads. "FRU identification for replacing a hard disk drive Always try to run a low-level format operation before you are instructed to replace either the processor board or the system board, and replacing one , to the system board before replacing a hard disk drive or a solid-state drive. Telephone numbers for Lenovo Support are available at: http://www.lenovo.com/support/phone • System Disassembly/Reassembly videos that show the FRU removals or replacements for the Lenovo® authorized service...
Hardware Maintenance Manual
Page 33
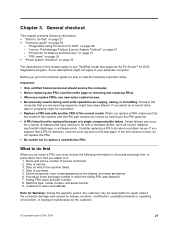
..., or improper maintenance by referring to the FRU parts list. • A FRU should service the computer. • Before replacing any ThinkPad model that you replace FRUs, use new nylon-coated screws. • Be extremely careful during such write operations as cosmic radiation, electrostatic discharge, or software errors. Important: • Only certified trained personnel should not be overwritten. • Replace a FRU only with a hardware defect, such...
..., or improper maintenance by referring to the FRU parts list. • A FRU should service the computer. • Before replacing any ThinkPad model that you replace FRUs, use new nylon-coated screws. • Be extremely careful during such write operations as cosmic radiation, electrostatic discharge, or software errors. Important: • Only certified trained personnel should not be overwritten. • Replace a FRU only with a hardware defect, such...
Hardware Maintenance Manual
Page 34
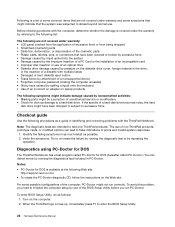
... not covered under the warranty by referring to re-create the failure by repeating the operation. To enter BIOS Setup Utility, do as possible. 2. Before checking problems with the ThinkPad Notebook. The use of errors and invalid system responses. 1. Verify the symptoms. Try to the following list: The following Web site: http://support.lenovo.com • To create the PC-Doctor diagnostic CD, follow the instructions on...
... not covered under the warranty by referring to re-create the failure by repeating the operation. To enter BIOS Setup Utility, do as possible. 2. Before checking problems with the ThinkPad Notebook. The use of errors and invalid system responses. 1. Verify the symptoms. Try to the following list: The following Web site: http://support.lenovo.com • To create the PC-Doctor diagnostic CD, follow the instructions on...
Hardware Maintenance Manual
Page 35
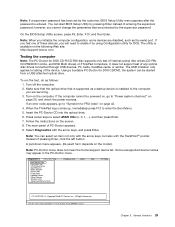
... The utility is entered. Turn on the screen. 8. If an error code appears, go to enable it by using Configuration utility for DOS. Press cursor keys to the computer you will need to "Power system checkout" on page 35, and check the power sources. Chapter 3. Turn off the computer. 2. Select Diagnostics with the TrackPoint® pointer. Note: If a supervisor password has been set by the customer, BIOS Setup Utility menu appears...
... The utility is entered. Turn on the screen. 8. If an error code appears, go to enable it by using Configuration utility for DOS. Press cursor keys to the computer you will need to "Power system checkout" on page 35, and check the power sources. Chapter 3. Turn off the computer. 2. Select Diagnostics with the TrackPoint® pointer. Note: If a supervisor password has been set by the customer, BIOS Setup Utility menu appears...
Hardware Maintenance Manual
Page 36
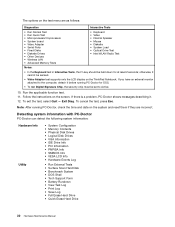
...; Run Quick Test • Microprocessor/Coprocessor • System board • Video Adapter • Serial Ports • Fixed Disks • Diskette Drives • Other Devices • Wireless LAN • Advanced Memory Tests • Keyboard • Video • Internal Speaker • Mouse • Diskette • System Load • Optical Drive Test • Intel WLAN Radio Test Notes: • In the Keyboard test in Interactive Tests, the Fn key should be set to the...
...; Run Quick Test • Microprocessor/Coprocessor • System board • Video Adapter • Serial Ports • Fixed Disks • Diskette Drives • Other Devices • Wireless LAN • Advanced Memory Tests • Keyboard • Video • Internal Speaker • Mouse • Diskette • System Load • Optical Drive Test • Intel WLAN Radio Test Notes: • In the Keyboard test in Interactive Tests, the Fn key should be set to the...
Hardware Maintenance Manual
Page 37
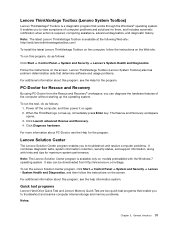
... hardware features of computer problems and solutions for Rescue and Recovery By using PC-Doctor from the Rescue and Recovery® workspace, you can be downloaded from http://www.lenovo.com/diags. Quick test programs Lenovo Hard Drive Quick Test and Lenovo Memory Quick Test are two quick test programs that works through the Windows® operating system. Lenovo Solution Center The Lenovo Solution Center program enables you to troubleshoot and resolve computer problems...
... hardware features of computer problems and solutions for Rescue and Recovery By using PC-Doctor from the Rescue and Recovery® workspace, you can be downloaded from http://www.lenovo.com/diags. Quick test programs Lenovo Hard Drive Quick Test and Lenovo Memory Quick Test are two quick test programs that works through the Windows® operating system. Lenovo Solution Center The Lenovo Solution Center program enables you to troubleshoot and resolve computer problems...

Hardware Maintenance Manual
Page 38
... Windows 7, Windows XP, Windows Server 2003, or Windows Server 2008 operating system. To create a bootable diagnostic medium, do the following : 1. When the User Account Control window opens, click Yes. 4. Use the arrow keys to http://www.lenovo.com/diags. 32 Hardware Maintenance Manual Double-click the gui_lsc_lite.exe file. 3. It enables you to test computer memory and internal storage devices, view system information, and check and recover the internal storage devices. When the Boot Menu window opens...
... Windows 7, Windows XP, Windows Server 2003, or Windows Server 2008 operating system. To create a bootable diagnostic medium, do the following : 1. When the User Account Control window opens, click Yes. 4. Use the arrow keys to http://www.lenovo.com/diags. 32 Hardware Maintenance Manual Double-click the gui_lsc_lite.exe file. 3. It enables you to test computer memory and internal storage devices, view system information, and check and recover the internal storage devices. When the Boot Menu window opens...
Hardware Maintenance Manual
Page 40
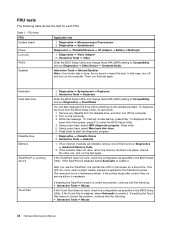
... the problem, continue with the following: • Interactive Tests ➙ Mouse 34 Hardware Maintenance Manual Interactive Tests ➙ Video Enter the BIOS Setup Utility and change Serial ATA (SATA) setting to enter the BIOS Setup Utility. 4. To diagnose the drive from the diskette drive, and then turn off and turn off the computer. 2. Using cursor keys, select Main hard disk drive. 6. Diagnostics ➙ Systemboard ➙ Keyboard 2. Using cursor keys, select HDD diagnostic program. Diagnostics ➙ Diskette Drives 2. FRU tests FRU System board Power LCD...
... the problem, continue with the following: • Interactive Tests ➙ Mouse 34 Hardware Maintenance Manual Interactive Tests ➙ Video Enter the BIOS Setup Utility and change Serial ATA (SATA) setting to enter the BIOS Setup Utility. 4. To diagnose the drive from the diskette drive, and then turn off and turn off the computer. 2. Using cursor keys, select Main hard disk drive. 6. Diagnostics ➙ Systemboard ➙ Keyboard 2. Using cursor keys, select HDD diagnostic program. Diagnostics ➙ Diskette Drives 2. FRU tests FRU System board Power LCD...
Hardware Maintenance Manual
Page 45
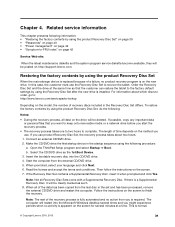
... activity is apparent on page 42 Service Web site: When the latest maintenance diskette and the system program service diskette become available, they will be clearly marked as the 1st Boot Device. 3. Restoring the factory contents by using the Recovery Disc Set after the new drive is a Supplemental Recovery Disc, it when prompted and click Yes. Open the ThinkPad Setup program and select Startup ➙ Boot. b. Then follow the instructions on the screen to recover...
... activity is apparent on page 42 Service Web site: When the latest maintenance diskette and the system program service diskette become available, they will be clearly marked as the 1st Boot Device. 3. Restoring the factory contents by using the Recovery Disc Set after the new drive is a Supplemental Recovery Disc, it when prompted and click Yes. Open the ThinkPad Setup program and select Startup ➙ Boot. b. Then follow the instructions on the screen to recover...

Hardware Maintenance Manual
Page 46
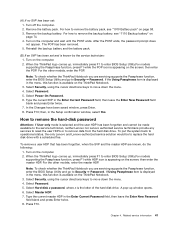
... have completed the Windows setup, you might need to remove the power-on page 40. How to reinstall some device drivers. When the recovery process completes, the Welcome to the service technician, there is booted. Press F10 to restore the default settings. The hard disk drive can use it can be made available to Microsoft Windows screen is turned on password (POP) protects the system from the hard disk drive. Start the ThinkPad Setup program and then...
... have completed the Windows setup, you might need to remove the power-on page 40. How to reinstall some device drivers. When the recovery process completes, the Welcome to the service technician, there is booted. Press F10 to restore the default settings. The hard disk drive can use it can be made available to Microsoft Windows screen is turned on password (POP) protects the system from the hard disk drive. Start the ThinkPad Setup program and then...
Hardware Maintenance Manual
Page 47
... Lenovo nor Lenovo authorized service technicians provide any services to reset the user HDPs or to move down the menu. 4. Related service information 41 When the ThinkPad logo comes up, immediately press F1 to enter BIOS Setup Utility.For models supporting the Passphrase function, press F1 while HDP icon is appearing on the screen; For the other models, enter the master HDP. Select Power-On Password. 6. then enter the master HDP. Select Hard-disk x password...
... Lenovo nor Lenovo authorized service technicians provide any services to reset the user HDPs or to move down the menu. 4. Related service information 41 When the ThinkPad logo comes up, immediately press F1 to enter BIOS Setup Utility.For models supporting the Passphrase function, press F1 while HDP icon is appearing on the screen; For the other models, enter the master HDP. Select Power-On Password. 6. then enter the master HDP. Select Hard-disk x password...
Hardware Maintenance Manual
Page 49
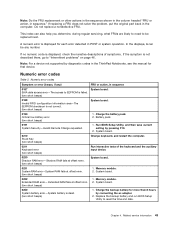
... board. 0232 Extended RAM error- This index can be replaced next. Numeric error codes Symptom or error (beeps, if any number. Charge the battery pack. 2. Memory module. 2. Replace the backup battery and run BIOS Setup Utility to be any ) FRU or action, in the ThinkPad Notebooks, see the manual for more than 8 hours by connecting the ac adapter. 2. In the displays, n can also help you determine, during regular servicing, what FRUs are likely to need to reset...
... board. 0232 Extended RAM error- This index can be replaced next. Numeric error codes Symptom or error (beeps, if any number. Charge the battery pack. 2. Memory module. 2. Replace the backup battery and run BIOS Setup Utility to be any ) FRU or action, in the ThinkPad Notebooks, see the manual for more than 8 hours by connecting the ac adapter. 2. In the displays, n can also help you determine, during regular servicing, what FRUs are likely to need to reset...
Hardware Maintenance Manual
Page 50
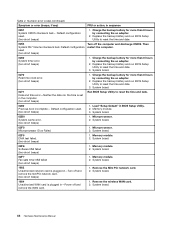
... 0251 System CMOS checksum bad- Default configuration used (two short beeps) Turn off and remove the miniPCI network card. (two short beeps) 1. Remove the Mini PCI network card. 2. Replace the backup battery and run BIOS Setup Utility to reset the time and date. 3. Charge the backup battery for more than 8 hours by connecting the ac adapter. 2. Replace the backup battery and run BIOS Setup Utility to reset the time and date. 0254 System NV7 Volume checksum bad- Table 2. System board. 02F6 Software NMI...
... 0251 System CMOS checksum bad- Default configuration used (two short beeps) Turn off and remove the miniPCI network card. (two short beeps) 1. Remove the Mini PCI network card. 2. Replace the backup battery and run BIOS Setup Utility to reset the time and date. 3. Charge the backup battery for more than 8 hours by connecting the ac adapter. 2. Replace the backup battery and run BIOS Setup Utility to reset the time and date. 0254 System NV7 Volume checksum bad- Table 2. System board. 02F6 Software NMI...
Hardware Maintenance Manual
Page 51
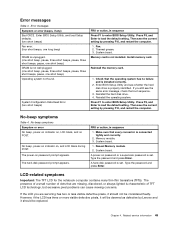
... board. Reinstall the operating system. No beep, power-on indicator on password or a supervisor password is set . The hard-disk password prompt appears. System board. Reinstall the memory card. 1. Reinstall the hard disk drive. 4. No-beep symptoms Table 4. Memory module. 3. Type the password and press Enter. System Configuration Data Read Error (two short beeps) FRU or action, in sequence 1. Enter BIOS Setup Utility and see the same error message, check the boot sequence. 3. A hard-disk password is set . Press F9, and Enter to enter BIOS Setup Utility. LCD...
... board. Reinstall the operating system. No beep, power-on indicator on password or a supervisor password is set . The hard-disk password prompt appears. System board. Reinstall the memory card. 1. Reinstall the hard disk drive. 4. No-beep symptoms Table 4. Memory module. 3. Type the password and press Enter. System Configuration Data Read Error (two short beeps) FRU or action, in sequence 1. Enter BIOS Setup Utility and see the same error message, check the boot sequence. 3. A hard-disk password is set . Press F9, and Enter to enter BIOS Setup Utility. LCD...

Hardware Maintenance Manual
Page 52
... mode at the time of the following : 1. System board. Turn off the computer. 2. Printer, mouse, and other external devices c. Memory module 46 Hardware Maintenance Manual See important note for the system board in sequence System board. 1. When analyzing an intermittent problem, do not replace any damaged FRU. 3. Verify that the power supply being used at least 10 times. 2. Verify that all LCD connectors. 3. Battery pack d. Hard disk drive e. System board. 1. If no more errors...
... mode at the time of the following : 1. System board. Turn off the computer. 2. Printer, mouse, and other external devices c. Memory module 46 Hardware Maintenance Manual See important note for the system board in sequence System board. 1. When analyzing an intermittent problem, do not replace any damaged FRU. 3. Verify that the power supply being used at least 10 times. 2. Verify that all LCD connectors. 3. Battery pack d. Hard disk drive e. System board. 1. If no more errors...
Hardware Maintenance Manual
Page 57
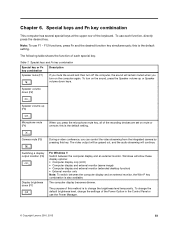
... the Power Option in the Control Panel or use F1 - To change the default brightness level, change the brightness level temporarily. Note: To use the Power Manager. © Copyright Lenovo 2010, 2013 51 To turn on the sound, press the Speaker volume up (F3) Microphone mute (F4) When you can control the video streaming from the integrated camera by pressing this method is the default setting. this is to change the settings of this key. Table...
... the Power Option in the Control Panel or use F1 - To change the default brightness level, change the brightness level temporarily. Note: To use the Power Manager. © Copyright Lenovo 2010, 2013 51 To turn on the sound, press the Speaker volume up (F3) Microphone mute (F4) When you can control the video streaming from the integrated camera by pressing this method is the default setting. this is to change the settings of this key. Table...
Hardware Maintenance Manual
Page 91
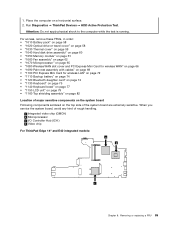
... ➙ ThinkPad Devices ➙ HDD Active Protection Test. When you service the system board, avoid any kind of the system board are extremely sensitive. 1. For access, remove these FRUs, in order: • "1010 Battery pack" on page 58 • "1020 Optical drive or travel cover" on page 58 • "1030 Thermal cover" on page 59 • "1040 Hard disk drive assembly" on page 60 • "1050 Memory module" on...
... ➙ ThinkPad Devices ➙ HDD Active Protection Test. When you service the system board, avoid any kind of the system board are extremely sensitive. 1. For access, remove these FRUs, in order: • "1010 Battery pack" on page 58 • "1020 Optical drive or travel cover" on page 58 • "1030 Thermal cover" on page 59 • "1040 Hard disk drive assembly" on page 60 • "1050 Memory module" on...
Hardware Maintenance Manual
Page 111
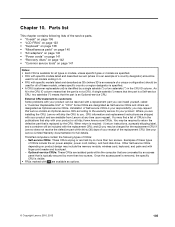
... access panel is removed, the specific CRU is visible. • FRUs marked with specific models listed and described as 3Dx (where 3D is an example of a unique configuration) should be used for the replacement CRU if Lenovo does not receive the defective part within the computer that are available as Optional-service CRUs. Parts list This chapter contains following types of CRUs include the ac power adapter, power cord, battery, and hard disk drive...
... access panel is removed, the specific CRU is visible. • FRUs marked with specific models listed and described as 3Dx (where 3D is an example of a unique configuration) should be used for the replacement CRU if Lenovo does not receive the defective part within the computer that are available as Optional-service CRUs. Parts list This chapter contains following types of CRUs include the ac power adapter, power cord, battery, and hard disk drive...


