User Manual
Page 47
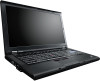
...for CTO, CMV, and GAV products" on page 41 Important: BIOS and device driver fixes are customer-installable. The BIOS and device drivers are posted on the customer support site http://www.lenovo.com/support System Disassembly/Reassembly videos that show the FRU removals or replacements for CTO...to the system board before replacing any software fixes, drivers, and BIOS downloads. Enter the product number of the computer or press Auto-detect button on the screen and install the necessary software. © Copyright Lenovo 2010 39 Important service information This chapter presents following...
...for CTO, CMV, and GAV products" on page 41 Important: BIOS and device driver fixes are customer-installable. The BIOS and device drivers are posted on the customer support site http://www.lenovo.com/support System Disassembly/Reassembly videos that show the FRU removals or replacements for CTO...to the system board before replacing any software fixes, drivers, and BIOS downloads. Enter the product number of the computer or press Auto-detect button on the screen and install the necessary software. © Copyright Lenovo 2010 39 Important service information This chapter presents following...
User Manual
Page 63
...solid state drive (SSD) is on the new drive. Operating System Recovery Disc (one or more discs) This disc restores the preinstalled applications and drivers on http://www.lenovo.com/spm Restoring the factory contents by using Recovery Disc Set" v "Passwords" on page 56 v "Power management" on page 60 v "Symptom... available, they arrive. Not all data on the drive will be deleted. Use this case, you start the recovery process. Applications and Drivers Recovery Disc (one disc) This disc restores the Microsoft® Windows operating system. If you do the following: © Copyright...
...solid state drive (SSD) is on the new drive. Operating System Recovery Disc (one or more discs) This disc restores the preinstalled applications and drivers on http://www.lenovo.com/spm Restoring the factory contents by using Recovery Disc Set" v "Passwords" on page 56 v "Power management" on page 60 v "Symptom... available, they arrive. Not all data on the drive will be deleted. Use this case, you start the recovery process. Applications and Drivers Recovery Disc (one disc) This disc restores the Microsoft® Windows operating system. If you do the following: © Copyright...
User Manual
Page 64
...(POP), the hard-disk password (HDP), and the supervisor password (SVP). The Setup Utility program opens. Insert the Applications and Drivers Recovery Disc when prompted and then click OK to save the Setup Utility configuration changes. Press F10 to begin the operating system recovery... process. 7. Note: After restoring a drive to begin the applications and drivers recovery process. 8. The computer does not start until the password is normal. 10. Passwords 1. Click Yes in the displayed window ...
...(POP), the hard-disk password (HDP), and the supervisor password (SVP). The Setup Utility program opens. Insert the Applications and Drivers Recovery Disc when prompted and then click OK to save the Setup Utility configuration changes. Press F10 to begin the operating system recovery... process. 7. Note: After restoring a drive to begin the applications and drivers recovery process. 8. The computer does not start until the password is normal. 10. Passwords 1. Click Yes in the displayed window ...
User Manual
Page 83
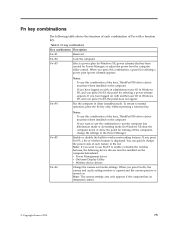
...quickly change the settings in sleep (standby) mode. Note: The camera settings area only appears if the computer has an integrated camera. © Copyright Lenovo 2010 75 Fn+F2 Lock the computer. When you press Fn+F6, the camera and audio setting window is opened and the camera preview is... created by Power Manager, or adjust the power level by using the slider control. When you press this combination of the keys, ThinkPad PM device driver must have logged on with a function key. Fn key combinations Key combination Description Fn+F1 Reserved. Fn+F5 Fn+F6 Notes: To use the...
...quickly change the settings in sleep (standby) mode. Note: The camera settings area only appears if the computer has an integrated camera. © Copyright Lenovo 2010 75 Fn+F2 Lock the computer. When you press Fn+F6, the camera and audio setting window is opened and the camera preview is... created by Power Manager, or adjust the power level by using the slider control. When you press this combination of the keys, ThinkPad PM device driver must have logged on with a function key. Fn key combinations Key combination Description Fn+F1 Reserved. Fn+F5 Fn+F6 Notes: To use the...
User Manual
Page 85
... will be displayed on the computer. Fn+Spacebar Fn+PrtSc Fn+ScrLk Fn+Pause Fn+cursor keys The purpose of the keys, ThinkPad PM device driver must have the following functions: v Fn + down arrow key: Play or Pause v Fn + up arrow key: Stop v Fn + right arrow key: Next Track v Fn + left...
... will be displayed on the computer. Fn+Spacebar Fn+PrtSc Fn+ScrLk Fn+Pause Fn+cursor keys The purpose of the keys, ThinkPad PM device driver must have the following functions: v Fn + down arrow key: Play or Pause v Fn + up arrow key: Stop v Fn + right arrow key: Next Track v Fn + left...
User Manual
Page 87
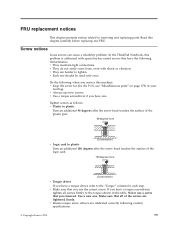
...once. Never use a screw that have a torque screwdriver, tighten all of the logic card: 180 degrees more (Cross-section) v Torque driver If you service this chapter carefully before replacing any FRU. Read this machine: v Keep the screw kit (for each step. If you have a torque...179) in the table. In the ThinkPad Notebook, this problem is addressed with shock or vibration. Do the following country specifications. © Copyright Lenovo 2010 79 v Always use the correct screw. Tighten screws as follows: v Plastic to plastic Turn an additional 90 degrees after the screw head...
...once. Never use a screw that have a torque screwdriver, tighten all of the logic card: 180 degrees more (Cross-section) v Torque driver If you service this chapter carefully before replacing any FRU. Read this machine: v Keep the screw kit (for each step. If you have a torque...179) in the table. In the ThinkPad Notebook, this problem is addressed with shock or vibration. Do the following country specifications. © Copyright Lenovo 2010 79 v Always use the correct screw. Tighten screws as follows: v Plastic to plastic Turn an additional 90 degrees after the screw head...


