Brochure
Page 3
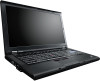
...; Ports: 4 USB ports, (1 USB / eSATA Combo, 1 Powered USB), IEEE 1394a, VGA, Display Port, Combo Jackt* • Slots: Express Card 34mm and 5-in-1 MMC Reader, Optional Contact or Contact-less Smart Card Reader** * eSATA / USB Combo Port is only available on T510 discrete models ** Available only on T510 discrete models Windows®. T SERIES ENHANCED EXPERIENCE THE LENOVO® THINKPAD® T410 AND T510 NOTEBOOK SPECIFICATIONS MODEL NAME - Life without Walls™. ROW • WLAN and Bluetooth® Supported Wireless...
...; Ports: 4 USB ports, (1 USB / eSATA Combo, 1 Powered USB), IEEE 1394a, VGA, Display Port, Combo Jackt* • Slots: Express Card 34mm and 5-in-1 MMC Reader, Optional Contact or Contact-less Smart Card Reader** * eSATA / USB Combo Port is only available on T510 discrete models ** Available only on T510 discrete models Windows®. T SERIES ENHANCED EXPERIENCE THE LENOVO® THINKPAD® T410 AND T510 NOTEBOOK SPECIFICATIONS MODEL NAME - Life without Walls™. ROW • WLAN and Bluetooth® Supported Wireless...

User Manual
Page 5
... adapter 51 Checking operational charging 52 Checking the battery pack 52 Checking the backup battery 53 Related service information 55 Restoring the factory contents by using Recovery Disc Set 55 Passwords 56 Power-on password 57 Hard-disk password 57 Supervisor password 57 How to remove the power-on password . . . . 57 How to remove the hard-disk password . . . . 58 Power management 60 Screen blank mode 60 Sleep (standby) mode 60 Hibernation mode 61 Symptom-to-FRU index 62 Numeric error codes 62 Error messages 66 © Copyright Lenovo...
... adapter 51 Checking operational charging 52 Checking the battery pack 52 Checking the backup battery 53 Related service information 55 Restoring the factory contents by using Recovery Disc Set 55 Passwords 56 Power-on password 57 Hard-disk password 57 Supervisor password 57 How to remove the power-on password . . . . 57 How to remove the hard-disk password . . . . 58 Power management 60 Screen blank mode 60 Sleep (standby) mode 60 Hibernation mode 61 Symptom-to-FRU index 62 Numeric error codes 62 Error messages 66 © Copyright Lenovo...
User Manual
Page 11
... has exposed electrical circuits, observe the following rules when working with live electrical currents. v Do not work area. Some hand tools have , near power supplies - v Find the room emergency power-off controls, is a complete circuit. Performing a mechanical inspection - v Never assume that has hazardous voltages. v If you . Instructions for safe operational condition. Important: Use only approved tools and test equipment.
... has exposed electrical circuits, observe the following rules when working with live electrical currents. v Do not work area. Some hand tools have , near power supplies - v Find the room emergency power-off controls, is a complete circuit. Performing a mechanical inspection - v Never assume that has hazardous voltages. v If you . Instructions for safe operational condition. Important: Use only approved tools and test equipment.
User Manual
Page 51
... the FRU part number are servicing sequence might not apply to do with another FRU of reasons that supports the PC-Doctor® for a variety of the correct model. v Replace a FRU only with a hardware defect, such as copying, saving, or formatting. Consider replacing a FRU only when a problem recurs. If the error does not recur, do first" on page 44 v "Checkout guide" on...
... the FRU part number are servicing sequence might not apply to do with another FRU of reasons that supports the PC-Doctor® for a variety of the correct model. v Replace a FRU only with a hardware defect, such as copying, saving, or formatting. Consider replacing a FRU only when a problem recurs. If the error does not recur, do first" on page 44 v "Checkout guide" on...
User Manual
Page 53
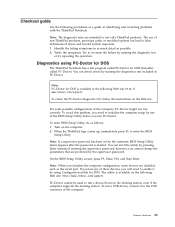
... devices, you cannot change the parameters that is entered. To enter BIOS Setup Utility, do as a guide in the docking station, even if the computer supports the docking station. however, you will need to test a device that are disabled, such as possible. 2. To test a USB device, connect it to enable it by using PC-Doctor for DOS The ThinkPad Notebook has a test program called PC-Doctor.) You can detect errors...
... devices, you cannot change the parameters that is entered. To enter BIOS Setup Utility, do as a guide in the docking station, even if the computer supports the docking station. however, you will need to test a device that are disabled, such as possible. 2. To test a USB device, connect it to enable it by using PC-Doctor for DOS The ThinkPad Notebook has a test program called PC-Doctor.) You can detect errors...
User Manual
Page 54
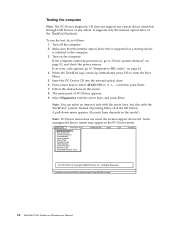
... "Power system checkout" on the model.) Note: PC-Doctor menu does not mean the formal support device list. The main panel of the ThinkPad Notebook. When the ThinkPad logo comes up, immediately press F12 to move in the PC-Doctor menu. Instead of pressing Enter, click the left button. Diagnostics Interactive Tests Run Normal Test Run Quick Test CPU/Coprocessor Systemboard Video Adapter Fixed Disks Diskette Drives Other Devices Communication Wireless LAN Advanced Memory...
... "Power system checkout" on the model.) Note: PC-Doctor menu does not mean the formal support device list. The main panel of the ThinkPad Notebook. When the ThinkPad logo comes up, immediately press F12 to move in the PC-Doctor menu. Instead of pressing Enter, click the left button. Diagnostics Interactive Tests Run Normal Test Run Quick Test CPU/Coprocessor Systemboard Video Adapter Fixed Disks Diskette Drives Other Devices Communication Wireless LAN Advanced Memory...
User Manual
Page 55
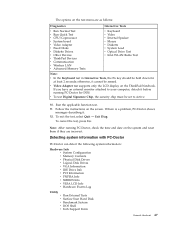
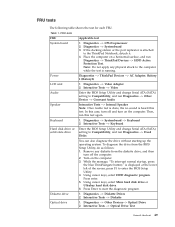
... Configuration v Memory Contents v Physical Disk Drives v Logical Disk Drives v VGA Information v IDE Drive Info v PCI Information v PNPISA Info v SMBIOS Info v VESA LCD Info v Hardware Events Log Utility v Run External Tests v Surface Scan Hard Disk v Benchmark System v DOS Shell v Tech Support Form General checkout 47 v Video Adapter test supports only the LCD display on the screen. If you have an external monitor attached to Active. 10. Follow the instructions on the ThinkPad Notebook. The options on the test menu...
... Configuration v Memory Contents v Physical Disk Drives v Logical Disk Drives v VGA Information v IDE Drive Info v PCI Information v PNPISA Info v SMBIOS Info v VESA LCD Info v Hardware Events Log Utility v Run External Tests v Surface Scan Hard Disk v Benchmark System v DOS Shell v Tech Support Form General checkout 47 v Video Adapter test supports only the LCD display on the screen. If you have an external monitor attached to Active. 10. Follow the instructions on the ThinkPad Notebook. The options on the test menu...
User Manual
Page 57
... Enter the BIOS Setup Utility and change Serial ATA (SATA) setting to the ThinkPad Notebook, detach it. 4. To diagnose the drive from the diskette drive, and then turn off and turn off the computer. 2. Remove any physical shock to Compatibility, and run Diagnostics --> ThinkPad Devices --> HDD Active Protection Test. Press Enter to enter the BIOS Setup Utility. 4. Diskette drive 1. Diagnostics --> CPU/Coprocessor 2. Power Diagnostics --> ThinkPad Devices --> AC Adapter, Battery 1 (Battery2) LCD unit 1. In this test again. Interactive Tests --> Keyboard Hard disk...
... Enter the BIOS Setup Utility and change Serial ATA (SATA) setting to the ThinkPad Notebook, detach it. 4. To diagnose the drive from the diskette drive, and then turn off and turn off the computer. 2. Remove any physical shock to Compatibility, and run Diagnostics --> ThinkPad Devices --> HDD Active Protection Test. Press Enter to enter the BIOS Setup Utility. 4. Diskette drive 1. Diagnostics --> CPU/Coprocessor 2. Power Diagnostics --> ThinkPad Devices --> AC Adapter, Battery 1 (Battery2) LCD unit 1. In this test again. Interactive Tests --> Keyboard Hard disk...
User Manual
Page 63
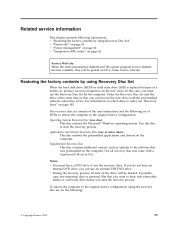
... user instructions and the following set , do not have a DVD drive to use the recovery discs. If you start the recovery process. To restore the computer to the original factory configuration using Recovery Disc Set When the hard disk drive (HDD) or solid state drive (SSD) is replaced because of a failure, no product recovery program is on the new drive. Use this case, you can use the Recovery Disc Set for the computer. Notes: v You must use an external USB DVD drive. Applications and Drivers Recovery Disc (one disc) This disc restores...
... user instructions and the following set , do not have a DVD drive to use the recovery discs. If you start the recovery process. To restore the computer to the original factory configuration using Recovery Disc Set When the hard disk drive (HDD) or solid state drive (SSD) is replaced because of a failure, no product recovery program is on the new drive. Use this case, you can use the Recovery Disc Set for the computer. Notes: v You must use an external USB DVD drive. Applications and Drivers Recovery Disc (one disc) This disc restores...
User Manual
Page 64
... restart into the DVD drive. 3. Use the arrow keys to save and exit the Setup Utility. Insert the Operating System Recovery Disc into the Microsoft Windows desktop several times and you have a Supplemental Recovery Disc, click No. 9. Press F10 to select Startup → Boot. Follow the instructions on . If you might experience periods when no action is turned on the screen to restore the default settings. Start the Setup Utility program and then...
... restart into the DVD drive. 3. Use the arrow keys to save and exit the Setup Utility. Insert the Operating System Recovery Disc into the Microsoft Windows desktop several times and you have a Supplemental Recovery Disc, click No. 9. Press F10 to select Startup → Boot. Follow the instructions on . If you might experience periods when no action is turned on the screen to restore the default settings. Start the Setup Utility program and then...
User Manual
Page 65
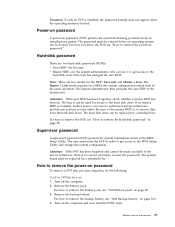
... remove the hard-disk password" on page 103. 4. For how to remove the POP, see "1100 Backup battery" on page 58. The system board must be entered before an operating system can use it can be used for a scheduled fee. Remove the battery pack. Related service information 57 The password must enter the SVP in the BIOS Setup Utility. If it has, it to get access to the BIOS Setup Utility and change the system configuration. Turn...
... remove the hard-disk password" on page 103. 4. For how to remove the POP, see "1100 Backup battery" on page 58. The system board must be entered before an operating system can use it can be used for a scheduled fee. Remove the battery pack. Related service information 57 The password must enter the SVP in the BIOS Setup Utility. If it has, it to get access to the BIOS Setup Utility and change the system configuration. Turn...

User Manual
Page 66
... user HDP has been forgotten and cannot be replaced for a scheduled fee. Note: To check whether the ThinkPad Notebook you are servicing supports the Passphrase function, enter the BIOS Setup Utility and go to recover data from the hard disk drive. A pop-up window opens. 6. Reinstall the backup battery and the battery pack. (B) If an SVP has been set and is appearing on the screen; If the Using Passphrase item is displayed in the menu...
... user HDP has been forgotten and cannot be replaced for a scheduled fee. Note: To check whether the ThinkPad Notebook you are servicing supports the Passphrase function, enter the BIOS Setup Utility and go to recover data from the hard disk drive. A pop-up window opens. 6. Reinstall the backup battery and the battery pack. (B) If an SVP has been set and is appearing on the screen; If the Using Passphrase item is displayed in the menu...

User Manual
Page 68
... set on the timer, and the user does not do any key. You can change the action of the following events occur in addition to what occurs in the operating system expires, the LCD backlight turns off . v Turn on the "Turn off monitor" timer in screen blank mode: v The LCD is a Windows 7 model, it does not support ThinkVantage Productivity Center. Press Fn+F3. v If the battery indicator blinks orange, indicating...
... set on the timer, and the user does not do any key. You can change the action of the following events occur in addition to what occurs in the operating system expires, the LCD backlight turns off . v Turn on the "Turn off monitor" timer in screen blank mode: v The LCD is a Windows 7 model, it does not support ThinkVantage Productivity Center. Press Fn+F3. v If the battery indicator blinks orange, indicating...
User Manual
Page 70
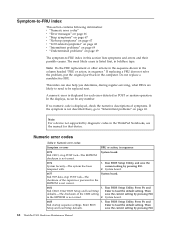
.... Enter BIOS Setup and load Setup defaults. 1. This index can be replaced next. A numeric error is not correct. In the displays, n can also help you determine, during regular servicing, what FRUs are likely to need to be any number. Numeric error codes Table 2. System board. 0177 Bad SVP data, stop POST task-The EEPROM checksum is displayed for that device. System board. 0182 1. Then save the current setting...
.... Enter BIOS Setup and load Setup defaults. 1. This index can be replaced next. A numeric error is not correct. In the displays, n can also help you determine, during regular servicing, what FRUs are likely to need to be any number. Numeric error codes Table 2. System board. 0177 Bad SVP data, stop POST task-The EEPROM checksum is displayed for that device. System board. 0182 1. Then save the current setting...
User Manual
Page 71
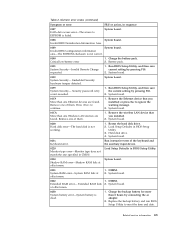
... to reset the time and date. Remove one of them . 1. Reseat the hard disk drive. 2. Hard disk drive. 4. Load Setup Defaults in CMOS. DIMM. Extended RAM fails 2. Table 2. Invalid RFID Serialization Information Area. 0189 System board. Run BIOS Setup Utility, and then save the current setting by pressing F10. 2. System board. 0192 System Security- Remove the wireless LAN device that you installed. 2. System board. 0200 Hard disk error-The hard disk is not correct. 0190 Critical low-battery error 1. System board. 021x Keyboard error. DIMM...
... to reset the time and date. Remove one of them . 1. Reseat the hard disk drive. 2. Hard disk drive. 4. Load Setup Defaults in CMOS. DIMM. Extended RAM fails 2. Table 2. Invalid RFID Serialization Information Area. 0189 System board. Run BIOS Setup Utility, and then save the current setting by pressing F10. 2. System board. 0192 System Security- Remove the wireless LAN device that you installed. 2. System board. 0200 Hard disk error-The hard disk is not correct. 0190 Critical low-battery error 1. System board. 021x Keyboard error. DIMM...
User Manual
Page 72
... -Power off and remove the WAN card. 1. Reset the password by connecting the ac adapter. 2. System board. 0271 Date and time error-Neither the date nor the time is cleared. Default configuration used . 1. DIMM. 3. System board. 02F5 DMA test failed. 1. DIMM. 2. Charge the backup battery for more than 8 hours by connecting the ac adapter. 2. Replace the backup battery. 3. Remove the WAN card that you installed. 2. Replace the backup battery and run BIOS Setup Utility to reset the time and date. 0280 Previous boot...
... -Power off and remove the WAN card. 1. Reset the password by connecting the ac adapter. 2. System board. 0271 Date and time error-Neither the date nor the time is cleared. Default configuration used . 1. DIMM. 3. System board. 02F5 DMA test failed. 1. DIMM. 2. Charge the backup battery for more than 8 hours by connecting the ac adapter. 2. Replace the backup battery. 3. Remove the WAN card that you installed. 2. Replace the backup battery and run BIOS Setup Utility to reset the time and date. 0280 Previous boot...
User Manual
Page 73
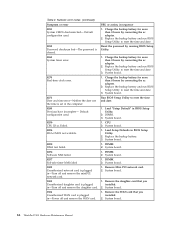
... Slot-0, but the reader that you set up for the authentication. 1830 Invalid memory configuration-Power off and install a memory module to the ThinkPad Notebook. 2. Reseat the hard disk drive. 2. Reseat the hard disk drive. disk drive) 3. Main hard disk drive. 3. Ultrabay hard disk drive. 3. Remove all but not in sequence 1805 Unauthorized Wireless USB card is attached. Undock docking station or port replicator if it by this system. Run Diagnostics --> ThinkPad Devices --> HDD Active Protection Test. 2010 Warning: Your internal hard disk drive (HDD) may not function...
... Slot-0, but the reader that you set up for the authentication. 1830 Invalid memory configuration-Power off and install a memory module to the ThinkPad Notebook. 2. Reseat the hard disk drive. 2. Reseat the hard disk drive. disk drive) 3. Main hard disk drive. 3. Ultrabay hard disk drive. 3. Remove all but not in sequence 1805 Unauthorized Wireless USB card is attached. Undock docking station or port replicator if it by this system. Run Diagnostics --> ThinkPad Devices --> HDD Active Protection Test. 2010 Warning: Your internal hard disk drive (HDD) may not function...
User Manual
Page 75
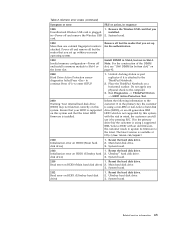
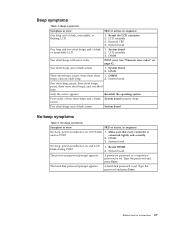
... "Numeric error codes" on password prompt appears. DIMM. connected tightly and correctly. 2. The hard-disk password prompt appears. A hard-disk password is set . Type the password and press Enter. Reinstall the operating system. Reseat DIMM. 2. The power-on page 62. Only the cursor appears. Five short beeps and a blank screen. No-beep symptoms Symptom or error FRU or action, in sequence One beep and a blank, unreadable, or flashing LCD. 1. Make sure...
... "Numeric error codes" on password prompt appears. DIMM. connected tightly and correctly. 2. The hard-disk password prompt appears. A hard-disk password is set . Type the password and press Enter. Reinstall the operating system. Reseat DIMM. 2. The power-on page 62. Only the cursor appears. Five short beeps and a blank screen. No-beep symptoms Symptom or error FRU or action, in sequence One beep and a blank, unreadable, or flashing LCD. 1. Make sure...
User Manual
Page 85
... sleep (standby) status indicator stops blinking. The on or off . To change the default brightness level, change the settings of numeric lock will be displayed on the ThinkPad Notebooks that have the ThinkLight. Fn+Spacebar Fn+PrtSc Fn+ScrLk Fn+Pause Fn+cursor keys The purpose of this combination of the Power Option in the Control Panel or use the Power Manager. The computer display becomes brighter. To change the default brightness level, change the settings...
... sleep (standby) status indicator stops blinking. The on or off . To change the default brightness level, change the settings of numeric lock will be displayed on the ThinkPad Notebooks that have the ThinkLight. Fn+Spacebar Fn+PrtSc Fn+ScrLk Fn+Pause Fn+cursor keys The purpose of this combination of the Power Option in the Control Panel or use the Power Manager. The computer display becomes brighter. To change the default brightness level, change the settings...
User Manual
Page 161
... AC adapter, a power cord, a battery, and a hard disk drive. v A CRU (customer replaceable unit) is available for all types or models, unless specific types or models are held by a single asterisk (*) or two asterisks (**) in U. v "Overall" on page 154 v "LCD FRUs" on page 170 v "Keyboard" on page 178 v "Miscellaneous parts" on page 179 v "AC adapters" on page 181 v "Power cords" on page 182 v "Recovery discs" on page 183 v "Common service tools...
... AC adapter, a power cord, a battery, and a hard disk drive. v A CRU (customer replaceable unit) is available for all types or models, unless specific types or models are held by a single asterisk (*) or two asterisks (**) in U. v "Overall" on page 154 v "LCD FRUs" on page 170 v "Keyboard" on page 178 v "Miscellaneous parts" on page 179 v "AC adapters" on page 181 v "Power cords" on page 182 v "Recovery discs" on page 183 v "Common service tools...


