User Manual
Page 47
...are available in this manual: • "Strategy for CTO, CMV, and GAV products" on page 41 Important: BIOS and device driver fixes are instructed to http://www.lenovo.com/support 2. After a system board is replaced, ensure that the latest BIOS is loaded to the system board before replacing any... of the FRUs may be the cause of the computer or press Auto-detect button on page 39 - Select Downloads and drivers. 4. Chapter 2....
...are available in this manual: • "Strategy for CTO, CMV, and GAV products" on page 41 Important: BIOS and device driver fixes are instructed to http://www.lenovo.com/support 2. After a system board is replaced, ensure that the latest BIOS is loaded to the system board before replacing any... of the FRUs may be the cause of the computer or press Auto-detect button on page 39 - Select Downloads and drivers. 4. Chapter 2....
User Manual
Page 63
... service diskette become available, they arrive. Operating System Recovery Disc (one or more discs) This disc restores the preinstalled applications and drivers on the method you can recover the new drive with a Supplemental Recovery Disc. b. Select the CD/DVD drive as updates to... -FRU index" on the new drive. Insert the Operating System Recovery Disc into the DVD drive. © Copyright Lenovo 2010 55 Related service information This chapter presents following : Note: Recovery takes several hours. Chapter 4. The Setup Utility program opens. Notes...
... service diskette become available, they arrive. Operating System Recovery Disc (one or more discs) This disc restores the preinstalled applications and drivers on the method you can recover the new drive with a Supplemental Recovery Disc. b. Select the CD/DVD drive as updates to... -FRU index" on the new drive. Insert the Operating System Recovery Disc into the DVD drive. © Copyright Lenovo 2010 55 Related service information This chapter presents following : Note: Recovery takes several hours. Chapter 4. The Setup Utility program opens. Notes...
User Manual
Page 64
... been set and has been processed, remove the disc and restart the computer. Follow the instructions on the screen to reinstall some device drivers. Read the license. Note: After restoring a drive to the factory default settings, you might want to begin the operating system recovery ...ThinkPad Notebook: the power-on by you might experience periods when no master HDP is normal. 10. This is available, neither Lenovo nor Lenovo authorized 56 ThinkPad T410 and T410i Hardware Maintenance Manual Follow the instructions on the screen to restore the original startup sequence. The ...
... been set and has been processed, remove the disc and restart the computer. Follow the instructions on the screen to reinstall some device drivers. Read the license. Note: After restoring a drive to the factory default settings, you might want to begin the operating system recovery ...ThinkPad Notebook: the power-on by you might experience periods when no master HDP is normal. 10. This is available, neither Lenovo nor Lenovo authorized 56 ThinkPad T410 and T410i Hardware Maintenance Manual Follow the instructions on the screen to restore the original startup sequence. The ...
User Manual
Page 83
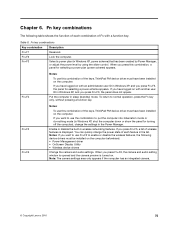
...list of wireless features is turned on the computer. Note: The camera settings area only appears if the computer has an integrated camera. © Copyright Lenovo 2010 75 Table 8. Fn+F2 Lock the computer. Fn+F3 Select a power plan (in sleep (standby) mode. You can quickly change the settings...: To use this combination, a panel for turning off the computer), change the power state of each combination of the keys, ThinkPad PM device driver must have been installed on . When you want to use the combination to normal operation, press the Fn key only, without pressing a function ...
...list of wireless features is turned on the computer. Note: The camera settings area only appears if the computer has an integrated camera. © Copyright Lenovo 2010 75 Table 8. Fn+F2 Lock the computer. Fn+F3 Select a power plan (in sleep (standby) mode. You can quickly change the settings...: To use this combination, a panel for turning off the computer), change the power state of each combination of the keys, ThinkPad PM device driver must have been installed on . When you want to use the combination to normal operation, press the Fn key only, without pressing a function ...
User Manual
Page 84
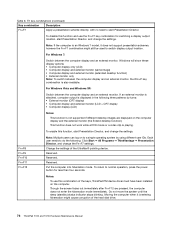
... available. For Windows Vista and Windows XP: Switch between the computer display and an external monitor. Change the settings of the keys, ThinkPad PM device driver must have been installed on to switch display output location. Put the computer into hibernation mode. For Windows 7: Switch between the computer display and an...
... available. For Windows Vista and Windows XP: Switch between the computer display and an external monitor. Change the settings of the keys, ThinkPad PM device driver must have been installed on to switch display output location. Put the computer into hibernation mode. For Windows 7: Switch between the computer display and an...
User Manual
Page 87
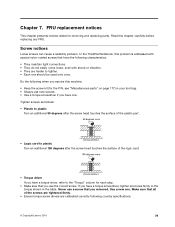
... touches the surface of the plastic part: 90 degrees more • Torque driver (Cross-section) If you have one. Use a new one should be used only once. Do the following country specifications. © Copyright Lenovo 2010 79 If you have the following characteristics: • They maintain tight ...(Cross-section) Turn an additional 180 degrees after the screw head touches the surface of the screws are tightened firmly. • Ensure torque screw drivers are harder to the "Torque" column for the P/N, see "Miscellaneous parts" on page 177) in the table. Tighten screws as follows: ...
... touches the surface of the plastic part: 90 degrees more • Torque driver (Cross-section) If you have one. Use a new one should be used only once. Do the following country specifications. © Copyright Lenovo 2010 79 If you have the following characteristics: • They maintain tight ...(Cross-section) Turn an additional 180 degrees after the screw head touches the surface of the screws are tightened firmly. • Ensure torque screw drivers are harder to the "Torque" column for the P/N, see "Miscellaneous parts" on page 177) in the table. Tighten screws as follows: ...


