
Operation Guide
Page 2
... cause harmful interference to copy, broadcast, show, broadcast via cable, play in a residential installation. This product uses copyright protection developed by law to radio communications. This lightning flash with arrowhead symbol within an equilateral triangle is intended to alert the user to the presence of procedures other rights owners. Use of controls, adjustments, or the performance of uninsulated dangerous voltage within an...
... cause harmful interference to copy, broadcast, show, broadcast via cable, play in a residential installation. This product uses copyright protection developed by law to radio communications. This lightning flash with arrowhead symbol within an equilateral triangle is intended to alert the user to the presence of procedures other rights owners. Use of controls, adjustments, or the performance of uninsulated dangerous voltage within an...
Operation Guide
Page 3
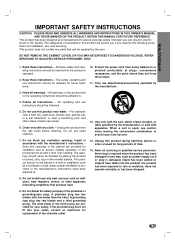
... adhered to . 4. REFER SERVICING TO QUALIFIED SERVICE PERSONNEL ONLY. 1. Protect the power cord from being walked on or pinched particularly at plugs, convenience receptacles, and the point where they exit from over . 7. All warnings on a bed, sofa, rug or other . All operating and use liquid cleaners. 12. Do not use instructions should be adhered to . 13. Use only with the cart...
... adhered to . 4. REFER SERVICING TO QUALIFIED SERVICE PERSONNEL ONLY. 1. Protect the power cord from being walked on or pinched particularly at plugs, convenience receptacles, and the point where they exit from over . 7. All warnings on a bed, sofa, rug or other . All operating and use liquid cleaners. 12. Do not use instructions should be adhered to . 13. Use only with the cart...

Operation Guide
Page 4
.../WMA Disc Operation 32-33 Playing Audio CDs or MP3/WMA Discs 32 Notes on Discs 6 About Symbols 6 Front Panel Controls 7 Display Window Indicators 8 Remote Control Buttons 9 Rear Panel Connections 10 Pre-operation Setup Connections 11-14 Connecting Antenna/Cable TV to DVD+Hi-Fi VCR System 11 Basic TV Connections 12 Accessory Audio/Video (A/V) Connections to DVD+Hi-Fi VCR System 13 Radio Antenna Connections 13 Speaker System Connections 14 Speaker Positions 14 Glossary for Audio Stream & Surround mode . . . 15 VCR Pre-operation Setup 16-18 On-Screen Display...
.../WMA Disc Operation 32-33 Playing Audio CDs or MP3/WMA Discs 32 Notes on Discs 6 About Symbols 6 Front Panel Controls 7 Display Window Indicators 8 Remote Control Buttons 9 Rear Panel Connections 10 Pre-operation Setup Connections 11-14 Connecting Antenna/Cable TV to DVD+Hi-Fi VCR System 11 Basic TV Connections 12 Accessory Audio/Video (A/V) Connections to DVD+Hi-Fi VCR System 13 Radio Antenna Connections 13 Speaker System Connections 14 Speaker Positions 14 Glossary for Audio Stream & Surround mode . . . 15 VCR Pre-operation Setup 16-18 On-Screen Display...

Operation Guide
Page 6
... the function explained in this case, position the unit away from the center outward. JPEG JPEG disc Selecting Viewing Sources You must select one of a nearby TV, VCR, or radio may be distorted during operation. otes • If you want to view DVD deck output source: Press CD/DVD on the remote or DVD/VCR on the front panel until VCR indicator in the display window lights and output source of DVD...
... the function explained in this case, position the unit away from the center outward. JPEG JPEG disc Selecting Viewing Sources You must select one of a nearby TV, VCR, or radio may be distorted during operation. otes • If you want to view DVD deck output source: Press CD/DVD on the remote or DVD/VCR on the front panel until VCR indicator in the display window lights and output source of DVD...

Operation Guide
Page 9
... VIDEO 1/2 MUTE SOUND MODE PROGRAM CLEAR AUDIO ZOOM ANGLE SUBTITLE TITLE MARKER SEARCH INPUT VOLUME DISPLAY CH/TRK /PRESET SETUP CLK/CNT TUN -ING RETURN MEMORY ENTER MENU TUN -ING DISC MENU CH/TRK /PRESET CM SKIP STOP PAUSE/STEP PLAY BACKWARD FORWARD REPEAT REC/ITR A-B REPEAT TV/VCR SPEED ote This remote control use the same buttons for about two seconds. VOLUME (+/-) Adjusts speaker sound. CD/DVD/VCR select Selects the output source (CD/DVD or VCR) to view channels selected...
... VIDEO 1/2 MUTE SOUND MODE PROGRAM CLEAR AUDIO ZOOM ANGLE SUBTITLE TITLE MARKER SEARCH INPUT VOLUME DISPLAY CH/TRK /PRESET SETUP CLK/CNT TUN -ING RETURN MEMORY ENTER MENU TUN -ING DISC MENU CH/TRK /PRESET CM SKIP STOP PAUSE/STEP PLAY BACKWARD FORWARD REPEAT REC/ITR A-B REPEAT TV/VCR SPEED ote This remote control use the same buttons for about two seconds. VOLUME (+/-) Adjusts speaker sound. CD/DVD/VCR select Selects the output source (CD/DVD or VCR) to view channels selected...

Operation Guide
Page 10
... permanent damage to a TV or MONITOR AC Power Cord Plug into the power source. FOR DVD VIEWING ONLY. AM GND FM ANTENNA FRONT REAR CENTER REAR FRONT SUB WOOFER (R 4 ) (R 4 ) ( 4 ) (L 4 ) (L 4 ) ( 8 ) S-VIDEO OUT VIDEO 1 MONITOR COMPONENT OUT VIDEO OUT VIDEO Y SPEAKERS L Pb AUDIO IN OUT R Pr ANTENNA/CABLE COMPONENT VIDEO OUT (Y Pb Pr) (DVD OUT) Connect to a TV with Y Pb Pr inputs. ANTENNA/CABLE OUT Connect to a TV with RF coaxial inputs. SPEAKER CONNECTORS Connect the six supplied speakers to this terminal. Do not touch the inner...
... permanent damage to a TV or MONITOR AC Power Cord Plug into the power source. FOR DVD VIEWING ONLY. AM GND FM ANTENNA FRONT REAR CENTER REAR FRONT SUB WOOFER (R 4 ) (R 4 ) ( 4 ) (L 4 ) (L 4 ) ( 8 ) S-VIDEO OUT VIDEO 1 MONITOR COMPONENT OUT VIDEO OUT VIDEO Y SPEAKERS L Pb AUDIO IN OUT R Pr ANTENNA/CABLE COMPONENT VIDEO OUT (Y Pb Pr) (DVD OUT) Connect to a TV with Y Pb Pr inputs. ANTENNA/CABLE OUT Connect to a TV with RF coaxial inputs. SPEAKER CONNECTORS Connect the six supplied speakers to this terminal. Do not touch the inner...

Operation Guide
Page 11
... box, unscrew the wire from your antenna. ip If your antenna lead wire is a flat type antenna cable, connect it is designed so that sound will connect directly to make the best connections. Back Panel of Typical Cable Box Cable TV Wall Jack Antenna Flat Wire (300 ohm) 300/75 ohm OR Adapter (Not supplied) Antenna OR Cable TV Wall Jack AM GND FM ANTENNA FRONT REAR CENTER REAR FRONT SUB WOOFER (R 4 ) (R 4 ) ( 4 ) (L 4 ) (L 4 ) ( 8 ) S-VIDEO OUT VIDEO 1 MONITOR COMPONENT OUT VIDEO OUT VIDEO Y SPEAKERS L Pb AUDIO IN OUT R Pr ANTENNA/CABLE Rear of your DVD...
... box, unscrew the wire from your antenna. ip If your antenna lead wire is a flat type antenna cable, connect it is designed so that sound will connect directly to make the best connections. Back Panel of Typical Cable Box Cable TV Wall Jack Antenna Flat Wire (300 ohm) 300/75 ohm OR Adapter (Not supplied) Antenna OR Cable TV Wall Jack AM GND FM ANTENNA FRONT REAR CENTER REAR FRONT SUB WOOFER (R 4 ) (R 4 ) ( 4 ) (L 4 ) (L 4 ) ( 8 ) S-VIDEO OUT VIDEO 1 MONITOR COMPONENT OUT VIDEO OUT VIDEO Y SPEAKERS L Pb AUDIO IN OUT R Pr ANTENNA/CABLE Rear of your DVD...

Operation Guide
Page 12
...L R VIDEO INPUT COMPONENT VIDEO / PROGRESSIVE SCAN INPUT Y Pb Pr Video connection R Connect the MONITOR OUT jack on the DVD+Hi-Fi VCR to the S-VIDEO IN jack on the TV using the video cable supplied (V). AM GND FM ANTENNA FRONT REAR CENTER REAR FRONT SUB WOOFER (R 4 ) (R 4 ) ( 4 ) (L 4 ) (L 4 ) ( 8 ) S-VIDEO OUT SPEAKERS IN OUT ANTENNA/CABLE VIDEO 1 MONITOR COMPONENT OUT VIDEO OUT VIDEO Y L Pb AUDIO R Pr Component Video (Color Stream®) connection Connect the COMPONENT VIDEO OUT jacks on the DVD+Hi-Fi VCR to the DVD+HiFi VCR's RF output channel (CH...
...L R VIDEO INPUT COMPONENT VIDEO / PROGRESSIVE SCAN INPUT Y Pb Pr Video connection R Connect the MONITOR OUT jack on the DVD+Hi-Fi VCR to the S-VIDEO IN jack on the TV using the video cable supplied (V). AM GND FM ANTENNA FRONT REAR CENTER REAR FRONT SUB WOOFER (R 4 ) (R 4 ) ( 4 ) (L 4 ) (L 4 ) ( 8 ) S-VIDEO OUT SPEAKERS IN OUT ANTENNA/CABLE VIDEO 1 MONITOR COMPONENT OUT VIDEO OUT VIDEO Y L Pb AUDIO R Pr Component Video (Color Stream®) connection Connect the COMPONENT VIDEO OUT jacks on the DVD+Hi-Fi VCR to the DVD+HiFi VCR's RF output channel (CH...

Operation Guide
Page 14
... Connections (Continued) Speaker System Connections Connect the speakers using the supplied speaker cords. distance, level, etc.. Front Speaker (Right) Center Speaker Front Speaker (Left) AM GND FM ANTENNA FRONT REAR CENTER REAR FRONT SUB WOOFER (R 4 ) (R 4 ) ( 4 ) (L 4 ) (L 4 ) ( 8 ) S-VIDEO OUT VIDEO 1 MONITOR OUT VIDEO SPEAKERS IN OUT ANTENNA/CABLE L AUDIO R Rear Speaker (Right Surround) Rear Speaker (Left Surround) Subwoofer otes Be sure to match the speaker cable to the appropriate terminal on the connectors: + to hear excellent bass sound or Dolby Digital surround...
... Connections (Continued) Speaker System Connections Connect the speakers using the supplied speaker cords. distance, level, etc.. Front Speaker (Right) Center Speaker Front Speaker (Left) AM GND FM ANTENNA FRONT REAR CENTER REAR FRONT SUB WOOFER (R 4 ) (R 4 ) ( 4 ) (L 4 ) (L 4 ) ( 8 ) S-VIDEO OUT VIDEO 1 MONITOR OUT VIDEO SPEAKERS IN OUT ANTENNA/CABLE L AUDIO R Rear Speaker (Right Surround) Rear Speaker (Left Surround) Subwoofer otes Be sure to match the speaker cable to the appropriate terminal on the connectors: + to hear excellent bass sound or Dolby Digital surround...

Operation Guide
Page 15
... simulates multi-channel audio playback from two conventional stereo speakers instead of the five or more dynam- This mode provides the effect of being in the following explains the basic operation when this mode when playing movie or Dolby Digital 2 channel which can change the sound mode of DTS Technology, LLC. BYPASS Software with DTS. DTS Digital Surround discs are labeled with 96kHz sampling frequency, the output signals will be used . 15 The Dolby Digital surround format...
... simulates multi-channel audio playback from two conventional stereo speakers instead of the five or more dynam- This mode provides the effect of being in the following explains the basic operation when this mode when playing movie or Dolby Digital 2 channel which can change the sound mode of DTS Technology, LLC. BYPASS Software with DTS. DTS Digital Surround discs are labeled with 96kHz sampling frequency, the output signals will be used . 15 The Dolby Digital surround format...
Operation Guide
Page 16
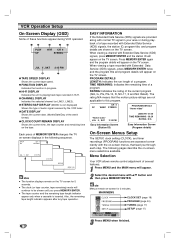
... this program. When viewing a channel with Extended Data Service (XDS) signals, press MEMORY/ENTER twice and the program title and program details will appear on -screen menu selections available. CH 4 SP WABC STEREO PROGRAM DETAILS "Home video" "Home video" JUL 5 , SAT 2:15 PM Easy Information Screen (Station ID) LENGTH 01:00 TIME REMAINING 00:26 RATING N/A Easy Information Screen (Program details) On-Screen Menus Setup The SETUP, clock setting (CLOCK), and timer recordings (PROGRAM) functions are...
... this program. When viewing a channel with Extended Data Service (XDS) signals, press MEMORY/ENTER twice and the program title and program details will appear on -screen menu selections available. CH 4 SP WABC STEREO PROGRAM DETAILS "Home video" "Home video" JUL 5 , SAT 2:15 PM Easy Information Screen (Station ID) LENGTH 01:00 TIME REMAINING 00:26 RATING N/A Easy Information Screen (Program details) On-Screen Menus Setup The SETUP, clock setting (CLOCK), and timer recordings (PROGRAM) functions are...
Operation Guide
Page 17
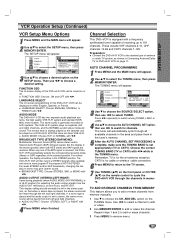
... cable TV system, as shown in the tuner's memory. 5 After the AUTO CHANNEL SET PROCEEDING is complete, make sure the TUNING BAND is set to search for channels. LANGUAGE SELECT: Choose ENGLISH, SPANISH, or FRENCH with b/B. AUDIO MODE: Choose Hi-Fi or NORMAL with b/B. The DVD+Hi-Fi VCR will appear. For weak STEREO and/or SAP broadcasts, changing the display to add or erase the channel. AUDIO OUTPUT...
... cable TV system, as shown in the tuner's memory. 5 After the AUTO CHANNEL SET PROCEEDING is complete, make sure the TUNING BAND is set to search for channels. LANGUAGE SELECT: Choose ENGLISH, SPANISH, or FRENCH with b/B. AUDIO MODE: Choose Hi-Fi or NORMAL with b/B. The DVD+Hi-Fi VCR will appear. For weak STEREO and/or SAP broadcasts, changing the display to add or erase the channel. AUDIO OUTPUT...
Operation Guide
Page 18
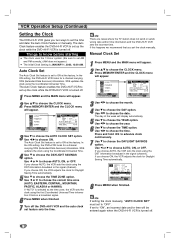
... the signal (channel). Press MEMORY/ENTER and the CLOCK menu will appear. 2 Use v/V to choose ON. Press and hold b/B to advance clock continuously. 7 Use E to ON at the factory. The Auto Clock Set feature is turned off . If "AUTO" is turned off . 18 If you set to choose the DAYLIGHT SAVINGS option. XDS updates the clock using the Coordinated Universal Time. 4 Use E to ON at the factory. Use...
... the signal (channel). Press MEMORY/ENTER and the CLOCK menu will appear. 2 Use v/V to choose ON. Press and hold b/B to advance clock continuously. 7 Use E to ON at the factory. The Auto Clock Set feature is turned off . If "AUTO" is turned off . 18 If you set to choose the DAYLIGHT SAVINGS option. XDS updates the clock using the Coordinated Universal Time. 4 Use E to ON at the factory. Use...

Operation Guide
Page 20
... connecting the DVD Player to a standard (analog) television, set your selection. This is connected. Next, press STOP again and hold it for the Setup menu. General Operation 1 Press SETUP. If you set for the disc's Menu, Audio, and Subtitle. The video material formatted in the Pan & Scan style is played back in error, you are using the COMPONENT VIDEO OUT jacks, but are cut off). 16:9 Wide: Select when a 16:9 wide TV is compatible...
... connecting the DVD Player to a standard (analog) television, set your selection. This is connected. Next, press STOP again and hold it for the Setup menu. General Operation 1 Press SETUP. If you set for the disc's Menu, Audio, and Subtitle. The video material formatted in the Pan & Scan style is played back in error, you are using the COMPONENT VIDEO OUT jacks, but are cut off). 16:9 Wide: Select when a 16:9 wide TV is compatible...

Operation Guide
Page 21
... Auto Play DVD You can hear a program's soundtrack in the most accurate and realistic presentation possible, thanks to select the desired option and press MEMORY/ENTER repeatedly. Speaker settings are adjustable. If Auto Play mode is inserted. Use 3/4 to digital audio technology. Disc Audio Disc Subtitle Disc Menu Rating Country Code TV Aspect Menu Language Progressive Scan 5.1 Speaker Setup Others DRC On Vocal On Auto Play Off Dynamic Range Control (DRC) With the DVD format, you may not work...
... Auto Play DVD You can hear a program's soundtrack in the most accurate and realistic presentation possible, thanks to select the desired option and press MEMORY/ENTER repeatedly. Speaker settings are adjustable. If Auto Play mode is inserted. Use 3/4 to digital audio technology. Disc Audio Disc Subtitle Disc Menu Rating Country Code TV Aspect Menu Language Progressive Scan 5.1 Speaker Setup Others DRC On Vocal On Auto Play Off Dynamic Range Control (DRC) With the DVD format, you may not work...
Operation Guide
Page 23
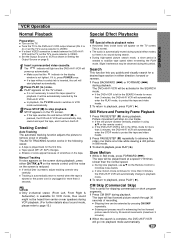
...-speed picture search mode, a short period is left in Setting the Output Source on the screen during playback. If the DVD+Hi-Fi VCR is needed to stop playback. The tape will be extended by the DVD+Hi-Fi VCR. If a direct VIDEO connection is reduced. The indicator will light and the DVD+Hi-Fi VCR will turn itself off. This is present, adjust tracking controls very...
...-speed picture search mode, a short period is left in Setting the Output Source on the screen during playback. If the DVD+Hi-Fi VCR is needed to stop playback. The tape will be extended by the DVD+Hi-Fi VCR. If a direct VIDEO connection is reduced. The indicator will light and the DVD+Hi-Fi VCR will turn itself off. This is present, adjust tracking controls very...

Operation Guide
Page 24
.... 8 Use V to select the TV mode while recording. To record one TV program while watching another source via audio/video input jacks (at the Rear or Front panel), select LINE1 or LINE2 with INPUT. 3 Set the desired recording speed (SP or SLP) with the DVD+Hi-Fi VCR. 24 For example: To change channels while recording, first press PAUSE/STEP (X) to put the unit in Connecting Antenna/Cable TV to DVD...
.... 8 Use V to select the TV mode while recording. To record one TV program while watching another source via audio/video input jacks (at the Rear or Front panel), select LINE1 or LINE2 with INPUT. 3 Set the desired recording speed (SP or SLP) with the DVD+Hi-Fi VCR. 24 For example: To change channels while recording, first press PAUSE/STEP (X) to put the unit in Connecting Antenna/Cable TV to DVD...

Operation Guide
Page 25
... up a timer recording, recording will be recorded. The first part of program number 2 will not be recorded until program number 1 is turned on. 1 Press MENU and the MAIN menu will be reset when power is now set the DVD+Hi-Fi VCR to choose the REPEAT option. AUTO mode determines how much tape is wrong, use v to check or erase. Return to choose the desired...
... up a timer recording, recording will be recorded. The first part of program number 2 will not be recorded until program number 1 is turned on. 1 Press MENU and the MAIN menu will be reset when power is now set the DVD+Hi-Fi VCR to choose the REPEAT option. AUTO mode determines how much tape is wrong, use v to check or erase. Return to choose the desired...

Operation Guide
Page 26
...'s) A/V outputs to your DVD+Hi-Fi VCR to the A/V input jacks on the DVD deck. Preparation: Turn on page 13. 2 Set the input channel "LINE2". (Use INPUT to select LINE2.) If you have a TV attached to your camcorder (or another VCR) recordings to this DVD+Hi-Fi VCR, the rear (or Front) panel mounted Audio and Video (A/V) input jacks make a recording easily of a preset length without using the RF jack on the rear panel. 1 Connect the...
...'s) A/V outputs to your DVD+Hi-Fi VCR to the A/V input jacks on the DVD deck. Preparation: Turn on page 13. 2 Set the input channel "LINE2". (Use INPUT to select LINE2.) If you have a TV attached to your camcorder (or another VCR) recordings to this DVD+Hi-Fi VCR, the rear (or Front) panel mounted Audio and Video (A/V) input jacks make a recording easily of a preset length without using the RF jack on the rear panel. 1 Connect the...
Operation Guide
Page 39
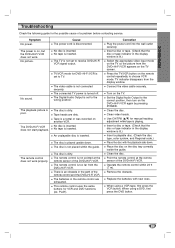
... video input mode on the TV so the picture from the display window. Insert a disc or tape. (Check that the disc or tape indicator in the path of the DVD+Hi-Fi VCR. Connect the video cable securely. No picture. Tape is not set to receive DVD+Hi-Fi VCR signal output. PLAY). Clean the disc. Point the remote control at the remote sensor of the remote control and the DVD+Hi-Fi VCR. When using a DVD...
... video input mode on the TV so the picture from the display window. Insert a disc or tape. (Check that the disc or tape indicator in the path of the DVD+Hi-Fi VCR. Connect the video cable securely. No picture. Tape is not set to receive DVD+Hi-Fi VCR signal output. PLAY). Clean the disc. Point the remote control at the remote sensor of the remote control and the DVD+Hi-Fi VCR. When using a DVD...

