Owner's Manual (English)
Page 3
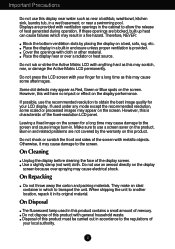
... for a long time may result in accordance to use an aerosol directly on the screen. Leaving a fixed image on the screen for your LCD display. Make sure to the regulations of mercury. Use a slightly damp (not wet) cloth. Important Precautions Do not use this display near ...screen saver on a bed, sofa, rug, etc. Do not rub or strike the Active Matrix LCD with your local authority. 2 Burn-in enclosure unless proper ventilation is characteristic of the fixed-resolution LCD panel. If these openings are blocked, built-up heat can cause failures which to allow the release ...
... for a long time may result in accordance to use an aerosol directly on the screen. Leaving a fixed image on the screen for your LCD display. Make sure to the regulations of mercury. Use a slightly damp (not wet) cloth. Important Precautions Do not use this display near ...screen saver on a bed, sofa, rug, etc. Do not rub or strike the Active Matrix LCD with your local authority. 2 Burn-in enclosure unless proper ventilation is characteristic of the fixed-resolution LCD panel. If these openings are blocked, built-up heat can cause failures which to allow the release ...

Owner's Manual (English)
Page 6
... other attached devices is removed, to adjust its height. Connecting the Display Before setting up the monitor, ensure that in order to maintain an ergonomic and comfortable viewing position, the forward tilt angle of the panel in various ways for maximum comfort. Tilt Range : -5˚~20˚ Swivel Range : 350˚ Height...
... other attached devices is removed, to adjust its height. Connecting the Display Before setting up the monitor, ensure that in order to maintain an ergonomic and comfortable viewing position, the forward tilt angle of the panel in various ways for maximum comfort. Tilt Range : -5˚~20˚ Swivel Range : 350˚ Height...

Owner's Manual (English)
Page 8
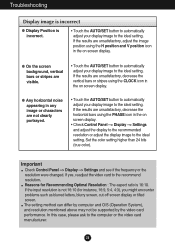
...with a DVI signal input cable. : Select DVI(DVI digital signal). When connecting with optimal display settings.When the user connects the monitor for the first time, this function automatically adjusts the display to optimal settings for individual input signals. 'AUTO/SET Function'? Touch the ...SOURCE button at the front side of panel to turn the power on , the 'Self Image Setting Function' is executed automatically. (Only to improve resolution. 3. INPUT RGB DVI ...
...with a DVI signal input cable. : Select DVI(DVI digital signal). When connecting with optimal display settings.When the user connects the monitor for the first time, this function automatically adjusts the display to optimal settings for individual input signals. 'AUTO/SET Function'? Touch the ...SOURCE button at the front side of panel to turn the power on , the 'Self Image Setting Function' is executed automatically. (Only to improve resolution. 3. INPUT RGB DVI ...

Owner's Manual (English)
Page 11
... to page 15 ~ 16. The message "OSD LOCKED" appears. To lock the OSD settings, press and hold the MENU button for several seconds. Control Panel Functions Front Panel Controls Button Use this button to enter EZ ZOOMING, 4:3 IN WIDE, PHOTO EFFECT, SOUND items, for more information, refer to adjust BRIGHTNESS directly. You...
... to page 15 ~ 16. The message "OSD LOCKED" appears. To lock the OSD settings, press and hold the MENU button for several seconds. Control Panel Functions Front Panel Controls Button Use this button to enter EZ ZOOMING, 4:3 IN WIDE, PHOTO EFFECT, SOUND items, for more information, refer to adjust BRIGHTNESS directly. You...

Owner's Manual (English)
Page 12
... the On Screen Display. AUTO IMAGE ADJUSTMENT When adjusting your display image to the ideal settings for the current screen resolution size (display mode). Control Panel Functions Buttons Use these buttons to select or adjust functions in the On Screen Display. HDMI AUTO/SET Button Use this indicator color changes to...
... the On Screen Display. AUTO IMAGE ADJUSTMENT When adjusting your display image to the ideal settings for the current screen resolution size (display mode). Control Panel Functions Buttons Use these buttons to select or adjust functions in the On Screen Display. HDMI AUTO/SET Button Use this indicator color changes to...
Owner's Manual (English)
Page 25
...using the H position and V position icon in the on screen display. In this case, please ask to the recommend resolution. Important Check Control Panel --> Display --> Settings and see if the frequency or the resolution were changed. If the input resolution is not 16:10 (for Recommending Optimal...bars or stripes are unsatisfactory, decrease the vertical bars or stripes using the PHASE icon in the on screen display. • Check Control Panel --> Display --> Settings and adjust the display to the recommended resolution or adjust the display image to the ideal setting. If the results are...
...using the H position and V position icon in the on screen display. In this case, please ask to the recommend resolution. Important Check Control Panel --> Display --> Settings and see if the frequency or the resolution were changed. If the input resolution is not 16:10 (for Recommending Optimal...bars or stripes are unsatisfactory, decrease the vertical bars or stripes using the PHASE icon in the on screen display. • Check Control Panel --> Display --> Settings and adjust the display to the recommended resolution or adjust the display image to the ideal setting. If the results are...

Owner's Manual (English)
Page 26
...sure the video card is set to interlace mode and if yes, change it to the recommend resolution. Have you see an "Unrecognized monitor, Plug&Play (VESA DDC) monitor found" message? • Make sure to install the display driver from our web site: http://www.lge.com. G Do you installed... slot. • Set the color setting higher than 24 bits (true color) at Control Panel - Or, you installed the display driver? • Be sure to check if the video card supports Plug&Play function. 25 Settings. G Have you can also download the driver from the display driver CD (or diskette...
...sure the video card is set to interlace mode and if yes, change it to the recommend resolution. Have you see an "Unrecognized monitor, Plug&Play (VESA DDC) monitor found" message? • Make sure to install the display driver from our web site: http://www.lge.com. G Do you installed... slot. • Set the color setting higher than 24 bits (true color) at Control Panel - Or, you installed the display driver? • Be sure to check if the video card supports Plug&Play function. 25 Settings. G Have you can also download the driver from the display driver CD (or diskette...
Owner's Manual (English)
Page 27
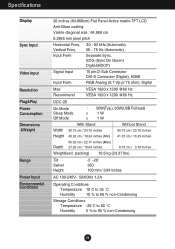
...(excl. Specifications Display Sync Input Video Input Resolution Plug&Play Power Consumption Dimensions &Weight Range Power Input Environmental Conditions 26 inches (64.868cm) Flat Panel Active matrix-TFT LCD Anti-Glare coating Visible diagonal size : 64.868 cm 0.2865 mm pixel pitch Horizontal Freq. 30 - 83 kHz (Automatic) Vertical Freq. 56 - 75...
...(excl. Specifications Display Sync Input Video Input Resolution Plug&Play Power Consumption Dimensions &Weight Range Power Input Environmental Conditions 26 inches (64.868cm) Flat Panel Active matrix-TFT LCD Anti-Glare coating Visible diagonal size : 64.868 cm 0.2865 mm pixel pitch Horizontal Freq. 30 - 83 kHz (Automatic) Vertical Freq. 56 - 75...
